WheresMyMojo's Red Baron's Fokker Dr.1 crashes and burns
-
TimJ

- Modelling Gent and Scholar
- Posts: 4290
- Joined: May 1st, 2011, 12:54 am
- Location: Oldbury, West Midlands
Re: WheresMyMojo's Red Baron's Fokker Dr.1 Sat 22nd Feb star
Nice work on the interior.
2020 A:35 B:18. 2021 A: 51 B:25 C:21 2022 A:63 B:23 C:11 2024 A:9 B:4 C:15

Re: WheresMyMojo's Red Baron's Fokker Dr.1 Sat 22nd Feb star
Great looking interior. Keep it going .
Besting 60 years of mediocre building of average kits in the stand off scale
-
ShaunW
- NOT the sheep
- Posts: 26188
- Joined: November 26th, 2011, 6:11 pm
- Location: Pontefract West Yorkshire
Re: WheresMyMojo's Red Baron's Fokker Dr.1 Sat 22nd Feb star
That is a nice looking interior Mojo, keep at it.
Doing - Tamiya 1/35th Universal Carrier.
Work is the curse of the modelling classes!
IPMS#12300
Work is the curse of the modelling classes!
IPMS#12300
-
splash

- Senior Service Rotorhead
- Posts: 13828
- Joined: May 1st, 2011, 11:02 am
- Location: Somerset England
Re: WheresMyMojo's Red Baron's Fokker Dr.1 Sat 22nd Feb star
Great start, good luck with the build.
Regards Splash
Regards Splash
My work bench is starting to look like Portsmouth Naval Dockyard.

Re: WheresMyMojo's Red Baron's Fokker Dr.1 Sat 22nd Feb star
Nice work on the cockpit - I never have the patience for that.
2021
Complete: Airfix 1/400 Mary Rose, 1/72: Airfix Swordfish Mk1 Floatplane, Airfix R.A.F. R.E.8, Airfix Hannover CL.111a, Mitsubishi A6M2b Zero, Curtiss P40B Warhawk
Complete: Airfix 1/400 Mary Rose, 1/72: Airfix Swordfish Mk1 Floatplane, Airfix R.A.F. R.E.8, Airfix Hannover CL.111a, Mitsubishi A6M2b Zero, Curtiss P40B Warhawk
-
WheresMyMojo
- Getting well comfy!
- Posts: 67
- Joined: September 2nd, 2011, 11:33 pm
- Location: Ipswich UK
Re: WheresMyMojo's Red Baron's Fokker Dr.1 Sat 22nd Feb star
Thanks folks, though I think I think I've done better. I also realised, after closing up that a coat of klear varnish wouldn't have gone amiss on the wooden and CDL parts of the cockpit.
Update, time 0:55, and I've forgotten to show the clock haven't I!
A better view of the cockpit, now assembled, with basic Tamiya tape harness. It's a little oversize but it'll do to fill up a space.
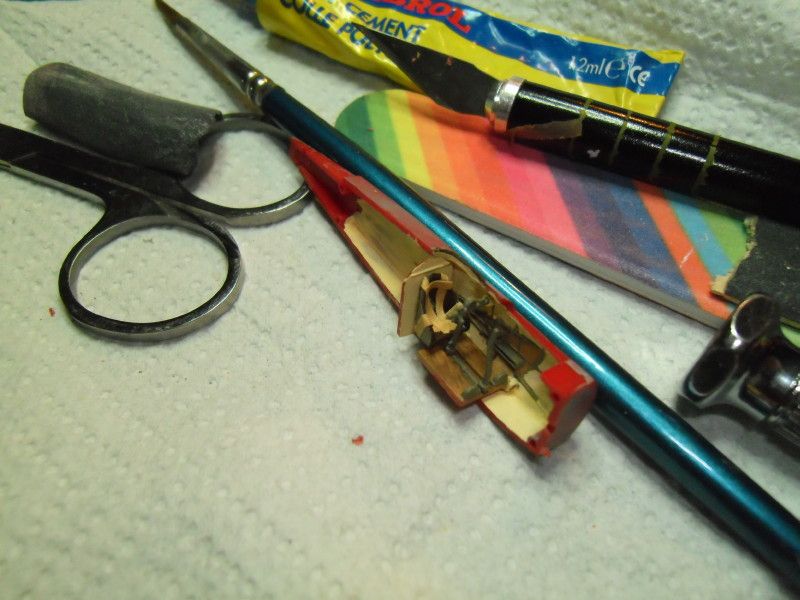
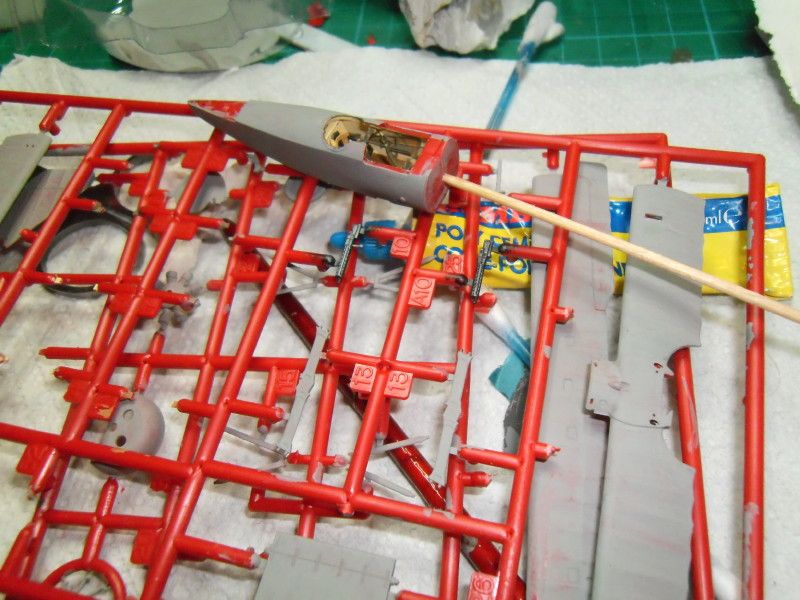
And all buttoned up, with fully primed parts, though many of these will need a clean up coat, it'll hopefully save time later. Also, the underside of the fuselage could do with some filler; I thought it would be okay but the primer showed up a little uneveness left/right. As it's a blitz and times getting on, it'll have to do. I also overdid some sanding just behind the cockpit but obviously filling it would mean taking into account extra time for drying.
The priming coats aren't as smooth as I'd like them to be, but times getting on so it was more important to just get the paint on and make sure that red was properly covered up. I mean't to drill through the dinky little exhaust outlets and block them off before closing up the fuselage but forgot and had to do it afterward. I just hope that light doesn't get through after I've added the cockpit front, which will go in place along with the wing/gun assembly. Guns have been done but again, will need a clean-up once removed from the sprue. I believe they should have magazine housings going into the cockpit but they're not represented, and I won't have time to make them.
Update, time 0:55, and I've forgotten to show the clock haven't I!
A better view of the cockpit, now assembled, with basic Tamiya tape harness. It's a little oversize but it'll do to fill up a space.
And all buttoned up, with fully primed parts, though many of these will need a clean up coat, it'll hopefully save time later. Also, the underside of the fuselage could do with some filler; I thought it would be okay but the primer showed up a little uneveness left/right. As it's a blitz and times getting on, it'll have to do. I also overdid some sanding just behind the cockpit but obviously filling it would mean taking into account extra time for drying.
The priming coats aren't as smooth as I'd like them to be, but times getting on so it was more important to just get the paint on and make sure that red was properly covered up. I mean't to drill through the dinky little exhaust outlets and block them off before closing up the fuselage but forgot and had to do it afterward. I just hope that light doesn't get through after I've added the cockpit front, which will go in place along with the wing/gun assembly. Guns have been done but again, will need a clean-up once removed from the sprue. I believe they should have magazine housings going into the cockpit but they're not represented, and I won't have time to make them.
Graham
The...errr...modeler...formerly known as 'chuffchuff'
The...errr...modeler...formerly known as 'chuffchuff'
Re: WheresMyMojo's Red Baron's Fokker Dr.1 Sat 22nd Feb star
This is looking very nice. Good progress.
Besting 60 years of mediocre building of average kits in the stand off scale
-
WheresMyMojo
- Getting well comfy!
- Posts: 67
- Joined: September 2nd, 2011, 11:33 pm
- Location: Ipswich UK
Re: WheresMyMojo's Red Baron's Fokker Dr.1 Sat 22nd Feb star
3:40 AM, its much later than I'd realised, thought it was about 2:00 AM at the latest! I'm a bit disappointed, I was aware I was laying the paint on a bit thick, but the brush marks are really obvious now I've got some red on. I tried polishing it down a bit but it's not having it. When all's done, hopefully a couple of clear matt coats will calm it down a bit.
One bonus is that despite being the wrong red, the H 19 gift paint I'm using is virtually indistinguishable from the plastic colour, which should make cleaning up sprue painted parts a little easier.
Nothing really to show, except that the grey stuff is now mostly red. I'm now going to have a cup of tea and decide whether to crash for a few hours, though the nights now more than half through!
Graham
The...errr...modeler...formerly known as 'chuffchuff'
The...errr...modeler...formerly known as 'chuffchuff'
-
Sissel

- Modelling Lady and Scholar
- Posts: 4097
- Joined: October 31st, 2011, 12:39 pm
- Location: Island in Norway
Re: WheresMyMojo's Red Baron's Fokker Dr.1 Sat 22nd Feb star
Well done on the interior, looks good. 
Confused as always, and somewhere in hiding on the Scandinavian peninsula...
-
WheresMyMojo
- Getting well comfy!
- Posts: 67
- Joined: September 2nd, 2011, 11:33 pm
- Location: Ipswich UK
Re: WheresMyMojo's Red Baron's Fokker Dr.1 Sat 22nd Feb star
Thanks Prisca! 9 AM and just saying I'm alive again, sort of. Just having a cuppa then I'll look at glueing some stuff together and posting more pics.
Graham
The...errr...modeler...formerly known as 'chuffchuff'
The...errr...modeler...formerly known as 'chuffchuff'
-
ShaunW
- NOT the sheep
- Posts: 26188
- Joined: November 26th, 2011, 6:11 pm
- Location: Pontefract West Yorkshire
Re: WheresMyMojo's Red Baron's Fokker Dr.1 Sat 22nd Feb star
Morning Mojo Man. She's looking good so far. If the gift set paint is Humbrol acrylic, those paints have a bit of a reputation as being less than good. Still, onwards and upwards, a blitz will generally never result in a modeller's finest effort at the bench but IMHO quality is secondary to meeting the challenge and finishing in time  Keep at it and best of luck!
Doing - Tamiya 1/35th Universal Carrier.
Work is the curse of the modelling classes!
IPMS#12300
Work is the curse of the modelling classes!
IPMS#12300
Re: WheresMyMojo's Red Baron's Fokker Dr.1 Sat 22nd Feb star
Good morning.
Besting 60 years of mediocre building of average kits in the stand off scale
-
WheresMyMojo
- Getting well comfy!
- Posts: 67
- Joined: September 2nd, 2011, 11:33 pm
- Location: Ipswich UK
Re: WheresMyMojo's Red Baron's Fokker Dr.1 Sat 22nd Feb star
10:30 AM start today.
I hate the idea of throwing paint away. I do have the equivalent Revell colour (though neither are the right red) and decided to use this to get rid of it. My results with Humbrol/Airfix gift paints has been mixed. A tip I found on here has helped though, adding a fair dose of washing-up liquid helps smooth it out. This red actually went on easily covered well, and unlike some gift paints I've used seems to stick reasonably well so farl. I usually deliberately over-thin my paint as I have a tendency to leave brush-marks otherwise, but the meagre first coat coverage of the non gift-paint Humbrol grey prompted me to break my normal habit to speed things up a bit, and that's what's caused the uneven coating.
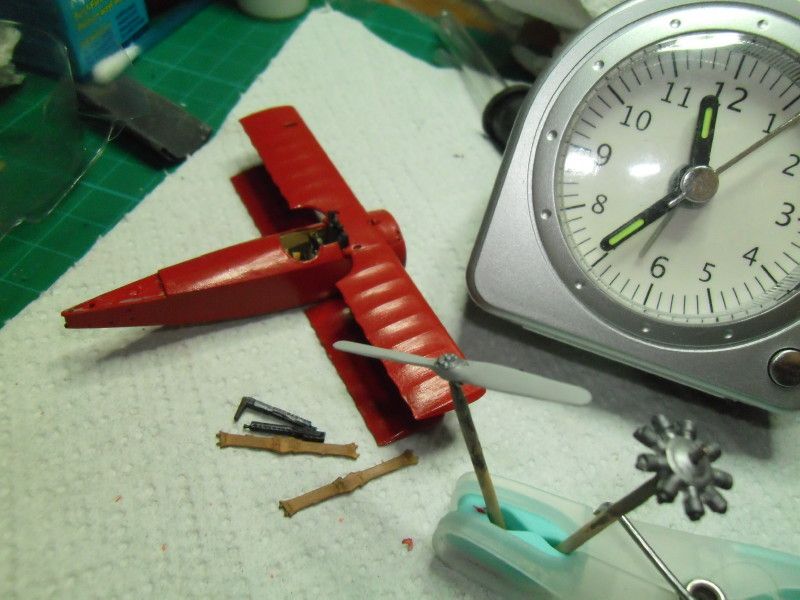
Lower wing is glued on, having had to keep hold of it while it dried to avoid a slight wing height discrepency. The mid wing is dry fitted to allow the cockpit front, which is attached, to dry in place. The guns should also have gone on, but I made the mistake of snipping off the supporting struts on the gun barrels, which I'd assumed were just sprue run-off! I tried to superglue them in but they wouldn't stay nor line up properly; one guns pad butts into the other, and it's slightly overwide, pushing the gun barrels together, so a little fix is needed.
Also pictured are the outer struts, which I've decided to do in wood finsh, though probably incorrect I thought to add a little extra interest to the scheme, and painting wood is still something I've yet to master. Basic coverage of the engine done in Humbrol gunmetal and Revell steel for a less monotone finish, but the gunmetal, which I thought would be nearly black, is much more just a slightly darker silver than the steel. Prop centre painted but the wood finish still to be added.
I hate the idea of throwing paint away. I do have the equivalent Revell colour (though neither are the right red) and decided to use this to get rid of it. My results with Humbrol/Airfix gift paints has been mixed. A tip I found on here has helped though, adding a fair dose of washing-up liquid helps smooth it out. This red actually went on easily covered well, and unlike some gift paints I've used seems to stick reasonably well so farl. I usually deliberately over-thin my paint as I have a tendency to leave brush-marks otherwise, but the meagre first coat coverage of the non gift-paint Humbrol grey prompted me to break my normal habit to speed things up a bit, and that's what's caused the uneven coating.
Lower wing is glued on, having had to keep hold of it while it dried to avoid a slight wing height discrepency. The mid wing is dry fitted to allow the cockpit front, which is attached, to dry in place. The guns should also have gone on, but I made the mistake of snipping off the supporting struts on the gun barrels, which I'd assumed were just sprue run-off! I tried to superglue them in but they wouldn't stay nor line up properly; one guns pad butts into the other, and it's slightly overwide, pushing the gun barrels together, so a little fix is needed.
Also pictured are the outer struts, which I've decided to do in wood finsh, though probably incorrect I thought to add a little extra interest to the scheme, and painting wood is still something I've yet to master. Basic coverage of the engine done in Humbrol gunmetal and Revell steel for a less monotone finish, but the gunmetal, which I thought would be nearly black, is much more just a slightly darker silver than the steel. Prop centre painted but the wood finish still to be added.
Graham
The...errr...modeler...formerly known as 'chuffchuff'
The...errr...modeler...formerly known as 'chuffchuff'
Re: WheresMyMojo's Red Baron's Fokker Dr.1 Sat 22nd Feb star
Looking quite nice Graham.
Besting 60 years of mediocre building of average kits in the stand off scale
-
ShaunW
- NOT the sheep
- Posts: 26188
- Joined: November 26th, 2011, 6:11 pm
- Location: Pontefract West Yorkshire
Re: WheresMyMojo's Red Baron's Fokker Dr.1 Sat 22nd Feb star
This is good progress Graham. Niggling little problems with kits are always amplified two fold when you're trying to build them in 24 hours!
Doing - Tamiya 1/35th Universal Carrier.
Work is the curse of the modelling classes!
IPMS#12300
Work is the curse of the modelling classes!
IPMS#12300