Dazzled's 2nd Gen Export

A GB for a single type aircraft, the MiG-21 - any kit, any scale, any markings.
Runs May 1st to 31st. Your GBL is Brickie.
User avatar
Dazzled
Modelling Gent and Scholar
Posts: 9592
Joined: October 1st, 2011, 11:08 pm
Location: Mid Glamorgan, South Wales
Contact:

Dazzled's 2nd Gen Export

Post by Dazzled »

I've speculated, deliberated and cogitated.

And now I've decided.

After cleaning off my bench and making some room in the limited space available......

Image

I couldn't very well choose anything else after Mrs Dazzled bought it for me as an anniversary present a few weeks ago :roll:

But, despite the squeeze into the den, I'm sure that building this will be anything but a chore. :)

The box top shows an aircraft in North Vietnamese AF markings but I'll be going for one of the other kit options....

Image

...an Egyptian Air Force example from the early 1980's representing an aircraft that had served throughout the 1970's.

The kit is very nice indeed and very comprehensive.

Image

Seven main sprues in medium grey styrene pus a clear sprue. Typically for an Eduard kit, there are a lot of parts that will be surplus and will become valued additions to the spares box. There are enough weapons to arm a small squadron ;-) and enough spare canopies to build a greenhouse :roll: .

Plus.....

Image

A very nicely printed decal sheet supplemented by a frightening array of stencil markings :shock:

Also included is a small sheet of yellow self adhesive paint masks and two frets of P.E., one coloured and one plain.

Time to let the journey begin. :grin:
COLD WAR S.I.G. LEADER

Wherever there's danger, wherever there's trouble, wherever there's important work to be done....I'll be somewhere else building a model!
User avatar
Clashcityrocker
Modelling Gent and Scholar
Posts: 10808
Joined: May 1st, 2011, 12:31 am
Location: Adelaide. South Australia

Re: Dazzled's 2nd Gen Export

Post by Clashcityrocker »

That is going to look very nice. Looking forward to your start.

Nigel
User avatar
TobyC
Modelling Gent and Scholar
Posts: 5540
Joined: January 15th, 2013, 2:13 pm
Location: Cobham, Surrey. Blighty

Re: Dazzled's 2nd Gen Export

Post by TobyC »

You've got a lot more bits then I have to put together. :mrgreen:
Enjoyment over accuracy. That's my motto
User avatar
Stuart
Raider of the Lost Ark Royal
Posts: 19417
Joined: February 25th, 2013, 4:55 pm
Location: North Wales
Contact:

Re: Dazzled's 2nd Gen Export

Post by Stuart »

That'll look great :)
Stuart Templeton I may not be good but I'm slow...

My Blog: https://stuartsscalemodels.blogspot.com/
ShaunW
NOT the sheep
Posts: 26180
Joined: November 26th, 2011, 6:11 pm
Location: Pontefract West Yorkshire

Re: Dazzled's 2nd Gen Export

Post by ShaunW »

What a fantastic looking kit Darryl, what a woman Mrs Dazzled is for getting that in :grin: The Egyptian scheme always looks good on the MiG-21 IMHO.
Doing - Tamiya 1/35th Universal Carrier.

Work is the curse of the modelling classes!
IPMS#12300
User avatar
Old_Tonto
Modelling Gent and Scholar
Posts: 8061
Joined: May 1st, 2011, 7:41 pm
Location: Middlesbrough, Peoples Republic of Teesside.

Re: Dazzled's 2nd Gen Export

Post by Old_Tonto »

ShaunW wrote:What a fantastic looking kit Darryl, what a woman Mrs Dazzled is for getting that in :grin:
She certainly sounds like a keeper. ;-)

That does look like a lovely kit, be sure to post plenty of pictures.
2023 - A:0 B:0 C:0
Current Projects:
East German Air Force (1956-90)
South African Air Force (1958-93)
User avatar
Dazzled
Modelling Gent and Scholar
Posts: 9592
Joined: October 1st, 2011, 11:08 pm
Location: Mid Glamorgan, South Wales
Contact:

Re: Dazzled's 2nd Gen Export

Post by Dazzled »

Yes, Mrs Dazzled has certainly become quite understanding of my hobby. In fact she's really looking forward to going to Telford this year (honest) and she's suggested that we go to the RIAT at Fairford this year ON HER BIRTHDAY :shock: .

Not that I'm complaining ;-)

Now, back to matters Mig-21.

I've managed a couple of short sessions. Not much glamorous to report I'm afraid. The usual start-up stuff. I've done some small bits of construction and pre-painting.

Image

It's mostly interior parts. cockpit side consoles and IP, control column, the back of the engine and that little black thing stuck on the end of the cocktail stick which is actually the gun sight and consisted of 3 very fiddly little parts. That was a test for the eyesight...

That failed and became a test for the magnifier :oops: .

There was also a little incident with the mounting tube on the engine back that involved Captain Clumsy here managing to stick it simultaneously to left thumb and forefinger with Zap-a-Gap :oops: .

My, how nobody laughed....... :roll:

When I freed my digits I painted some other parts on the sprue..


Image

These are more engine bits. I also painted the jetpipe halves and exhaust in polished steel and the actuators and rudder pedals in flat aluminium. These aren't in the picture though.

Lastly, while I was at the bench, just for a laugh :roll: I assembled the fuselage spine and fin.

Image

No particular reason for doing this out of sequence but it doesn't effect anything else so it seemed a good way of progressing while other parts dried.

Hopefully my next update will be considerably more exciting and won't involve me gluing myself to anything ;-)

Darryl
COLD WAR S.I.G. LEADER

Wherever there's danger, wherever there's trouble, wherever there's important work to be done....I'll be somewhere else building a model!
ShaunW
NOT the sheep
Posts: 26180
Joined: November 26th, 2011, 6:11 pm
Location: Pontefract West Yorkshire

Re: Dazzled's 2nd Gen Export

Post by ShaunW »

A start is better than no start Darryl. I didn't snigger at your antics with the super glue. Honest :ha:
Doing - Tamiya 1/35th Universal Carrier.

Work is the curse of the modelling classes!
IPMS#12300
User avatar
Dazzled
Modelling Gent and Scholar
Posts: 9592
Joined: October 1st, 2011, 11:08 pm
Location: Mid Glamorgan, South Wales
Contact:

Re: Dazzled's 2nd Gen Export

Post by Dazzled »

I didn't snigger either mate.

Although I did discover a new skill in self-surgery. :roll:

Now, to the GB!

I've had a lousy day today. Mrs Dazzled has been in work, my son was out all day and I was left at home all on my lonesome. I had intended to study but, for one reason and another, I just couldn't get my head around it. By 4 o'clock, it was really stressing me out thinking that the day was going to be wasted so I turned to my de-stressing outlet, the modelling bench.

And this is how it went.

All of the previous painting and gluing has had plenty of chance to dry so it was a good time to remove some more bits from the sprue, starting with this beauty.

Image

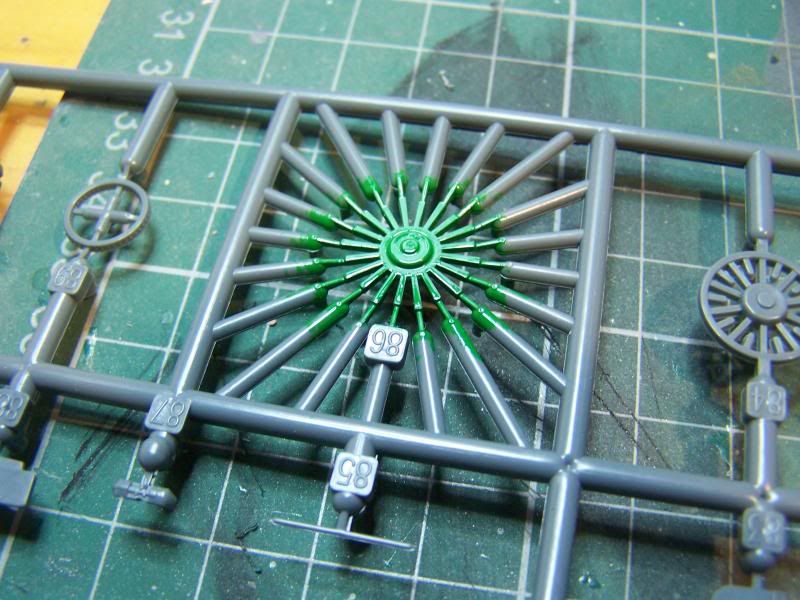
It's the afterburner ring. It's very nicely moulded but, looking at the way it's attached, I'm not sure that Eduard really want me to have it ;-)

This was going to require that surgery I'd practiced a couple of days ago. I plunged in rather gingerly.

Image

I carefully cut the sprue one leg at a time using a razor saw and then snipped each mould gate with a very sharp pair of small scissors.
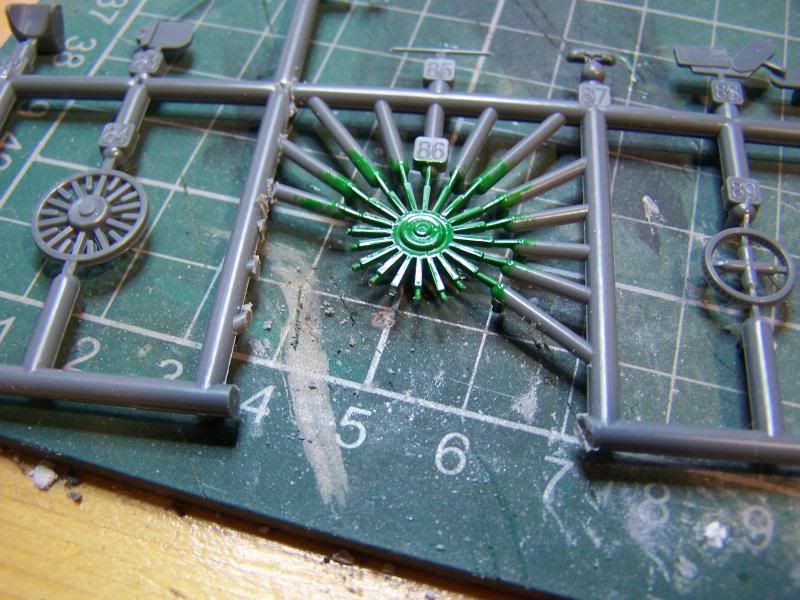
I only broke one :frown:

And two more cleaning up the ends :oops:

At least they were easy to fix and, after a paint touch up, the part was assembled into the rear of the engine.

Image

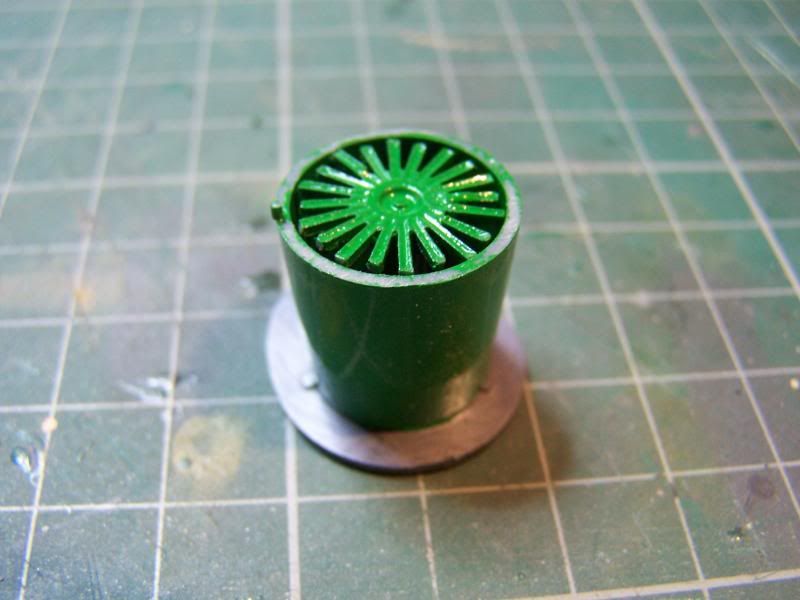
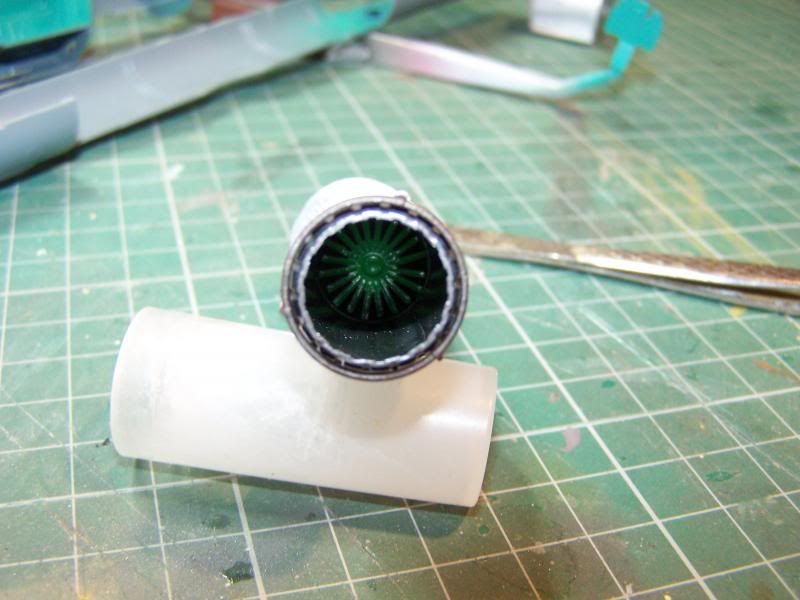
This part, of course, needs to be a little bit longer if it's going to reach the back of the aeroplane, and so there's another bit to go on.

Image

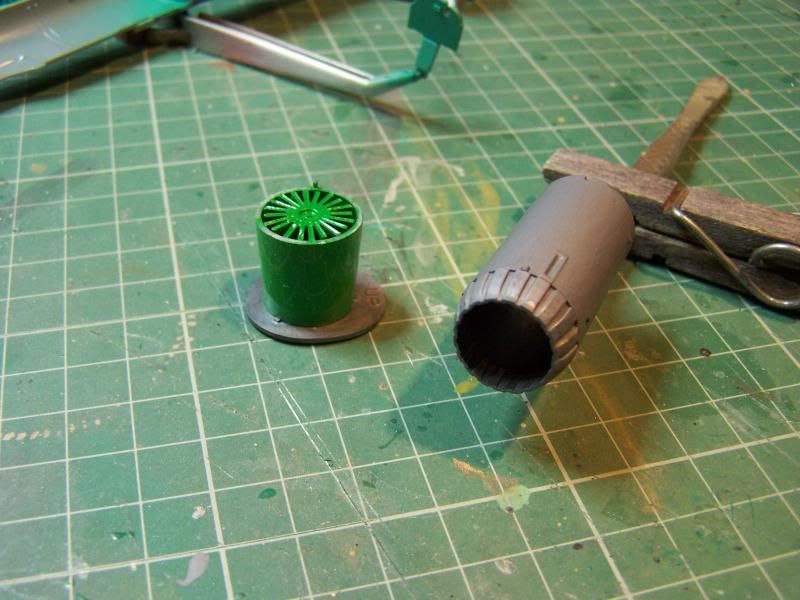
The jetpipe was in two halves plus a nozzle and has been painted with Humbrol Metalcote polished steel.

Onto this went the ring and actuators to vary the nozzle. And it turned out like this.

Image

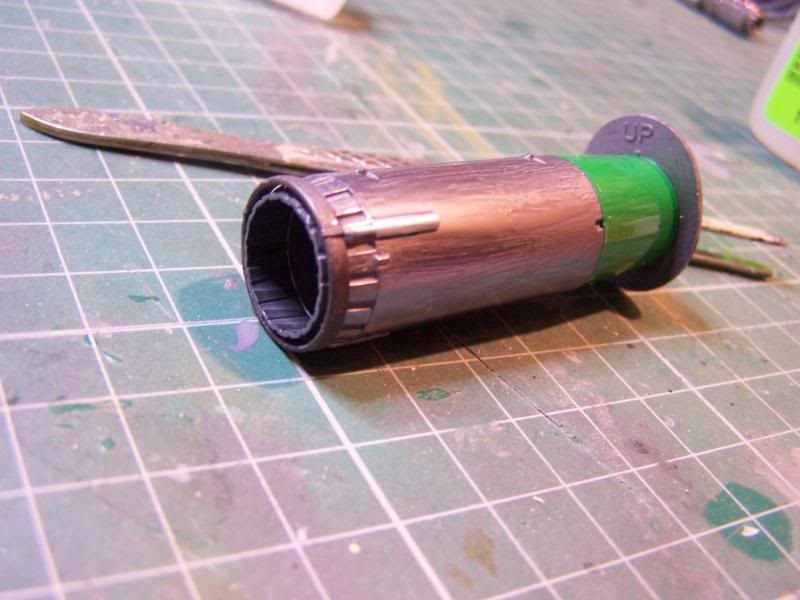
The effect of the afterburner ring is quite good.

Image

And the bodges are happily hidden up a deep, dark hole ;-)

Also on today's agenda was the radome.

Image

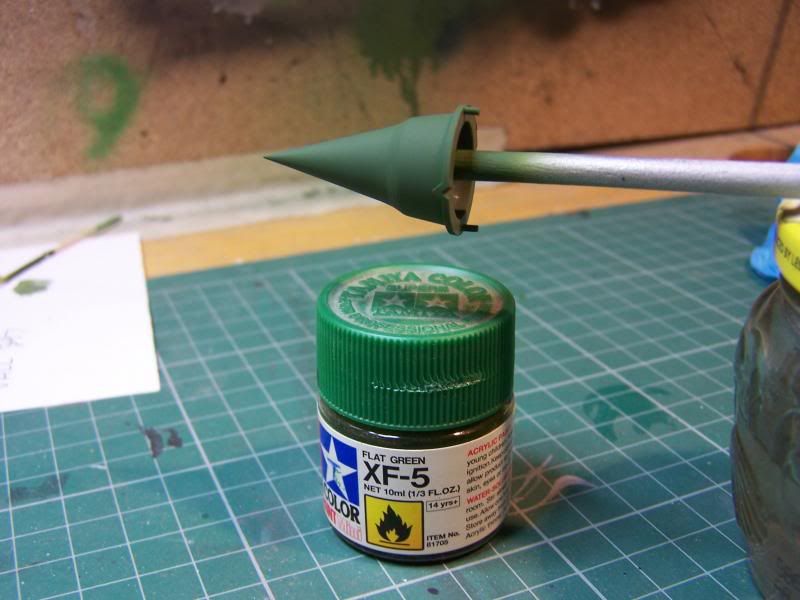
There's an awful lot of deliberation about painting Mig-21 radomes and, truth be told, there is an awful lot of variation, so an open mind is called for but IMHO the best match I've found after much experimentation is Tamiya XF-5, flat green. It looks good to me anyway :)

Finally today, I've done some work on the cockpit and wheel wells.

Image

In this picture the floor and side consoles are in as is the rear bulkhead. While I had the Liquid Poly out I took the opportunity to add the other two internal bulkheads.

And now, for all you fans of Soviet Barf Turquoise, here's how to do it :ha:

First get the right paint.

Image

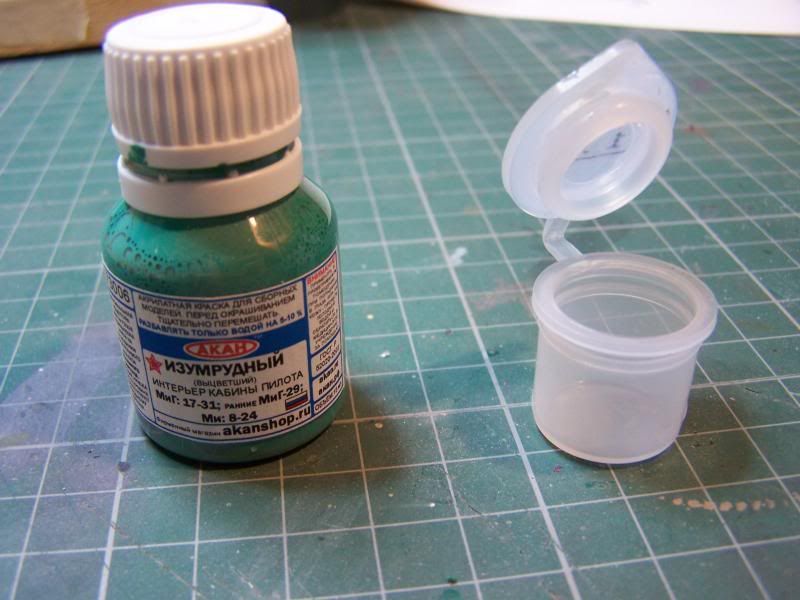
When you have the right paint decant a bit into a separate container and thin.

Then fill your airbrush, put on your sunglasses/welding goggles and spray.

And this is the beautiful, restrained shade you should achieve :lol:

Image

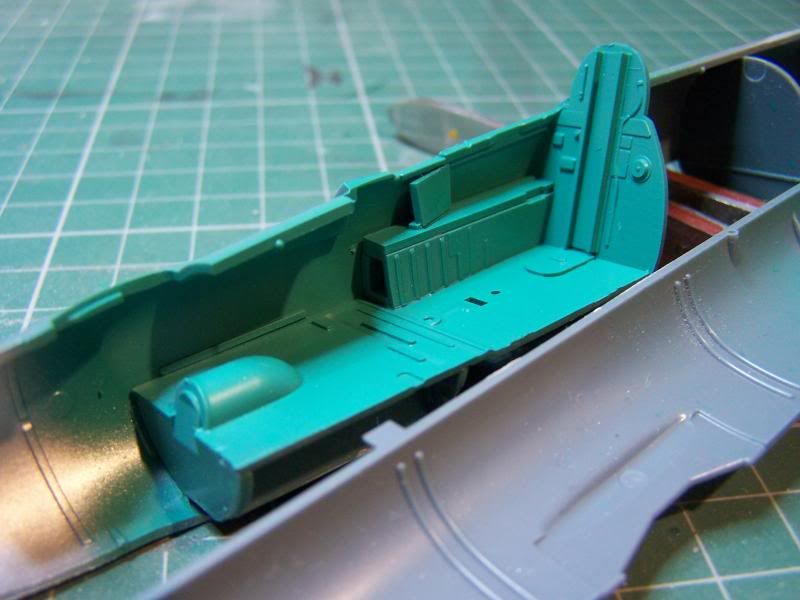
I bet British Leyland must have painted cars in this in the seventies!

Of course, I did both sides and the instrument panel...

Image

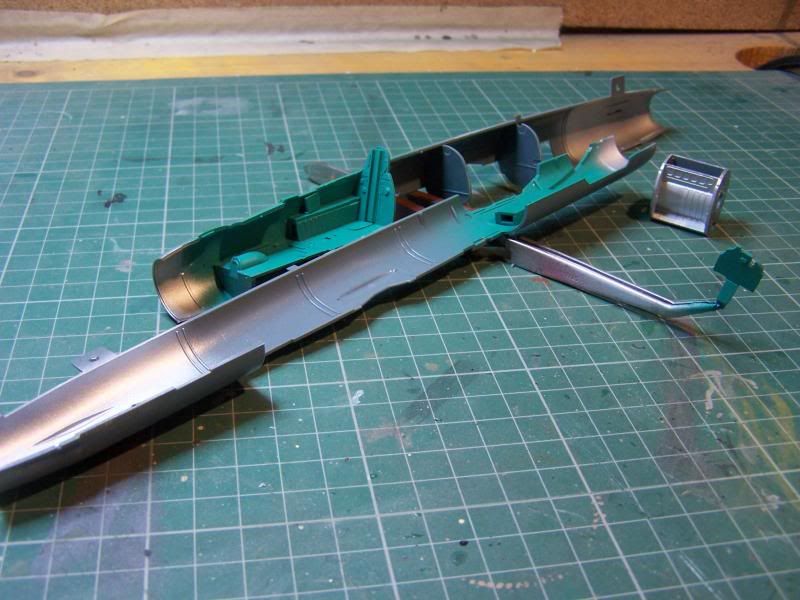
Before deftly switching nozzles and colour cup and painting the other fuselage parts and the insides of the u/c bays with Tamiya XF-16, flat aluminium.

And that's that for now. I'll leave everything to dry before assaulting the cockpit with some photo-etch and, hopefully, getting the fuselage buttoned up.

So, it turned out that my day wasn't wasted after all :-D
COLD WAR S.I.G. LEADER

Wherever there's danger, wherever there's trouble, wherever there's important work to be done....I'll be somewhere else building a model!
User avatar
Dazzled
Modelling Gent and Scholar
Posts: 9592
Joined: October 1st, 2011, 11:08 pm
Location: Mid Glamorgan, South Wales
Contact:

Re: Dazzled's 2nd Gen Export

Post by Dazzled »

I've had another push at the Mig today. I had hoped to get the fuselage buttoned up but there is quite a bit of photo-etch to fiddle with.

I have made quite a bit of progress with the office though.

Image

And I got some more bits together as well.

Image

Just a few more (very) small parts to get in and then it'll be time for some major assembly.

At last.
COLD WAR S.I.G. LEADER

Wherever there's danger, wherever there's trouble, wherever there's important work to be done....I'll be somewhere else building a model!
ShaunW
NOT the sheep
Posts: 26180
Joined: November 26th, 2011, 6:11 pm
Location: Pontefract West Yorkshire

Re: Dazzled's 2nd Gen Export

Post by ShaunW »

This is looking great Darryl, there is some really nice detail in this kit including that really good looking cockpit.
Doing - Tamiya 1/35th Universal Carrier.

Work is the curse of the modelling classes!
IPMS#12300
User avatar
Clashcityrocker
Modelling Gent and Scholar
Posts: 10808
Joined: May 1st, 2011, 12:31 am
Location: Adelaide. South Australia

Re: Dazzled's 2nd Gen Export

Post by Clashcityrocker »

Wot Shaun said. Good stuff.

Nigel
User avatar
TobyC
Modelling Gent and Scholar
Posts: 5540
Joined: January 15th, 2013, 2:13 pm
Location: Cobham, Surrey. Blighty

Re: Dazzled's 2nd Gen Export

Post by TobyC »

Wow. That's looking really good.
Enjoyment over accuracy. That's my motto
User avatar
Dazzled
Modelling Gent and Scholar
Posts: 9592
Joined: October 1st, 2011, 11:08 pm
Location: Mid Glamorgan, South Wales
Contact:

Re: Dazzled's 2nd Gen Export

Post by Dazzled »

Thank you chaps :) .

Just a short update today.

I hope I've got enough weight in the nose.

Image

The centre of gravity is just behind the pilot's bottom.

So that should do it

Then, finally, the fuselage got joined.

Image

It's always a nice moment with any aircraft kit 8-) .

So with that drying overnight I thought it might be a good time to start on the wing.

Image

Just opened up some holes for the ordnance and pitots and cemented on the sides of the u/c bays. I've used liquid poly for this. A strong bond but a long drying time.

That should give me time to decide whether or not to open up the air brakes.

More updates soon.
COLD WAR S.I.G. LEADER

Wherever there's danger, wherever there's trouble, wherever there's important work to be done....I'll be somewhere else building a model!
ShaunW
NOT the sheep
Posts: 26180
Joined: November 26th, 2011, 6:11 pm
Location: Pontefract West Yorkshire

Re: Dazzled's 2nd Gen Export

Post by ShaunW »

Nice one Darryl. So long as there is enough weight in there to sink a ship, you'll be OK :ha:
Doing - Tamiya 1/35th Universal Carrier.

Work is the curse of the modelling classes!
IPMS#12300
Locked

Return to “MiG-21 GB”