This is looking great Darryl & happy birthday for tomorrow.
It is Mrs OT's birthday tomorrow too. Apparently she does not want a Mig-21. Can you believe it?
Dazzled's 2nd Gen Export
-
Old_Tonto

- Modelling Gent and Scholar
- Posts: 8061
- Joined: May 1st, 2011, 7:41 pm
- Location: Middlesbrough, Peoples Republic of Teesside.
Re: Dazzled's 2nd Gen Export
2023 - A:0 B:0 C:0
Current Projects:
East German Air Force (1956-90)
South African Air Force (1958-93)
Current Projects:
East German Air Force (1956-90)
South African Air Force (1958-93)
-
Dazzled

- Modelling Gent and Scholar
- Posts: 9592
- Joined: October 1st, 2011, 11:08 pm
- Location: Mid Glamorgan, South Wales
- Contact:
Re: Dazzled's 2nd Gen Export
I find that very difficult to believe OT.
If I were you I'd buy her one just in case
If I were you I'd buy her one just in case
COLD WAR S.I.G. LEADER
Wherever there's danger, wherever there's trouble, wherever there's important work to be done....I'll be somewhere else building a model!
Wherever there's danger, wherever there's trouble, wherever there's important work to be done....I'll be somewhere else building a model!
-
Chris

- Modelling Gent and Scholar
- Posts: 2917
- Joined: March 15th, 2013, 7:18 pm
- Location: In your head
- Contact:
Re: Dazzled's 2nd Gen Export
For your own health, do not buy her one.Old_Tonto wrote:This is looking great Darryl & happy birthday for tomorrow.
It is Mrs OT's birthday tomorrow too. Apparently she does not want a Mig-21. Can you believe it?
Its much better to get an F4.
Honcho of ASMMF
-
ShaunW
- NOT the sheep
- Posts: 26188
- Joined: November 26th, 2011, 6:11 pm
- Location: Pontefract West Yorkshire
Re: Dazzled's 2nd Gen Export
That really does look great Darryl and the replacement pitot is well worth it. Happy birthday!
Doing - Tamiya 1/35th Universal Carrier.
Work is the curse of the modelling classes!
IPMS#12300
Work is the curse of the modelling classes!
IPMS#12300
-
Dazzled
- Modelling Gent and Scholar
- Posts: 9592
- Joined: October 1st, 2011, 11:08 pm
- Location: Mid Glamorgan, South Wales
- Contact:
Re: Dazzled's 2nd Gen Export
More progress. I had hoped to get more done but my plans for today were given a good pasting by a visit to the hospital to have a consultant finally look my shoulder over. I had thought that it would be a simple in-out-book a scan job but the quack decided that it would be good to ram in an intramuscular injection. What she didn't tell me was quite how painful it would be when it wore off 
My progress has also been limited by me needing to have a little fettle of seams and joins, so I've been doing some work to the ejector seat. This is a little kit in it's own right. Actually, I've built whole kits with less parts.
First job was to gather all the parts together.
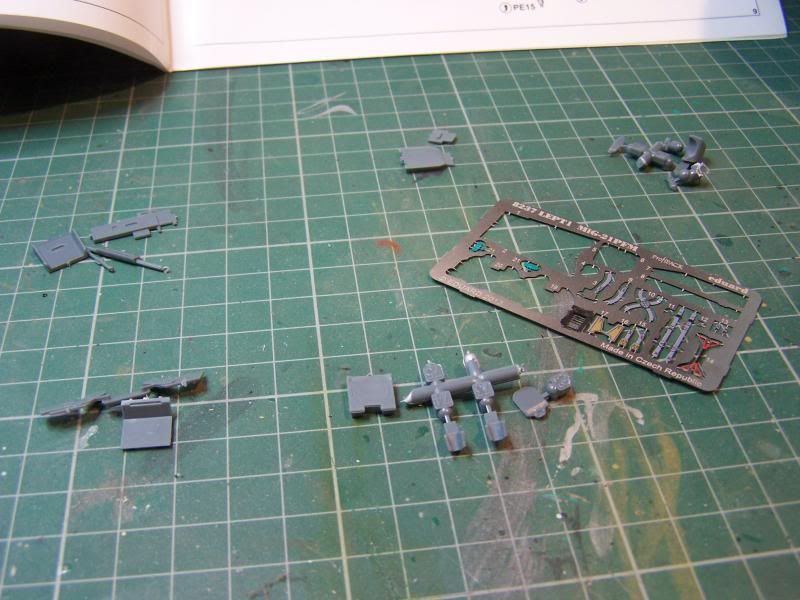
There are 30 components in total, 17 styrene and 13 photo-etched.
After pre-painting I assembled the styrene parts to form the main body of the seat.
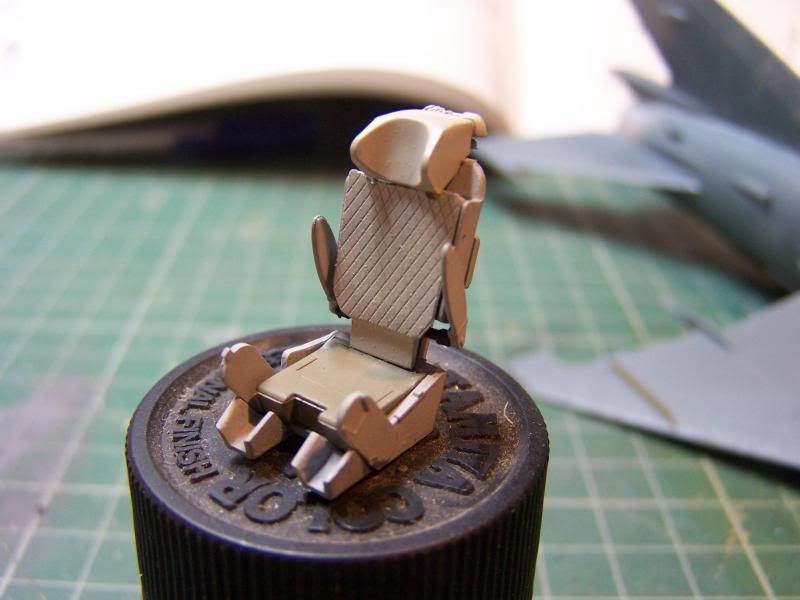
I ignored the colour call outs in the kit instructions, choosing instead to take directions from reference pictures I found on the internet. It's quite bland looking but there's still work to be done.
At this stage I took the opportunity to dry fit it in the cockpit. The seat goes in just like the prototype, by sliding down the rails on the rear cockpit bulkhead. I say "just like", what I should have said was "almost like" as I'm pretty certain that on a real Mig-21 the ejector seat actually fits in between the side consoles .
.
Some swipes with a sanding stick on the sides of the seat base sorted out the issue but it's a good thing that these will be hidden when the seat is finally fitted.
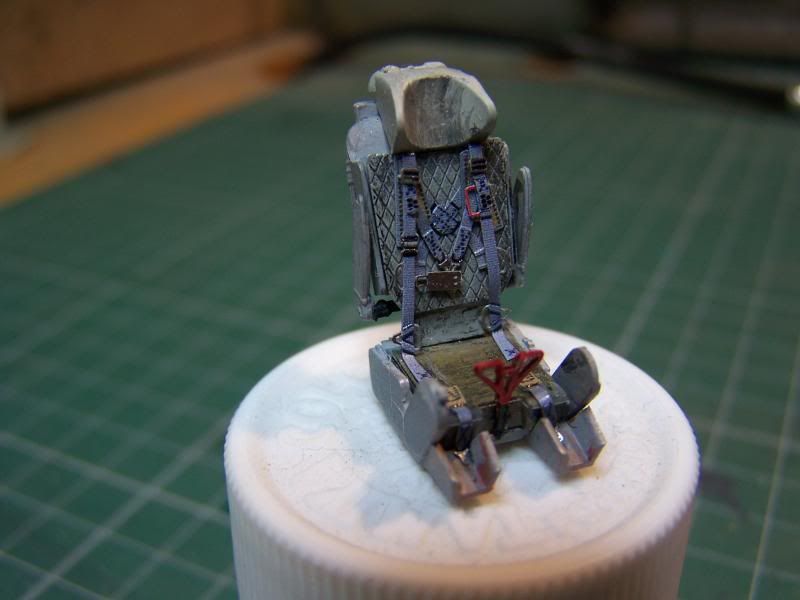
Then it was out with the dry brush and a few washes followed by the addition of the pre-coloured photo-etch. This wasn't exactly as straightforward as it seemed and a bit of touching up was required, but, after some twiddling and tweaking plus some gentle filing, not to mention a modicum of colourful Anglo-Saxon, I got the seat finished.
With this put aside, I hope to get some paint on the model quite soon, although imminent home improvement commitments (we're having a whole new central heating system fitted next week) plus the pressing need to finish my latest OU assignment quickly may put a complete halt to progress on the Mig
I'm keeping my fingers crossed that things will go smoothly.
Darryl
My progress has also been limited by me needing to have a little fettle of seams and joins, so I've been doing some work to the ejector seat. This is a little kit in it's own right. Actually, I've built whole kits with less parts.
First job was to gather all the parts together.

There are 30 components in total, 17 styrene and 13 photo-etched.
After pre-painting I assembled the styrene parts to form the main body of the seat.

I ignored the colour call outs in the kit instructions, choosing instead to take directions from reference pictures I found on the internet. It's quite bland looking but there's still work to be done.
At this stage I took the opportunity to dry fit it in the cockpit. The seat goes in just like the prototype, by sliding down the rails on the rear cockpit bulkhead. I say "just like", what I should have said was "almost like" as I'm pretty certain that on a real Mig-21 the ejector seat actually fits in between the side consoles
Some swipes with a sanding stick on the sides of the seat base sorted out the issue but it's a good thing that these will be hidden when the seat is finally fitted.
Then it was out with the dry brush and a few washes followed by the addition of the pre-coloured photo-etch. This wasn't exactly as straightforward as it seemed and a bit of touching up was required, but, after some twiddling and tweaking plus some gentle filing, not to mention a modicum of colourful Anglo-Saxon, I got the seat finished.

With this put aside, I hope to get some paint on the model quite soon, although imminent home improvement commitments (we're having a whole new central heating system fitted next week) plus the pressing need to finish my latest OU assignment quickly may put a complete halt to progress on the Mig
I'm keeping my fingers crossed that things will go smoothly.
Darryl
COLD WAR S.I.G. LEADER
Wherever there's danger, wherever there's trouble, wherever there's important work to be done....I'll be somewhere else building a model!
Wherever there's danger, wherever there's trouble, wherever there's important work to be done....I'll be somewhere else building a model!
-
TobyC

- Modelling Gent and Scholar
- Posts: 5540
- Joined: January 15th, 2013, 2:13 pm
- Location: Cobham, Surrey. Blighty
Re: Dazzled's 2nd Gen Export
Cor blimey guv. That's a bit special 
Enjoyment over accuracy. That's my motto
-
Old_Tonto
- Modelling Gent and Scholar
- Posts: 8061
- Joined: May 1st, 2011, 7:41 pm
- Location: Middlesbrough, Peoples Republic of Teesside.
Re: Dazzled's 2nd Gen Export
That seat is a work of art mate.
Sorry to hear about your shoulder.
My right shoulder is giving me constant grief at the moment, waking me at night but I am reluctant to call on the GP.
I foresee needles in my future.
Sorry to hear about your shoulder.
My right shoulder is giving me constant grief at the moment, waking me at night but I am reluctant to call on the GP.
I foresee needles in my future.
2023 - A:0 B:0 C:0
Current Projects:
East German Air Force (1956-90)
South African Air Force (1958-93)
Current Projects:
East German Air Force (1956-90)
South African Air Force (1958-93)
-
ShaunW
- NOT the sheep
- Posts: 26188
- Joined: November 26th, 2011, 6:11 pm
- Location: Pontefract West Yorkshire
Re: Dazzled's 2nd Gen Export
That seat is wonderful Darryl. Hope the shoulder gets sorted and you manage to find the time to complete this fantastic kit.
Doing - Tamiya 1/35th Universal Carrier.
Work is the curse of the modelling classes!
IPMS#12300
Work is the curse of the modelling classes!
IPMS#12300
-
iggie

- Modelling Gent and Scholar
- Posts: 23428
- Joined: July 31st, 2013, 11:04 am
- Location: North Somercotes, Lincolnshire
- Contact:
Re: Dazzled's 2nd Gen Export
Fantastic seat! Looking forward to seeing the rest of the build follow in similar style and quality
Body joints (Human ones that is) are literally a pain sometimes.....I hope your shoulder gets better soon Daz
Body joints (Human ones that is) are literally a pain sometimes.....I hope your shoulder gets better soon Daz
Best wishes
Jim
If you can walk away from a landing, it's a good landing. If you use the airplane the next day, it's an outstanding landing
"Never put off till tomorrow, what you can do the day after tomorrow"
Jim
If you can walk away from a landing, it's a good landing. If you use the airplane the next day, it's an outstanding landing
"Never put off till tomorrow, what you can do the day after tomorrow"
-
Dazzled
- Modelling Gent and Scholar
- Posts: 9592
- Joined: October 1st, 2011, 11:08 pm
- Location: Mid Glamorgan, South Wales
- Contact:
Re: Dazzled's 2nd Gen Export
Thanks for the encouraging messages guys. Much appreciated 
Life has continued to conspire to get itself between me and the model bench but, with a bit of luck, things may get a little easier soon as it looks like my shift pattern in work is going to be changed meaning more time for everything. I'll still be flying a desk for the time being but I can start to get my life back together a bit. As a bonus I'm getting a few days off before I have to start on shifts .
.
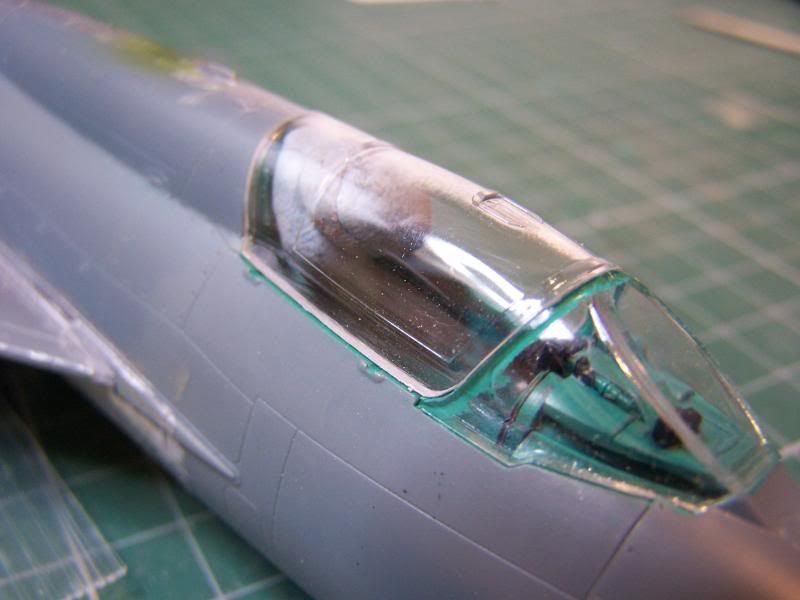
I have made a little progress towards the paint stage. One of the things I overlooked sooner was getting the windscreen sorted. Eduard provide a mask set for the model but they only cover the outside of the cockpit glazing. Personally, I like to get at least some colour on the inside to add a little depth. So after a dip in Klear and an overnight dry I've set to work.
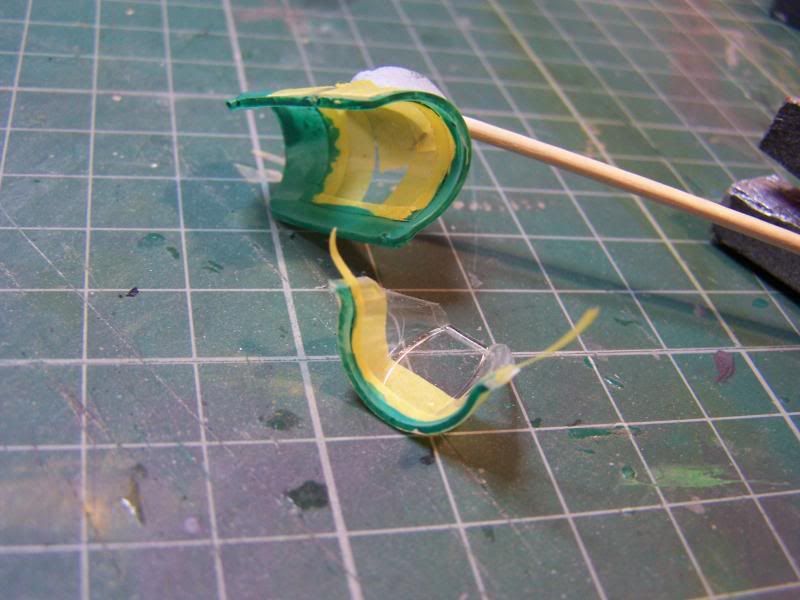
Here I've masked the inside of the canopy with Tamiya tape and done the same to the rear bar of the screen. In the picture they've had a first coat of barf turquoise. There's a fair bit more to do, particularly to the canopy which has a red brown seam around the glazing. It's going to be time consuming to replicate but worth it. In the meantime I think I'll use one of the spares in the kit to cover the cockpit while I paint.
Aside from this I've added some paint to the dielectric panels, including another coat over the radome, and painted the rear fuselage exhaust area and intake ring.
While I was waiting for things to dry I thought I'd make a start on the weapons. There are a lot of missiles in the kit but for my version all I need is a large centreline tank and two R-3S missiles. They come like this in the kit.
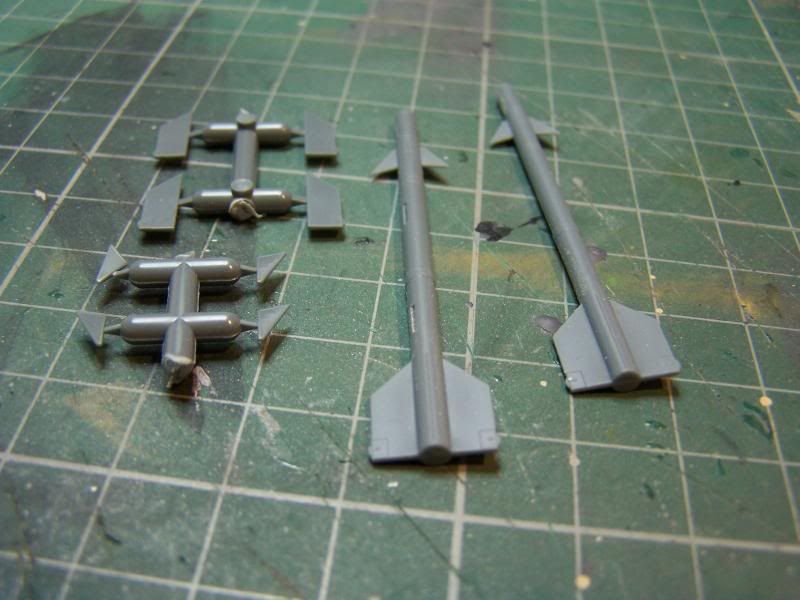
There's some nice detail but also some fiddly assembly. The fins just butt join to the missile bodies and there is just a faint indentation to align them. So it's slowly-slowly with these using Liquid Poly to join things and allowing plenty of time to dry in between. Another job I'll have to do, and something I'm surprised Eduard have omitted given the level of detail in this kit, is that there are no holes in the rear of the missiles.
And, as we all know, you have to have a hole for the gas to escape from
More updates soon.
Darryl
Life has continued to conspire to get itself between me and the model bench but, with a bit of luck, things may get a little easier soon as it looks like my shift pattern in work is going to be changed meaning more time for everything. I'll still be flying a desk for the time being but I can start to get my life back together a bit. As a bonus I'm getting a few days off before I have to start on shifts
I have made a little progress towards the paint stage. One of the things I overlooked sooner was getting the windscreen sorted. Eduard provide a mask set for the model but they only cover the outside of the cockpit glazing. Personally, I like to get at least some colour on the inside to add a little depth. So after a dip in Klear and an overnight dry I've set to work.

Here I've masked the inside of the canopy with Tamiya tape and done the same to the rear bar of the screen. In the picture they've had a first coat of barf turquoise. There's a fair bit more to do, particularly to the canopy which has a red brown seam around the glazing. It's going to be time consuming to replicate but worth it. In the meantime I think I'll use one of the spares in the kit to cover the cockpit while I paint.
Aside from this I've added some paint to the dielectric panels, including another coat over the radome, and painted the rear fuselage exhaust area and intake ring.
While I was waiting for things to dry I thought I'd make a start on the weapons. There are a lot of missiles in the kit but for my version all I need is a large centreline tank and two R-3S missiles. They come like this in the kit.

There's some nice detail but also some fiddly assembly. The fins just butt join to the missile bodies and there is just a faint indentation to align them. So it's slowly-slowly with these using Liquid Poly to join things and allowing plenty of time to dry in between. Another job I'll have to do, and something I'm surprised Eduard have omitted given the level of detail in this kit, is that there are no holes in the rear of the missiles.
And, as we all know, you have to have a hole for the gas to escape from
More updates soon.
Darryl
COLD WAR S.I.G. LEADER
Wherever there's danger, wherever there's trouble, wherever there's important work to be done....I'll be somewhere else building a model!
Wherever there's danger, wherever there's trouble, wherever there's important work to be done....I'll be somewhere else building a model!
-
ShaunW
- NOT the sheep
- Posts: 26188
- Joined: November 26th, 2011, 6:11 pm
- Location: Pontefract West Yorkshire
Re: Dazzled's 2nd Gen Export
Great work Darryl. I can be lazy with canopies and omit the interior framing, especially if they are being modelled in the closed position. Tut, tut, Eduard. I'm also surprised regarding the missile exhausts or rather the lack thereof. Still, a few minutes with a small drill bit will sort those out and doesn't detract from the fact that this is an excellent looking kit.
Doing - Tamiya 1/35th Universal Carrier.
Work is the curse of the modelling classes!
IPMS#12300
Work is the curse of the modelling classes!
IPMS#12300
-
Dirkpitt289

- NUMA's Auto Mechanic
- Posts: 8724
- Joined: May 2nd, 2011, 1:55 am
- Location: New jersey USA
- Contact:
Re: Dazzled's 2nd Gen Export
Looking good.
.... Dirk
Beware of the DOG's of WAR
My Youtube Channel
https://www.youtube.com/user/ModelingGu ... rid&view=0
Beware of the DOG's of WAR
My Youtube Channel
https://www.youtube.com/user/ModelingGu ... rid&view=0
-
Dazzled
- Modelling Gent and Scholar
- Posts: 9592
- Joined: October 1st, 2011, 11:08 pm
- Location: Mid Glamorgan, South Wales
- Contact:
Re: Dazzled's 2nd Gen Export
Thanks guys.
It's true Shaun, this is an excellent kit. There are some issues but they are very minor and it would be unduly harsh of me to criticise Eduard. This has to be the best Mig-21 in this scale by a country mile.
Today has seen a fair bit of work done to the house in preparation for the upcoming central heating replacement next week. On the bright side it has given me the opportunity to get Mrs Dazzled onside with my plans for a dedicated modelling set-up in the box room .
.
Despite the busy day I have been a busy boy at the bench for a couple of hours. It's been mostly prep work and niggly little bits to do. Time consuming but necessary.
I unmasked the windscreen and attached it, rather nervously, with a small amount of superglue.
I say "nervously" because I normally use Clearfix for transparencies and I feared that I might cloud the component. The problem with Clearfix is that it doesn't always give a strong bond, particularly on windscreens which can get bashed about a bit at the mask/paint stage so, after seeing some "proper" modellers use cyano glue in magazines I thought I'd give it a try. Happily, it all seems to have gone well. While I was there I fixed one of the extra canopies in place with a lump of Blu-tak. Eduard provide 3 in the kit and this one will be sacrificed as a paintproof cover for the cockpit.
Another thing that occurred to me was that I'd like to model the Mig with it's flaps dropped as they are normally seen while parked. Actuator covers are provided but they are only suitable for an aircraft with flaps straight. So I made a little modification.
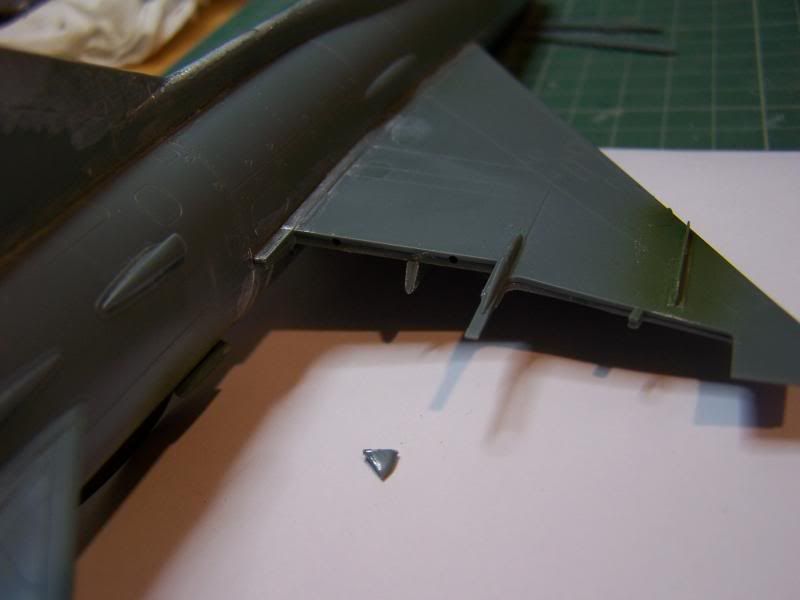
Once the flaps are in place I'll insert the reworked triangles in the gaps.
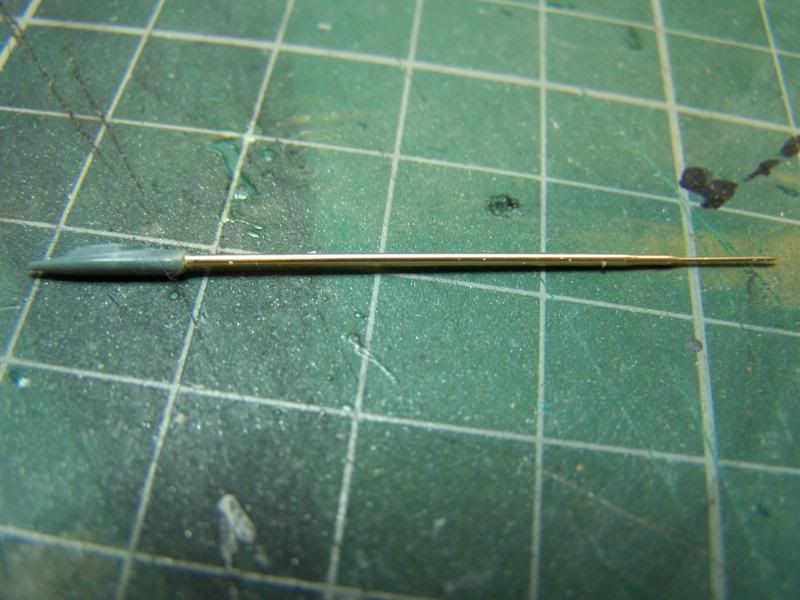
Another task achieved today was the pitot tube. This is why I thought it was a good idea to get a new one...
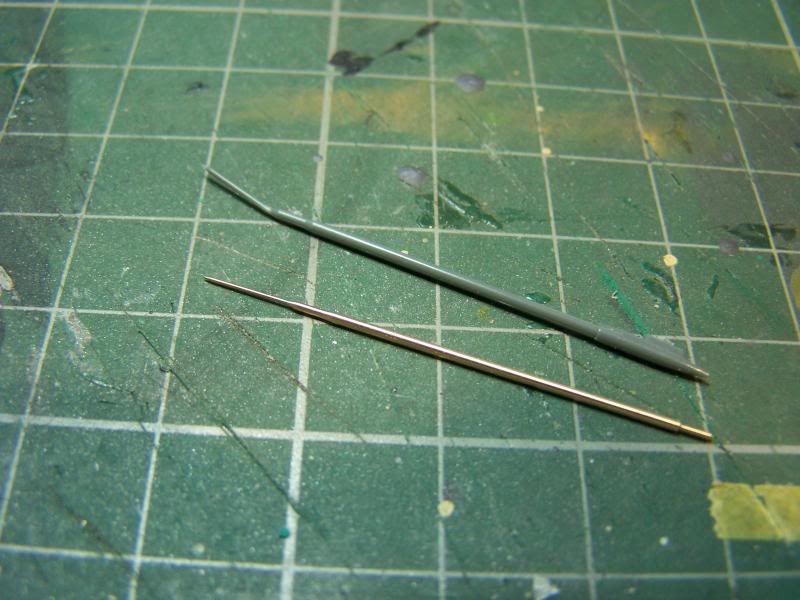
Half an hour of surgery made things a lot better
And that's pretty much it so far. I've started masking and I also attached the intake ring. Looking at it, I may have to do a little reshaping at the front. But that decision can wait until tomorrow when the liquid glue has had a good chance to set.
Darryl
It's true Shaun, this is an excellent kit. There are some issues but they are very minor and it would be unduly harsh of me to criticise Eduard. This has to be the best Mig-21 in this scale by a country mile.
Today has seen a fair bit of work done to the house in preparation for the upcoming central heating replacement next week. On the bright side it has given me the opportunity to get Mrs Dazzled onside with my plans for a dedicated modelling set-up in the box room
Despite the busy day I have been a busy boy at the bench for a couple of hours. It's been mostly prep work and niggly little bits to do. Time consuming but necessary.
I unmasked the windscreen and attached it, rather nervously, with a small amount of superglue.

I say "nervously" because I normally use Clearfix for transparencies and I feared that I might cloud the component. The problem with Clearfix is that it doesn't always give a strong bond, particularly on windscreens which can get bashed about a bit at the mask/paint stage so, after seeing some "proper" modellers use cyano glue in magazines I thought I'd give it a try. Happily, it all seems to have gone well. While I was there I fixed one of the extra canopies in place with a lump of Blu-tak. Eduard provide 3 in the kit and this one will be sacrificed as a paintproof cover for the cockpit.
Another thing that occurred to me was that I'd like to model the Mig with it's flaps dropped as they are normally seen while parked. Actuator covers are provided but they are only suitable for an aircraft with flaps straight. So I made a little modification.

Once the flaps are in place I'll insert the reworked triangles in the gaps.
Another task achieved today was the pitot tube. This is why I thought it was a good idea to get a new one...

Half an hour of surgery made things a lot better

And that's pretty much it so far. I've started masking and I also attached the intake ring. Looking at it, I may have to do a little reshaping at the front. But that decision can wait until tomorrow when the liquid glue has had a good chance to set.
Darryl
COLD WAR S.I.G. LEADER
Wherever there's danger, wherever there's trouble, wherever there's important work to be done....I'll be somewhere else building a model!
Wherever there's danger, wherever there's trouble, wherever there's important work to be done....I'll be somewhere else building a model!
-
Dazzled
- Modelling Gent and Scholar
- Posts: 9592
- Joined: October 1st, 2011, 11:08 pm
- Location: Mid Glamorgan, South Wales
- Contact:
Re: Dazzled's 2nd Gen Export
Todays activities were dominated by a session of plastering, unfortunately not involving alcohol , to prepare a couple of walls for radiator mounting.
Later on I managed to find time to do some other preparation work and continued with the pre-paint stage on the Mig.
Yesterday I attached the intake ring. I had prevaricated over whether to fit it after paint or before but by fitting it now I could also check the fit.
And I'm glad I did.
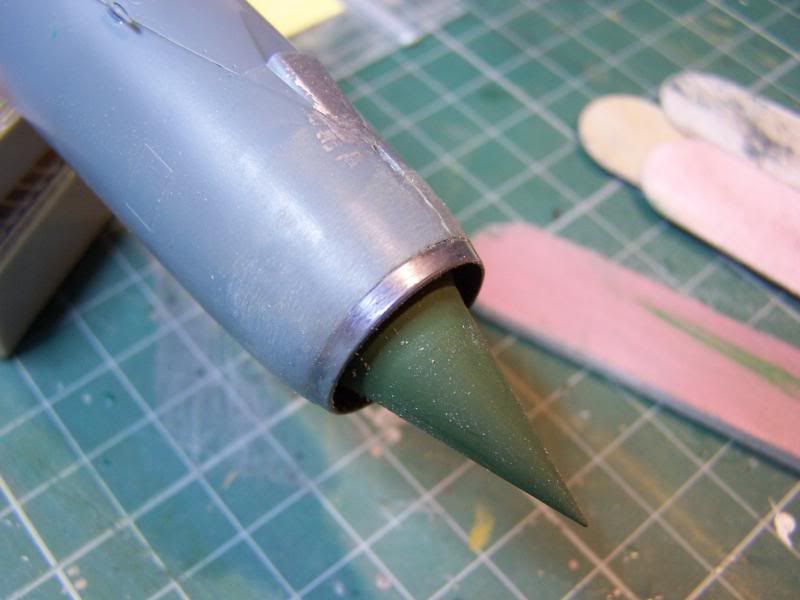
There was a definite step between ring and fuselage, so a session of sanding was in order to get the nose slightly reduced to get a nice flush line.
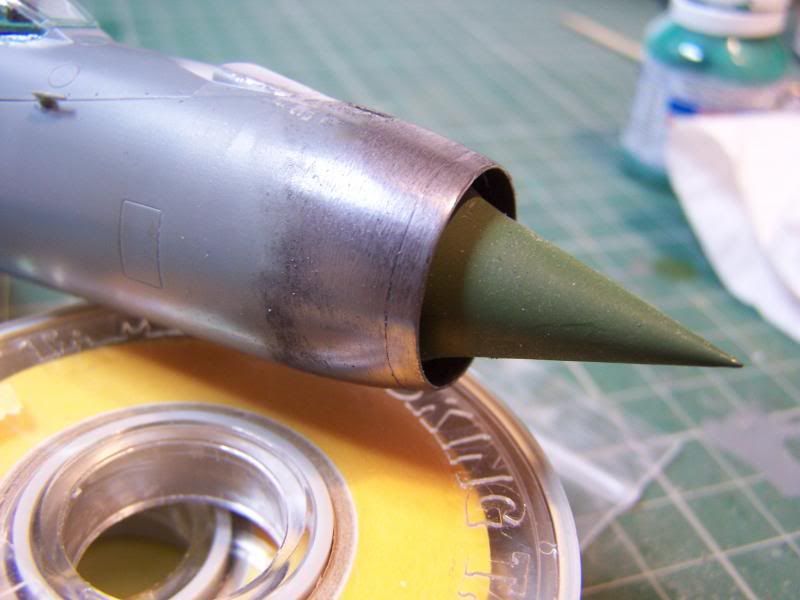
A coat of Humbrol Metalcote polished steel gave it all a nice shine. I was going to mask off the intake ring for painting. However, when I went to remove a misaligned piece of Tamiya tape for a second go, the ring came off. .
.
Never mind though. At least I know it fits.
Then it was onwards with the masking. I used a combination of Tamiya tape, medium density closure foam (for the jet pipe and wheel wells) and the pre-cut masks that came with the kit. I have to be honest about these, they weren't all good.
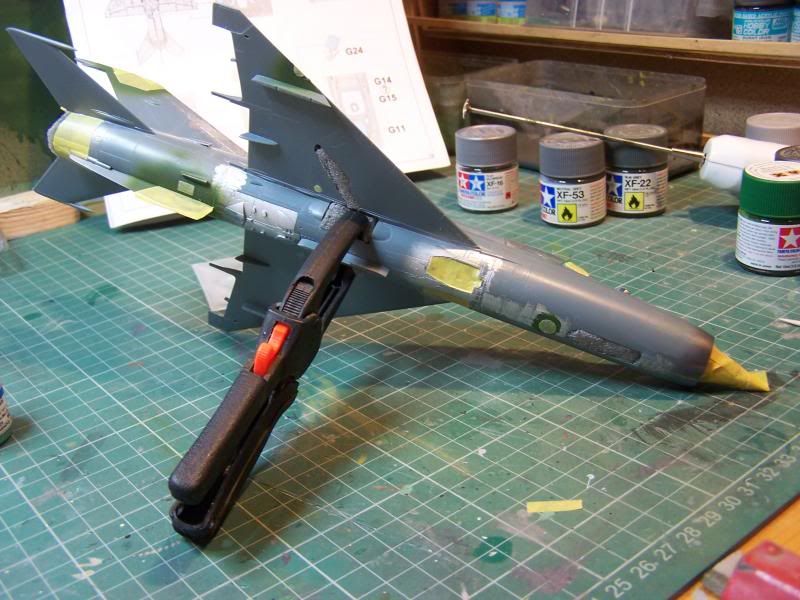
The pieces for the windscreen were good to fair and the dielectric panels at the wing leading edges were a surprisingly good fit, but the one atop the fin plain didn't fit and there wasn't a mask at all for the one on the ventral fin. These weren't too onerous to mask using good ol' Tamiya tape but it was a bit of a disappointment. I'm even more concerned about issues with these masks as I've just bought a couple of sets for a pair of 1/72nd Airfix Me110s. I really hope they do work well on all those little panels 
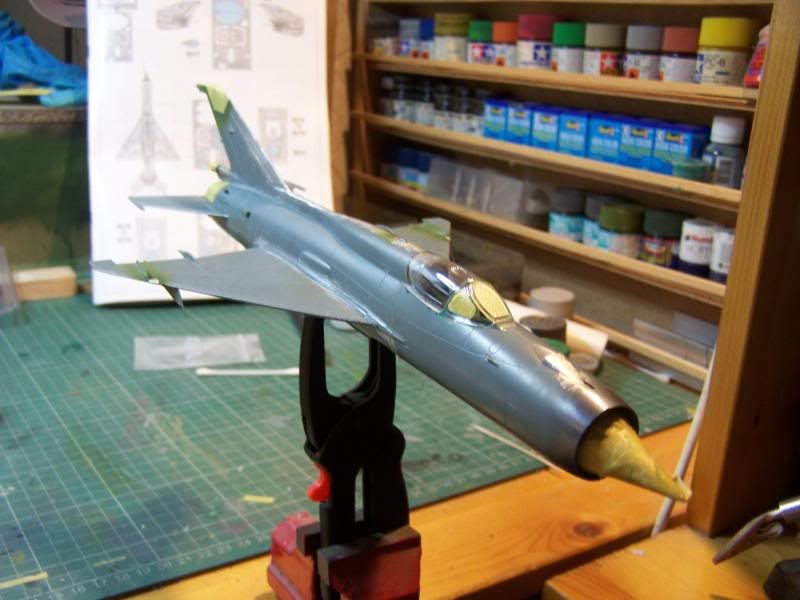
And finally, after masking, it was time for a spot of paint.
First up, some more barf turquoise around the windscreen area. Which showed up.......

....a pronounced step where the screen fits.
The other side is perfect.
Oh well, a little more sanding.
I must empty the dust out of my slippers.
Darryl
Later on I managed to find time to do some other preparation work and continued with the pre-paint stage on the Mig.
Yesterday I attached the intake ring. I had prevaricated over whether to fit it after paint or before but by fitting it now I could also check the fit.
And I'm glad I did.

There was a definite step between ring and fuselage, so a session of sanding was in order to get the nose slightly reduced to get a nice flush line.

A coat of Humbrol Metalcote polished steel gave it all a nice shine. I was going to mask off the intake ring for painting. However, when I went to remove a misaligned piece of Tamiya tape for a second go, the ring came off.
Never mind though. At least I know it fits.
Then it was onwards with the masking. I used a combination of Tamiya tape, medium density closure foam (for the jet pipe and wheel wells) and the pre-cut masks that came with the kit. I have to be honest about these, they weren't all good.


The pieces for the windscreen were good to fair and the dielectric panels at the wing leading edges were a surprisingly good fit, but the one atop the fin plain didn't fit
And finally, after masking, it was time for a spot of paint.
First up, some more barf turquoise around the windscreen area. Which showed up.......

....a pronounced step where the screen fits.
The other side is perfect.
Oh well, a little more sanding.
I must empty the dust out of my slippers.
Darryl
COLD WAR S.I.G. LEADER
Wherever there's danger, wherever there's trouble, wherever there's important work to be done....I'll be somewhere else building a model!
Wherever there's danger, wherever there's trouble, wherever there's important work to be done....I'll be somewhere else building a model!
-
Dazzled
- Modelling Gent and Scholar
- Posts: 9592
- Joined: October 1st, 2011, 11:08 pm
- Location: Mid Glamorgan, South Wales
- Contact:
Re: Dazzled's 2nd Gen Export
Todays activities were dominated by a session of plastering, unfortunately not involving alcohol , to prepare a couple of walls for radiator mounting.
Later on I managed to find time to do some other preparation work and continued with the pre-paint stage on the Mig.
Yesterday I attached the intake ring. I had prevaricated over whether to fit it after paint or before but by fitting it now I could also check the fit.
And I'm glad I did.
There was a definite step between ring and fuselage, so a session of sanding was in order to get the nose slightly reduced to get a nice flush line.
A coat of Humbrol Metalcote polished steel gave it all a nice shine. I was going to mask off the intake ring for painting. However, when I went to remove a misaligned piece of Tamiya tape for a second go, the ring came off. .
Never mind though. At least I know it fits.
Then it was onwards with the masking. I used a combination of Tamiya tape, medium density closure foam (for the jet pipe and wheel wells) and the pre-cut masks that came with the kit. I have to be honest about these, they weren't all good.
The pieces for the windscreen were good to fair and the dielectric panels at the wing leading edges were a surprisingly good fit, but the one atop the fin plain didn't fit and there wasn't a mask at all for the one on the ventral fin. These weren't too onerous to mask using good ol' Tamiya tape but it was a bit of a disappointment. I'm even more concerned about issues with these masks as I've just bought a couple of sets for a pair of 1/72nd Airfix Me110s. I really hope they do work well on all those little panels
And finally, after masking, it was time for a spot of paint.
First up, some more barf turquoise around the windscreen area. Which showed up.......
....a pronounced step where the screen fits.
The other side is perfect.
Oh well, a little more sanding.
I must empty the dust out of my slippers.
Darryl
Later on I managed to find time to do some other preparation work and continued with the pre-paint stage on the Mig.
Yesterday I attached the intake ring. I had prevaricated over whether to fit it after paint or before but by fitting it now I could also check the fit.
And I'm glad I did.
There was a definite step between ring and fuselage, so a session of sanding was in order to get the nose slightly reduced to get a nice flush line.
A coat of Humbrol Metalcote polished steel gave it all a nice shine. I was going to mask off the intake ring for painting. However, when I went to remove a misaligned piece of Tamiya tape for a second go, the ring came off.
Never mind though. At least I know it fits.
Then it was onwards with the masking. I used a combination of Tamiya tape, medium density closure foam (for the jet pipe and wheel wells) and the pre-cut masks that came with the kit. I have to be honest about these, they weren't all good.
The pieces for the windscreen were good to fair and the dielectric panels at the wing leading edges were a surprisingly good fit, but the one atop the fin plain didn't fit
And finally, after masking, it was time for a spot of paint.
First up, some more barf turquoise around the windscreen area. Which showed up.......
....a pronounced step where the screen fits.
The other side is perfect.
Oh well, a little more sanding.
I must empty the dust out of my slippers.
Darryl
COLD WAR S.I.G. LEADER
Wherever there's danger, wherever there's trouble, wherever there's important work to be done....I'll be somewhere else building a model!
Wherever there's danger, wherever there's trouble, wherever there's important work to be done....I'll be somewhere else building a model!