Found some instructions here...seems to be a mirror of Uhu02's actual site...
http://www.blogtopicnews.com/l/726113
Simon does Barbarella ***COMPLETED***
-
SJPONeill

- Modelling Gent and Scholar
- Posts: 3525
- Joined: May 1st, 2011, 12:01 am
- Location: Near the Spiral, NZ.
- Contact:
Re: Simon does Barbarella
Please critique my posts honestly i.e. say what you think so I can learn and improve...
The World According To Me
The World According To Me
-
SJPONeill
- Modelling Gent and Scholar
- Posts: 3525
- Joined: May 1st, 2011, 12:01 am
- Location: Near the Spiral, NZ.
- Contact:
Re: Simon does Barbarella

The hull sides i.e. the three layers of the sides themselves Plus the internal formers I added to better support the hull proper...laminating the three parts of the sides was a real cow as I did not have an easy method of aligning the parts once the glue was on them and, of course, once they touched they stuck. This is an area of technique that I need to review...

These are the sides of the bumpy bits along each side of the fuselage, laminated for extra strength to some 170gsm paper...the spiky bits are tabs to be folded inwards as glueing surface for mounting the hull sides. Not too sure how well they will bend with the reinforcing layer of paper but any resistance and I'll just eliminate them...

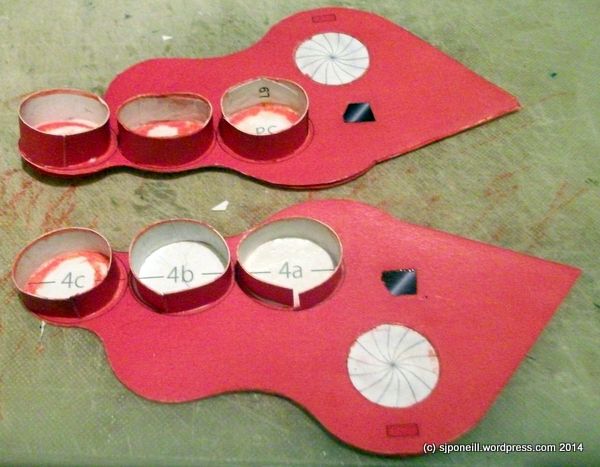
At the top, the parts for the bumpy bits along the hull sides; below them. is the single hull piece laminated also to 170gsm paper for extra strength. I have cut off the spiky glueing tabs that were arranged along the sides of this piece as I have added the card formers to the insides of the hull sides to serve the same purpose, hopefully better...

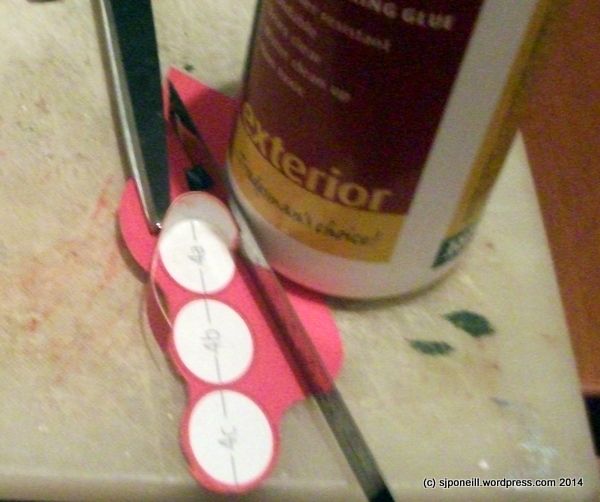
A bit blurry and I haven't even had a gin tonight...I marked the reverse of the hull part where the fold lines need to be scored so that it will fold smoothly around the contours of the hull formers...
Please critique my posts honestly i.e. say what you think so I can learn and improve...
The World According To Me
The World According To Me
-
SJPONeill
- Modelling Gent and Scholar
- Posts: 3525
- Joined: May 1st, 2011, 12:01 am
- Location: Near the Spiral, NZ.
- Contact:
Re: Simon does Barbarella
I'm sorry that I have somewhat neglected this build while wrestling with my nemesis beast model in the TSR.2 GB...
I started to add the bumpy sticky outy things on the side of the hull last night. I am a very slow learner and despite just having relearned the lesson witht he TSR.2, did not think to precurve the part before starting to fix it in place...as a result it really did not want to stay crrved and in place and so needed some persuasion til the glue cured.
I decided that the 'teeth' on the base of the part that were intended to be folded inwards to provide a better gluing surface were not really necessary so have cut them all off. I don't think that there absence was a contributing factor in the non-compliance of the first one to be mounted...

Here is the first one in place. You can see that the ends don't quite meet and I am not sure why this is. I can fill the gap with a strip of same coloured paper and hopefully the other ones will be better. This is one of the problems that occur when designers leave white space where a part is meant to go: if the fit is not quite right then the white shows around the part. Some times this is a design issues, others it is down to the builder. Uhu02 designs normally require a high degree of precision so it is probably my fault...

The next five precurved (may give them a little more) and ready to be fixed in place...

I started to add the bumpy sticky outy things on the side of the hull last night. I am a very slow learner and despite just having relearned the lesson witht he TSR.2, did not think to precurve the part before starting to fix it in place...as a result it really did not want to stay crrved and in place and so needed some persuasion til the glue cured.

I decided that the 'teeth' on the base of the part that were intended to be folded inwards to provide a better gluing surface were not really necessary so have cut them all off. I don't think that there absence was a contributing factor in the non-compliance of the first one to be mounted...

Here is the first one in place. You can see that the ends don't quite meet and I am not sure why this is. I can fill the gap with a strip of same coloured paper and hopefully the other ones will be better. This is one of the problems that occur when designers leave white space where a part is meant to go: if the fit is not quite right then the white shows around the part. Some times this is a design issues, others it is down to the builder. Uhu02 designs normally require a high degree of precision so it is probably my fault...

The next five precurved (may give them a little more) and ready to be fixed in place...
Please critique my posts honestly i.e. say what you think so I can learn and improve...
The World According To Me
The World According To Me
-
SJPONeill
- Modelling Gent and Scholar
- Posts: 3525
- Joined: May 1st, 2011, 12:01 am
- Location: Near the Spiral, NZ.
- Contact:
Re: Simon does Barbarella

Bumpy bits attached to the righthand side...relearning lessons tonight like remember to colour the edges of the white surface to conceal any misfits, and the best way to attach a shape like this if it doesn't have internal formers to keep it in shape is to start at one point and work your way PATIENTLY around the edge til it is done...

The other side shaded before fitting the bumpy bits...I have actually fitted them but must hace accidentally binned the pic I took of them in place...will redo tomorrow...
Please critique my posts honestly i.e. say what you think so I can learn and improve...
The World According To Me
The World According To Me
-
Chris

- Modelling Gent and Scholar
- Posts: 2917
- Joined: March 15th, 2013, 7:18 pm
- Location: In your head
- Contact:
Re: Simon does Barbarella
I doubt if I will ever do a paper kit, seems more work then I am willing to do!
Honcho of ASMMF
-
SJPONeill
- Modelling Gent and Scholar
- Posts: 3525
- Joined: May 1st, 2011, 12:01 am
- Location: Near the Spiral, NZ.
- Contact:
Re: Simon does Barbarella
I make it look harder than it needs to beChris wrote:I doubt if I will ever do a paper kit, seems more work then I am willing to do!
Please critique my posts honestly i.e. say what you think so I can learn and improve...
The World According To Me
The World According To Me
-
SJPONeill
- Modelling Gent and Scholar
- Posts: 3525
- Joined: May 1st, 2011, 12:01 am
- Location: Near the Spiral, NZ.
- Contact:
Re: Simon does Barbarella
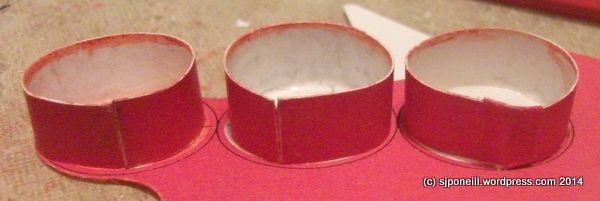
Got quite a lot done last night...I was dreading the shaping of the bumpy bits that go on the sticky-out bits on each side of the hull but it wasn't actually that difficult...

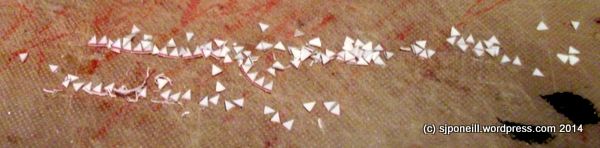
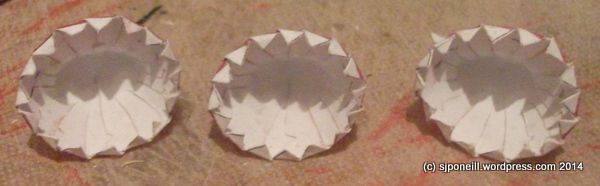
The six bumpy bits in their native 2D form...the most difficult bit was cutting them out as there are some quite fiddly bits but once I production-lined this process, it was quite easy.
I hate metal constructions in paper models but this was the most painless that I have done so far. One at a time, I brushed a little glue on onto the joining tabs, and then nested the tabs under the adjacent edge. I could then hold this in place with my thumb and forefinger while applying glue to the next join. The body heat from my fingers was enough to cure the glue quite quickly so I was able to work my way quickly around each shape without need to pause to let joins cure til they held on their own before the next one.
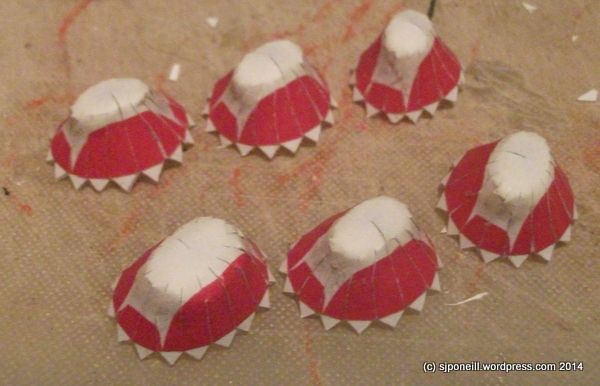
Looking back I could have made the joins smoother by cutting off the joining tabs and adding new ones to the inside of each petal: this would have meant that each join would be a butt join and eliminate the slight step between each petal. Why didn't I do this? Simple reason: didn't even think of it til I had finished...petalling is a necessary evil in paper model design to convince 2D paper that it really does want to be manipulated into a 3D compound curve. Unfortunately, there isn't really any way to avoid noticeable joins between each petal unless you fill the shape from the inside, sand it smooth and then repaint it to match the rest of the model...or...just use the paper parts as templates for plastic parts and build the model as you would a plastic one...certainly this simple model of an unusual subject would lean itself to this approach...
 Ugly job of shaping and attaching the sticky out bits...I should have made internal formers around which to shape the parts. While this would have required a bit of trial and error to get the size right, it would have resulted in a much more consistent shape, and, I suspect, make the attachment of the bumpy bits easier and tidier as well...
I used a small portion of scrap in the hull colour to cover the gap in the seam of the first sticky out bit that I attached to the hull. I had this printed on a laser which is gives better colourfastness than an inkjet (certainly without a sealing coat) but without going into town for another copy, I am limited to the small bits of scrap off the original printed sheets. Getting a good match off a inkjet doesn't always go that well...
So progressing nicely timewise, although I am not happy with the quality of my work in a number of areas. Still, practice makes perfect and GBs like this are good for forcing me to stick to a build and develop skills that have been left to languish...

The six bumpy bits in their native 2D form...the most difficult bit was cutting them out as there are some quite fiddly bits but once I production-lined this process, it was quite easy.
I hate metal constructions in paper models but this was the most painless that I have done so far. One at a time, I brushed a little glue on onto the joining tabs, and then nested the tabs under the adjacent edge. I could then hold this in place with my thumb and forefinger while applying glue to the next join. The body heat from my fingers was enough to cure the glue quite quickly so I was able to work my way quickly around each shape without need to pause to let joins cure til they held on their own before the next one.

Looking back I could have made the joins smoother by cutting off the joining tabs and adding new ones to the inside of each petal: this would have meant that each join would be a butt join and eliminate the slight step between each petal. Why didn't I do this? Simple reason: didn't even think of it til I had finished...petalling is a necessary evil in paper model design to convince 2D paper that it really does want to be manipulated into a 3D compound curve. Unfortunately, there isn't really any way to avoid noticeable joins between each petal unless you fill the shape from the inside, sand it smooth and then repaint it to match the rest of the model...or...just use the paper parts as templates for plastic parts and build the model as you would a plastic one...certainly this simple model of an unusual subject would lean itself to this approach...


I used a small portion of scrap in the hull colour to cover the gap in the seam of the first sticky out bit that I attached to the hull. I had this printed on a laser which is gives better colourfastness than an inkjet (certainly without a sealing coat) but without going into town for another copy, I am limited to the small bits of scrap off the original printed sheets. Getting a good match off a inkjet doesn't always go that well...
So progressing nicely timewise, although I am not happy with the quality of my work in a number of areas. Still, practice makes perfect and GBs like this are good for forcing me to stick to a build and develop skills that have been left to languish...
Please critique my posts honestly i.e. say what you think so I can learn and improve...
The World According To Me
The World According To Me
-
SJPONeill
- Modelling Gent and Scholar
- Posts: 3525
- Joined: May 1st, 2011, 12:01 am
- Location: Near the Spiral, NZ.
- Contact:
Re: Simon does Barbarella
Still plugging away and will probably finish tonight...
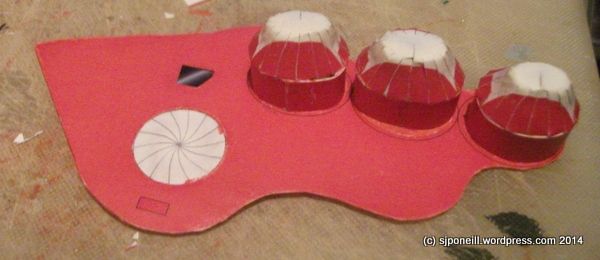
They look quite vicious on the insides...the bumpy bits for the sticky out bits on the hull sides...these teeth are a double edges tool: while they offer an increased surface area for gluing, no matter how sharp the folds are, the tend to act like springs to push the part away from its intended mating surface. I didn't really want to remove them because my bumpy bits did not conform to the shape of the sticky out bits. If I build this again, I would insert formers into the sticky out bits and bumpy bits to ensure that there had matching profiles for a better fit...
Hmmm...
My gut reaction to petalled parts is always that they need to be sanded flush and painted in as close a colour as possible to the other parts...

They look quite vicious on the insides...the bumpy bits for the sticky out bits on the hull sides...these teeth are a double edges tool: while they offer an increased surface area for gluing, no matter how sharp the folds are, the tend to act like springs to push the part away from its intended mating surface. I didn't really want to remove them because my bumpy bits did not conform to the shape of the sticky out bits. If I build this again, I would insert formers into the sticky out bits and bumpy bits to ensure that there had matching profiles for a better fit...

Hmmm...
My gut reaction to petalled parts is always that they need to be sanded flush and painted in as close a colour as possible to the other parts...
Please critique my posts honestly i.e. say what you think so I can learn and improve...
The World According To Me
The World According To Me
-
SJPONeill
- Modelling Gent and Scholar
- Posts: 3525
- Joined: May 1st, 2011, 12:01 am
- Location: Near the Spiral, NZ.
- Contact:
Re: Simon does Barbarella
Something I try to do once a year...Chris wrote:Glad to see you will finish this one.
Please critique my posts honestly i.e. say what you think so I can learn and improve...
The World According To Me
The World According To Me
-
Molly-new

- Modelling Gent and Scholar
- Posts: 2355
- Joined: May 4th, 2011, 8:42 pm
- Location: Stoke-on-Trent, England
Re: Simon does Barbarella
SJPONeill wrote: Hopefully something nice and simple...
It seems to have fought you all the way, but it has raised some good points to watch out for for us novices. Looking forward to seeing it finished.
Airfix WWII Aircraft Of The Aces.
Completed - 10
Building -
Pending -4
Completed - 10
Building -
Pending -4
-
SJPONeill
- Modelling Gent and Scholar
- Posts: 3525
- Joined: May 1st, 2011, 12:01 am
- Location: Near the Spiral, NZ.
- Contact:
Re: Simon does Barbarella

I meant to add this pic with the last update however managed to accidentally delete it off the camera...I started to add the main hull piece that connect the the two hull sides on Friday night. I planned on doing it all that evening but was a bit heavy on the gin and had a snooze instead of continuing on + it was Coro night...

Another shot of Friday's work...it looks a bit wobbly here but that is just the result of not having the full hull in place to keep the sides evenly apart...

I am now about 3/4 of the way around the hull. I added a fairly substantial joining tab from 1mm card as a firm location for the final seam. In working my around the hull last night, I realised that I have actually put it on back to front or upside down i.e. the black and grey engine vent you can see should actually be on the underneath...no doubt Barbarella rivet-counters will be all over me for this...

The model as she looks at the moment...I just have the final hull section to complete as will be calling her done...I had laminated the hull sheet so that it would be strong enough to support the hull side. I did not realise at the time but this made it too thick to allow the sharp crease around the windscreen and you can see where it has cracked. This is also due to the fact that this part was laser-printed and the toner is prone to cracking on sharp bends.
The orange peel effect is due to my using cartridge paper as a modelling medium: this is not a perfectly smooth surface and this shows up faintly orange-peely. the 170gsm matt art paper that I have used for the TSR.2 has a very smooth surface but does not work as well with my new Brother inkjet.
Should finish this tonight before Agents of SHIELD...
Please critique my posts honestly i.e. say what you think so I can learn and improve...
The World According To Me
The World According To Me
-
SJPONeill
- Modelling Gent and Scholar
- Posts: 3525
- Joined: May 1st, 2011, 12:01 am
- Location: Near the Spiral, NZ.
- Contact:
Re: Simon does Barbarella

The double thickness paper that U used for the hull is very stiff and quite spring so I have been giving each section of the hull and full night for the glue to cure before proceeding onto the next section. Tonight I will attempt the final section which will start with a sharp crease around the final turn in the hull shape. If I had not put the hull on the wrong way, this would already have been scribed to make the bend sharper. The prescribed line is now elsewhere on the hull due to the aforementioned wrongwayness of the hull piece...
Please critique my posts honestly i.e. say what you think so I can learn and improve...
The World According To Me
The World According To Me
-
general rocket

- Modelling Gent and Scholar
- Posts: 2790
- Joined: May 1st, 2011, 4:42 pm
- Location: Telford
-
SJPONeill
- Modelling Gent and Scholar
- Posts: 3525
- Joined: May 1st, 2011, 12:01 am
- Location: Near the Spiral, NZ.
- Contact:
Re: Simon does Barbarella

Only one task last night and that was the sealing of the final part of the wrap-round hull part...yes, it is still back to front but I'd have to rip the whole think apart now to fix it...so I'm calling this one done...

Here she is in the completion cabinet with last year's completion...
Please critique my posts honestly i.e. say what you think so I can learn and improve...
The World According To Me
The World According To Me