Do the finger holes have to be round?
If they are not seen and it's not a structural need for round holes, ie stress cracking like they had on the Comets window, then square holes would do.
Regards Splash
Simon's Big Bird ***DNF*** :(
-
splash

- Senior Service Rotorhead
- Posts: 13828
- Joined: May 1st, 2011, 11:02 am
- Location: Somerset England
Re: Simon's Big Bird
My work bench is starting to look like Portsmouth Naval Dockyard.
-
SJPONeill

- Modelling Gent and Scholar
- Posts: 3525
- Joined: May 1st, 2011, 12:01 am
- Location: Near the Spiral, NZ.
- Contact:
Re: Simon's Big Bird
Thanks, David...I'm finding that it all this cutting of heavy card has come at a bit of a cost as the tips of my forefinger where I apply pressure to the knife handle has been like wood the last couple of days since and i think that the constant pressure has kicked off my old cold nerve injury again...either that or carrying a frozen dog roll in from the freezer in the garage the same night...lancfan wrote:Simon it looks to be exactly what it is- a lot of careful, accurate cutting work. These card models have a lot in common with Balsawood flying models and scratchbuilds/vac forms- you have to make your kit of parts before you can build the model, good work.SJPONeill wrote: It doesn't look like too much but it was more work than I expected last night to cut out these finger holes in the main former parts-
David.
All the cutting is one of the reasons that I like paper modelling, in much the same way as I like sanding vacforms...to see the slow emergence of a recognisable form from what was a flat sheet of paper...
Please critique my posts honestly i.e. say what you think so I can learn and improve...
The World According To Me
The World According To Me
-
SJPONeill
- Modelling Gent and Scholar
- Posts: 3525
- Joined: May 1st, 2011, 12:01 am
- Location: Near the Spiral, NZ.
- Contact:
Re: Simon's Big Bird
Good thinking, Splash...to the best of my knowledge (now that you have made me think about the blindingly obvioussplash wrote:Do the finger holes have to be round?
If they are not seen and it's not a structural need for round holes, ie stress cracking like they had on the Comets window, then square holes would do.
Regards Splash
Please critique my posts honestly i.e. say what you think so I can learn and improve...
The World According To Me
The World According To Me
-
SJPONeill
- Modelling Gent and Scholar
- Posts: 3525
- Joined: May 1st, 2011, 12:01 am
- Location: Near the Spiral, NZ.
- Contact:
Re: Simon's Big Bird
My grand-daughters came to visit over the weekend and left their comfort blankets behind and, in the interests of their (parents') domestic harmony, I drove into town to reunite them...
While there I was able to get the A3 sheet for the TSR.2's detail parts scanned onto a USB stick so that i could print off spares at home (I have a printer that can print A3 but can only scan up to A4 size pages). I was bracing myself to pay city prices for this task, but it only cost $5 for the six sheets, so I invested another $5 and got the Rotodyne from the same stable scanned as well...really can't complain about that...even better, they said that laser printing of A3 pages was $8 for a single page but for 10-20 pages would drop down to around $2 per page...from a paper modelling perspective this is really useful as laser printing is less susceptible to smearing and ink running if exposed to moisture e.g. in water-based glues...
While there I was able to get the A3 sheet for the TSR.2's detail parts scanned onto a USB stick so that i could print off spares at home (I have a printer that can print A3 but can only scan up to A4 size pages). I was bracing myself to pay city prices for this task, but it only cost $5 for the six sheets, so I invested another $5 and got the Rotodyne from the same stable scanned as well...really can't complain about that...even better, they said that laser printing of A3 pages was $8 for a single page but for 10-20 pages would drop down to around $2 per page...from a paper modelling perspective this is really useful as laser printing is less susceptible to smearing and ink running if exposed to moisture e.g. in water-based glues...
Please critique my posts honestly i.e. say what you think so I can learn and improve...
The World According To Me
The World According To Me
-
SJPONeill
- Modelling Gent and Scholar
- Posts: 3525
- Joined: May 1st, 2011, 12:01 am
- Location: Near the Spiral, NZ.
- Contact:
Re: Simon's Big Bird
I have found many other things that I had thought forever lost but still no hole punches...tomorrow I will continue the search and start on another part of the aircraft as the search goes on...I was going to start tonight but I had a pear vodka and ginger beer and the ginger beer must have been a little off as I feel all sleepy nooooooooowwwwww.....
Please critique my posts honestly i.e. say what you think so I can learn and improve...
The World According To Me
The World According To Me
-
iggie

- Modelling Gent and Scholar
- Posts: 23418
- Joined: July 31st, 2013, 11:04 am
- Location: North Somercotes, Lincolnshire
- Contact:
Re: Simon's Big Bird
That's funny, I used to have that problem with ginger ale.
But only when mixed with scotch
Good luck with the hole punch search!
But only when mixed with scotch
Good luck with the hole punch search!
Best wishes
Jim
If you can walk away from a landing, it's a good landing. If you use the airplane the next day, it's an outstanding landing
"Never put off till tomorrow, what you can do the day after tomorrow"
Jim
If you can walk away from a landing, it's a good landing. If you use the airplane the next day, it's an outstanding landing
"Never put off till tomorrow, what you can do the day after tomorrow"
-
SJPONeill
- Modelling Gent and Scholar
- Posts: 3525
- Joined: May 1st, 2011, 12:01 am
- Location: Near the Spiral, NZ.
- Contact:
Re: Simon's Big Bird

While foraging around in the garage, still looking for the rest of my paper modeling tools, I unearthed this bottle of glue. What caught my eye about was that it is sandable...

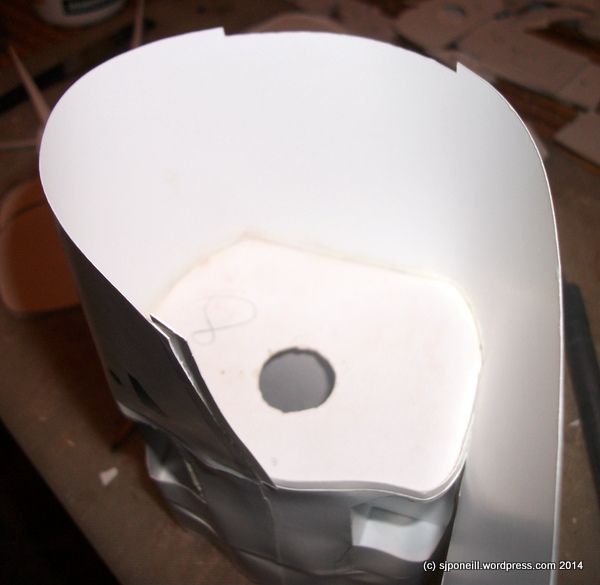
As I still don't have my punches, I cut out the main gear support holes using a fresh #11 blade and cutting through one layer of the card at a time. I then liberally coated the edges of the holes with the woodworking PVA, on the theory that, once cured, it would allow me to tidy the holes up my sanding around the edges...we shall see tomorrow...

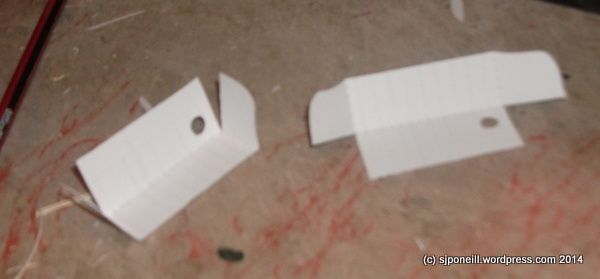
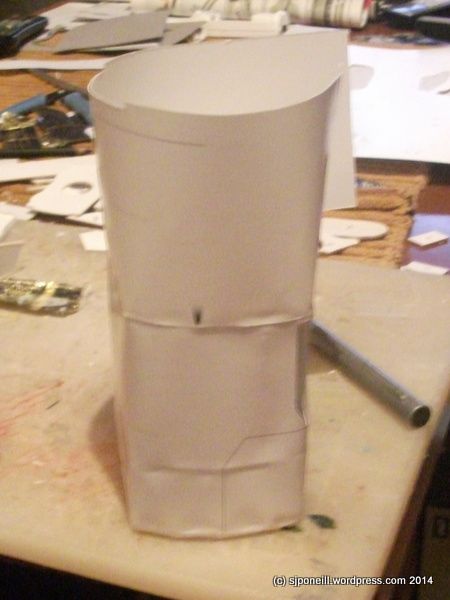
Despite to join some parts together, I started on the tail....this is the vertical fin support fixed to the former for the fin base....

...and here the corners for the tail horizontal surfaces...once cured, these will fold back to meet up with the next former back to provide a firm structure for the tail and the right degree of sweep...
That's probably all clear as mud but will hopefully start to make sense of the next few nights...
Please critique my posts honestly i.e. say what you think so I can learn and improve...
The World According To Me
The World According To Me
-
splash
- Senior Service Rotorhead
- Posts: 13828
- Joined: May 1st, 2011, 11:02 am
- Location: Somerset England
Re: Simon's Big Bird
[quote="SJPONeill"]...and here the corners for the tail horizontal surfaces...once cured, these will fold back to meet up with the next former back to provide a firm structure for the tail and the right degree of sweep...
quote]
That's clever.
Regards Splash
quote]
That's clever.
Regards Splash
My work bench is starting to look like Portsmouth Naval Dockyard.
-
iggie
- Modelling Gent and Scholar
- Posts: 23418
- Joined: July 31st, 2013, 11:04 am
- Location: North Somercotes, Lincolnshire
- Contact:
Re: Simon's Big Bird
I promise one day I will try a paper kit.......but it doesn't half look a lot of work! 
BTW what thickness of card do you stick the paper patterns onto?
BTW what thickness of card do you stick the paper patterns onto?
Best wishes
Jim
If you can walk away from a landing, it's a good landing. If you use the airplane the next day, it's an outstanding landing
"Never put off till tomorrow, what you can do the day after tomorrow"
Jim
If you can walk away from a landing, it's a good landing. If you use the airplane the next day, it's an outstanding landing
"Never put off till tomorrow, what you can do the day after tomorrow"
-
SJPONeill
- Modelling Gent and Scholar
- Posts: 3525
- Joined: May 1st, 2011, 12:01 am
- Location: Near the Spiral, NZ.
- Contact:
Re: Simon's Big Bird
Not much more work than many plastic kits...don't forget that the time spent in preparing the parts is recovered to an extent by time saved in not having to worry about painting and markings...iggie wrote:I promise one day I will try a paper kit.......but it doesn't half look a lot of work!
BTW what thickness of card do you stick the paper patterns onto?
The card thickness for corners is most commonly 0.5 or 1mm although models may need thicker pieces or just double thicknesses of paper. If I was looking at building a paper model that had a large number of parts over a millimeter thick I would either hunt out some laser cut parts (paper modeling has its own range of aftermarket accessories too) or invest in a small scroll saw to make the cutting easier...
Please critique my posts honestly i.e. say what you think so I can learn and improve...
The World According To Me
The World According To Me
-
SJPONeill
- Modelling Gent and Scholar
- Posts: 3525
- Joined: May 1st, 2011, 12:01 am
- Location: Near the Spiral, NZ.
- Contact:
Re: Simon's Big Bird
I'll update with pix in the morning...
I have started assembly of the main gear area and after a very detailed review of the parts against what passes for the instructions, I think that I am ready to start on the rear fuselage next...
...but...
...first I have had to do some parts management as it looks like I missed out a section of the pages with the former templates on them and so had to do a roll call of all the parts to date to confirm that all were present and accounted for...they weren't and I had to reprint and remount them on the 1mm card. They're left to cure overnight and I will cut them out again tomorrow...
I am now also at the stage where I need some of the skins and so will print the first of these tomorrow as well...I am a bit reticent about this as my last attempt at printing of the new printer resulted in some blotting of the ink on the heavier paper. Hopefully that was a one-off and will not obstruct me this time...
Please critique my posts honestly i.e. say what you think so I can learn and improve...
The World According To Me
The World According To Me
-
SJPONeill
- Modelling Gent and Scholar
- Posts: 3525
- Joined: May 1st, 2011, 12:01 am
- Location: Near the Spiral, NZ.
- Contact:
Re: Simon's Big Bird

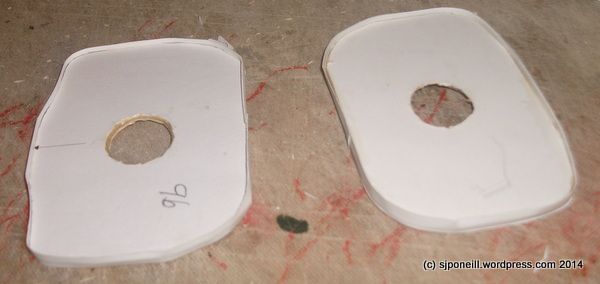
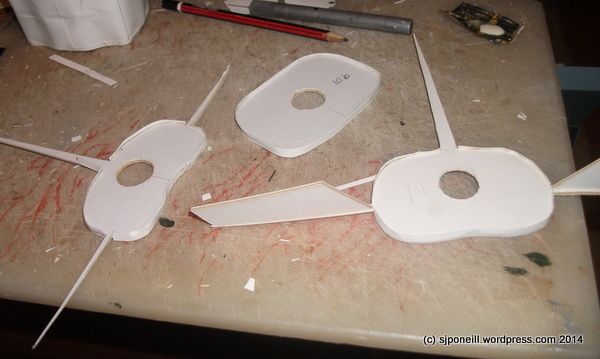
The replacement former parts mounted on card for liberation this evening...I hope that these are the only ones as I am almost out of this size of card...I had heard that woodworking PVA does not saturate the paper in the same way as normal PVA and, so far, this seems to be the case: the slight deformation you may see on some of the parts is actually a build up of glue underneath where I was too tardy to brush it out in time...

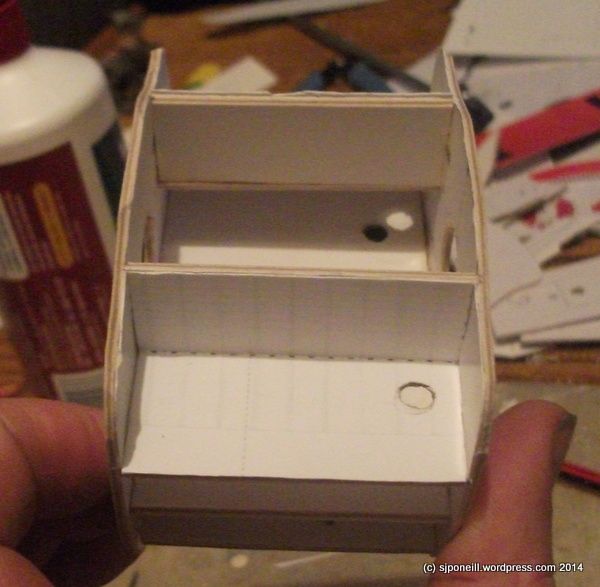
The main gear section underway...the cream smear on the gold piece of scrap is my ready-use glue: that bottle holds so much that I don't feel bad about dumping a dollop out and brushing it onto the the parts...it is so cheap that I can afford to lose a little just for the convenience...It sets like rock so I will often brush any surplus along the interior of joins to reinforce them...

I'm not sure why the triple support at the top of the structure are not square: they seem to be in the instruction pics but I couldn't get them to be vertical and still marry up with the attachment point on each of the horizontal surfaces. I'm not too worried as these are structural parts and not visible once the skins go on...

You'll see that I have pencilled in the part numbers on the larger parts...for some reason, the part number was on the inside of the finger hole i.e. the discarded scrap so once I had finished cutting out the finger holes, I had no idea which part was which - and many are almost but not quite identical: tip for young players, pencil the part numbers on parts as you cut them out if they are on a scrap area (or not there at all)...

I have actually completed this structure by adding the vertical former to the end but only know noticed that I haven't taken a pic of that yet...will remedy later on after I have cut some more firewood...
Please critique my posts honestly i.e. say what you think so I can learn and improve...
The World According To Me
The World According To Me
-
SJPONeill
- Modelling Gent and Scholar
- Posts: 3525
- Joined: May 1st, 2011, 12:01 am
- Location: Near the Spiral, NZ.
- Contact:
Re: Simon's Big Bird
It is indeed, Splash, although I had a funny feeling before continuing and went back to review the chicken entrails aka the instructions...I need to add the skins before continuing or they will probably not be able to wrap right around the formers as intended...once the skins are on, I can carry on to apply the sweep to the elevator formers...splash wrote:SJPONeill wrote:...and here the corners for the tail horizontal surfaces...once cured, these will fold back to meet up with the next former back to provide a firm structure for the tail and the right degree of sweep...
quote]
That's clever.
Regards Splash
Please critique my posts honestly i.e. say what you think so I can learn and improve...
The World According To Me
The World According To Me
-
SJPONeill
- Modelling Gent and Scholar
- Posts: 3525
- Joined: May 1st, 2011, 12:01 am
- Location: Near the Spiral, NZ.
- Contact:
Re: Simon's Big Bird


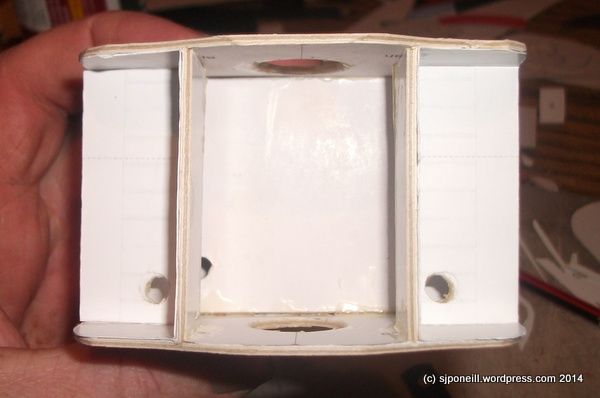
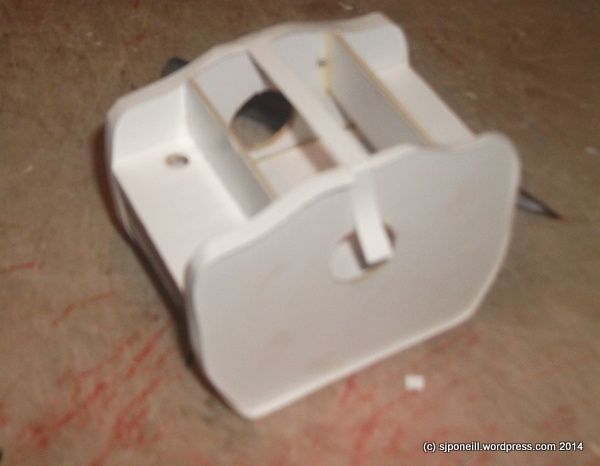
The completed fuselage former assembly around the main gear...
Please critique my posts honestly i.e. say what you think so I can learn and improve...
The World According To Me
The World According To Me
-
SJPONeill
- Modelling Gent and Scholar
- Posts: 3525
- Joined: May 1st, 2011, 12:01 am
- Location: Near the Spiral, NZ.
- Contact:
Re: Simon's Big Bird
A big update today that covers my progress over the last weekend. I am not moving as quickly as I anticipated as the assembly of the skins is only happening a couple of cm at a time...
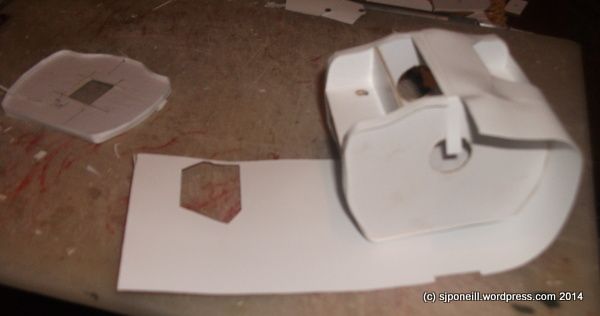
The kit comes with detail inserts for each of the main gear bays...the detail is very subtle on the originals and barely shows in pix but the effect is there for anyone that might choose to look in...this shows both pieces creased and folded before being inserted.
One of the gear bays in place...both were a fraction too long for the space between the formers - not sure is this is due to an error in my cutting or an error in the design...
Both gear bays in place...
Here you can see the joining strips that run around the formers that provide a broader attachment surface for the skins and which also act as mating guides for the next section of fuselage: the open end of the next section sort of 'nests' over the joining strip of the previous section...

The instructions were super-vague on which of the possible panels was actually the main gear bays doors that need to be cut out: the text just says to carefully cut them out but they are not indicated clearly on the part sheet or shown in the sparse construction images...
I had to add a longways strip across the joining surface as there was no such supplied on the parts sheets and without it, there would be no supporting surface for the ends of the skin sheet.
You need to mark the centre of the bulkhead formers on the external sides (they are only marked on internal face, so that you know where to align the edge of the skin surface.
I thought that this was really hit and miss but managed to work my way around the shape, glued in a couple of centimetres at a time - that woodworking glue is working out really well for this as it gives you a couple of minutes to get everything aligned but starts to grip quite quickly after that.
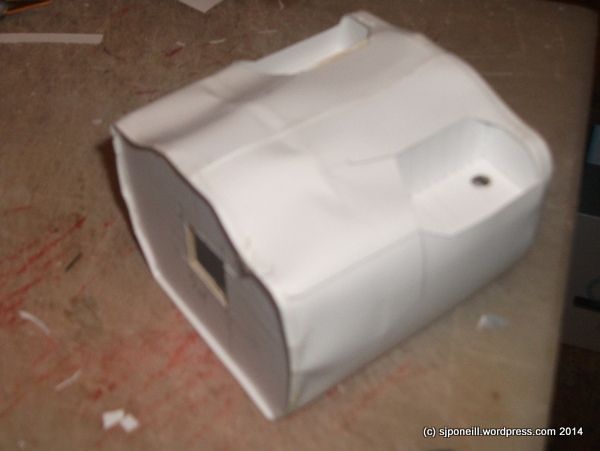
I managed to get the skin on and only had a 1mm overlap when I got it back to the start point...albeit with a few more dents than desired...
Joining strips added to the next lot of rearmost formers...
Adding the next rearmost skin section...it looks horribler in the pic than in reality - the camera is quite unforgiving - but still not as harp as I would have liked...this is quite am ambitious project when I have not done anything this size for a couple of years...the penny dropped last night that I have forgotten to roll some shape into the skin pieces so that they better conform to the shapes of the formers and so thay are still trying to return to their normal 2D flat profile...
An inside view...you can see the longways joining strip and how the edge of the skin fits over the joining strip around the former...any surplus glue from the blob I squeeze out to work from gets brushed around the join for extra strength...
The last three formers from the rear fuselage with their joining strips fitted...the kit only supplies a single strip for the formers with the elevator and rudder spars and this has to be cut to fit...not difficult but makes me wonder if the designer has taken a few shortcut just to get it done...I know that this was a difficult model from a design POV, that it went on the backburner a number of times, and that there was a lot of interest/pressure within the paper modelling community for its completion and release so that might be a little understandable...It's still the only large scale TSR.2 around and I don't think any of the issues that I have encountered are warstoppers...

The kit comes with detail inserts for each of the main gear bays...the detail is very subtle on the originals and barely shows in pix but the effect is there for anyone that might choose to look in...this shows both pieces creased and folded before being inserted.

One of the gear bays in place...both were a fraction too long for the space between the formers - not sure is this is due to an error in my cutting or an error in the design...

Both gear bays in place...

Here you can see the joining strips that run around the formers that provide a broader attachment surface for the skins and which also act as mating guides for the next section of fuselage: the open end of the next section sort of 'nests' over the joining strip of the previous section...

The instructions were super-vague on which of the possible panels was actually the main gear bays doors that need to be cut out: the text just says to carefully cut them out but they are not indicated clearly on the part sheet or shown in the sparse construction images...
I had to add a longways strip across the joining surface as there was no such supplied on the parts sheets and without it, there would be no supporting surface for the ends of the skin sheet.
You need to mark the centre of the bulkhead formers on the external sides (they are only marked on internal face, so that you know where to align the edge of the skin surface.

I thought that this was really hit and miss but managed to work my way around the shape, glued in a couple of centimetres at a time - that woodworking glue is working out really well for this as it gives you a couple of minutes to get everything aligned but starts to grip quite quickly after that.

I managed to get the skin on and only had a 1mm overlap when I got it back to the start point...albeit with a few more dents than desired...

Joining strips added to the next lot of rearmost formers...

Adding the next rearmost skin section...it looks horribler in the pic than in reality - the camera is quite unforgiving - but still not as harp as I would have liked...this is quite am ambitious project when I have not done anything this size for a couple of years...the penny dropped last night that I have forgotten to roll some shape into the skin pieces so that they better conform to the shapes of the formers and so thay are still trying to return to their normal 2D flat profile...

An inside view...you can see the longways joining strip and how the edge of the skin fits over the joining strip around the former...any surplus glue from the blob I squeeze out to work from gets brushed around the join for extra strength...

The last three formers from the rear fuselage with their joining strips fitted...the kit only supplies a single strip for the formers with the elevator and rudder spars and this has to be cut to fit...not difficult but makes me wonder if the designer has taken a few shortcut just to get it done...I know that this was a difficult model from a design POV, that it went on the backburner a number of times, and that there was a lot of interest/pressure within the paper modelling community for its completion and release so that might be a little understandable...It's still the only large scale TSR.2 around and I don't think any of the issues that I have encountered are warstoppers...
Please critique my posts honestly i.e. say what you think so I can learn and improve...
The World According To Me
The World According To Me