Shaun's builds

Kitmaster, Airfix and Dapol railway model kits

Moderator: JamesPerrin

ShaunW
NOT the sheep
Posts: 26180
Joined: November 26th, 2011, 6:11 pm
Location: Pontefract West Yorkshire

Shaun's builds

Post by ShaunW »

OK, here we go then with my contributions to the cause. Arrived today from Al, here is the Dapol Class 9F 2-10-0. I intend to build this in the all-black freight scheme as opposed to the Evening Star, as the all-black scheme is more representative of this class of locos. And the scheme gives me the opportunity to do a little more weathering. Dapol seem to have done a decent job of keeping the moulds going as the parts are much better than I was expecting of a kit of this vintage. The kit has been part started by Al.

Image

Image

Image

I'll make a start tomorrow and the first thing I want to take a look at is replacing the moulded on grab handles along the sides of the body with wire.

Thanks for looking.
Doing - Tamiya 1/35th Universal Carrier.

Work is the curse of the modelling classes!
IPMS#12300
User avatar
splash
Senior Service Rotorhead
Posts: 13828
Joined: May 1st, 2011, 11:02 am
Location: Somerset England

Re: Shaun's builds

Post by splash »

It's a nice kit Shaun, changing the grab rails makes a big difference to the kit, one problem I had in the past was the main chassis was twisted/warped this caused me wheel alignment problems.

My old build was an Airfix kit so this might not be a problem with the dapol kit.

How do you intended to remove the grab rail's? I find the soft grey plastic Dapol use,reacts well to being scraped off.

Regards Splash
My work bench is starting to look like Portsmouth Naval Dockyard.
ShaunW
NOT the sheep
Posts: 26180
Joined: November 26th, 2011, 6:11 pm
Location: Pontefract West Yorkshire

Re: Shaun's builds

Post by ShaunW »

I'll probably scrape and sand Splash. The kit chassis has been assembled by Al and looks to be straight enough. I have managed to cadge some old Hornby railway track from my nephew, which will help greatly in getting the wheel alignment correct and will also be used to display the finished model away from the CBK stand - I don't think it really suits locos/trains to have them standing on a shelf or table without track. Looking at photos, I think the bands along the circumference of the loco body also look to be a bit overdone, so I will give those a sanding down as well or I might even replace them altogether. There is plenty of scope to detail this model using bits and bobs, so it's right up my street really.
Doing - Tamiya 1/35th Universal Carrier.

Work is the curse of the modelling classes!
IPMS#12300
ShaunW
NOT the sheep
Posts: 26180
Joined: November 26th, 2011, 6:11 pm
Location: Pontefract West Yorkshire

Re: Shaun's builds

Post by ShaunW »

And we're off. First up is dealing with the moulded on detail. I started on the left hand side of the body (I almost typed "fuselage" there :grin: ) firstly by drilling holes using a 0.5mm bit for the replacement handrails using the moulded on rails as a template. Thereafter it was a case of out with the modelling knife to scrape off as much as possible before sanding down with wet or dry paper used dry. This is quite brutal stuff and, of course, rapidly puts the model (and the modeller) at a point of no return. I am approaching the body in three stages, left side, top and right side. I started with the left hand side as that has the most moulded on detail to be addressed. Care had to be taken not to eradicate the distinctive "portholes" at the rear, which I had to constantly re-scribe using a dental pick during the sanding process. As you can see, I have left some of the moulded on detail visible at this stage, to aid making up and aligning replacement parts. Once I have made up some replacement parts, all of this detail will be removed. The plastic of the kit is, thankfully, quite forgiving and easy to work.

Image

Here's the untreated right hand side to show you what I am aiming to replace. As you can see, the hand rails are moulded on solid to the body and are crying out to be replaced.

Image

And here is another example of moulded on detail that I can't live with. The flange like object here (and visible in the photo above) is actually a pipe on the full-size and again, if you suffer with mild AMS such as me, it has to be replaced with something that resembles a pipe.

Image

This is the start of quite a long journey I feel :grin:
Doing - Tamiya 1/35th Universal Carrier.

Work is the curse of the modelling classes!
IPMS#12300
ShaunW
NOT the sheep
Posts: 26180
Joined: November 26th, 2011, 6:11 pm
Location: Pontefract West Yorkshire

Re: Shaun's builds

Post by ShaunW »

Most of today's session has been spent sanding and sanding and sanding....

However, after a few hours of that I managed to start adding back the detail. Firstly I added a length of square section U channel to the left hand side to represent the conduit that runs along the body carrying steam pipes (I presume). After that I commenced with the body joins starting at the front with a length of 0.5mm Plastruct rod to represent the front flange/joint, which is quite prominent. Stretched sprue was then added to represent the other joins along the body (I had marked the positions of the joins in pencil underneath the upper body prior to finally removing the moulded on joins). The chimney received inserts of tubing and as you can see, I have attached what I presume to be safety valves or the whistle arrangement towards the rear (sorry, but I know very little about loco parts) and the fit is quite poor, requiring the use of Vallejo filler. More sanding then :roll: The upper part of the body has not been permanently attached to to the lower at this stage.

Image

Image

Hopefully I'll get the chance to keep this moving forward during the rest of the week.

Thanks for looking.
Doing - Tamiya 1/35th Universal Carrier.

Work is the curse of the modelling classes!
IPMS#12300
chrism
Modelling Gent and Scholar
Posts: 4669
Joined: September 29th, 2013, 11:07 pm

Re: Shaun's builds

Post by chrism »

Your off to an excellent start there, and from this latest post making good progress with the improvements and reinstatement work.
Trying to Build kits and not Buy kits
User avatar
splash
Senior Service Rotorhead
Posts: 13828
Joined: May 1st, 2011, 11:02 am
Location: Somerset England

Re: Shaun's builds

Post by splash »

Nice work, that's a big improvement on the kit parts.
My work bench is starting to look like Portsmouth Naval Dockyard.
ShaunW
NOT the sheep
Posts: 26180
Joined: November 26th, 2011, 6:11 pm
Location: Pontefract West Yorkshire

Re: Shaun's builds

Post by ShaunW »

Cheers boys. More work has been done this evening and I'll post up more pics once I'm a little bit further down the line, so to speak :grin:
Doing - Tamiya 1/35th Universal Carrier.

Work is the curse of the modelling classes!
IPMS#12300
ShaunW
NOT the sheep
Posts: 26180
Joined: November 26th, 2011, 6:11 pm
Location: Pontefract West Yorkshire

Re: Shaun's builds

Post by ShaunW »

Alas, it's that time of year again and Mrs W has had me out in the garden cutting back this and that for most of the weekend to help prevent us from living in a jungle.

I have managed some progress however. Looking at photos of these locos revealed that most of the external pipework actually sits behind the body side handrails and therefore for ease of construction I commenced with the pipes. I have started on the left hand side of the body as that is where most of the external pipes reside. The photo shows that work I have done at the front. The large steam pipe is made from plastic rod which has been fitted into drilled holes at top and bottom. The hole that you can see next to the upper outlet is as per photos. The rest of the pipes are a mixture of 0.5mm Plastruct rod and stretched sprue plumbed into gizmology parts salvaged from the engine sprues of an old Dragon 1/48th Ta-152H kit. Other bits have been made from scraps of plastic card. I'm sure this little lot wouldn't really fool a dedicated Class 9F enthusiast but it looks near enough for jazz to me :grin:

Image

It's my day off tomorrow and hopefully I will be able to indulge in a reasonable session of pipe making!

Thanks for looking.
Doing - Tamiya 1/35th Universal Carrier.

Work is the curse of the modelling classes!
IPMS#12300
User avatar
beany
Fat git, glasses, goatie - Avoid!
Posts: 4331
Joined: April 6th, 2011, 11:05 am
Location: Chellaston, Derby

Re: Shaun's builds

Post by beany »

You're just bloody showing off now Shaun :ha:
Lovely work mate, so looking forward to seeing this one come together - always been a big 9F fan.
2024 Acquired: 9 Built: 1
User avatar
splash
Senior Service Rotorhead
Posts: 13828
Joined: May 1st, 2011, 11:02 am
Location: Somerset England

Re: Shaun's builds

Post by splash »

If I hadn't been building a scrap 9F it would have looked like scrap next to yours :-D

That's a really neat bit of micro scratch building.

Regards Splash
My work bench is starting to look like Portsmouth Naval Dockyard.
ShaunW
NOT the sheep
Posts: 26180
Joined: November 26th, 2011, 6:11 pm
Location: Pontefract West Yorkshire

Re: Shaun's builds

Post by ShaunW »

Thanks boys. This afternoon has been spent fitting about eight parts to this model, fiddly is not the word! Mind you, it's all self inflicted of course.

I fitted the boiler/cab front combination to give me reference points for the various pipes and linkages that were to come. First up, because the rear steam pipes fit over the top of them, I made up and fitted the linkage rods for whatever they link to - the regulator perhaps? which I made out of 0.5mm Plastruct rod. The rod was fitted into a housing made from U section tube cut to fit the cab front where it joins the cab roof, which I test fitted. The cranks were made from, believe it or not, some spare crank shaped parts that I found on a 1/72nd scale Hasegawa F-4J sprue, left over from my build of that model last year. The parts fitted perfectly and, to my eye, look like they were meant for this kit.

Image

The rear steam pipes were made from brass wire and what a PITA they were to make, resisting my attempts to bend the into shape. Still, I got there in the end and although far from perfect, they at least look something like the real thing. The wire was attached using two-part epoxy resin and the junction box thingy you can see one of the wires leading into is yet more gizmology from the Dragon Ta-152 engine sprues.

Image

I don't intend to try and replicate every bit of pipework in this scale as I think to do so would probably send me to an early grave. I'll put on enough to make it look busy and leave it at that.

Thanks for looking.
Doing - Tamiya 1/35th Universal Carrier.

Work is the curse of the modelling classes!
IPMS#12300
User avatar
splash
Senior Service Rotorhead
Posts: 13828
Joined: May 1st, 2011, 11:02 am
Location: Somerset England

Re: Shaun's builds

Post by splash »

Funny when I worked on RN F-4K's I can't remember the cranks on the steam regulators it must have been different on the F-4j's :-D
My work bench is starting to look like Portsmouth Naval Dockyard.
ShaunW
NOT the sheep
Posts: 26180
Joined: November 26th, 2011, 6:11 pm
Location: Pontefract West Yorkshire

Re: Shaun's builds

Post by ShaunW »

splash wrote:Funny when I worked on RN F-4K's I can't remember the cranks on the steam regulators it must have been different on the F-4j's :-D
Those items were probably deemed to be top secret by the CIA and so we had to make do with the Heath Robinson regulator arrangement :ha:
Doing - Tamiya 1/35th Universal Carrier.

Work is the curse of the modelling classes!
IPMS#12300
ShaunW
NOT the sheep
Posts: 26180
Joined: November 26th, 2011, 6:11 pm
Location: Pontefract West Yorkshire

Re: Shaun's builds

Post by ShaunW »

Real life has managed to get in the way over the last few days, but I have managed to squeeze a bit in.

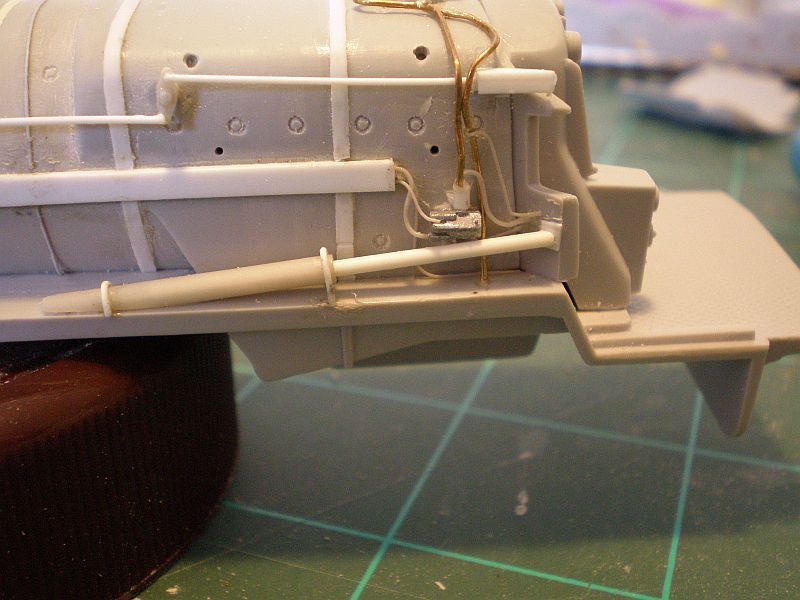
At the rear left of the engine I have now completed the pipework. It was never my intention to try and replicate each and every pipe, but just to add enough to make it busy. Stretched sprue was used for these finer pipes. In addition, I have also added the tubular affair to the left rear end, which I suspect might have something to do with the brakes on the full-size. I shaved off the moulded effort and then made up the new parts using two sizes of plastic rod, one fitted inside the other, together with some 0.5mm Plastruct rod bent to shape to make the mounting brackets.

Image

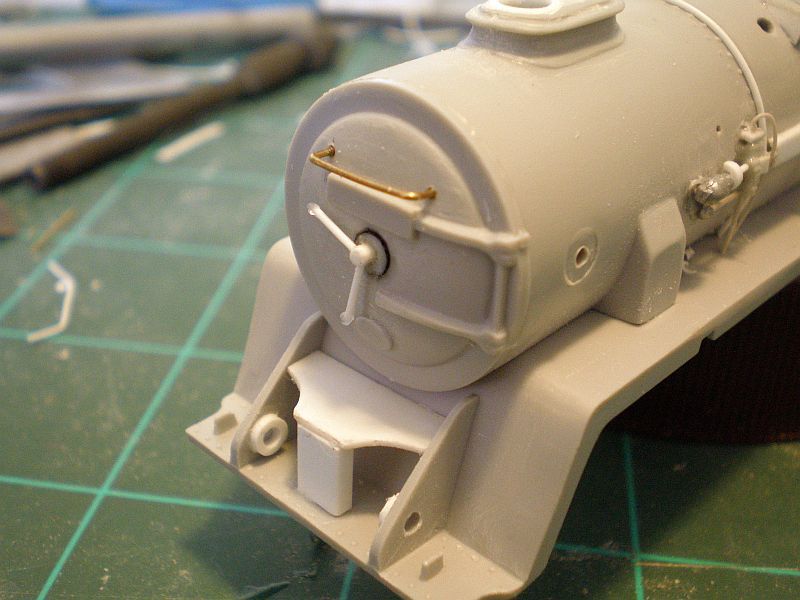
Moving on to the front of the loco I detailed the front door to the cylinders by removing the moulded on upper grab handle, which I replaced with brass wire and I also removed the moulded on clock hands locking bars. After removing the moulded on bars I drilled out the centre of the door as removing the moulded on bars knackered the detail and I then added a replacement centre using a part from the Ta-152 engine sprues, which was handily the right diameter and was also drilled in the centre, which saved another job. I then drilled out some plastic rod to take the replacement locking bars (very fiddly!), which was then glued into the door centre and the replacement bars, made from 0.5mm Plastruct rod, were glued into their respective holes and a little blob of PVA was applied to the end of each to represent the bar end detail. Underneath the door I fitted the shelf arrangement which appears on a number of these locos, using plastic card supported by a bit of scrap girder section and I also drilled through the down supports on either side of the shelf and backed the holes with chopped down hollow plastic rod in an attempt to replicate the detail that I've seen in photos. I've also removed the moulded on foot steps on either side of the engine cylinder at the front prior to fitting the large baffle board thingies to the front. The steps were interfering with the fit of the boards and looked a bit pants in any event.

Image

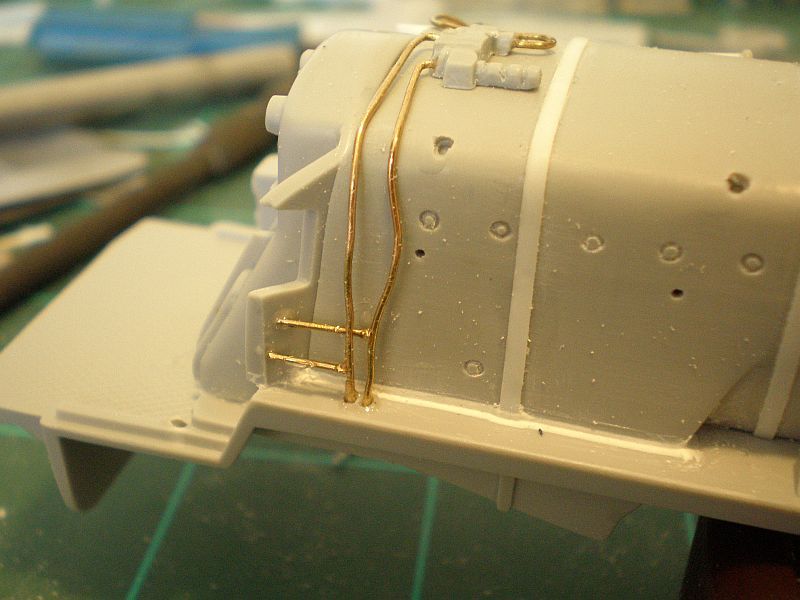
Moving on to the right hand side of the engine, I replaced the moulded on rear pipes with brass rod

Image

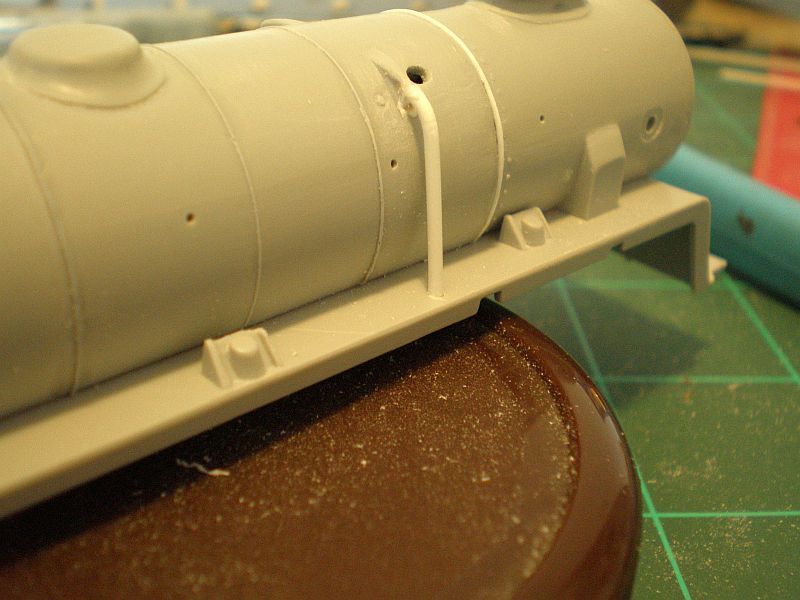
And at the front right I replaced the moulded on main pipe with rod as per the other side

Image

And that's it. Slowly does it, but she's starting to shape up.
Doing - Tamiya 1/35th Universal Carrier.

Work is the curse of the modelling classes!
IPMS#12300
Locked

Return to “SMW 2015 - Going loco”