Tom's Low Altitude Spitfire **DNF**
-
Molly-new

- Modelling Gent and Scholar
- Posts: 2355
- Joined: May 4th, 2011, 8:42 pm
- Location: Stoke-on-Trent, England
Re: Tom's Low Altitude Spitfire
Good work and a handy tutorial on things to look out for. Cheers Tom.
Airfix WWII Aircraft Of The Aces.
Completed - 10
Building -
Pending -4
Completed - 10
Building -
Pending -4
-
iggie

- Modelling Gent and Scholar
- Posts: 23437
- Joined: July 31st, 2013, 11:04 am
- Location: North Somercotes, Lincolnshire
- Contact:
Re: Tom's Low Altitude Spitfire
Very neat work Tom, will be investigating the tippex filler properties myself after seeing your results
Best wishes
Jim
If you can walk away from a landing, it's a good landing. If you use the airplane the next day, it's an outstanding landing
"Never put off till tomorrow, what you can do the day after tomorrow"
Jim
If you can walk away from a landing, it's a good landing. If you use the airplane the next day, it's an outstanding landing
"Never put off till tomorrow, what you can do the day after tomorrow"
-
TomW

- Modelling Gent and Scholar
- Posts: 2279
- Joined: May 1st, 2011, 8:09 am
- Location: Devizes, Wiltshire
Re: Tom's Low Altitude Spitfire
Thanks guys  , Iggie make sure you get a bottle with a sponge applicator, it makes it a lot easier to use for modelling purposes.
Regards
Tom
Regards
Tom
Veni, Venari, Vamoosi
Coastal Command SIG Leader 2012 - 2016
We'll call him Dinghy Watts...... - Paul Bradley
2016 A:B = 29:11
2015 A:B = 38:14
2014 A:B = 25:9
2013 A:B = 20:17
2012 A:B = I didn't keep score
2011 A:B = 39:11
2010 A:B = 51:10
Coastal Command SIG Leader 2012 - 2016
We'll call him Dinghy Watts...... - Paul Bradley
2016 A:B = 29:11
2015 A:B = 38:14
2014 A:B = 25:9
2013 A:B = 20:17
2012 A:B = I didn't keep score
2011 A:B = 39:11
2010 A:B = 51:10
-
PaulBradley

- Staring out the window
- Posts: 21212
- Joined: April 6th, 2011, 3:08 pm
- Location: Flagstaff, AZ
Re: Tom's Low Altitude Spitfire
Nice work, Tom. If you have a punch and die set, a simple solution to the filler cap issue is to punch a small circle from 5 thou plastic card. If you make it slightly smaller than the hole, it looks just like a filler cap!
Paul
За демократію і незалежний Україну
"For Democracy and a Free Ukraine"
За демократію і незалежний Україну
"For Democracy and a Free Ukraine"

Re: Tom's Low Altitude Spitfire
I too am a Tippex (correction fluid) devotee - in the modelling sense of course. A cotton bud dampened (not swimming in) enamel thinners can get it off without harming the plastic. "Not swimming in" as too much will damage the plastic.
I am also becoming very attached (pun intended) to my bottle of Tamiya extra thin. Marvellous for getting into - and securing - long seams, and it evaporates so quickly it doesn't melt the plastic.
regards,
Martin
I am also becoming very attached (pun intended) to my bottle of Tamiya extra thin. Marvellous for getting into - and securing - long seams, and it evaporates so quickly it doesn't melt the plastic.
regards,
Martin
Martin R
"the 'R' stands for 'Representative'."
"the 'R' stands for 'Representative'."
-
iggie
- Modelling Gent and Scholar
- Posts: 23437
- Joined: July 31st, 2013, 11:04 am
- Location: North Somercotes, Lincolnshire
- Contact:
Re: Tom's Low Altitude Spitfire
Thanks for the tip(pex  Did you see what I did there?
  ) regarding the sponge type applicator Tom
As for glue, other than superglue for obstinate or tiny parts, I only use liquid poly for plastic to plastic; no gobs of cement everywhere, and rapid drying too
As for glue, other than superglue for obstinate or tiny parts, I only use liquid poly for plastic to plastic; no gobs of cement everywhere, and rapid drying too
Best wishes
Jim
If you can walk away from a landing, it's a good landing. If you use the airplane the next day, it's an outstanding landing
"Never put off till tomorrow, what you can do the day after tomorrow"
Jim
If you can walk away from a landing, it's a good landing. If you use the airplane the next day, it's an outstanding landing
"Never put off till tomorrow, what you can do the day after tomorrow"
-
TomW
- Modelling Gent and Scholar
- Posts: 2279
- Joined: May 1st, 2011, 8:09 am
- Location: Devizes, Wiltshire
Re: Tom's Low Altitude Spitfire
Thanks for the interest guys and thanks for the tip Paul. Unfortunately I haven't got a punch and die set (yet, one is now on my shopping list) so I'll have to resort to careful filling and keeping my fingers crossed 
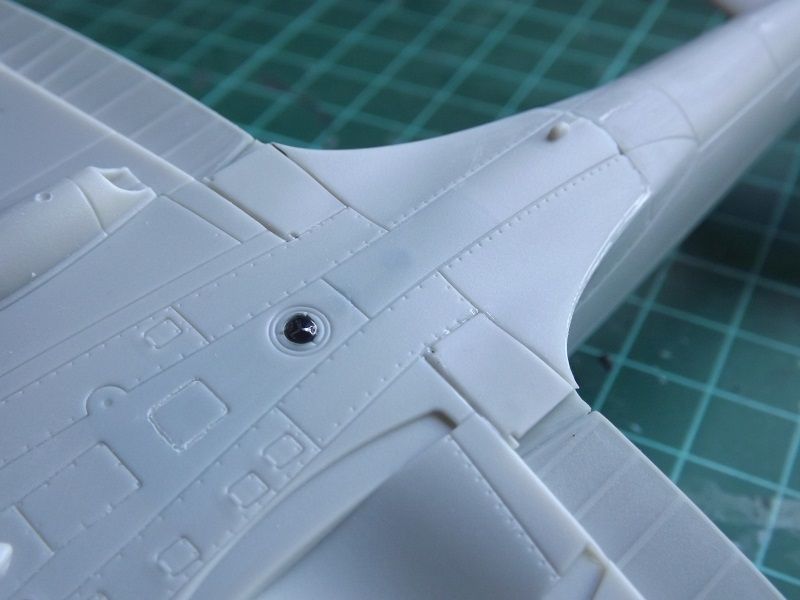
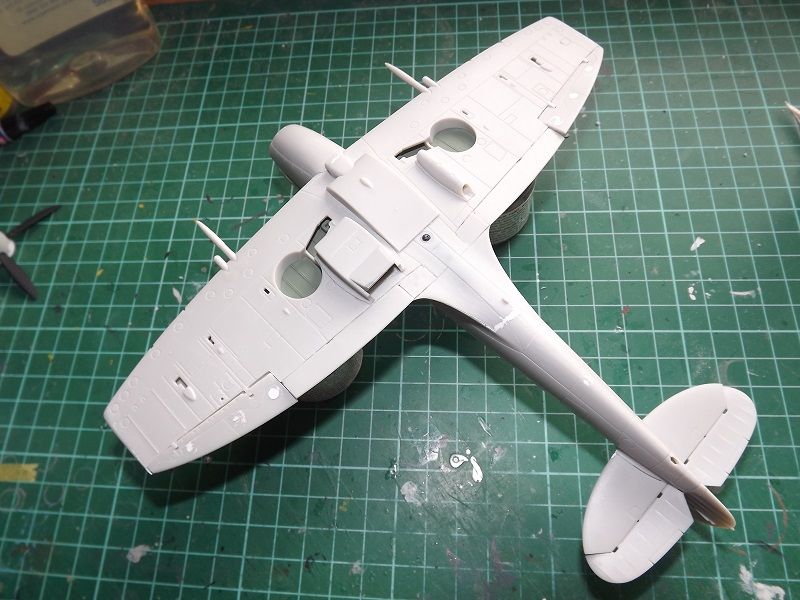
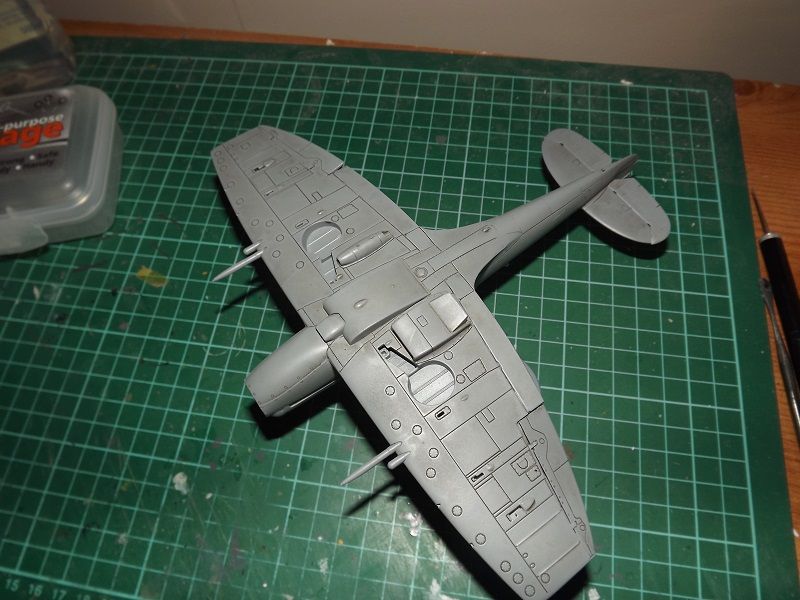
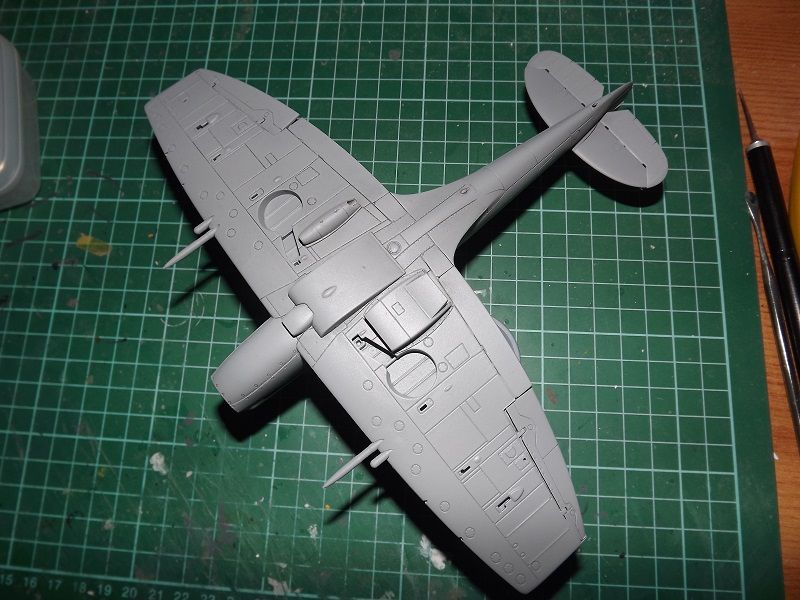
Time for another illustrated part in my guide on how (not) to build the Airfix Spitfire XII. You may recall yesterday that my efforts to create the perfect wing to fuselage join had left me with a big ole' step to deal with under the nose. Well after much deliberation and squinting at the aircraft I decided to bite the bullet and reached for the 240 grit. Some careful re-shaping and smoothing later this is what it looked like:
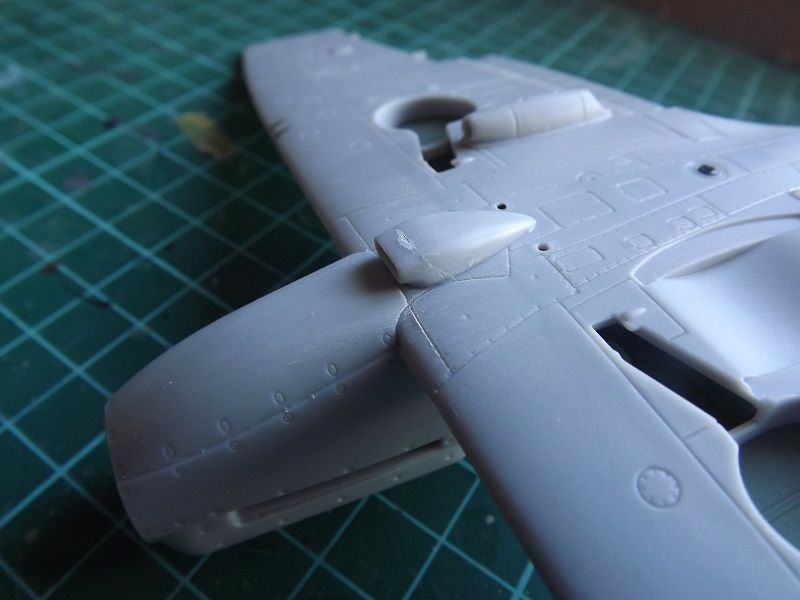
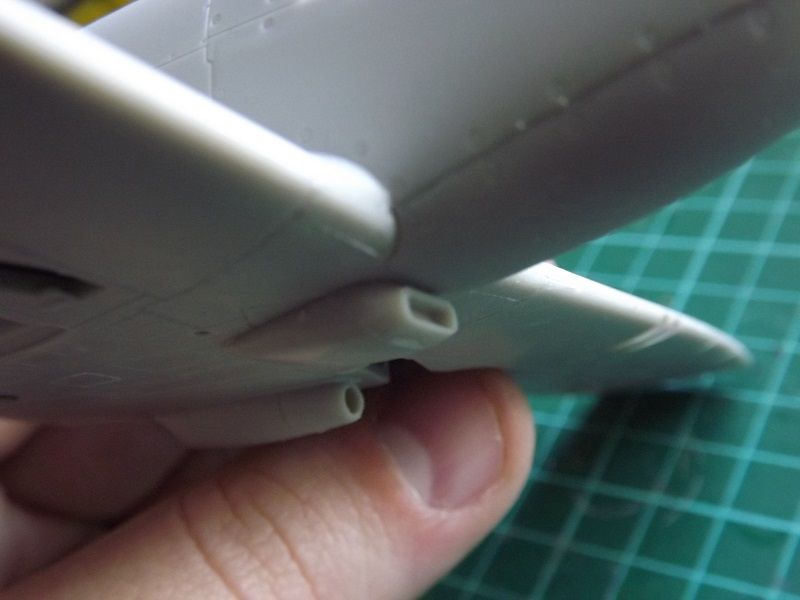
Sorry that last one is a bit out of focus, looks like my camera prefers human fleshy bits to plastic bits but you get the idea, no more step and there is the right amount of clearance between the carb intake and the cowling lower edge. Incidently the Carb intake is a three part assembly (part three is the mesh ice guard that isn't fitted yet because I have plans for it
  ) and isn't a great fit with a mismatch all the way round that needs remedying.
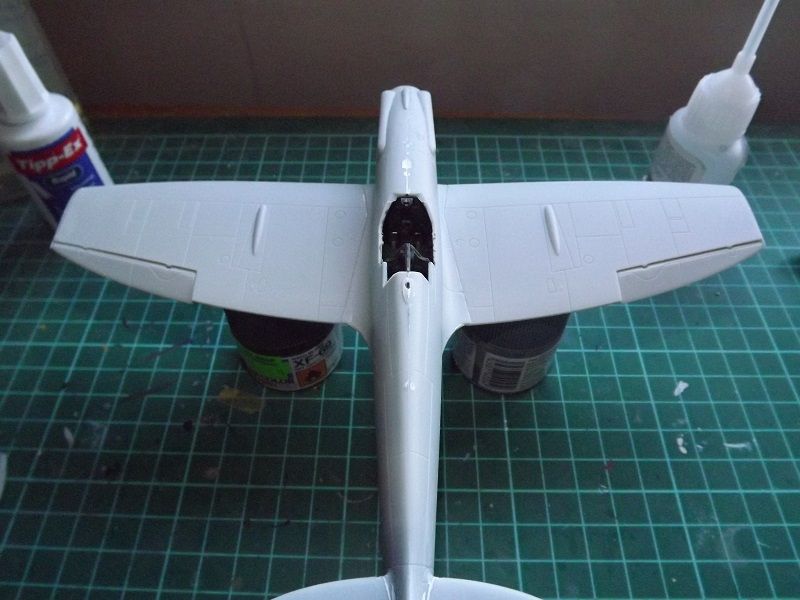
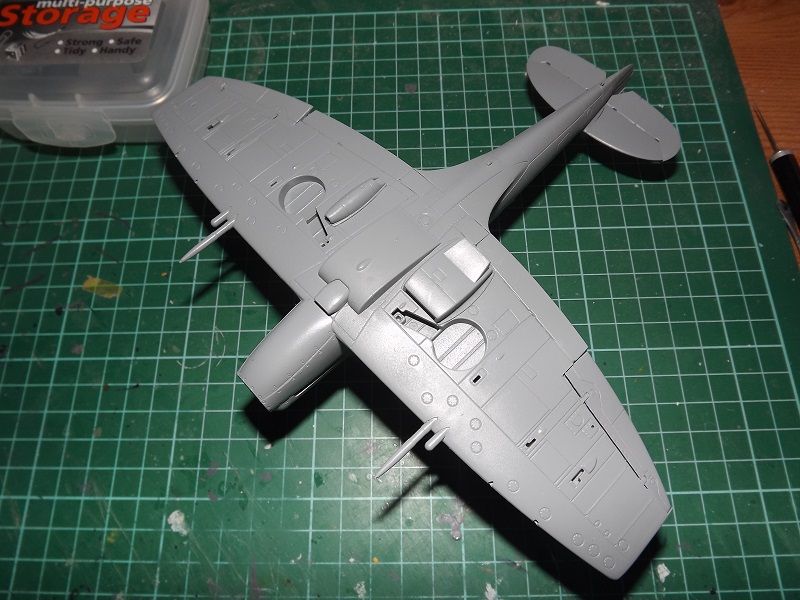
But enough of the front of the airframe for now because its time to look at the tail. Airfix provide the elevators as a single piece which is very handy if you want to set them at an angle; which surprise surprise I do Only because Spitfires on the ground have droopy elevators of course, nothing to do with me wanting to generate visual interest at all, no sir . Anyways this how they look set to about 20 degrees down plane:
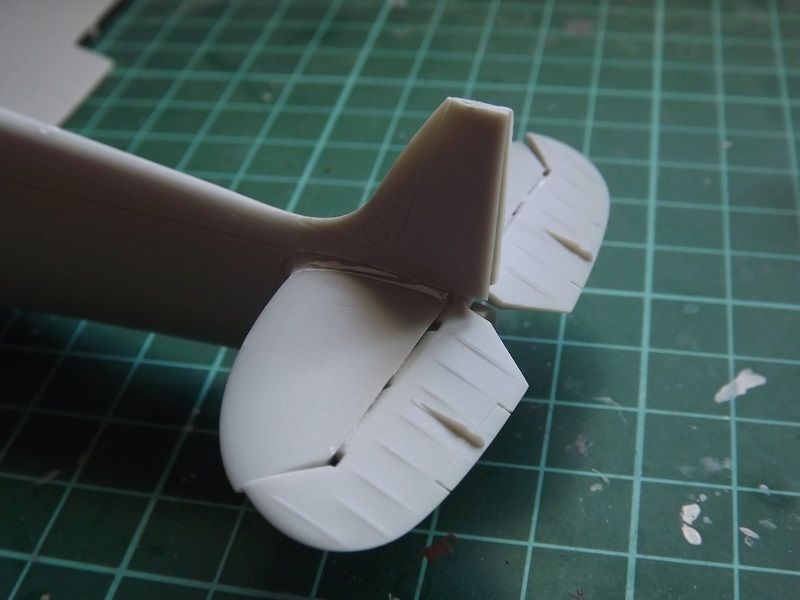
You can just about see that there is a square section missing at the back roots of the elevators where the rudder attaches. Now Airfix provide a small part that fills this gap and completes the rudder post. Guess what? yep it doesn't fit when the elevators are drooped and believe me I tried every possible permutation of fitting it until it went 'ping' and flew off into the waiting mouth of my Carpet Monster (who incidentally has been getting a little thin recently - poor thing) Cue much swearing about Airfix, the Modelling Gods and small things in general.
Walking away from the bench for a cup of tea saved the Spit from going on a premature maiden flight (or getting peppered with some of the pointy Spitfires from my opening post) and at least this meant I could do a little 'proper' modelling; so out with the plasticard and a quick and dirty bodge job gave me this:
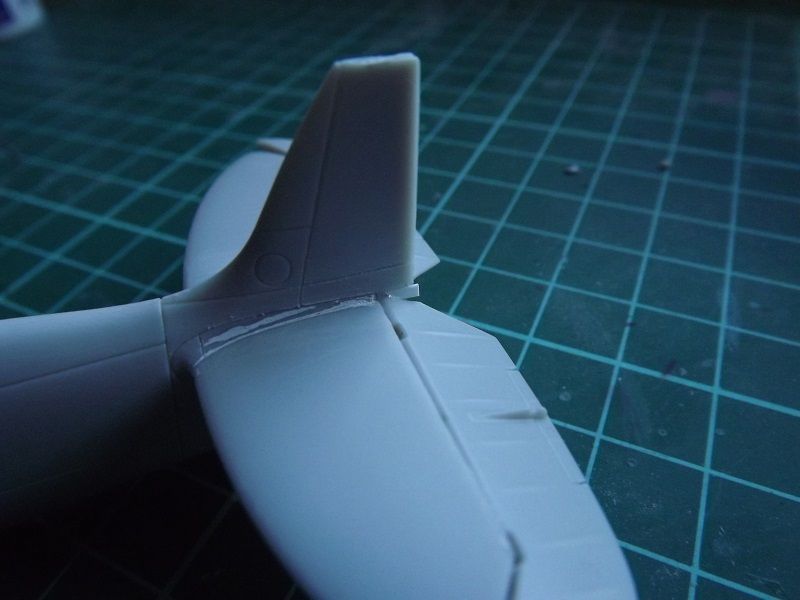
Not perfect by any stretch of the imagination but it'll do the trick I figured it might be wise to avoid the tail for a little while just so I didn't push my luck. With this in mind I though I'd get the flaps fitted. Spitfire flaps are either up or down, they don't have a middle 'takeoff' setting and are not normally seen in the deployed position on the ground. Not unless the airframe is undergoing maintenance or the pilot is getting a right royal rollicking from his C/O (Flaps up before you leave the aircraft sonny boy!) With this in mind I decided to go for the closed position ( I quite fancied having them deployed to show off the nicely moulded detail but there are some people in the world who might have heart-attacks if I did thankfully none of them are around here though ) . They fit very nicely closed:
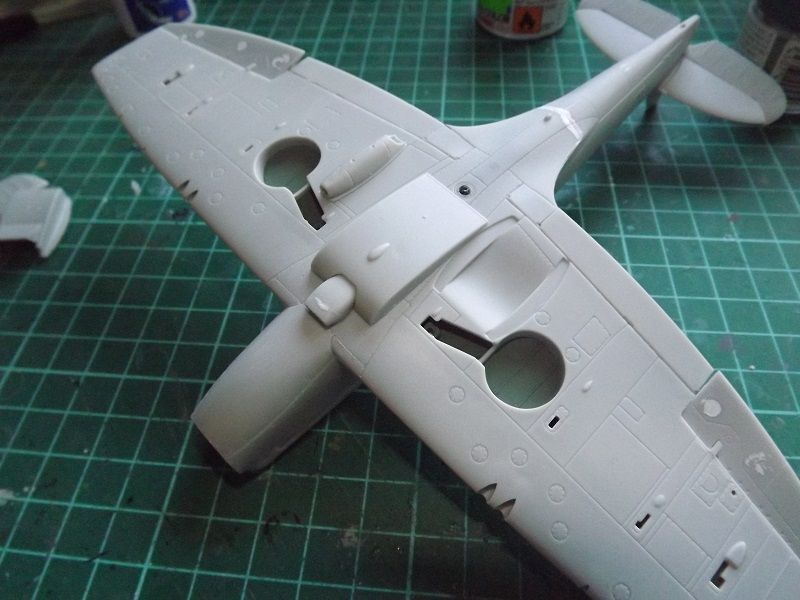
Next on the list of things to decide upon was how I wanted the ailerons fitted, up? down? on the roll? I decided to go for both dropped to a similar angle to the elevators which proved easy to achieve thanks to the way that Airfix have moulded them. So that's all the dynamic bits sorted for tonight but I still needed to decide on the slipper tank. In the end I tossed a coin and the Modelling Gods said that it must be fitted, so it is:
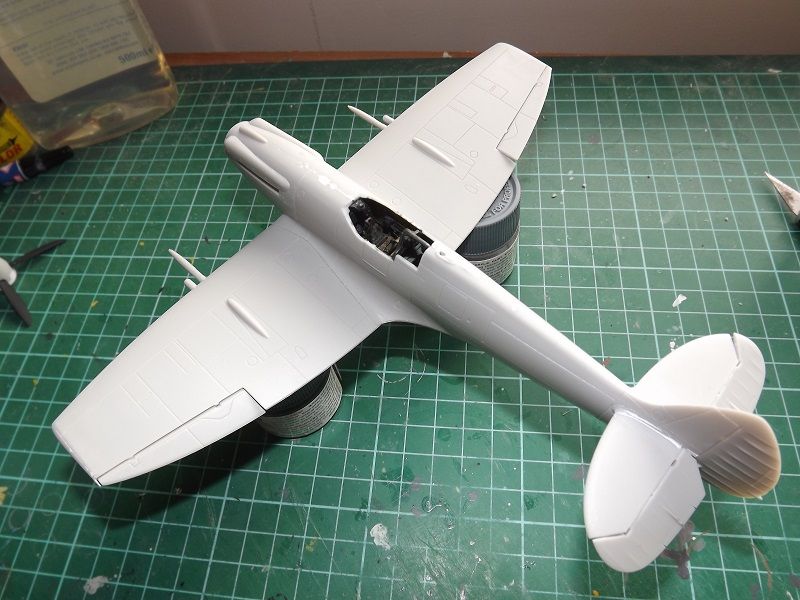
And this is where I'll leave the story for this evening, definitely looking like a Spitfire but lots still to do:
Might be able to do some more tomorrow so who knows what'll happen next
Regards
Tom
**EDIT** Paul has kindly pointed out that Spitfire ailerons (like all aircraft) operate in opposition not in co-operation. As a result I have removed and re-attached the starboard aileron at a positive angle. Not the first time I've made such a schoolboy error
Time for another illustrated part in my guide on how (not) to build the Airfix Spitfire XII. You may recall yesterday that my efforts to create the perfect wing to fuselage join had left me with a big ole' step to deal with under the nose. Well after much deliberation and squinting at the aircraft I decided to bite the bullet and reached for the 240 grit. Some careful re-shaping and smoothing later this is what it looked like:


Sorry that last one is a bit out of focus, looks like my camera prefers human fleshy bits to plastic bits
But enough of the front of the airframe for now because its time to look at the tail. Airfix provide the elevators as a single piece which is very handy if you want to set them at an angle; which surprise surprise I do

You can just about see that there is a square section missing at the back roots of the elevators where the rudder attaches. Now Airfix provide a small part that fills this gap and completes the rudder post. Guess what? yep it doesn't fit when the elevators are drooped
Walking away from the bench for a cup of tea saved the Spit from going on a premature maiden flight (or getting peppered with some of the pointy Spitfires from my opening post) and at least this meant I could do a little 'proper' modelling; so out with the plasticard and a quick and dirty bodge job gave me this:

Not perfect by any stretch of the imagination but it'll do the trick

Next on the list of things to decide upon was how I wanted the ailerons fitted, up? down? on the roll? I decided to go for both dropped to a similar angle to the elevators which proved easy to achieve thanks to the way that Airfix have moulded them. So that's all the dynamic bits sorted for tonight but I still needed to decide on the slipper tank. In the end I tossed a coin and the Modelling Gods said that it must be fitted, so it is:

And this is where I'll leave the story for this evening, definitely looking like a Spitfire but lots still to do:

Might be able to do some more tomorrow so who knows what'll happen next
Regards
Tom
**EDIT** Paul has kindly pointed out that Spitfire ailerons (like all aircraft) operate in opposition not in co-operation. As a result I have removed and re-attached the starboard aileron at a positive angle. Not the first time I've made such a schoolboy error
Veni, Venari, Vamoosi
Coastal Command SIG Leader 2012 - 2016
We'll call him Dinghy Watts...... - Paul Bradley
2016 A:B = 29:11
2015 A:B = 38:14
2014 A:B = 25:9
2013 A:B = 20:17
2012 A:B = I didn't keep score
2011 A:B = 39:11
2010 A:B = 51:10
Coastal Command SIG Leader 2012 - 2016
We'll call him Dinghy Watts...... - Paul Bradley
2016 A:B = 29:11
2015 A:B = 38:14
2014 A:B = 25:9
2013 A:B = 20:17
2012 A:B = I didn't keep score
2011 A:B = 39:11
2010 A:B = 51:10
-
iggie
- Modelling Gent and Scholar
- Posts: 23437
- Joined: July 31st, 2013, 11:04 am
- Location: North Somercotes, Lincolnshire
- Contact:
Re: Tom's Low Altitude Spitfire
Great progress and recovery from your small oversight on the ailerons front; I'm sure that in calmer moments (i.e. not just after having your rudder post eaten by the carpet monster ) you would have remembered it on your own
Best wishes
Jim
If you can walk away from a landing, it's a good landing. If you use the airplane the next day, it's an outstanding landing
"Never put off till tomorrow, what you can do the day after tomorrow"
Jim
If you can walk away from a landing, it's a good landing. If you use the airplane the next day, it's an outstanding landing
"Never put off till tomorrow, what you can do the day after tomorrow"
-
TomW
- Modelling Gent and Scholar
- Posts: 2279
- Joined: May 1st, 2011, 8:09 am
- Location: Devizes, Wiltshire
Re: Tom's Low Altitude Spitfire
I doubt it Iggie, you are talking about the man who managed to fit the nosecone of his Tamiya Mosquito upside down and when it didn't fit cleanly, cut off the locating lugs because he was convinced that Tamiya had made the mistake and not himself
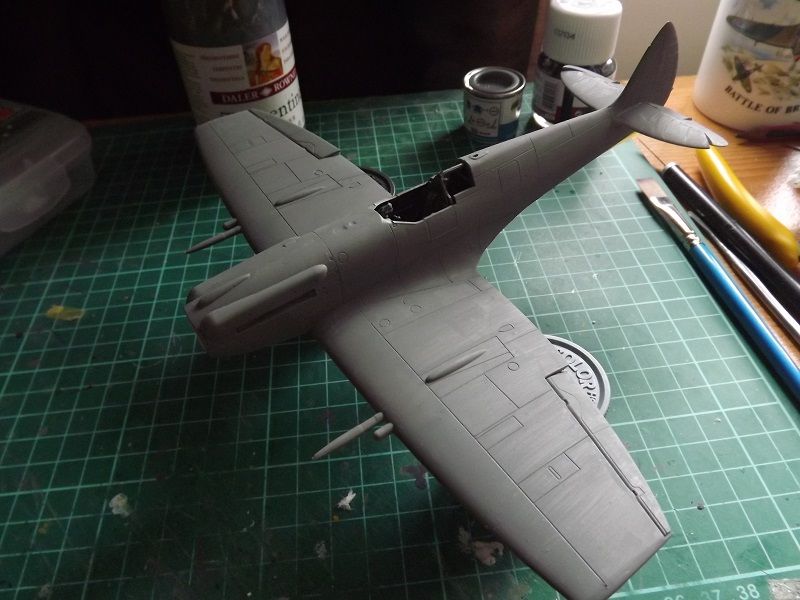
Anyways that is a story for another day and this is a build of a different RAF icon. This is where I started this afternoon after sorting the aileron issue and fitting the armament and radiator housing:
Time to mask up the cockpit and landing light and then down to the spraying booth for a few coats of Medium Sea Grey (Humbrol rattlecan):
Once that had cured I decided to try something a little different to shade the panel lines. I have used Florymodels Dark Dirt wash before as a final weathering product but I thought I'd try it as a pre-shade this time. So first was to cover the undersides in a nice heavy wash:
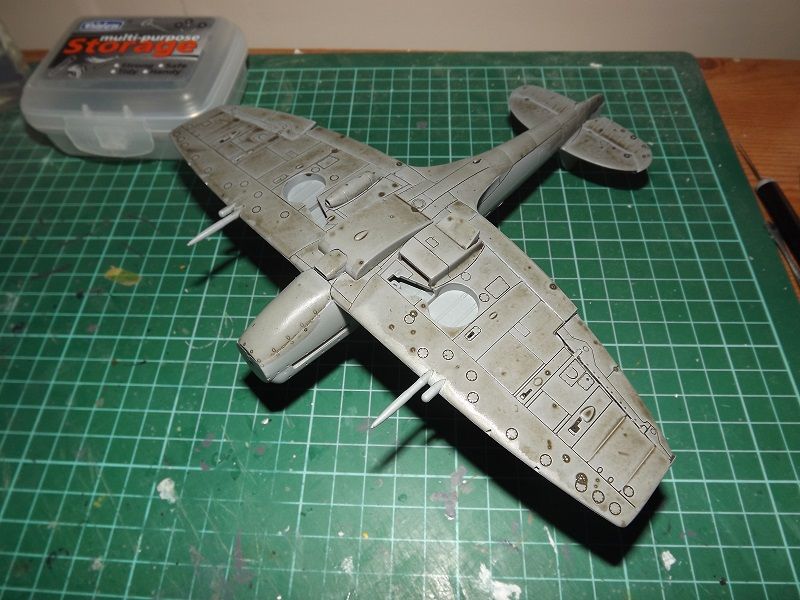
Once dry I rubbed off the excess as instructed with a dampened piece of kitchen paper, making sure to follow the airflow and not to lift any of the wash out of the panel lines:
Actually at this stage I was tempted to leave well alone as the effect was nicely uniform and not too filthy. But I'm not aiming for a uniform finish with this build (the upperworks will have another new technique tried on them to do something similar) so it was back down to the spraybooth for a couple of mistcoats of MSG to soften the lines:
Not too bad, there is some unevenness to the depth of the shadowing which is what I was aiming for but it is very subtle. The flash has wiped a lot of the effect out in the photo so I will do one in natural light once the sun comes back up tomorrow. Next up is to mask off the demarcation on the nose and rear fuselage and get on with the Ocean Grey.
Regards
Tom
Anyways that is a story for another day and this is a build of a different RAF icon. This is where I started this afternoon after sorting the aileron issue and fitting the armament and radiator housing:


Time to mask up the cockpit and landing light and then down to the spraying booth for a few coats of Medium Sea Grey (Humbrol rattlecan):

Once that had cured I decided to try something a little different to shade the panel lines. I have used Florymodels Dark Dirt wash before as a final weathering product but I thought I'd try it as a pre-shade this time. So first was to cover the undersides in a nice heavy wash:

Once dry I rubbed off the excess as instructed with a dampened piece of kitchen paper, making sure to follow the airflow and not to lift any of the wash out of the panel lines:

Actually at this stage I was tempted to leave well alone as the effect was nicely uniform and not too filthy. But I'm not aiming for a uniform finish with this build (the upperworks will have another new technique tried on them to do something similar) so it was back down to the spraybooth for a couple of mistcoats of MSG to soften the lines:

Not too bad, there is some unevenness to the depth of the shadowing which is what I was aiming for but it is very subtle. The flash has wiped a lot of the effect out in the photo so I will do one in natural light once the sun comes back up tomorrow. Next up is to mask off the demarcation on the nose and rear fuselage and get on with the Ocean Grey.
Regards
Tom
Veni, Venari, Vamoosi
Coastal Command SIG Leader 2012 - 2016
We'll call him Dinghy Watts...... - Paul Bradley
2016 A:B = 29:11
2015 A:B = 38:14
2014 A:B = 25:9
2013 A:B = 20:17
2012 A:B = I didn't keep score
2011 A:B = 39:11
2010 A:B = 51:10
Coastal Command SIG Leader 2012 - 2016
We'll call him Dinghy Watts...... - Paul Bradley
2016 A:B = 29:11
2015 A:B = 38:14
2014 A:B = 25:9
2013 A:B = 20:17
2012 A:B = I didn't keep score
2011 A:B = 39:11
2010 A:B = 51:10
-
TomW
- Modelling Gent and Scholar
- Posts: 2279
- Joined: May 1st, 2011, 8:09 am
- Location: Devizes, Wiltshire
Re: Tom's Low Altitude Spitfire
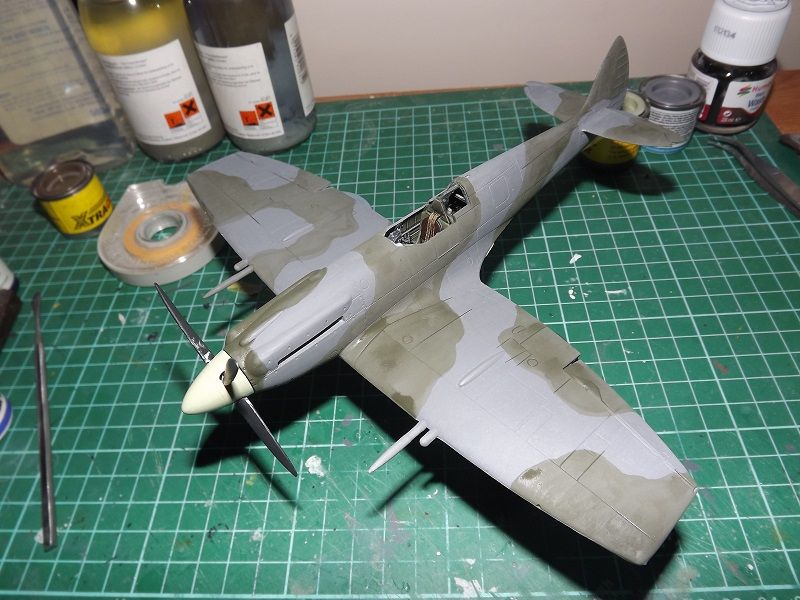
No a lot of progress this week thanks to work (never volunteer to do overtime ) but I have managed two thin coats of Ocean Grey on the upperworks. One more will be needed before I can move on to the Dark Green:
This is the first time I've tried pre-shading before painting and there is a hint of it showing through. More practise needed I think.
Regards
Tom

This is the first time I've tried pre-shading before painting and there is a hint of it showing through. More practise needed I think.
Regards
Tom
Veni, Venari, Vamoosi
Coastal Command SIG Leader 2012 - 2016
We'll call him Dinghy Watts...... - Paul Bradley
2016 A:B = 29:11
2015 A:B = 38:14
2014 A:B = 25:9
2013 A:B = 20:17
2012 A:B = I didn't keep score
2011 A:B = 39:11
2010 A:B = 51:10
Coastal Command SIG Leader 2012 - 2016
We'll call him Dinghy Watts...... - Paul Bradley
2016 A:B = 29:11
2015 A:B = 38:14
2014 A:B = 25:9
2013 A:B = 20:17
2012 A:B = I didn't keep score
2011 A:B = 39:11
2010 A:B = 51:10
-
Clashcityrocker

- Modelling Gent and Scholar
- Posts: 10817
- Joined: May 1st, 2011, 12:31 am
- Location: Adelaide. South Australia
Re: Tom's Low Altitude Spitfire
Progressing nicely.
Nigel
Nigel
-
Molly-new
- Modelling Gent and Scholar
- Posts: 2355
- Joined: May 4th, 2011, 8:42 pm
- Location: Stoke-on-Trent, England
Re: Tom's Low Altitude Spitfire
I find that pre-shading is a bit pointless on 1/72 kits, but when I do go for it then a more bold affect is needed:TomW wrote:This is the first time I've tried pre-shading before painting and there is a hint of it showing through.

I think the wash technique that you have used is better suited for the final process prior to weathering.
Airfix WWII Aircraft Of The Aces.
Completed - 10
Building -
Pending -4
Completed - 10
Building -
Pending -4
-
TomW
- Modelling Gent and Scholar
- Posts: 2279
- Joined: May 1st, 2011, 8:09 am
- Location: Devizes, Wiltshire
Re: Tom's Low Altitude Spitfire
Im in agreement with you Chip, this was an experiment to see if I could replicate the effect using a brush and different materials to my previous attempts, looks like its back to the drawing board this time round though
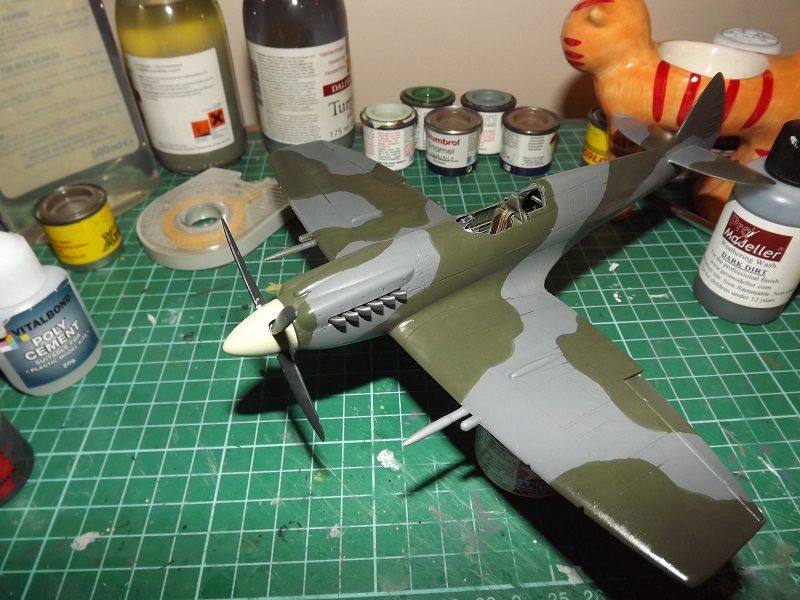
The Spitfire now has had three thin coats of Ocean Grey and this afternoon I got the first Dark Green one on, I'll probably need three coats for this too as I'm experimenting with thinning my paints for the first time in ages:
Regards
Tom
The Spitfire now has had three thin coats of Ocean Grey and this afternoon I got the first Dark Green one on, I'll probably need three coats for this too as I'm experimenting with thinning my paints for the first time in ages:

Regards
Tom
Veni, Venari, Vamoosi
Coastal Command SIG Leader 2012 - 2016
We'll call him Dinghy Watts...... - Paul Bradley
2016 A:B = 29:11
2015 A:B = 38:14
2014 A:B = 25:9
2013 A:B = 20:17
2012 A:B = I didn't keep score
2011 A:B = 39:11
2010 A:B = 51:10
Coastal Command SIG Leader 2012 - 2016
We'll call him Dinghy Watts...... - Paul Bradley
2016 A:B = 29:11
2015 A:B = 38:14
2014 A:B = 25:9
2013 A:B = 20:17
2012 A:B = I didn't keep score
2011 A:B = 39:11
2010 A:B = 51:10
-
TomW
- Modelling Gent and Scholar
- Posts: 2279
- Joined: May 1st, 2011, 8:09 am
- Location: Devizes, Wiltshire
Re: Tom's Low Altitude Spitfire
Just to say I'm still chipping away at the build. Paint is done and Klear coats are going on. Photo's tomorrow once the sun comes back up.
Regards
Tom
Regards
Tom
Veni, Venari, Vamoosi
Coastal Command SIG Leader 2012 - 2016
We'll call him Dinghy Watts...... - Paul Bradley
2016 A:B = 29:11
2015 A:B = 38:14
2014 A:B = 25:9
2013 A:B = 20:17
2012 A:B = I didn't keep score
2011 A:B = 39:11
2010 A:B = 51:10
Coastal Command SIG Leader 2012 - 2016
We'll call him Dinghy Watts...... - Paul Bradley
2016 A:B = 29:11
2015 A:B = 38:14
2014 A:B = 25:9
2013 A:B = 20:17
2012 A:B = I didn't keep score
2011 A:B = 39:11
2010 A:B = 51:10
-
TomW
- Modelling Gent and Scholar
- Posts: 2279
- Joined: May 1st, 2011, 8:09 am
- Location: Devizes, Wiltshire
Re: Tom's Low Altitude Spitfire
Photo's as promised, all glossed up and ready for decaling:

Next up decals.
Regards
Tom


Next up decals.
Regards
Tom
Veni, Venari, Vamoosi
Coastal Command SIG Leader 2012 - 2016
We'll call him Dinghy Watts...... - Paul Bradley
2016 A:B = 29:11
2015 A:B = 38:14
2014 A:B = 25:9
2013 A:B = 20:17
2012 A:B = I didn't keep score
2011 A:B = 39:11
2010 A:B = 51:10
Coastal Command SIG Leader 2012 - 2016
We'll call him Dinghy Watts...... - Paul Bradley
2016 A:B = 29:11
2015 A:B = 38:14
2014 A:B = 25:9
2013 A:B = 20:17
2012 A:B = I didn't keep score
2011 A:B = 39:11
2010 A:B = 51:10