Rob's 31 *Finished*
-
Kitaholic

- Modelling Gent and Scholar
- Posts: 3765
- Joined: November 10th, 2014, 7:53 pm
- Location: 5 mins from SMW
Re: Rob's 31
Looking rather good and very menacing, nice work on the office
Regards
Gord
Desperately trying to find his MOJO, don't know where I left it
Gord
Desperately trying to find his MOJO, don't know where I left it
-
Stuart

- Raider of the Lost Ark Royal
- Posts: 19415
- Joined: February 25th, 2013, 4:55 pm
- Location: North Wales
- Contact:
Re: Rob's 31
That's looking great Rob!
Stuart Templeton I may not be good but I'm slow...
My Blog: https://stuartsscalemodels.blogspot.com/
My Blog: https://stuartsscalemodels.blogspot.com/
-
Old_Tonto

- Modelling Gent and Scholar
- Posts: 8061
- Joined: May 1st, 2011, 7:41 pm
- Location: Middlesbrough, Peoples Republic of Teesside.
Re: Rob's 31
Great work going on here Rob. That interior is really nice.
2023 - A:0 B:0 C:0
Current Projects:
East German Air Force (1956-90)
South African Air Force (1958-93)
Current Projects:
East German Air Force (1956-90)
South African Air Force (1958-93)
-
rob_van_riel
- Modelling Gent and Scholar
- Posts: 3325
- Joined: November 4th, 2012, 11:28 am
- Location: The Netherlands
- Contact:
Re: Rob's 31
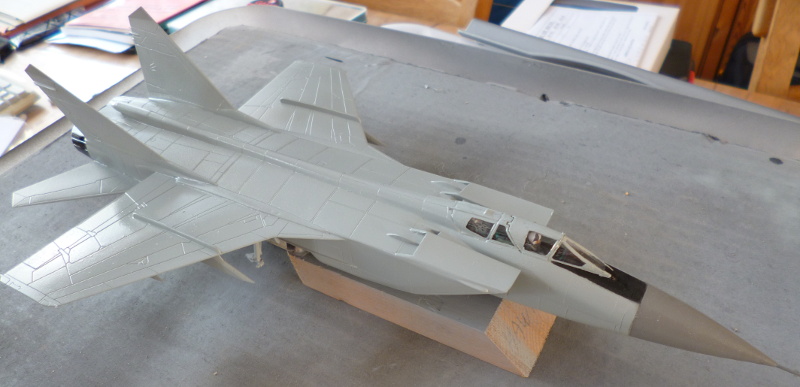
A mean case of blitzery prevented updates (not to mention work) on this last wednesday, but now the Mig is back at the front of the queue. I've completed the final pre-paint odds and sods, filed the worst edges of the transparencies, managed to get the nose probe on only slightly wrong, and have just sprayed on the final coat of primer. Painting should begin in earnest tomorrow.
-
rob_van_riel
- Modelling Gent and Scholar
- Posts: 3325
- Joined: November 4th, 2012, 11:28 am
- Location: The Netherlands
- Contact:
Re: Rob's 31
Yessterday was a bad day at the paintshop for the Mig. I just found out the anti-glare panels (real and dummy) cover much more area than I thought and painted, and while masking the engine exhausts, I ripped some of the paint off primer and all. In other words, I'll have to do most of yesterday's work over again 
-
rob_van_riel
- Modelling Gent and Scholar
- Posts: 3325
- Joined: November 4th, 2012, 11:28 am
- Location: The Netherlands
- Contact:
Re: Rob's 31
This thing hates me. After repainting yesterday's stuff this morning, I remasked later in the evening. I then hit the model with some old (yeah, I know, STUPID) Humbrol airbrush 127. So far, this paint has been very well behaved, despite it's age, but tonight it decided to come up with airbrush clogging lumps. After doing the bottom half of the plane, I stopped for problem #2 (see below), and cleaned out the airbrush. I then attempted to shoot some paint onto my Mosquito, only to find the airbrush jamming up again. Even deeper cleaning appears to have cleared the problem, although I have yet to retest it with more than thinner. Still, ugly, half useable paint on one side of the Mossie, rest of the batch of paint lost, not a happy camper..
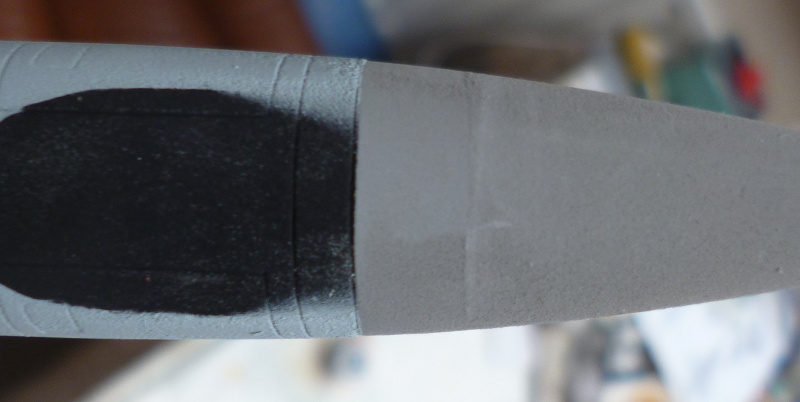
Problem #2: the Revell black I hit the Mig with to create anti-glare panels has a rather grainy surface, which doesn't really show until you put a lighter colour over it. Then you gets black grains sticking through your nice new paintjob. Yet another bit of paint I'll have to sand smooth after drying. I also suspect it compromised masking tape adhesion enough for paint to sneak under it in some quantity.
By now so thouroughly enraged that I don't trust myself with anything that could break or break other things anymore, so I'll just step away from the bench, put on some really, really stupid movie, and slough on the couch till I cool off
I know, half of this is my own stupid fault for provoking fate like this, but really, it didn't need to take every opportunity to mess me up did it?
-
Old_Tonto
- Modelling Gent and Scholar
- Posts: 8061
- Joined: May 1st, 2011, 7:41 pm
- Location: Middlesbrough, Peoples Republic of Teesside.
Re: Rob's 31
I feel your pain Rob. Chill out and have an evening off, drink some wine.
2023 - A:0 B:0 C:0
Current Projects:
East German Air Force (1956-90)
South African Air Force (1958-93)
Current Projects:
East German Air Force (1956-90)
South African Air Force (1958-93)
-
rob_van_riel
- Modelling Gent and Scholar
- Posts: 3325
- Joined: November 4th, 2012, 11:28 am
- Location: The Netherlands
- Contact:
Re: Rob's 31
I think I went one better, and combined retail therapy with getting even instead of mad:Old_Tonto wrote:Chill out and have an evening off, drink some wine.
http://www.ebay.co.uk/itm/271868947613? ... EBIDX%3AIT;
If these work anywhere near as advertised, they're not getting me like this again
The offending Revell paint, mainwhile, has been consigned to the trashcan; it too won't be getting any digs at me again. I have a fresh jar of 127 (which, properly thinned, the airbrush liked well enough while blitzing the Rafale last week) to complete the Mig with, so that won't slow me down either; using up the old stock can wait until the filters have arrived.
-
rob_van_riel
- Modelling Gent and Scholar
- Posts: 3325
- Joined: November 4th, 2012, 11:28 am
- Location: The Netherlands
- Contact:
Re: Rob's 31
Sanding and repainting with the newer 127 did the job, or at least as near as I dared go with the sandpaper. Unmasking proved a bit frustrating though: once again I'd lost some jet pipe black, and the initial batch of grey had indeed managed to wreck the fake canopy on the bottom. And then there was the nose <whimper..>
Somehow, a lighter grey ring had formed completely around the nose cone. No idea how or why, but there it was, and it would have to go.
First attempt to fix this, was lightly hitting it with the 0.2mm airbrush, freehand, with just a scrap of handheld paper for rough masking. It wasn't pretty..
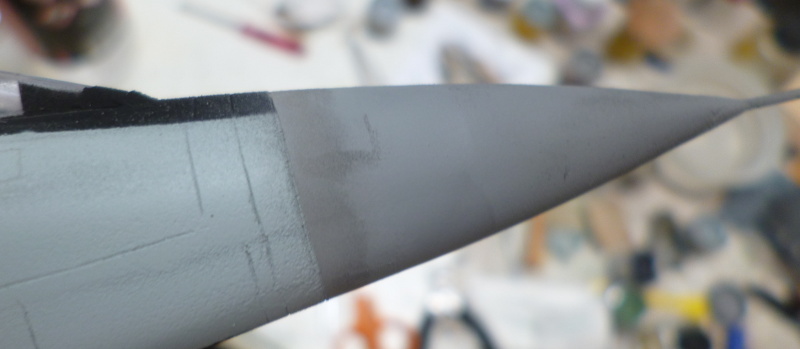
I then decided to completely re-paint the nose cone, masked, and hit it again with the airbrush. By all rights that should have resulted in a nice even finish on the nose. Dream on. Despite the fact that this area had never been exposed to the degraded black paint, some areas were rough surfaced, and refused to accept a smoothing layer of paint.
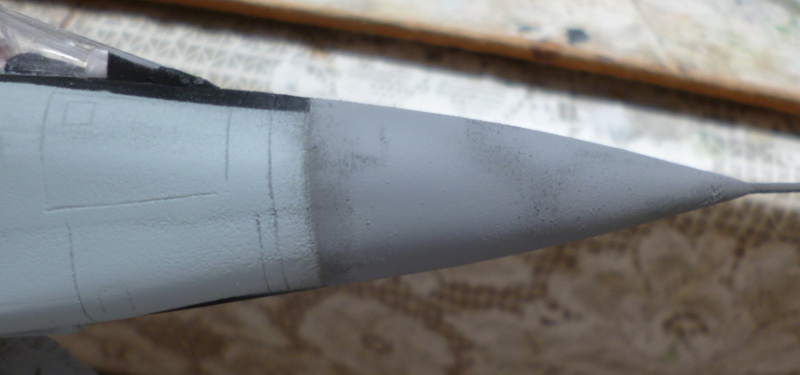
Fine, you want it rough, you get it rough No more of this modern artsy fartsy airbrushery, hand me my hairy stick. All else had failed, the kit was scoring way too many trashcan points anyway, so why not. Completely re-painted the nose cone, the forward section of the fuselage, and the anti glare panel.
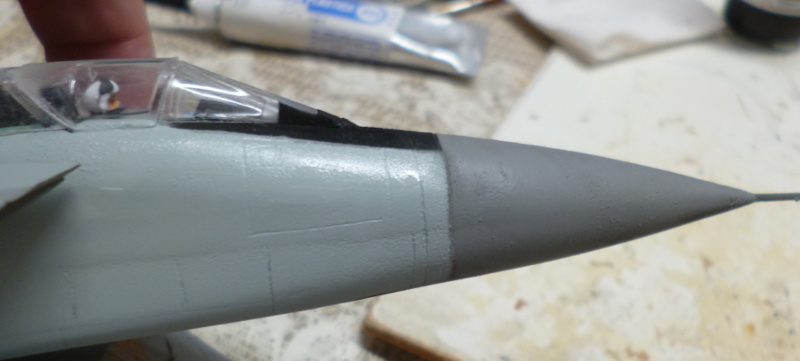
Not half bad, even if I say so myself
Of course, after some further drying it's beginning to look like the nose cone will need another layer of paint, and I can only get this right so often before I slip and really wreck it
Somehow, a lighter grey ring had formed completely around the nose cone. No idea how or why, but there it was, and it would have to go.
First attempt to fix this, was lightly hitting it with the 0.2mm airbrush, freehand, with just a scrap of handheld paper for rough masking. It wasn't pretty..
I then decided to completely re-paint the nose cone, masked, and hit it again with the airbrush. By all rights that should have resulted in a nice even finish on the nose. Dream on. Despite the fact that this area had never been exposed to the degraded black paint, some areas were rough surfaced, and refused to accept a smoothing layer of paint.
Fine, you want it rough, you get it rough
Not half bad, even if I say so myself
Of course, after some further drying it's beginning to look like the nose cone will need another layer of paint, and I can only get this right so often before I slip and really wreck it
-
Dazzled

- Modelling Gent and Scholar
- Posts: 9592
- Joined: October 1st, 2011, 11:08 pm
- Location: Mid Glamorgan, South Wales
- Contact:
Re: Rob's 31
Nice recovery Rob. Some days don't go right and you have to bite the bullet and rework things. I believe the term is "$#/£ happens" 
COLD WAR S.I.G. LEADER
Wherever there's danger, wherever there's trouble, wherever there's important work to be done....I'll be somewhere else building a model!
Wherever there's danger, wherever there's trouble, wherever there's important work to be done....I'll be somewhere else building a model!
-
rob_van_riel
- Modelling Gent and Scholar
- Posts: 3325
- Joined: November 4th, 2012, 11:28 am
- Location: The Netherlands
- Contact:
Re: Rob's 31
I handpainted the canopy frames today, then hit the plane with (another experiment...) Alclad high gloss varnish. As can be seen from the picture, two coats produce a nice gleam, and hopefully a good base for decals.
I find the canopy frames to be a bit too clunky, but there's little I can do about it. The colours on the front part of the canopy don't look right; I'll check some references and adjust as needed.
I find the canopy frames to be a bit too clunky, but there's little I can do about it. The colours on the front part of the canopy don't look right; I'll check some references and adjust as needed.
-
rob_van_riel
- Modelling Gent and Scholar
- Posts: 3325
- Joined: November 4th, 2012, 11:28 am
- Location: The Netherlands
- Contact:
Re: Rob's 31
The Alclad varnish does an admirable job of providing a smooth glossy finish, but it's still slightly tacky after two days. Maybe it will cure completely eventually (gloss varnishes can be like that), but I don't have time to wait for it. Now holding the model with a latex glove to avoid fingerprinting..
I decided to take a shot at smoothing over the ridges and gaps between the canopy parts after all, and have hit them with some Vallejo filler. Quick drying stuff, so I should be able to paint over it all soon.
The kit decals are all on now, and are waiting to set before getting hit with MicroSol. Well behaved decals, if very slightly yellowed (realised this too late to apply a few weeks in direct sunlight), and the bort numbers look a bit chipped (built in weathering?)
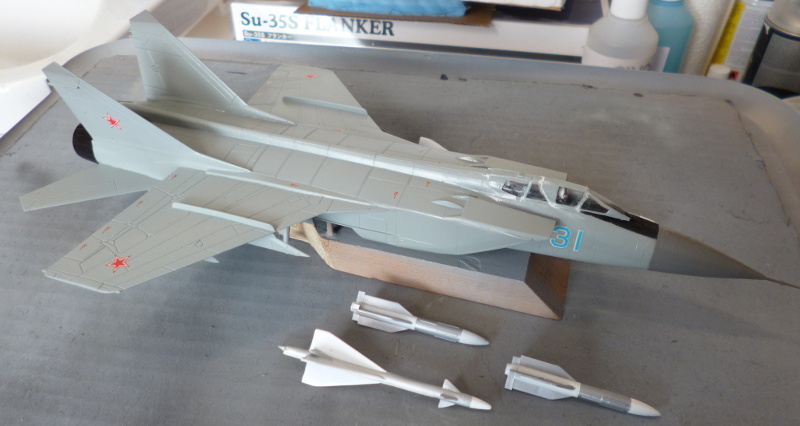
Not so visible on the picture: the wheelbays and undercarriage have been painted, and are ready for assembly.
I decided to take a shot at smoothing over the ridges and gaps between the canopy parts after all, and have hit them with some Vallejo filler. Quick drying stuff, so I should be able to paint over it all soon.
The kit decals are all on now, and are waiting to set before getting hit with MicroSol. Well behaved decals, if very slightly yellowed (realised this too late to apply a few weeks in direct sunlight), and the bort numbers look a bit chipped (built in weathering?)
Not so visible on the picture: the wheelbays and undercarriage have been painted, and are ready for assembly.
-
Old_Tonto
- Modelling Gent and Scholar
- Posts: 8061
- Joined: May 1st, 2011, 7:41 pm
- Location: Middlesbrough, Peoples Republic of Teesside.
Re: Rob's 31
Wow Rob that is turning into a stunner. Really nice work and excellent save on the nose.
The canopy framing looks fine to me. They are quite sturdy on the real thing.
The canopy framing looks fine to me. They are quite sturdy on the real thing.
2023 - A:0 B:0 C:0
Current Projects:
East German Air Force (1956-90)
South African Air Force (1958-93)
Current Projects:
East German Air Force (1956-90)
South African Air Force (1958-93)
-
rob_van_riel
- Modelling Gent and Scholar
- Posts: 3325
- Joined: November 4th, 2012, 11:28 am
- Location: The Netherlands
- Contact:
Re: Rob's 31
Thanks. The canopy frames are supposed to be sturdy, but they're also supposed to line up properly. The parts as they were left gaps and very visible steps, so steps (ahem..) had to be taken.Old_Tonto wrote:Wow Rob that is turning into a stunner. Really nice work and excellent save on the nose.
The canopy framing looks fine to me. They are quite sturdy on the real thing.
I just found out I'd completely forgotten to paint the wing tanks. Cue a scramble for the airbrush..
I've also discovered the one part of this kit that cannot be fiddled into proper shape: the lenses for the lights in the front wheel well door are significantly smaller than the holes they're supposed to cover. I hope to fix this with drops of learfix, but the holes are rather too shallow for that.
-
rob_van_riel
- Modelling Gent and Scholar
- Posts: 3325
- Joined: November 4th, 2012, 11:28 am
- Location: The Netherlands
- Contact:
Re: Rob's 31
The paint filters I bought work, but not well enough. The old paint still had very fine, but noticable grains in at after putting it through the filter. They did do an excellent job on paint with some blobs in it earlier, so I don't consider this a loss, but for paint with bad habits, it's not enough.
Since I was deternined to use this paint, I then ran it through some tissue paper, and this removed the grains nicely. It also soaked up about half of the paint, and made an ungodly mess in the process. Clearly, this isn't the solution either.
Still, that's the price of experimentation, and I did end up with enough workable paint to do the tanks.
In the mean time, I stuck on all the undecarriage bits (except the forward nose wheel door, which will go on last, even after varnishing). The undercarriage, especially the front wheel, is not particularly well engineered; large numbers of parts, that don't neccessarily fit all that well, and all have to be lined up before fixing anything. Predictably, this did not go perfectly in several ways, but it will do.
The things under wings have been stuck under wings and fuselage (why don't we have a catchy phrase that acknowledges the fuselage hardpoints?). The final decal has also been applied: the fake anti-glare panel that I so thouroughly messed up while airbrushing. In the picture, it's still soaking in MicroSol, hence the very high gloss. Don't tell the folks at MiG, but I used the side door of a DC-3 for a pattern
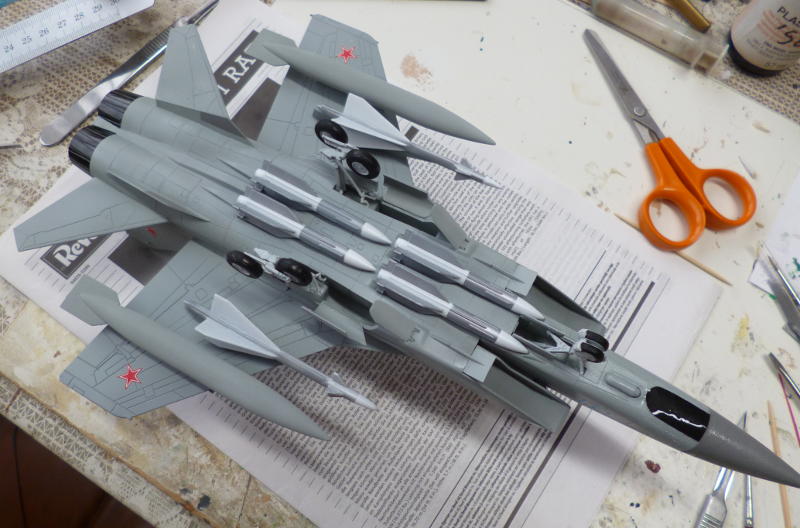
Just some finishing touches now, and a shot of satin varnish...