Martin's Tante Ju
-
JohnRatzenberger

- Why is he so confused ?
- Posts: 15727
- Joined: April 5th, 2011, 3:42 pm
- Location: Living on a sandbar - Nags Head, NC.
Re: Martin's Tante Ju
Hardly know the fuselage had a warp - nice work.
John Ratzenberger 
It's my model and I'll do what I want with it.
It's my model and I'll do what I want with it.

Re: Martin's Tante Ju
Thanks, John!
In lieu of real progress, here are some pictures:


As well as the engines and cowlings that I need to do, I'll have to add some strip to the front edge of the cockpit opening as the transparency is a teeny bit (well, massively actually) too small!
regards,
Martin
In lieu of real progress, here are some pictures:
As well as the engines and cowlings that I need to do, I'll have to add some strip to the front edge of the cockpit opening as the transparency is a teeny bit (well, massively actually) too small!
regards,
Martin
Martin R
"the 'R' stands for 'Representative'."
"the 'R' stands for 'Representative'."
Re: Martin's Tante Ju
Oh, and as a bonus, here's another on the build pile in the same scheme. Tell me: how am I going to do splinter camo over corrugations?


regards,
Martin
regards,
Martin
Martin R
"the 'R' stands for 'Representative'."
"the 'R' stands for 'Representative'."
Re: Martin's Tante Ju
Hi folks!
Sorry I have been a bit quiet, but lots going on, leaving little time for modelling. Progress has been made, but I'm waiting for photobucket to play. To bring you up to speed:
Cowlings have been primed and painted yellow, and engines painted and installed;
Canopy has been kleared (to little effect); sides and front of cockpit have been shimmed with plastic card, filled and rubbed down, improving the fit of the canopy from "doesn't" to ok. Canopy has then been added;
Flaps and ailerons have been added.
So, now I just have to add the below engine gubbins, mask the transparencies and apply a thick coat of primer to highlight the myriad of issues that still require work. After sorting those out, time for some paint!
I must admit, this has not been an easy build thus far: industrial strength flash, warped parts and mould shift have all been conspicuous issues. If I get tante ju looking halfway decent, it'll be a real achievement.
Regards and hope you are all well.
Martin
Martin R
"the 'R' stands for 'Representative'."
"the 'R' stands for 'Representative'."
-
iggie

- Modelling Gent and Scholar
- Posts: 23417
- Joined: July 31st, 2013, 11:04 am
- Location: North Somercotes, Lincolnshire
- Contact:
Re: Martin's Tante Ju
Sounds like you are going to need a rest after this one Martin!
Looking forward to the pictures when Photobucket behaves, or you could use the 'add images' button down there (the arrow wasn't supposed to be that big, sorry!!)

Looking forward to the pictures when Photobucket behaves, or you could use the 'add images' button down there (the arrow wasn't supposed to be that big, sorry!!)
Best wishes
Jim
If you can walk away from a landing, it's a good landing. If you use the airplane the next day, it's an outstanding landing
"Never put off till tomorrow, what you can do the day after tomorrow"
Jim
If you can walk away from a landing, it's a good landing. If you use the airplane the next day, it's an outstanding landing
"Never put off till tomorrow, what you can do the day after tomorrow"
Re: Martin's Tante Ju
PB now playing, so photos:


regards,
Martin
regards,
Martin
Martin R
"the 'R' stands for 'Representative'."
"the 'R' stands for 'Representative'."
-
AndrewR

- In the basement lab
- Posts: 24059
- Joined: April 5th, 2011, 4:13 pm
- Location: Ottawa, Ontario, The Great White North
- Contact:
Re: Martin's Tante Ju
That is looking very tidy Martin, despite the issues with a kit of that age.
Up in the Great White North
Re: Martin's Tante Ju
Hi folks,
More progress made: a coat of primer has been applied, having masked off the transparencies. I have also applied a first coat of Hellblau on the undersides. However, there a few greeblies I will have to touch up. PB still having problems and my computer is on its last legs.
Regards,
Martin
More progress made: a coat of primer has been applied, having masked off the transparencies. I have also applied a first coat of Hellblau on the undersides. However, there a few greeblies I will have to touch up. PB still having problems and my computer is on its last legs.
Regards,
Martin
Martin R
"the 'R' stands for 'Representative'."
"the 'R' stands for 'Representative'."
-
Zee28

- Modelling Gent and Scholar
- Posts: 2834
- Joined: March 8th, 2013, 10:21 pm
- Location: South London
Re: Martin's Tante Ju
Martin, sorry to come in so late on this. I've recently built one of these and it's a great old kit. I did the same versions as you and masked the camo with conventional Tamiya masking tape and then painstakingly pushed the tape down into every single corrugation with the end of a cocktail stick. It took an age and tested my patience to the limit, but after spraying I had absolutely zero bleed, so it was worth it.
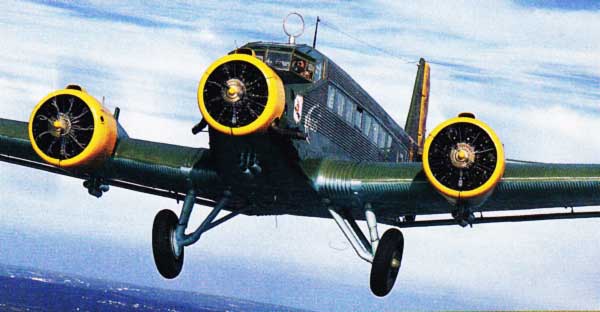
The only thing I'd warn you about if you're doing the wheeled version is how Airfix have tooled the undercarriage, here you can benefit from my mistake. They have tooled it in it's 'Relaxed' state, as if it was in-flight with the U/C hanging. In real life it compresses quite dramatically when weighted and under load on the ground.
The outer struts need shortening dramatically to get it to stand right. It should stand so it's wheels are angled so the tops of the tyres lean inwards a bit. If built straight out of the box the tops of the tyres lean outwards and the model sits way too high.
I got it completely wrong but I didn't realise until I saw a real one parked at Duxford.
Photos will make my words make more sense. Here it is in flight which is how Airfix have moulded it:
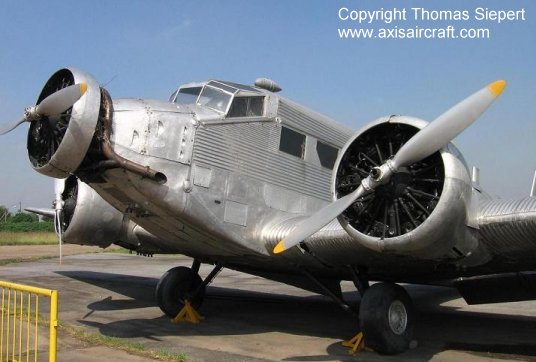
Here it is on the ground showing the quite dramatic difference in the angle of the U/C:
Hope this helps mate,
Zee28
The only thing I'd warn you about if you're doing the wheeled version is how Airfix have tooled the undercarriage, here you can benefit from my mistake. They have tooled it in it's 'Relaxed' state, as if it was in-flight with the U/C hanging. In real life it compresses quite dramatically when weighted and under load on the ground.
The outer struts need shortening dramatically to get it to stand right. It should stand so it's wheels are angled so the tops of the tyres lean inwards a bit. If built straight out of the box the tops of the tyres lean outwards and the model sits way too high.
I got it completely wrong but I didn't realise until I saw a real one parked at Duxford.
Photos will make my words make more sense. Here it is in flight which is how Airfix have moulded it:
Here it is on the ground showing the quite dramatic difference in the angle of the U/C:
Hope this helps mate,
Zee28
Re: Martin's Tante Ju
Zee,
I noticed the wheels had an outward cant and thought that was likely not to be right. However, I just want to get this build finished, so it's being done as it was moulded, I'm afraid.
The fact has been stored away if I'm ever tempted to build this type again!
regards,
Martin
I noticed the wheels had an outward cant and thought that was likely not to be right. However, I just want to get this build finished, so it's being done as it was moulded, I'm afraid.
The fact has been stored away if I'm ever tempted to build this type again!
regards,
Martin
Martin R
"the 'R' stands for 'Representative'."
"the 'R' stands for 'Representative'."
Re: Martin's Tante Ju
OK, I've painted a coat of RLM70 over the topsides. It's a bit rough and I'll need to touch up the undersides in due course. However, PB is completely refusing to resize my images, so nothing to show.
I'm a bit frustrated, to be honest!
regards,
Martin
I'm a bit frustrated, to be honest!
regards,
Martin
Martin R
"the 'R' stands for 'Representative'."
"the 'R' stands for 'Representative'."
Re: Martin's Tante Ju
PB has finally started playing again. Hooray! Anyway, latest status of the flash monster:


regards,
Martin
regards,
Martin
Re: Martin's Tante Ju
I resprayed the rudder last night (having masked up the rear fuselage, fin and tailplanes), then added another coat of schwartzgrun on top. One more coat tonight and I'll start masking for the splinter.
regards,
Martin
regards,
Martin
Martin R
"the 'R' stands for 'Representative'."
"the 'R' stands for 'Representative'."
Re: Martin's Tante Ju
Thanks, Andrew. It's getting there, at least.AndrewR wrote:Looking good, Martin.
Your Caproni's looking good, too.
regards,
Martin