Mav's Matchbox FRS.1 ***FINISHED***
-
IronMan129
- Modelling Gent and Scholar
- Posts: 4385
- Joined: November 23rd, 2012, 4:20 pm
Re: Mav's Matchbox FRS.1
Thanks for the heads up Andrew I'll definitely look into doing that, a little dry fitting first will help me out.
-
TobyC

- Modelling Gent and Scholar
- Posts: 5540
- Joined: January 15th, 2013, 2:13 pm
- Location: Cobham, Surrey. Blighty
Re: Mav's Matchbox FRS.1
Nice work so far on a Golden oldie
Enjoyment over accuracy. That's my motto
-
IronMan129
- Modelling Gent and Scholar
- Posts: 4385
- Joined: November 23rd, 2012, 4:20 pm
Re: Mav's Matchbox FRS.1
Thank you Toby.
Its funny how much love a build can make you have for a particular type of aircraft.
When I started this build I wasn't overly font of the FRS.1, now though I think its one of the best looking harriers out there, she's going to look nice sat next to the AV-8A and GR.1.
Its funny how much love a build can make you have for a particular type of aircraft.
When I started this build I wasn't overly font of the FRS.1, now though I think its one of the best looking harriers out there, she's going to look nice sat next to the AV-8A and GR.1.
-
DavidWomby

- Modelling Gent and Scholar
- Posts: 11750
- Joined: May 1st, 2011, 8:09 pm
- Location: Florida, USA
Re: Mav's Matchbox FRS.1
I have to agree that I think the FRS1 is the best looking Harrier variant plus those old Mbox kits can be so much fun - this is a great combination.
David
David
-
IronMan129
- Modelling Gent and Scholar
- Posts: 4385
- Joined: November 23rd, 2012, 4:20 pm
Re: Mav's Matchbox FRS.1
I got chance to do some more work on the Sea Harrier today.
I have been thinking about what configuration and loadout I should have her in since I started this builds.
I have settled on having a refueling probe as I won't be using it on any other future harrier build.
I'm going to have twin sidewinder mounts on each of the outer mounted pilons, standard drop tanks on the inner pilons and I'm still unsure yet if I want gun pods mounted on the belly or not.
If I do I will be stealing them from the GR.1 kit as I can't find replacements for a good price.
So onto tonights progress.
I have sanded down the fuselage joins, added the tail boom, nose cone, nose antenna and refueling probe.
I've also made a start painting the wings and landing gear.
Only one pic tonight.
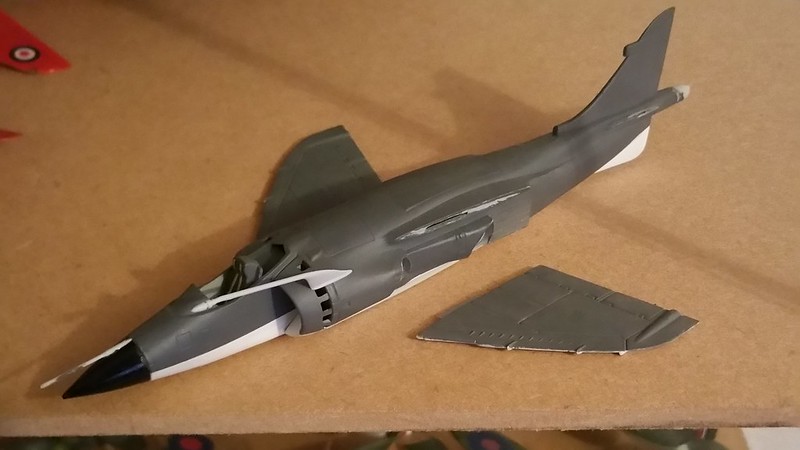
More tomorrow hopefully.
I have been thinking about what configuration and loadout I should have her in since I started this builds.
I have settled on having a refueling probe as I won't be using it on any other future harrier build.
I'm going to have twin sidewinder mounts on each of the outer mounted pilons, standard drop tanks on the inner pilons and I'm still unsure yet if I want gun pods mounted on the belly or not.
If I do I will be stealing them from the GR.1 kit as I can't find replacements for a good price.
So onto tonights progress.
I have sanded down the fuselage joins, added the tail boom, nose cone, nose antenna and refueling probe.
I've also made a start painting the wings and landing gear.
Only one pic tonight.
More tomorrow hopefully.
-
IronMan129
- Modelling Gent and Scholar
- Posts: 4385
- Joined: November 23rd, 2012, 4:20 pm
Re: Mav's Matchbox FRS.1
I'm really cracking on with this one now.
Tonight I got the wings, horizontal stabilizers and landing gear on and along with the tail boom, nose pitot tube and refueling probe all painted too.
I also added a borrowed set of gun pods from the Airfix FA.2 kit, they're borrowed as I am being sent a set which I'll return to the FA.2 when they arrive.
I know they are about 4mm too short as it seems but atleast they're from another Sea Harrier.
Here are a couple of pics of her sat next to a 4 Squadron GR.3.
I think painting the engine fan silver was a really good idea as its really visible through the intake and I'm still very impressed with the Ejector Seat:
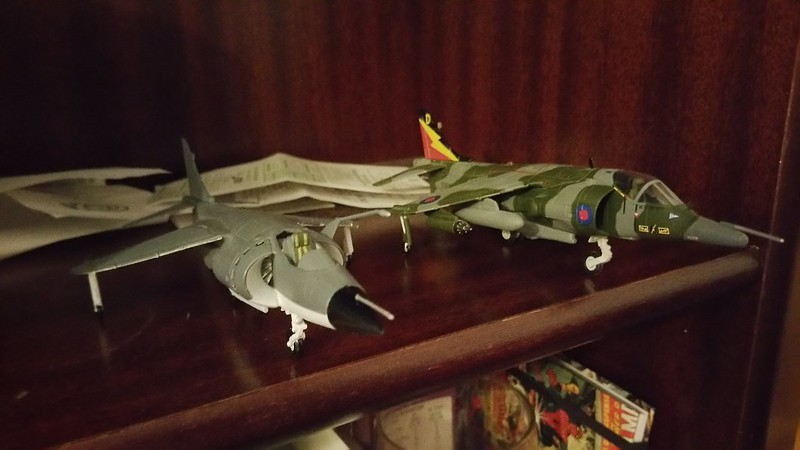
I tried using HDR on my phone but its only made a very tiny difference:
C&c welcome as always.
Tonight I got the wings, horizontal stabilizers and landing gear on and along with the tail boom, nose pitot tube and refueling probe all painted too.
I also added a borrowed set of gun pods from the Airfix FA.2 kit, they're borrowed as I am being sent a set which I'll return to the FA.2 when they arrive.
I know they are about 4mm too short as it seems but atleast they're from another Sea Harrier.
Here are a couple of pics of her sat next to a 4 Squadron GR.3.
I think painting the engine fan silver was a really good idea as its really visible through the intake and I'm still very impressed with the Ejector Seat:
I tried using HDR on my phone but its only made a very tiny difference:
C&c welcome as always.
-
IronMan129
- Modelling Gent and Scholar
- Posts: 4385
- Joined: November 23rd, 2012, 4:20 pm
Re: Mav's Matchbox FRS.1
I was looking online for a while and I found this pic:
Is this load out accurate?
If so would the twin bomb rack be used with rockets on the outer pilons and a single bomb mounted on the center pilon?
Is this load out accurate?
If so would the twin bomb rack be used with rockets on the outer pilons and a single bomb mounted on the center pilon?
-
IronMan129
- Modelling Gent and Scholar
- Posts: 4385
- Joined: November 23rd, 2012, 4:20 pm
Re: Mav's Matchbox FRS.1
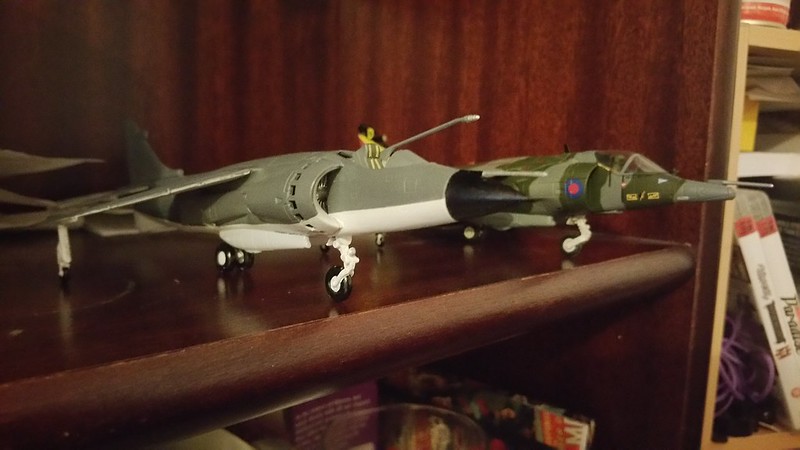
Not a lot of progress has been made today but I decided to post a reply to keep the thread alive.
Basically just finishing off the grey paint work and making her a more solid model.
I'm going to finish off the white and adding the last little details as well as adding the 2 black antenna to the top of the fuselage behind the canopy.
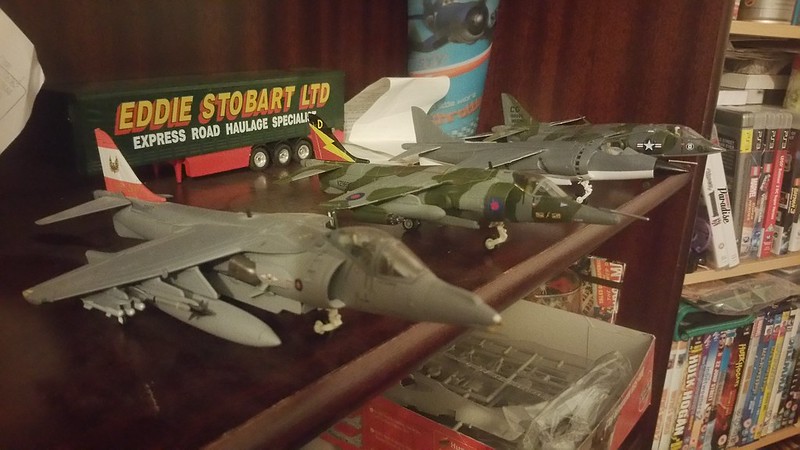
I haven't taken a pic as she is in therers no big changes to see through the camera lens but here is a pic of one of each type of Harrier in my collection.
Basically just finishing off the grey paint work and making her a more solid model.
I'm going to finish off the white and adding the last little details as well as adding the 2 black antenna to the top of the fuselage behind the canopy.
I haven't taken a pic as she is in therers no big changes to see through the camera lens but here is a pic of one of each type of Harrier in my collection.
-
IronMan129
- Modelling Gent and Scholar
- Posts: 4385
- Joined: November 23rd, 2012, 4:20 pm
Re: Mav's Matchbox FRS.1
Last night I applied a coat of Klear in preparation for decals.
The decals have been batting in sun light for a couple of days to try and deyellow them.
Also If anyone has any info on any weapons the FRS.1 carried please feel free to either post in this thread or pm me as I want to learn anything I can in order to get an accurate ordinance load out.
That includes adaptors for missiles and things.
-
DavidWomby
- Modelling Gent and Scholar
- Posts: 11750
- Joined: May 1st, 2011, 8:09 pm
- Location: Florida, USA
Re: Mav's Matchbox FRS.1
I think the most typical load was drop tanks on inner pylons and single AIM-9s on outer pylons with gun pods on fuselage and nothing on centreline.
David
David
-
splash

- Senior Service Rotorhead
- Posts: 13828
- Joined: May 1st, 2011, 11:02 am
- Location: Somerset England
Re: Mav's Matchbox FRS.1
I would agree with David.dwomby wrote:I think the most typical load was drop tanks on inner pylons and single AIM-9s on outer pylons with gun pods on fuselage and nothing on centreline.
David
Regards Splash
My work bench is starting to look like Portsmouth Naval Dockyard.
-
IronMan129
- Modelling Gent and Scholar
- Posts: 4385
- Joined: November 23rd, 2012, 4:20 pm
Re: Mav's Matchbox FRS.1
Thanks for the advice guys!
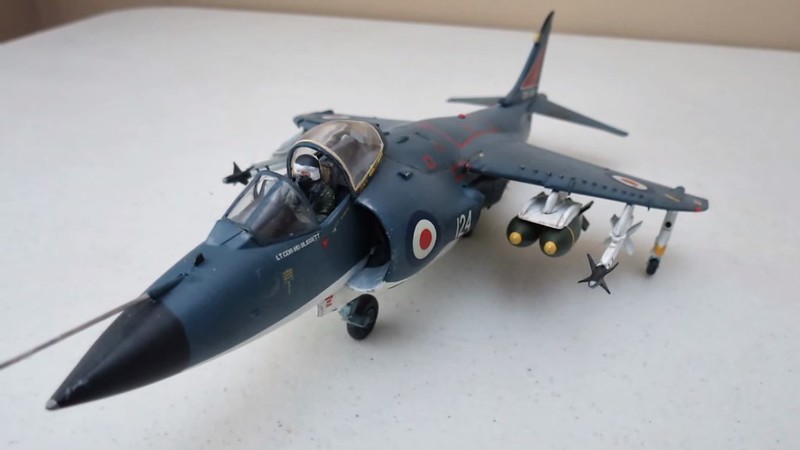
Ok last night I got onto decaling.
I can't believe how nice these decals are to work with!
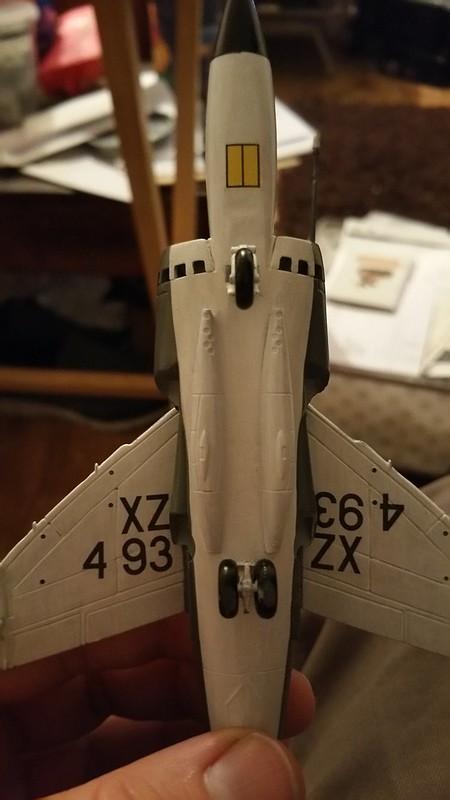
Obviously I have a lot more to do decal wise but here is a shot of the belly so far:
I also managed to get a half decent result on the red top surface decals:
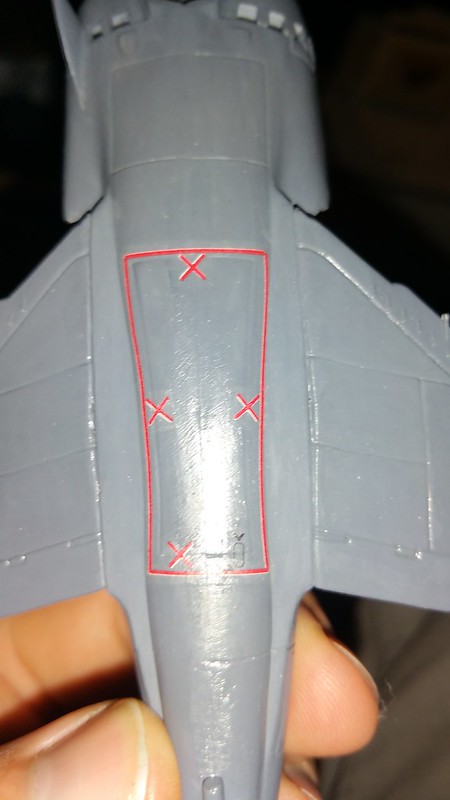
I was happy until the wing joins started to get to me so in order to not mess up the decals I've decided to make my own brush on putty, its going to take 24 hours to be usable so the wing joins won't be filled till tomorrow.

C&c welcome.
Ok last night I got onto decaling.
I can't believe how nice these decals are to work with!
Obviously I have a lot more to do decal wise but here is a shot of the belly so far:
I also managed to get a half decent result on the red top surface decals:
I was happy until the wing joins started to get to me so in order to not mess up the decals I've decided to make my own brush on putty, its going to take 24 hours to be usable so the wing joins won't be filled till tomorrow.
C&c welcome.
-
fredk

- Modelling Gent and Scholar
- Posts: 6195
- Joined: May 1st, 2012, 6:25 am
- Location: Donaghadee, N'rn Ir'n
Re: Mav's Matchbox FRS.1
You sure you want to use that?
Depending how deep the valley is I either use Vallejo putty, or run a bit of superglue into it.
Depending how deep the valley is I either use Vallejo putty, or run a bit of superglue into it.
Al speling misteaks aer all mi own werk..
Its not just how good your painting is, its how good the touch-ups are too.
Its not just how good your painting is, its how good the touch-ups are too.
-
IronMan129
- Modelling Gent and Scholar
- Posts: 4385
- Joined: November 23rd, 2012, 4:20 pm
Re: Mav's Matchbox FRS.1
What's wrong with using home made putty?
-
fredk
- Modelling Gent and Scholar
- Posts: 6195
- Joined: May 1st, 2012, 6:25 am
- Location: Donaghadee, N'rn Ir'n
Re: Mav's Matchbox FRS.1
Sorry; I thought - without proper data - that perhaps it was a mix of something aggressive which might attack your paint job.
Al speling misteaks aer all mi own werk..
Its not just how good your painting is, its how good the touch-ups are too.
Its not just how good your painting is, its how good the touch-ups are too.