Shaun's Cold War Builds
-
Stuart

- Raider of the Lost Ark Royal
- Posts: 19451
- Joined: February 25th, 2013, 4:55 pm
- Location: North Wales
- Contact:
Re: Shaun's Cold War Builds
You sir - are mad... just thought you should know 
Stuart Templeton I may not be good but I'm slow...
My Blog: https://stuartsscalemodels.blogspot.com/
My Blog: https://stuartsscalemodels.blogspot.com/
-
Dazzled

- Modelling Gent and Scholar
- Posts: 9592
- Joined: October 1st, 2011, 11:08 pm
- Location: Mid Glamorgan, South Wales
- Contact:
Re: Shaun's Cold War Builds
Sir T wrote:You sir - are mad... just thought you should know
I think the term is "eccentric"......with a side helping of obsessive
But definitely talented
I can't wait to see these in the flesh.
COLD WAR S.I.G. LEADER
Wherever there's danger, wherever there's trouble, wherever there's important work to be done....I'll be somewhere else building a model!
Wherever there's danger, wherever there's trouble, wherever there's important work to be done....I'll be somewhere else building a model!
-
ShaunW
- NOT the sheep
- Posts: 26188
- Joined: November 26th, 2011, 6:11 pm
- Location: Pontefract West Yorkshire
Re: Shaun's Cold War Builds
Cheers boys. Let the madness continue 
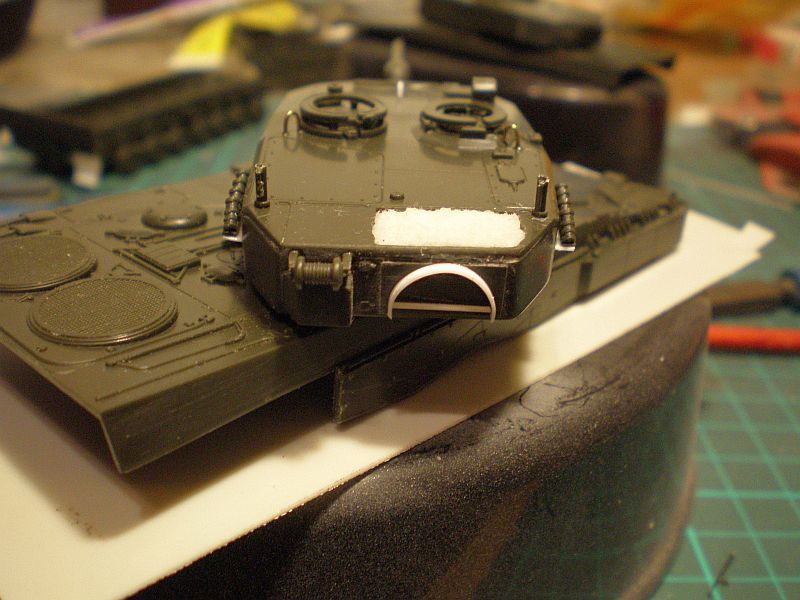
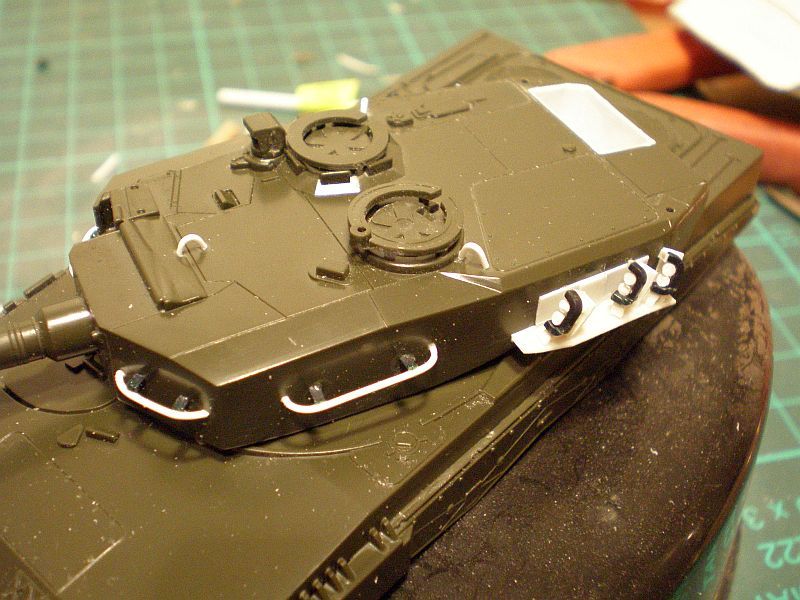
For the latter part of the week I've been fighting the mother of all head colds but, mother's brave little soldier that I am, I have managed to carry out more work. I've decided to get the German version ready for paint and to that end I have completed the turret detailing. Grab rails are OOB and I have fashioned the prominent turret lifting rings that are missing from the kit, but are visible in plenty of photos, from brass wire. The foremost ring was also originally made from brass but I managed to knock it off during handling of the turret, lost it and decided to replace it with one made from 0.5mm Plastruct rod to save the hassle of mixing up more two-part epoxy resin for the sake of one component. Ho hum.
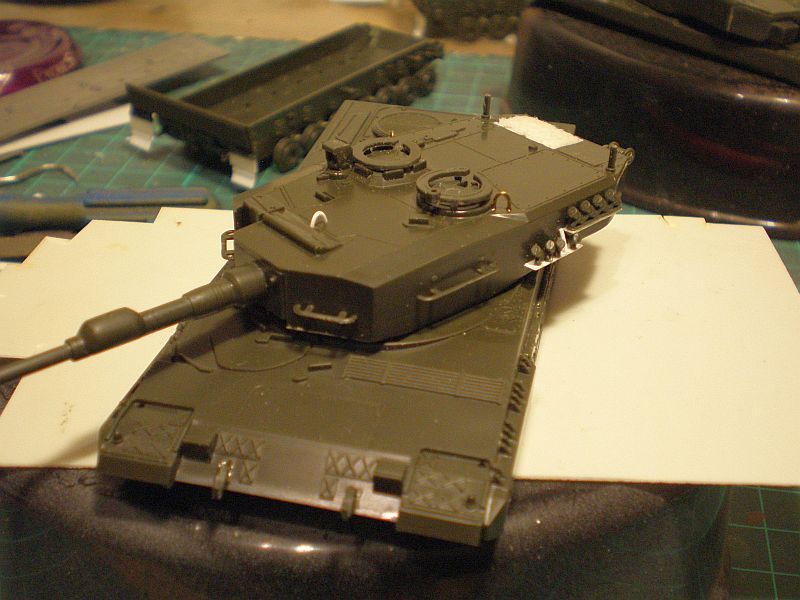
At the rear, I have fashioned a tarp from tissue soaked in PVA diluted in water to fill the rear bin. The tarp has been textured with a cocktail stick and hopefully that will show when it is painted. Unfortunately, being white, the tarp has not come across very well in my pics. I have also added the bow shaped object to the rear of the turret using an off cut strip of plastic card and a bit of the aforementioned Plastruct rod. No idea what the thing is but plenty of these tanks sport one so I thought mine should too! I have also removed the rearmost section of the side skirts. Many photos show tanks with this section removed - perhaps they clog with mud? and I thought at least one of my models should reflect that. Photos also show that the rear section can actually be latched in the up position so I have retained the clipped off parts to give myself that option.
I now need to fit the driver's mirrors and the headlights and this model will be ready for its initial coat of paint.
Thanks for looking.
For the latter part of the week I've been fighting the mother of all head colds but, mother's brave little soldier that I am, I have managed to carry out more work. I've decided to get the German version ready for paint and to that end I have completed the turret detailing. Grab rails are OOB and I have fashioned the prominent turret lifting rings that are missing from the kit, but are visible in plenty of photos, from brass wire. The foremost ring was also originally made from brass but I managed to knock it off during handling of the turret, lost it and decided to replace it with one made from 0.5mm Plastruct rod to save the hassle of mixing up more two-part epoxy resin for the sake of one component. Ho hum.

At the rear, I have fashioned a tarp from tissue soaked in PVA diluted in water to fill the rear bin. The tarp has been textured with a cocktail stick and hopefully that will show when it is painted. Unfortunately, being white, the tarp has not come across very well in my pics. I have also added the bow shaped object to the rear of the turret using an off cut strip of plastic card and a bit of the aforementioned Plastruct rod. No idea what the thing is but plenty of these tanks sport one so I thought mine should too! I have also removed the rearmost section of the side skirts. Many photos show tanks with this section removed - perhaps they clog with mud? and I thought at least one of my models should reflect that. Photos also show that the rear section can actually be latched in the up position so I have retained the clipped off parts to give myself that option.

I now need to fit the driver's mirrors and the headlights and this model will be ready for its initial coat of paint.
Thanks for looking.
Doing - Tamiya 1/35th Universal Carrier.
Work is the curse of the modelling classes!
IPMS#12300
Work is the curse of the modelling classes!
IPMS#12300
-
iggie

- Modelling Gent and Scholar
- Posts: 23438
- Joined: July 31st, 2013, 11:04 am
- Location: North Somercotes, Lincolnshire
- Contact:
Re: Shaun's Cold War Builds
Great work Shaun; oob these make up into very nice finished models but your extra work and attention to detail will make something special!
Best wishes
Jim
If you can walk away from a landing, it's a good landing. If you use the airplane the next day, it's an outstanding landing
"Never put off till tomorrow, what you can do the day after tomorrow"
Jim
If you can walk away from a landing, it's a good landing. If you use the airplane the next day, it's an outstanding landing
"Never put off till tomorrow, what you can do the day after tomorrow"
-
Stuart
- Raider of the Lost Ark Royal
- Posts: 19451
- Joined: February 25th, 2013, 4:55 pm
- Location: North Wales
- Contact:
Re: Shaun's Cold War Builds
That's looking really smart Shaun - those are some great improvements.
I hope you're feeling better.
I hope you're feeling better.
Stuart Templeton I may not be good but I'm slow...
My Blog: https://stuartsscalemodels.blogspot.com/
My Blog: https://stuartsscalemodels.blogspot.com/
-
Dazzled
- Modelling Gent and Scholar
- Posts: 9592
- Joined: October 1st, 2011, 11:08 pm
- Location: Mid Glamorgan, South Wales
- Contact:
Re: Shaun's Cold War Builds
It's all looking great Shaun. 
COLD WAR S.I.G. LEADER
Wherever there's danger, wherever there's trouble, wherever there's important work to be done....I'll be somewhere else building a model!
Wherever there's danger, wherever there's trouble, wherever there's important work to be done....I'll be somewhere else building a model!
-
ShaunW
- NOT the sheep
- Posts: 26188
- Joined: November 26th, 2011, 6:11 pm
- Location: Pontefract West Yorkshire
Re: Shaun's Cold War Builds
Cheers boys. I was hoping to do more today but unfortunately the cold lurgy has got the better of me and I couldn't concentrate well enough. Looking on the bright side - it's nearly the holidays 
Doing - Tamiya 1/35th Universal Carrier.
Work is the curse of the modelling classes!
IPMS#12300
Work is the curse of the modelling classes!
IPMS#12300
-
Dazzled
- Modelling Gent and Scholar
- Posts: 9592
- Joined: October 1st, 2011, 11:08 pm
- Location: Mid Glamorgan, South Wales
- Contact:
Re: Shaun's Cold War Builds
With my dodgy internet access over the last few days I missed the last post in this thread. I hope you're feeling better mate. 
It must be a bad one to keep you away from the modelling bench
It must be a bad one to keep you away from the modelling bench
COLD WAR S.I.G. LEADER
Wherever there's danger, wherever there's trouble, wherever there's important work to be done....I'll be somewhere else building a model!
Wherever there's danger, wherever there's trouble, wherever there's important work to be done....I'll be somewhere else building a model!
-
ShaunW
- NOT the sheep
- Posts: 26188
- Joined: November 26th, 2011, 6:11 pm
- Location: Pontefract West Yorkshire
Re: Shaun's Cold War Builds
I'm feeling quite a lot better Daz ta very much and now the cold has started to subside it's back to business at the bench. Over the weekend I started further work on the earlier of the two kits (which I note from the interweb appeared in a Matchbox box), that I hope to finish as a Dutch version of the vehicle. I have elected to fit the side skirts in full on this model. In addition I have also opened up the turret storage bin using the same chain drilling technique as on the other model. This time I am going to portray the bin as being empty, which is not an uncommon sight on the full-size. Having an empty bin has obliged me to create interior walls and a floor using thin plastic card as these bins do not have a lid. The photo shows the plastic card inserts drying prior to final trimming to height using sandpaper and micromesh and the interior joins will also require a touch of filler.
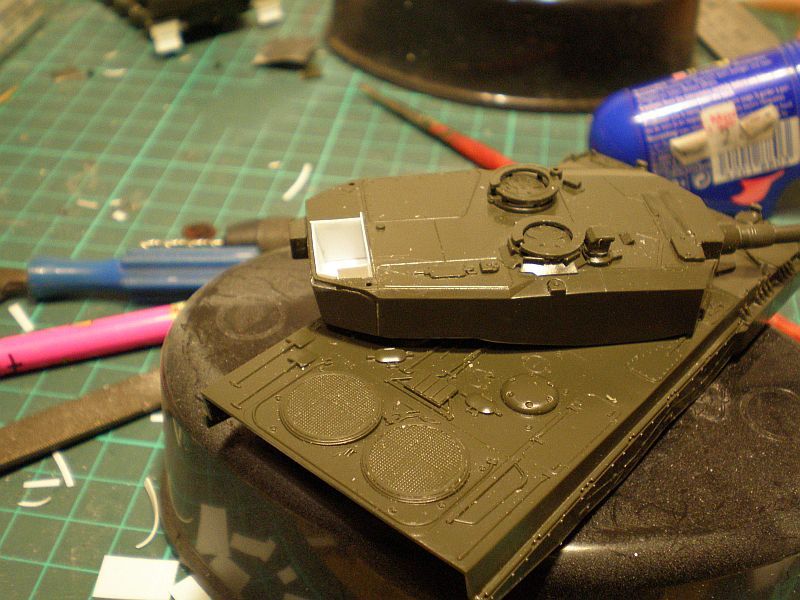
This model will require a number of parts to be scratch built, which should help to keep me out of mischief over the holiday period!
Thanks for looking.

This model will require a number of parts to be scratch built, which should help to keep me out of mischief over the holiday period!
Thanks for looking.
Doing - Tamiya 1/35th Universal Carrier.
Work is the curse of the modelling classes!
IPMS#12300
Work is the curse of the modelling classes!
IPMS#12300
-
Stuart
- Raider of the Lost Ark Royal
- Posts: 19451
- Joined: February 25th, 2013, 4:55 pm
- Location: North Wales
- Contact:
Re: Shaun's Cold War Builds
That's coming along nicely Shaun - Glad to hear you're feeling better.
Stuart Templeton I may not be good but I'm slow...
My Blog: https://stuartsscalemodels.blogspot.com/
My Blog: https://stuartsscalemodels.blogspot.com/
-
ShaunW
- NOT the sheep
- Posts: 26188
- Joined: November 26th, 2011, 6:11 pm
- Location: Pontefract West Yorkshire
Re: Shaun's Cold War Builds
I've had a bit of camera trouble and hence there hasn't been an update for a while. The battery retaining catch in the camera has become weak and is not holding the battery against its terminals firmly enough, causing the camera to throw a wobbler. I've managed to bodge it for the time being, which has saved me having to brave the Christmas shopping crowds, but it looks like I will be having to invest in a replacement camera before too long. Should be some sales on in January!
I've been busy on these builds during the hols where family time has allowed and the Dutch turret is now largely completed. The smoke launchers are a totally different pattern to those on the German vehicle and are, I think, unique to the Dutch Army. Digging around in my spares boxes, I found some brackets left over from a 1/35th Tamiya Tiger II which I used to fashion the C shaped covers and then bits of plastic rod and card were used to make the rest. As is often the case in this scale, the job was made more difficult because of the small size of the components. I also made grab rails for the turret out of 0.5mm Plastruct rod and some other spare bracket thingies from the King Tiger sprues and the turret lifting rings were also fashioned from the Plastruct rod.
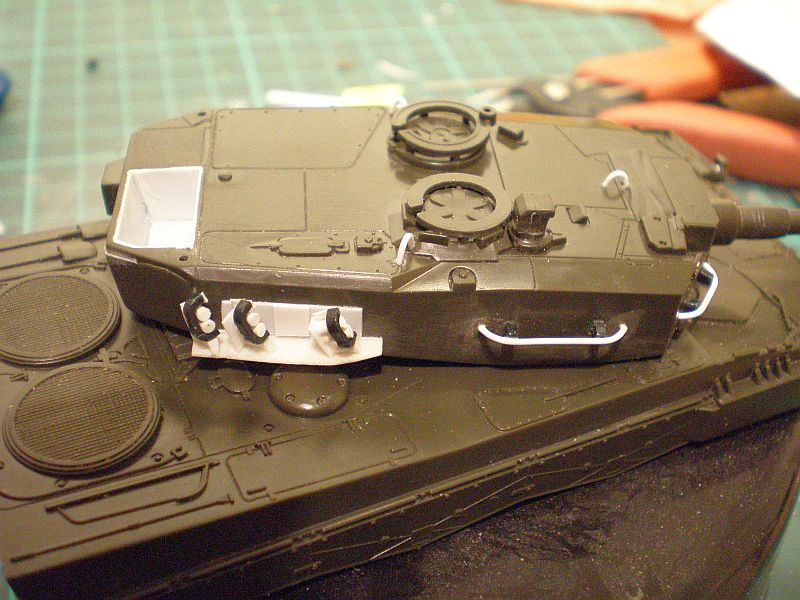
Next up, I'll try to make some driving mirrors and I might also amuse myself by having a go at scratching up a Hoffman gunfire simulator. Photos of Leopard 2 tanks show that they used a brute of a Hoffman, with far more barrels than I've seen on other NATO vehicles.
Thanks for looking.
I've been busy on these builds during the hols where family time has allowed and the Dutch turret is now largely completed. The smoke launchers are a totally different pattern to those on the German vehicle and are, I think, unique to the Dutch Army. Digging around in my spares boxes, I found some brackets left over from a 1/35th Tamiya Tiger II which I used to fashion the C shaped covers and then bits of plastic rod and card were used to make the rest. As is often the case in this scale, the job was made more difficult because of the small size of the components. I also made grab rails for the turret out of 0.5mm Plastruct rod and some other spare bracket thingies from the King Tiger sprues and the turret lifting rings were also fashioned from the Plastruct rod.


Next up, I'll try to make some driving mirrors and I might also amuse myself by having a go at scratching up a Hoffman gunfire simulator. Photos of Leopard 2 tanks show that they used a brute of a Hoffman, with far more barrels than I've seen on other NATO vehicles.
Thanks for looking.
Doing - Tamiya 1/35th Universal Carrier.
Work is the curse of the modelling classes!
IPMS#12300
Work is the curse of the modelling classes!
IPMS#12300
-
Dazzled
- Modelling Gent and Scholar
- Posts: 9592
- Joined: October 1st, 2011, 11:08 pm
- Location: Mid Glamorgan, South Wales
- Contact:
Re: Shaun's Cold War Builds
Outstanding work on that turret Shaun. You're really setting a high bar for the SMW display
COLD WAR S.I.G. LEADER
Wherever there's danger, wherever there's trouble, wherever there's important work to be done....I'll be somewhere else building a model!
Wherever there's danger, wherever there's trouble, wherever there's important work to be done....I'll be somewhere else building a model!
-
ShaunW
- NOT the sheep
- Posts: 26188
- Joined: November 26th, 2011, 6:11 pm
- Location: Pontefract West Yorkshire
Re: Shaun's Cold War Builds
Cheers Daz. I'm really enjoying these builds, though it has to be said that 1/35th would have saved me a bit of eye strain!
Doing - Tamiya 1/35th Universal Carrier.
Work is the curse of the modelling classes!
IPMS#12300
Work is the curse of the modelling classes!
IPMS#12300
-
Stuart
- Raider of the Lost Ark Royal
- Posts: 19451
- Joined: February 25th, 2013, 4:55 pm
- Location: North Wales
- Contact:
Re: Shaun's Cold War Builds
I agree Darryl - please hide my Challenger at the back as it won't compare to thisDazzled wrote:Outstanding work on that turret Shaun. You're really setting a high bar for the SMW display
Stuart Templeton I may not be good but I'm slow...
My Blog: https://stuartsscalemodels.blogspot.com/
My Blog: https://stuartsscalemodels.blogspot.com/
-
ShaunW
- NOT the sheep
- Posts: 26188
- Joined: November 26th, 2011, 6:11 pm
- Location: Pontefract West Yorkshire
Re: Shaun's Cold War Builds
Thanks for the vote of confidence Stuart and I'm sure your Challenger will turn out fine, your builds usually look good to me. I've yet to try the link and length tracks on these builds and this will be my first time with that method of track construction.... could be tears before bedtime!
Anyway, on the penultimate day of the year I have now completed the turret on the Dutch Leopard. I decided for a laugh to have a go at scratching up a Hoffman gunfire simulator and I think it has turned out reasonably well. The Hoffman fitted to these tanks is a 17 barrel monster, with 9 lower barrels and 8 upper ones. I used plastic rod for the barrels and plastic card for the rest, making constant reference to photos. The Hoffman is secured to the turret roof using an attachment plate secured through the turret front lifting ring and I used scrap Plastruct rod to make the attachment rod and turret ring. The whole thing was a bit of a fiddly nightmare but I like a challenge Just behind the loader's hatch is a large storage box that most Dutch tanks seem to sport and I made this using a leftover part from an Airfix Apache helicopter mounted to a base of plastic card and with a Plastruct rod surround and plastic card beams on top. Not 100% accurate but near enough for jazz! At the hull front can also be seen the driver's mirrors, which were made from shaped plastic card and Plastruct rod. The mirrors have been modelled in a typical stored position, flat to the hull.
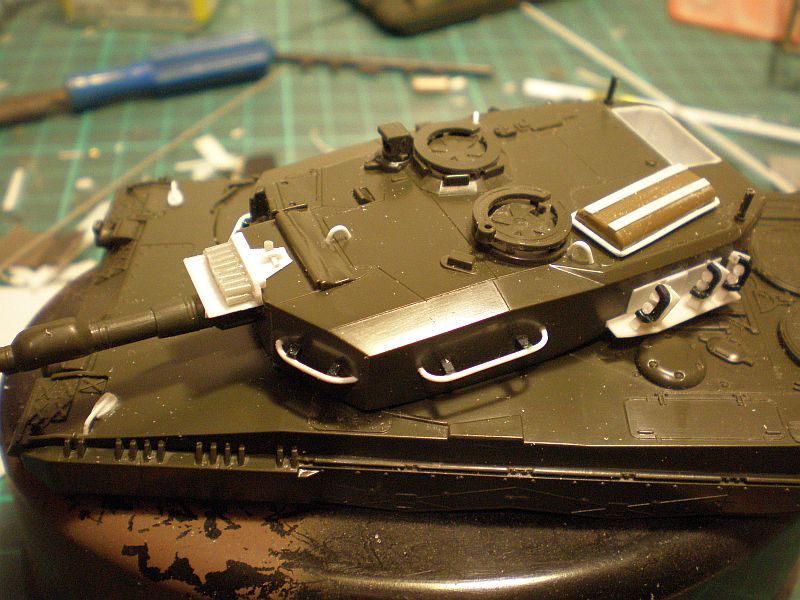
All being well, I hope to apply the first of the paint to both models tomorrow.
Thanks for looking.
Anyway, on the penultimate day of the year I have now completed the turret on the Dutch Leopard. I decided for a laugh to have a go at scratching up a Hoffman gunfire simulator and I think it has turned out reasonably well. The Hoffman fitted to these tanks is a 17 barrel monster, with 9 lower barrels and 8 upper ones. I used plastic rod for the barrels and plastic card for the rest, making constant reference to photos. The Hoffman is secured to the turret roof using an attachment plate secured through the turret front lifting ring and I used scrap Plastruct rod to make the attachment rod and turret ring. The whole thing was a bit of a fiddly nightmare but I like a challenge

All being well, I hope to apply the first of the paint to both models tomorrow.
Thanks for looking.
Doing - Tamiya 1/35th Universal Carrier.
Work is the curse of the modelling classes!
IPMS#12300
Work is the curse of the modelling classes!
IPMS#12300