James' Combrig 1/700 HMS Canada
-
JamesPerrin

- Looks like his avatar
- Posts: 13669
- Joined: April 5th, 2011, 8:09 pm
- Location: W. Yorkshire
- Contact:
Re: James' Combrig 1/700 HMS Canada
Cheers guys. I put the blutac on a small base not the desk or cutting matt. This allows it to be rotated and moved to again make it as straight forward as possible to pick up these fiddly parts
Classic British Kits SIG Leader Better to fettle than to fill
(2024 A:B 5:2) (2023 13:8:7) (2022 21:11) (2021 15:8) (2020 8:4:4)
(2024 A:B 5:2) (2023 13:8:7) (2022 21:11) (2021 15:8) (2020 8:4:4)
-
splash

- Senior Service Rotorhead
- Posts: 13828
- Joined: May 1st, 2011, 11:02 am
- Location: Somerset England
Re: James' Combrig 1/700 HMS Canada
Cheers for the tip, I have just picked up some blutac to copy you.
My work bench is starting to look like Portsmouth Naval Dockyard.
-
JamesPerrin
- Looks like his avatar
- Posts: 13669
- Joined: April 5th, 2011, 8:09 pm
- Location: W. Yorkshire
- Contact:
Re: James' Combrig 1/700 HMS Canada
More metal work, this time the required scratch built parts.
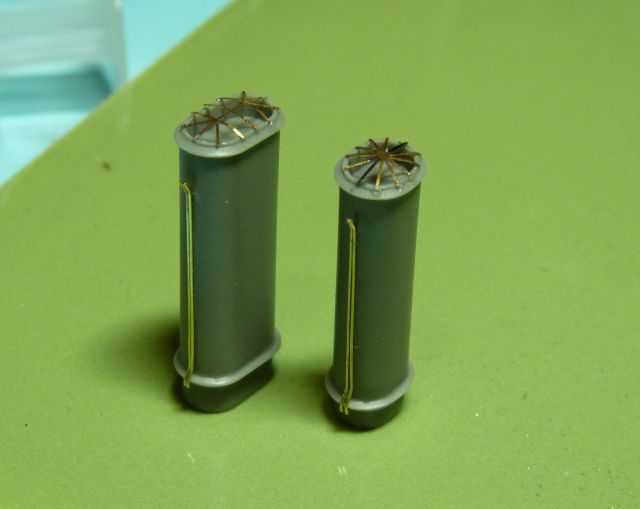
First up the (as I learned 24hr later) the steam pipes on the side of the funnels. 7 in all bunch in twos and threes with kinks top and bottom. I got better at getting these on straight by the final lot so might go back and redo the first ones.
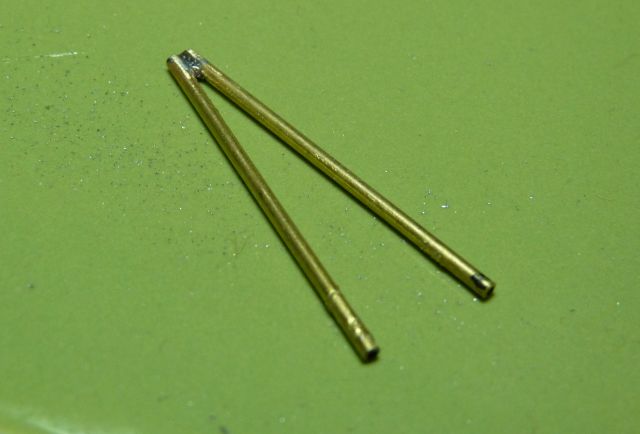
Tonight I've turn the bench into a mast and yardarm manufacturing site. A few weeks ago I realized I probably didn't have enough decent material, plenty of very fine wire but not a lot in the 0.5 -1.0mm range. I found K&S metals are quite a bit cheaper than other producers of brass rod and got three packs at 0.51, 0.82, and 1.0mm diameter.
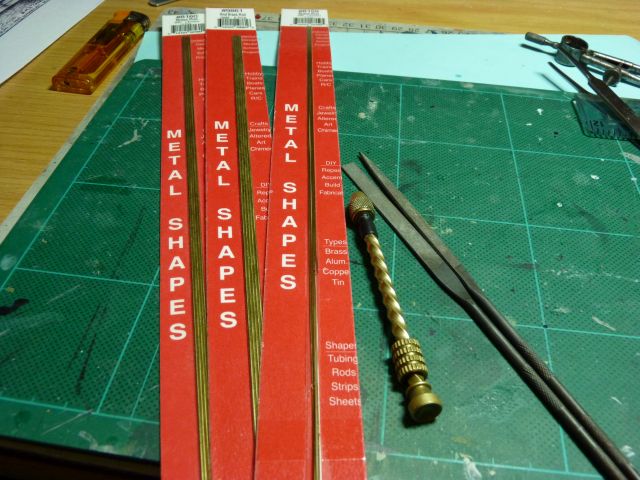
To taper the mask and yardarms I mounted the lengths of brass rod to in pin-vice and then holding them flat against the edge of the cutting matt file them to shape.
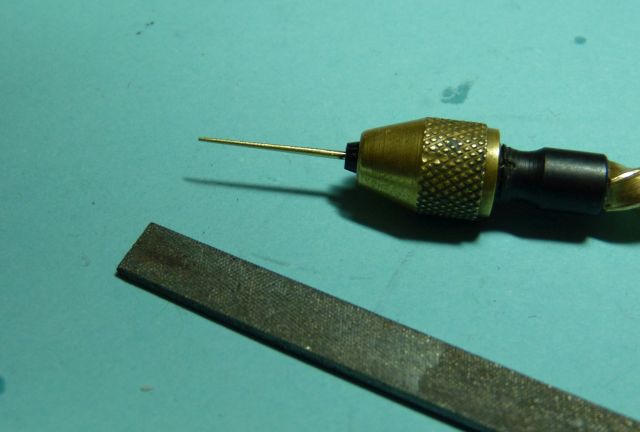
The small ones take 3-4mins, the large ones nearer 10min. Rubbed smooth with a coarse sandings sponge and I'm done.

Now I'm ready for the next adventure in model ship building, a spot of soldering!
First up the (as I learned 24hr later) the steam pipes on the side of the funnels. 7 in all bunch in twos and threes with kinks top and bottom. I got better at getting these on straight by the final lot so might go back and redo the first ones.
Tonight I've turn the bench into a mast and yardarm manufacturing site. A few weeks ago I realized I probably didn't have enough decent material, plenty of very fine wire but not a lot in the 0.5 -1.0mm range. I found K&S metals are quite a bit cheaper than other producers of brass rod and got three packs at 0.51, 0.82, and 1.0mm diameter.
To taper the mask and yardarms I mounted the lengths of brass rod to in pin-vice and then holding them flat against the edge of the cutting matt file them to shape.
The small ones take 3-4mins, the large ones nearer 10min. Rubbed smooth with a coarse sandings sponge and I'm done.
Now I'm ready for the next adventure in model ship building, a spot of soldering!
Classic British Kits SIG Leader Better to fettle than to fill
(2024 A:B 5:2) (2023 13:8:7) (2022 21:11) (2021 15:8) (2020 8:4:4)
(2024 A:B 5:2) (2023 13:8:7) (2022 21:11) (2021 15:8) (2020 8:4:4)
-
PaulBradley

- Staring out the window
- Posts: 21201
- Joined: April 6th, 2011, 3:08 pm
- Location: Flagstaff, AZ
Re: James' Combrig 1/700 HMS Canada
Nice tip on shaping the yardarms, James.
Paul
За демократію і незалежний Україну
"For Democracy and a Free Ukraine"
За демократію і незалежний Україну
"For Democracy and a Free Ukraine"
-
JamesPerrin
- Looks like his avatar
- Posts: 13669
- Joined: April 5th, 2011, 8:09 pm
- Location: W. Yorkshire
- Contact:
Re: James' Combrig 1/700 HMS Canada
Thanks Paul but the technique came from David Griffith's excellent book on scale ship building.PaulBradley wrote:Nice tip on shaping the yardarms, James.
https://www.amazon.co.uk/gp/aw/d/184832 ... ref=plSrch;
Classic British Kits SIG Leader Better to fettle than to fill
(2024 A:B 5:2) (2023 13:8:7) (2022 21:11) (2021 15:8) (2020 8:4:4)
(2024 A:B 5:2) (2023 13:8:7) (2022 21:11) (2021 15:8) (2020 8:4:4)
-
iggie

- Modelling Gent and Scholar
- Posts: 23417
- Joined: July 31st, 2013, 11:04 am
- Location: North Somercotes, Lincolnshire
- Contact:
Re: James' Combrig 1/700 HMS Canada
Crikey; I thought my funnel cowls were hard work in 1/350, yours must have been extra fun!
Best wishes
Jim
If you can walk away from a landing, it's a good landing. If you use the airplane the next day, it's an outstanding landing
"Never put off till tomorrow, what you can do the day after tomorrow"
Jim
If you can walk away from a landing, it's a good landing. If you use the airplane the next day, it's an outstanding landing
"Never put off till tomorrow, what you can do the day after tomorrow"
-
JohnRatzenberger

- Why is he so confused ?
- Posts: 15727
- Joined: April 5th, 2011, 3:42 pm
- Location: Living on a sandbar - Nags Head, NC.
Re: James' Combrig 1/700 HMS Canada
Really good work, James !
I usually file a small indent/notch in the yardarms/spars and the mast so they fit together. Easier to hold horizontal position and alignment and gives a bit more mating surface.
I usually file a small indent/notch in the yardarms/spars and the mast so they fit together. Easier to hold horizontal position and alignment and gives a bit more mating surface.
John Ratzenberger 
It's my model and I'll do what I want with it.
It's my model and I'll do what I want with it.
-
JamesPerrin
- Looks like his avatar
- Posts: 13669
- Joined: April 5th, 2011, 8:09 pm
- Location: W. Yorkshire
- Contact:
Re: James' Combrig 1/700 HMS Canada
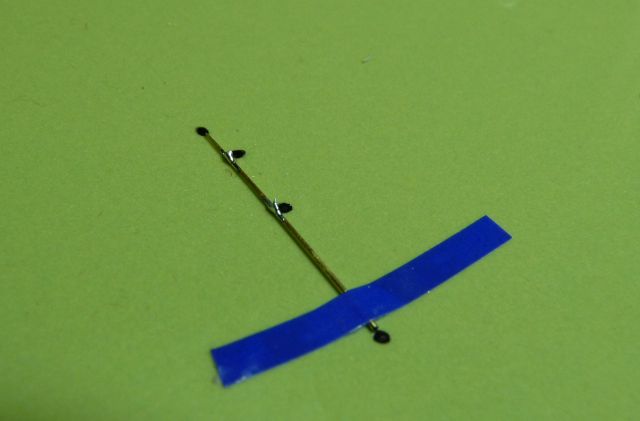
Though I had done some basic soldering of wiring I went back and re-read the articles I had and watched some videos as I really didn't want to make a mess of the parts I'd made. I decided that my plan of attack would be to tin the parts using a small amount of solder that I tinned the iron's tip with. ie I never applied solder directly to the parts ( the exception being the main mast supports ). I have to say it all went pretty well. One part was desoldered so as it needed repositioning.
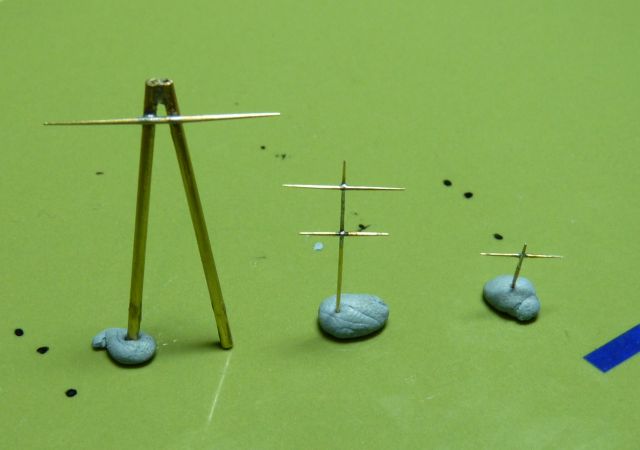
Taped, yardarms positions marked and tinned.
yardarms attached
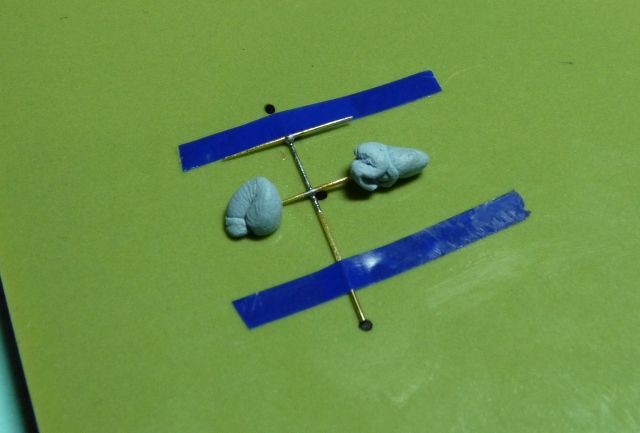
Main truss after solder cleaned up with a file. Combrig have you attach the main yardarm to the mast but the plans and pics clearly show it attaches to the back of the truss. There is another yardarm not in the instructions that runs through the crows nest too.
Finished pieces
Taped, yardarms positions marked and tinned.
yardarms attached
Main truss after solder cleaned up with a file. Combrig have you attach the main yardarm to the mast but the plans and pics clearly show it attaches to the back of the truss. There is another yardarm not in the instructions that runs through the crows nest too.
Finished pieces
Classic British Kits SIG Leader Better to fettle than to fill
(2024 A:B 5:2) (2023 13:8:7) (2022 21:11) (2021 15:8) (2020 8:4:4)
(2024 A:B 5:2) (2023 13:8:7) (2022 21:11) (2021 15:8) (2020 8:4:4)
-
Clashcityrocker

- Modelling Gent and Scholar
- Posts: 10798
- Joined: May 1st, 2011, 12:31 am
- Location: Adelaide. South Australia
Re: James' Combrig 1/700 HMS Canada
Much finer. Nice work.
Nigel
Nigel
-
JamesPerrin
- Looks like his avatar
- Posts: 13669
- Joined: April 5th, 2011, 8:09 pm
- Location: W. Yorkshire
- Contact:
Re: James' Combrig 1/700 HMS Canada
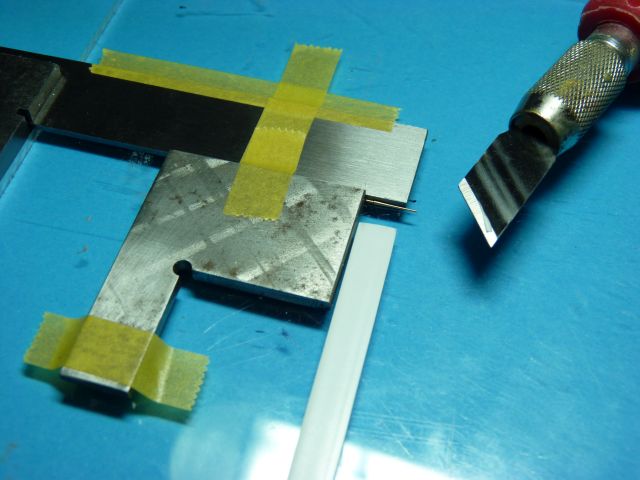
Toniht I've dealt with the 6" secondary armament. Again I decided to replace the resin parts with some lovely Master brass barrels. Again like the 14" though these were too long, by about 2mm, and looked a little skinny. I therefore decide to trim all the barrels ends down, this would maintain the thicker breach end. I cut one free hand to size and then made a jig with some squares. The strip of plastic kept the part in place while it was cut.
As this is the last night of the GB here are couple of shots of the work done so far dry fitted together.
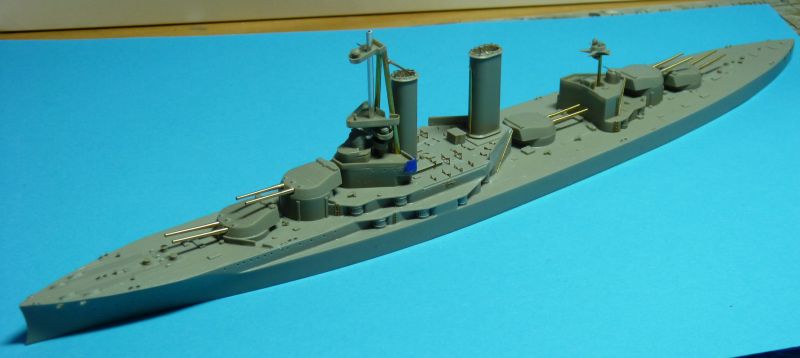
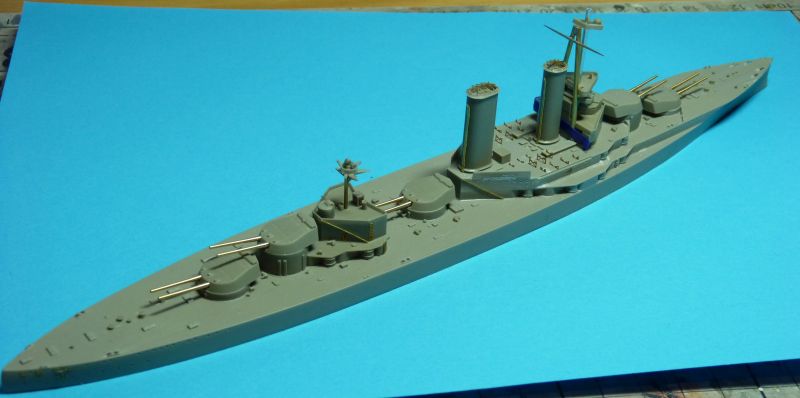
The GB has been a much needed push to get this project started. Other's work has been fascinating and inspiring. I've learned a lot in the past few weeks and found that discipline and planning are essentially for working at this scale, as well as some decent magnification! I've a few more jobs to do then I will put this aside while I finish off my Sea Harrier and a couple of other projects that are close to been completed, before I return to this to start on the painting.
As this is the last night of the GB here are couple of shots of the work done so far dry fitted together.
The GB has been a much needed push to get this project started. Other's work has been fascinating and inspiring. I've learned a lot in the past few weeks and found that discipline and planning are essentially for working at this scale, as well as some decent magnification! I've a few more jobs to do then I will put this aside while I finish off my Sea Harrier and a couple of other projects that are close to been completed, before I return to this to start on the painting.
Classic British Kits SIG Leader Better to fettle than to fill
(2024 A:B 5:2) (2023 13:8:7) (2022 21:11) (2021 15:8) (2020 8:4:4)
(2024 A:B 5:2) (2023 13:8:7) (2022 21:11) (2021 15:8) (2020 8:4:4)
-
PaulBradley
- Staring out the window
- Posts: 21201
- Joined: April 6th, 2011, 3:08 pm
- Location: Flagstaff, AZ
Re: James' Combrig 1/700 HMS Canada
Looks very nice indeed, James. As a (mostly) aircraft builder, I, too, have learned an awful lot during the course of this GB. It will hold me in good stead when I tackle my Telford projects.
Paul
За демократію і незалежний Україну
"For Democracy and a Free Ukraine"
За демократію і незалежний Україну
"For Democracy and a Free Ukraine"
-
splash
- Senior Service Rotorhead
- Posts: 13828
- Joined: May 1st, 2011, 11:02 am
- Location: Somerset England
Re: James' Combrig 1/700 HMS Canada
I fully second what you both have said. This GB has been a great introduction to ships an I'm afraid I think I have caught the ship building bugPaulBradley wrote:Looks very nice indeed, James. As a (mostly) aircraft builder, I, too, have learned an awful lot during the course of this GB. It will hold me in good stead when I tackle my Telford projects.
My work bench is starting to look like Portsmouth Naval Dockyard.
-
iggie
- Modelling Gent and Scholar
- Posts: 23417
- Joined: July 31st, 2013, 11:04 am
- Location: North Somercotes, Lincolnshire
- Contact:
Re: James' Combrig 1/700 HMS Canada
Nice work so far James and I'm looking forward to seeing it progress further in time.
Best wishes
Jim
If you can walk away from a landing, it's a good landing. If you use the airplane the next day, it's an outstanding landing
"Never put off till tomorrow, what you can do the day after tomorrow"
Jim
If you can walk away from a landing, it's a good landing. If you use the airplane the next day, it's an outstanding landing
"Never put off till tomorrow, what you can do the day after tomorrow"