Excellent PE work
That's an impressive 965 double bedstead, RNAS Yeovilton used to have one of those out side it's old control tower, we used to climb the tower and practice abseiling, it disappeared when the moved control tower over the other side of the A/F
I'm about to play with PE what glue do you use?
Dazzled's Home Build **IN SERVICE**
-
splash

- Senior Service Rotorhead
- Posts: 13828
- Joined: May 1st, 2011, 11:02 am
- Location: Somerset England
Re: Dazzled's Home Build
My work bench is starting to look like Portsmouth Naval Dockyard.
-
Dazzled

- Modelling Gent and Scholar
- Posts: 9592
- Joined: October 1st, 2011, 11:08 pm
- Location: Mid Glamorgan, South Wales
- Contact:
Re: Dazzled's Home Build
Sorry Alan, haven't been on the forum too much for a couple of days. I've been using Zap-a-Gap thick (green label) cyano with good results but any superglue should do the trick.splash wrote:Excellent PE work
That's an impressive 965 double bedstead, RNAS Yeovilton used to have one of those out side it's old control tower, we used to climb the tower and practice abseiling, it disappeared when the moved control tower over the other side of the A/F
I'm about to play with PE what glue do you use?
COLD WAR S.I.G. LEADER
Wherever there's danger, wherever there's trouble, wherever there's important work to be done....I'll be somewhere else building a model!
Wherever there's danger, wherever there's trouble, wherever there's important work to be done....I'll be somewhere else building a model!
-
splash
- Senior Service Rotorhead
- Posts: 13828
- Joined: May 1st, 2011, 11:02 am
- Location: Somerset England
Re: Dazzled's Home Build
Cheers.Dazzled wrote: I've been using Zap-a-Gap thick (green label) cyano with good results but any superglue should do the trick.
My work bench is starting to look like Portsmouth Naval Dockyard.
-
Dazzled
- Modelling Gent and Scholar
- Posts: 9592
- Joined: October 1st, 2011, 11:08 pm
- Location: Mid Glamorgan, South Wales
- Contact:
Re: Dazzled's Home Build
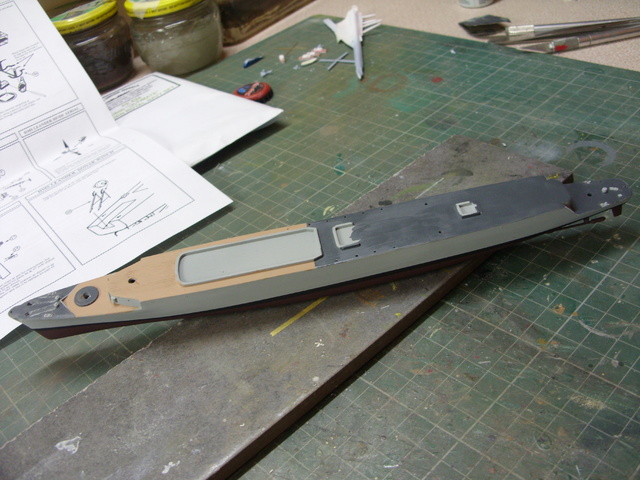
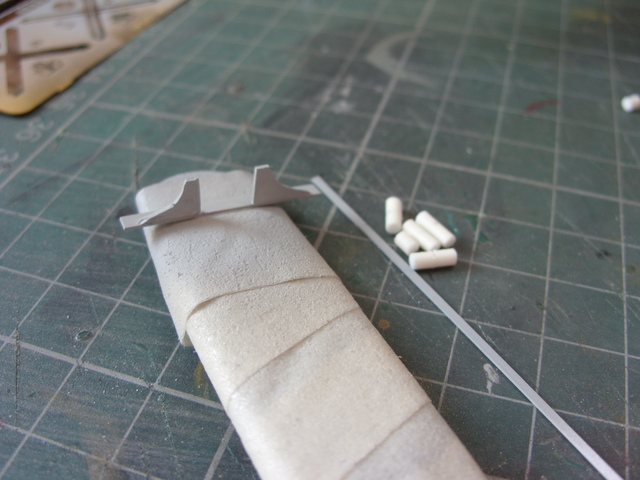
I have been plugging away at the Glamorgan for the last few days but, as with most older kits, work has been slow and there's been little of significance to report. However, in order to keep up the momentum, here's some of what I've been up to.
The prop shafts and rudders were cleaned up, fettled mercilessly and attached. Then the hull got painted.
 screenshot tool
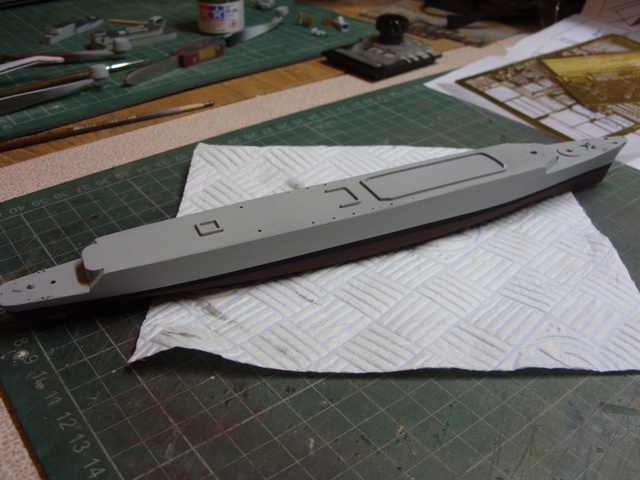 photo uploading websites
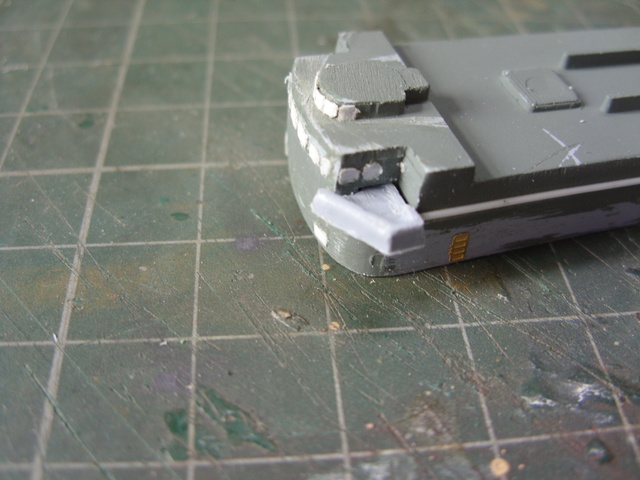
The upperworks are progressing too.
First the bridge wings.
 uploading pictures
The problem is that these are meant to be flush with the front of the bridge
So a little trimming was in order.
 photoupload
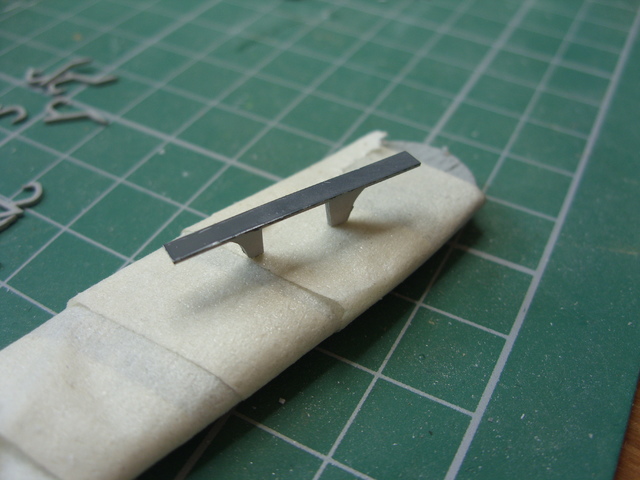
As was some filling and sanding to get everything blended in. More detailing work followed, adding doors mostly, to lift the rather blank components a little.
 image upload no compression
Right now they look like this.
 images upload
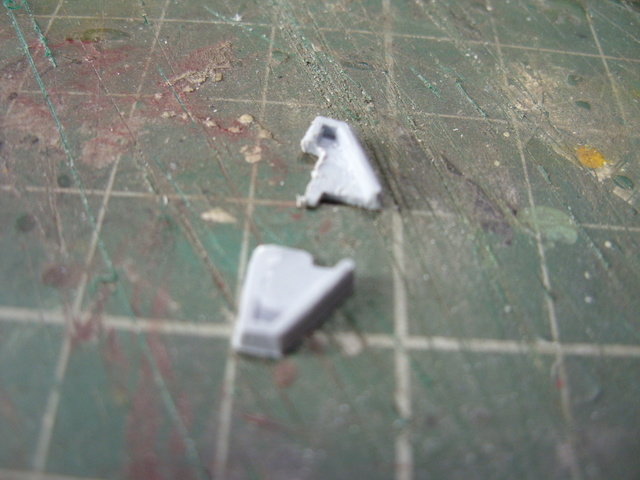
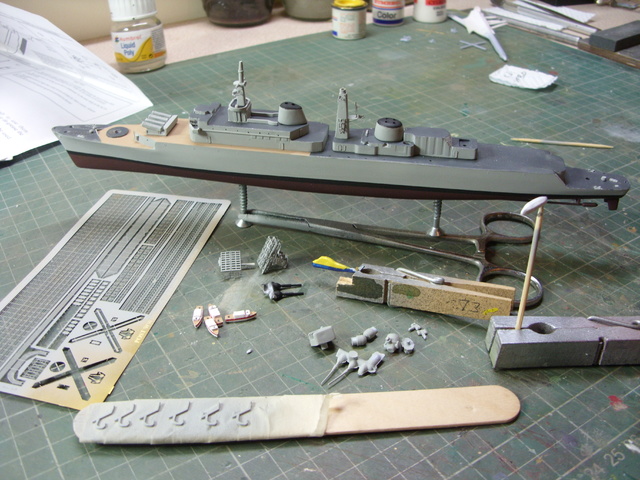
While waiting for things to dry and set I took to doing a bit of work on the additional bits that will eventually board the ship i.e. the boats and helicopter. There are 4 motor lauches and an open boat. The latter wasn't at all well moulded with major imperfections in the top so I decided to try and replicate a cover over the top of it.
 image sharing
Just a thin piece of plasticard but when trimmed down it looked much better.
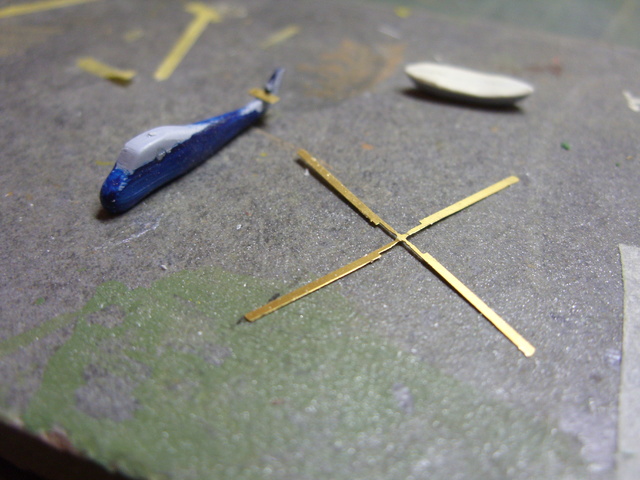 image hoster
And in the foreground is the Wessex helicopter, trimmed, filled and sanded so it looks like a pregnant tadpole . The addition of PE rotors, wheels and stabiliser should bring this up a treat.
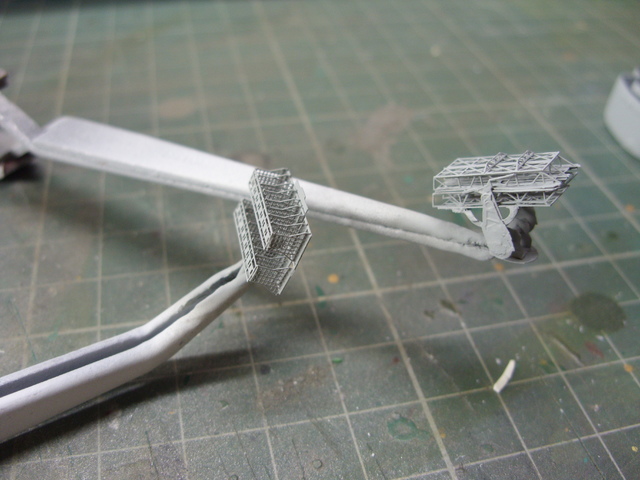
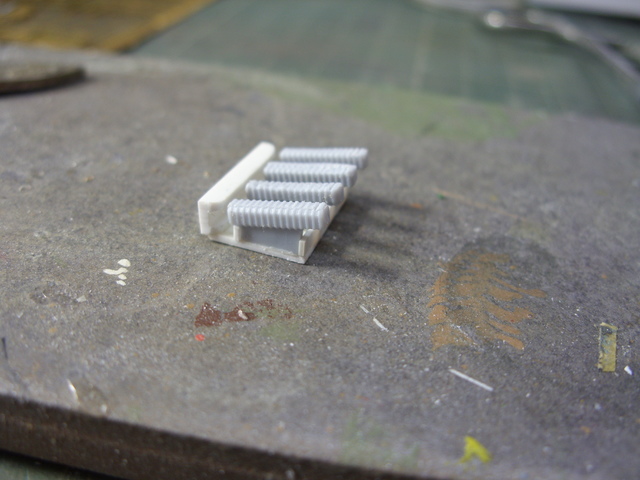
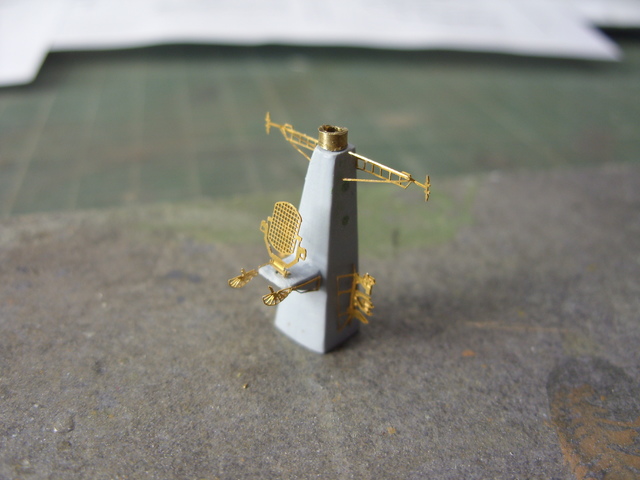
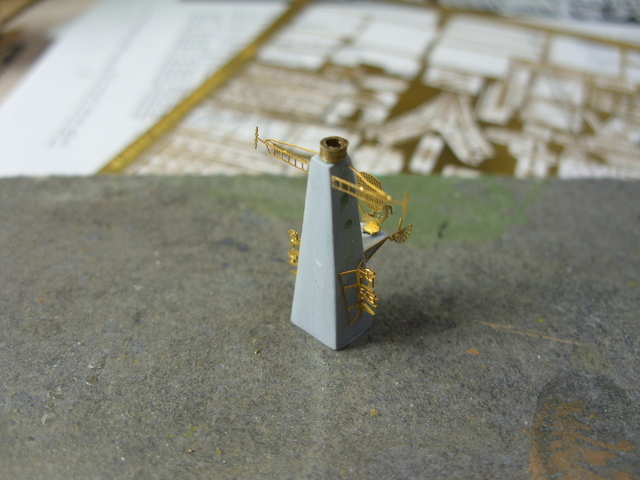
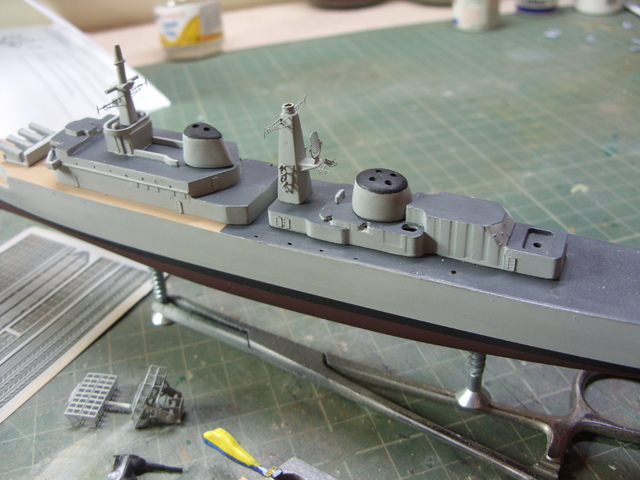
As smaller parts have become ready they've been subjected to paint. I'm using Tamiya XF-80, RN Grey and it looks spot on to me (Just like old Humbrol 64 ). It certainly makes the Seaslug launcher and 965 look better.
 free image upload
And, finally, I did mention motor launches.
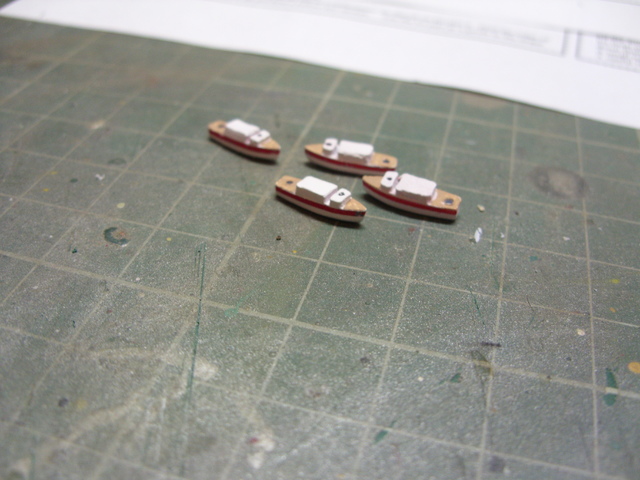 image ru
1mm nail masking tape was invaluable on these. They still need a little finishing off but I'm quite happy with them so far.
More updates soon
The prop shafts and rudders were cleaned up, fettled mercilessly and attached. Then the hull got painted.
screenshot toolphoto uploading websitesThe upperworks are progressing too.
First the bridge wings.
uploading picturesThe problem is that these are meant to be flush with the front of the bridge
So a little trimming was in order.
photouploadAs was some filling and sanding to get everything blended in. More detailing work followed, adding doors mostly, to lift the rather blank components a little.
image upload no compressionRight now they look like this.
images uploadWhile waiting for things to dry and set I took to doing a bit of work on the additional bits that will eventually board the ship i.e. the boats and helicopter. There are 4 motor lauches and an open boat. The latter wasn't at all well moulded with major imperfections in the top so I decided to try and replicate a cover over the top of it.
image sharingJust a thin piece of plasticard but when trimmed down it looked much better.
image hosterAnd in the foreground is the Wessex helicopter, trimmed, filled and sanded so it looks like a pregnant tadpole
As smaller parts have become ready they've been subjected to paint. I'm using Tamiya XF-80, RN Grey and it looks spot on to me (Just like old Humbrol 64
free image uploadAnd, finally, I did mention motor launches.
image ru1mm nail masking tape was invaluable on these. They still need a little finishing off but I'm quite happy with them so far.
More updates soon
COLD WAR S.I.G. LEADER
Wherever there's danger, wherever there's trouble, wherever there's important work to be done....I'll be somewhere else building a model!
Wherever there's danger, wherever there's trouble, wherever there's important work to be done....I'll be somewhere else building a model!
-
JamesPerrin

- Looks like his avatar
- Posts: 13695
- Joined: April 5th, 2011, 8:09 pm
- Location: W. Yorkshire
- Contact:
Re: Dazzled's Home Build
Mighty fine PE work!
Classic British Kits SIG Leader Better to fettle than to fill
(2024 A:B 5:2) (2023 13:8:7) (2022 21:11) (2021 15:8) (2020 8:4:4)
(2024 A:B 5:2) (2023 13:8:7) (2022 21:11) (2021 15:8) (2020 8:4:4)
-
PaulBradley

- Staring out the window
- Posts: 21219
- Joined: April 6th, 2011, 3:08 pm
- Location: Flagstaff, AZ
Re: Dazzled's Home Build
Very nice!
Paul
За демократію і незалежний Україну
"For Democracy and a Free Ukraine"
За демократію і незалежний Україну
"For Democracy and a Free Ukraine"
-
Dazzled
- Modelling Gent and Scholar
- Posts: 9592
- Joined: October 1st, 2011, 11:08 pm
- Location: Mid Glamorgan, South Wales
- Contact:
Re: Dazzled's Home Build
Thanks guys 
I've spent a fair bit of time in the new Den today. Rain definitely stopped play as far as building a fence was concerned so I made the best of the opportunity.
There's still a fair bit of PE and scratchbuilding to do. Today, I looked at the masts.
First the foremast.
It's quite wrong, I'm afraid.
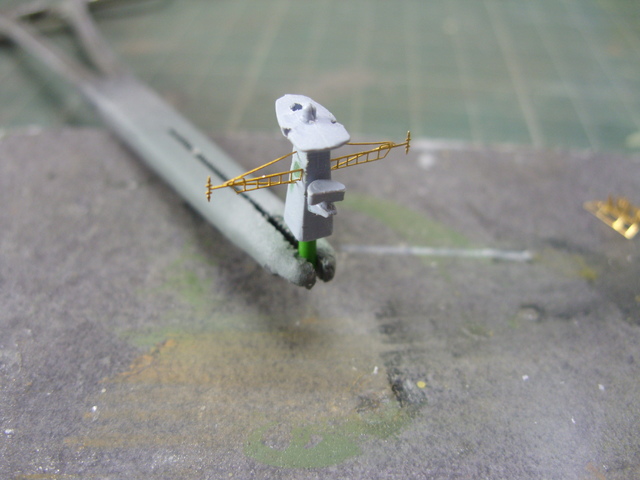 image url upload
Naturally I noticed the fault after I attached the PE aerials. Basically it should be taller as later Exocet equipped Counties had an extra flat radar antenna on an extended mast. So, after a bit of delicate hacking and scratchbuilding.
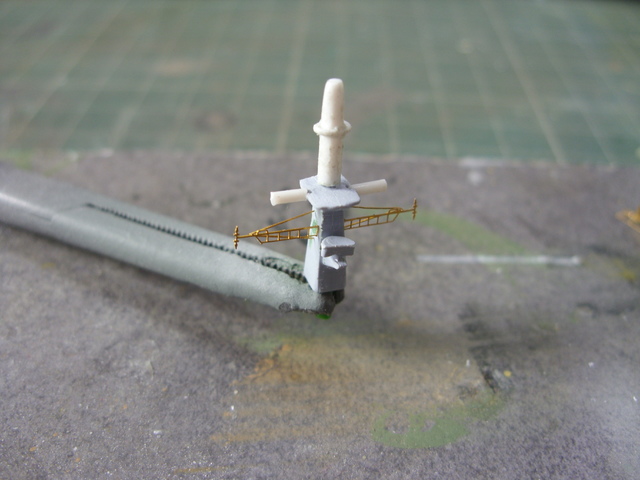 image hosting services
And speaking of Exocets....
 free photo hosting
I built this a couple of nights ago. I couldn't sleep so I popped next door and indulged in some therapeutic plastic bashing. It's the launcher tubes that came with the kit (and are as rough as a bear's @£s*) with a scratchbuilt frame and deflector. Better than Airfix's idea of slapping them straight onto the deck around the turret mounting hole I think. At least the hole will be covered up if nothing else.
Now, where was I?
Oh yes, masts.
There were a lot of little bits to add to the main mast.
 free photo hosting
 how to do a screenshot on a pc
It took a couple of hours but I think it was worth the effort ......... even if I did need a lie down afterwards
And finally today, I started in on painting the main deck
 online photo storage
Surprising myself too by finding out that I can still use a hairy stick . I used Tamiya XF-78, Wooden Deck Tan acrylic and Humbrol 123 ( some kind of dark grey  ) enamel.
Now I have to wait for this to dry and carry out any necessary touch-ups.
More updates soon, I hope
I've spent a fair bit of time in the new Den today. Rain definitely stopped play as far as building a fence was concerned so I made the best of the opportunity.
There's still a fair bit of PE and scratchbuilding to do. Today, I looked at the masts.
First the foremast.
It's quite wrong, I'm afraid.
image url uploadNaturally I noticed the fault after I attached the PE aerials. Basically it should be taller as later Exocet equipped Counties had an extra flat radar antenna on an extended mast. So, after a bit of delicate hacking and scratchbuilding.
image hosting servicesAnd speaking of Exocets....
free photo hostingI built this a couple of nights ago. I couldn't sleep so I popped next door and indulged in some therapeutic plastic bashing. It's the launcher tubes that came with the kit (and are as rough as a bear's @£s*) with a scratchbuilt frame and deflector. Better than Airfix's idea of slapping them straight onto the deck around the turret mounting hole I think.
Now, where was I?
Oh yes, masts.
There were a lot of little bits to add to the main mast.
free photo hostinghow to do a screenshot on a pcIt took a couple of hours but I think it was worth the effort ......... even if I did need a lie down afterwards
And finally today, I started in on painting the main deck
online photo storageSurprising myself too by finding out that I can still use a hairy stick
Now I have to wait for this to dry and carry out any necessary touch-ups.
More updates soon, I hope
COLD WAR S.I.G. LEADER
Wherever there's danger, wherever there's trouble, wherever there's important work to be done....I'll be somewhere else building a model!
Wherever there's danger, wherever there's trouble, wherever there's important work to be done....I'll be somewhere else building a model!
Re: Dazzled's Home Build
Your turning into the man with the golden (or should that be brass) touch
Trying to Build kits and not Buy kits
-
splash
- Senior Service Rotorhead
- Posts: 13828
- Joined: May 1st, 2011, 11:02 am
- Location: Somerset England
Re: Dazzled's Home Build
Watching all your excellent work has got me buying PE 
My work bench is starting to look like Portsmouth Naval Dockyard.
-
Clashcityrocker

- Modelling Gent and Scholar
- Posts: 10823
- Joined: May 1st, 2011, 12:31 am
- Location: Adelaide. South Australia
Re: Dazzled's Home Build
Some very nice work going on here.
Nigel
Nigel
-
Dazzled
- Modelling Gent and Scholar
- Posts: 9592
- Joined: October 1st, 2011, 11:08 pm
- Location: Mid Glamorgan, South Wales
- Contact:
Re: Dazzled's Home Build
Thanks for all the kind comments folks.
The last couple of days have seen some pleasing progress.
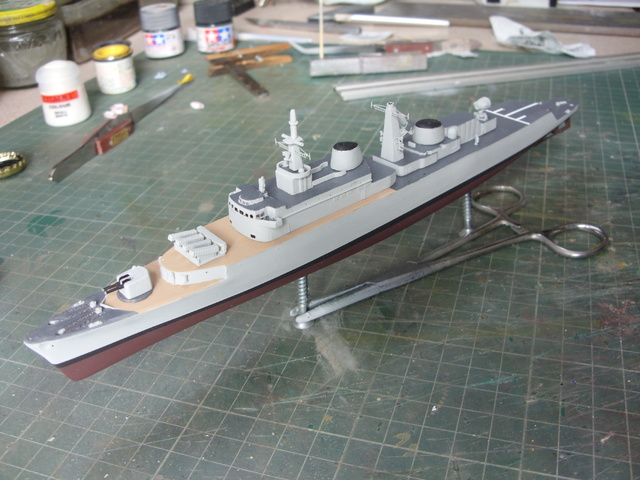
The superstructure got fitted.
 capture screen
As did the Exocet launcher
 capture screen
At the end of yesterday the bench looked like this.
 capture screen
Pretty much all the necessary parts are in the picture, or so I thought at the time.
I was hoping to have been putting on a coat of Klear this morning but, not unusually, the kit threw me a couple of curve balls.
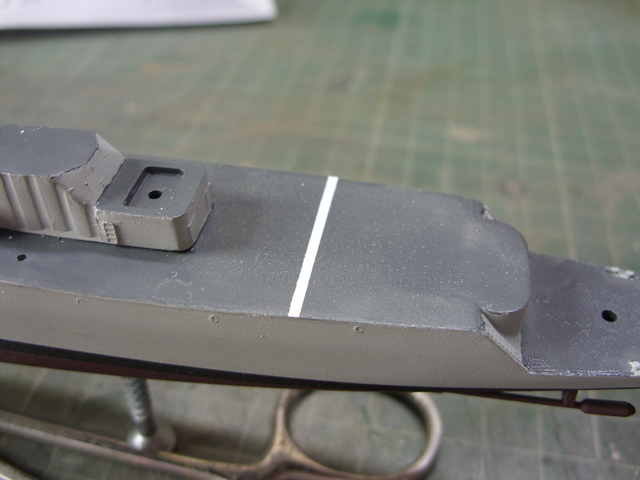
First there was the matter of the helicopter deck. It's a bit bare and there are no markings for it on the decal sheet. Leander and Amazon have these but the Devonshire class doesn't. Only one thing for it then....start masking.
 capture screen
First line on in the picture. Just a case of mask, paint, allow to dry, repeat. Ho hum
Then I spotted a couple more "slight" omissions.
 capture screen
Admittedly you probably wouldn't spot this unless you'd done a bit of research into County Class Destroyers but there's actually a deck missing....a whole deck!
It's a long, narrow elevated wing deck that sits in front of the main mast and carries a white radome at each end. It's pretty noticeable on the actual ship so I thought I'd spend a little time replicating one.
 capture screen
 capture screen
Also in the first picture is the other noticeable thing I'm scratchbuilding, liferaft canisters. There are a number of them on the real ships and, being white, they stick out like a sore thumb so I couldn't leave them out. Still, it's all part of the deep joy that is the lot of the CBK builder
And finally, Glamorgan needs a decent stand.
 capture screen
And this is underway at the moment.
All this progress and I even built a garden fence.
The last couple of days have seen some pleasing progress.
The superstructure got fitted.
capture screenAs did the Exocet launcher
capture screenAt the end of yesterday the bench looked like this.
capture screenPretty much all the necessary parts are in the picture, or so I thought at the time.
I was hoping to have been putting on a coat of Klear this morning but, not unusually, the kit threw me a couple of curve balls.
First there was the matter of the helicopter deck. It's a bit bare and there are no markings for it on the decal sheet. Leander and Amazon have these but the Devonshire class doesn't. Only one thing for it then....start masking.
capture screenFirst line on in the picture. Just a case of mask, paint, allow to dry, repeat. Ho hum
Then I spotted a couple more "slight" omissions.
capture screenAdmittedly you probably wouldn't spot this unless you'd done a bit of research into County Class Destroyers but there's actually a deck missing....a whole deck!
It's a long, narrow elevated wing deck that sits in front of the main mast and carries a white radome at each end. It's pretty noticeable on the actual ship so I thought I'd spend a little time replicating one.
capture screencapture screenAlso in the first picture is the other noticeable thing I'm scratchbuilding, liferaft canisters. There are a number of them on the real ships and, being white, they stick out like a sore thumb so I couldn't leave them out. Still, it's all part of the deep joy that is the lot of the CBK builder
And finally, Glamorgan needs a decent stand.
capture screenAnd this is underway at the moment.
All this progress and I even built a garden fence.
COLD WAR S.I.G. LEADER
Wherever there's danger, wherever there's trouble, wherever there's important work to be done....I'll be somewhere else building a model!
Wherever there's danger, wherever there's trouble, wherever there's important work to be done....I'll be somewhere else building a model!
-
gnomemeansgnome

- Modelling Gent and Scholar
- Posts: 5269
- Joined: July 16th, 2013, 4:03 pm
- Location: No Fun City
Re: Dazzled's Home Build
So good! My copy of Devonshire is a shipwreck :p
Ego no habeo consilium.
ICBM = Insatiable Collector and Builder of Models
ICBM = Insatiable Collector and Builder of Models
-
PaulBradley
- Staring out the window
- Posts: 21219
- Joined: April 6th, 2011, 3:08 pm
- Location: Flagstaff, AZ
Re: Dazzled's Home Build
Cool! Some really nice modelling going on!
Paul
За демократію і незалежний Україну
"For Democracy and a Free Ukraine"
За демократію і незалежний Україну
"For Democracy and a Free Ukraine"
-
Clashcityrocker
- Modelling Gent and Scholar
- Posts: 10823
- Joined: May 1st, 2011, 12:31 am
- Location: Adelaide. South Australia
Re: Dazzled's Home Build
Excellent progress.
Nigel
Nigel
-
JamesPerrin
- Looks like his avatar
- Posts: 13695
- Joined: April 5th, 2011, 8:09 pm
- Location: W. Yorkshire
- Contact:
Re: Dazzled's Home Build
Impressed with your nocturnal output 
Hopefully your additions will help tie the basic kit detail in with elaborate PE.
Hopefully your additions will help tie the basic kit detail in with elaborate PE.
Classic British Kits SIG Leader Better to fettle than to fill
(2024 A:B 5:2) (2023 13:8:7) (2022 21:11) (2021 15:8) (2020 8:4:4)
(2024 A:B 5:2) (2023 13:8:7) (2022 21:11) (2021 15:8) (2020 8:4:4)