Rob's big Texan
-
JohnRatzenberger

- Why is he so confused ?
- Posts: 15733
- Joined: April 5th, 2011, 3:42 pm
- Location: Living on a sandbar - Nags Head, NC.
Re: Rob's big Texan
That "blue" could very well be "Engine Gray", looking a bit bluish in the light ....
John Ratzenberger 
It's my model and I'll do what I want with it.
It's my model and I'll do what I want with it.
-
rob_van_riel
- Modelling Gent and Scholar
- Posts: 3325
- Joined: November 4th, 2012, 11:28 am
- Location: The Netherlands
- Contact:
Re: Rob's big Texan
Could well be. I'm fairly certain it is not Insignia Blue, as indicated by the instructions though. I've quite arbitarily decided to use Humbrol 230 PPR blue instead, for no other reason than that it looked roughly right when staring at the paint rack at the LHSjRatz wrote:That "blue" could very well be "Engine Gray", looking a bit bluish in the light ....
-
JohnRatzenberger
- Why is he so confused ?
- Posts: 15733
- Joined: April 5th, 2011, 3:42 pm
- Location: Living on a sandbar - Nags Head, NC.
Re: Rob's big Texan
The one I was thinking of is Model Master (Testors) 2034 -- the FS# is 36076.
John Ratzenberger
It's my model and I'll do what I want with it.
It's my model and I'll do what I want with it.
-
rob_van_riel
- Modelling Gent and Scholar
- Posts: 3325
- Joined: November 4th, 2012, 11:28 am
- Location: The Netherlands
- Contact:
Re: Rob's big Texan
As promised, I've blinged up the engine a bit. The result is a lot livelier than my original version; a rather like the change.
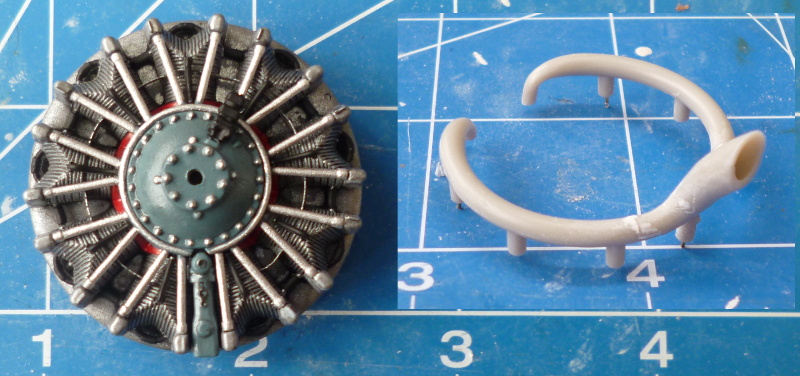
Next to the main block is the collector ring(?), all five ill-fitting parts of it. I just can't figure out how the folks at Kitty Hawk ever came up with the way the rear parts of the engine block are supposed to be assembled. There's a spiky thing (fuel injection?) which has alignment pins for the backplate and front half, and this ring which sits between it and the backplate. There's a sort of cowling around those three parts, and the front half of the engine is then supposed to be attached to the lot. Problem with this sequence is that there is just no way to align the collector ring with the engine block that way, or the pre-align it with the backplate. Alignment with the engine block is shaky even without the complications; the tubing does not line up perfectly with the cylinder heads, the few locator knobs hinder more than they help, and all that is before messing up the alignment with the rotation I need due to my earlier mistakes.
So, perhaps foolishly, I'll be taking a different approach. The spiky thing will go onto the engine first, followed by the ring which has been given some brass locators. The result will then be mounted on the backplate, and finally the cowling will be wiggled around the entire block.
that's all for the future, however, since I'll be going back to some cockpit work now while the various chemicals on the engine cure.
-
TobyC

- Modelling Gent and Scholar
- Posts: 5540
- Joined: January 15th, 2013, 2:13 pm
- Location: Cobham, Surrey. Blighty
Re: Rob's big Texan
Nice work in the engine. Very convincing.
Enjoyment over accuracy. That's my motto
-
rob_van_riel
- Modelling Gent and Scholar
- Posts: 3325
- Joined: November 4th, 2012, 11:28 am
- Location: The Netherlands
- Contact:
Re: Rob's big Texan
I've just spent four and a half hours just making parts out of even smaller parts, and have very little to show for it. This is partially my own fault for insisting on etched details, but the kit itself seems to really like large part numbers. Every tiny bit seems to be made up of at least two even smaller bits, sometimes without apparent reason, and all those parts need a bit of work. Fit is rarely perfect, so after joining up the bits that make up bits some work on the seams is needed. I'm certain the kit will yield up a nice model, but at a price 
-
rob_van_riel
- Modelling Gent and Scholar
- Posts: 3325
- Joined: November 4th, 2012, 11:28 am
- Location: The Netherlands
- Contact:
Re: Rob's big Texan
Thank you. Quite a bit more to come in that department though; the engine is far from complete. Note that, apart from some almost invisible details, this engine is straight OOB.TobyC wrote:Nice work in the engine. Very convincing.
-
rob_van_riel
- Modelling Gent and Scholar
- Posts: 3325
- Joined: November 4th, 2012, 11:28 am
- Location: The Netherlands
- Contact:
Re: Rob's big Texan
Finally, some visible progress on the cockpit area..
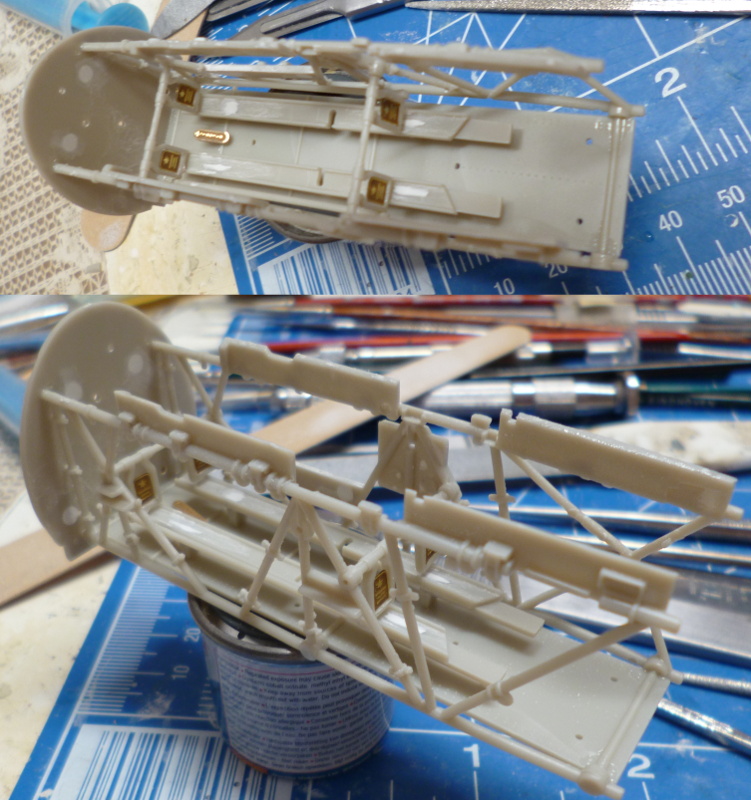
Again, this is just the kit parts, except for the easily spotted bits of etch, and minus instrument detail on the four side panels, which was removed to make room for etched bits after painting. In case anyone is wondering what the pedal on the floor between the front rudder pedals is, it's apparently the starter. I wouldn't have know, save for the fact that is you look a lot closer than is possible on the pictures, the etched wiggles on it turn out to be readable text: "starter"
Again, this is just the kit parts, except for the easily spotted bits of etch, and minus instrument detail on the four side panels, which was removed to make room for etched bits after painting. In case anyone is wondering what the pedal on the floor between the front rudder pedals is, it's apparently the starter. I wouldn't have know, save for the fact that is you look a lot closer than is possible on the pictures, the etched wiggles on it turn out to be readable text: "starter"
-
rob_van_riel
- Modelling Gent and Scholar
- Posts: 3325
- Joined: November 4th, 2012, 11:28 am
- Location: The Netherlands
- Contact:
Re: Rob's big Texan
Grrrrr... just spent rather too much time fighting seatbelts. Both the kit and the Big Ed set contain PE seatbelts. The kit set is rather thick, strong brass, which will not bend naturally. The Eduard set is thin, springy unidentified silvery metal, which will not bend naturally. The kit set is never mentioned in the instructions, which gave me slight hope there might also be decals (which could have been placed on a nice and malleable chocolate wrapper), but no such luck. Not happy with this bunch 
Paper/fabric plan C on order, we'll see if that behaves..
Paper/fabric plan C on order, we'll see if that behaves..
-
SJPONeill

- Modelling Gent and Scholar
- Posts: 3525
- Joined: May 1st, 2011, 12:01 am
- Location: Near the Spiral, NZ.
- Contact:
Re: Rob's big Texan
Heat the etch parts and drop them in cold water while they are still hot. That will make them a lot more malleable...or create a black hole the will swallow the planet, I can never remember which...
Please critique my posts honestly i.e. say what you think so I can learn and improve...
The World According To Me
The World According To Me
-
rob_van_riel
- Modelling Gent and Scholar
- Posts: 3325
- Joined: November 4th, 2012, 11:28 am
- Location: The Netherlands
- Contact:
Re: Rob's big Texan
This will work on brass, so I might try it on the kit parts if the parts I ordered yesterday also fail. The cold water part is optional, by the way; it does nothing for the brass, but it really cuts down on the potential for blisters/scorch marks while the brass coolsSJPONeill wrote:Heat the etch parts and drop them in cold water while they are still hot. That will make them a lot more malleable...or create a black hole the will swallow the planet, I can never remember which...
I have no idea if it would have any effect on the Eduard parts, other that to burn of the paint. Different metals respond differently to heat, and I have no idea what the Eduard parts are made off (except that it clearly isn't brass or anything magnetic).
-
rob_van_riel
- Modelling Gent and Scholar
- Posts: 3325
- Joined: November 4th, 2012, 11:28 am
- Location: The Netherlands
- Contact:
Re: Rob's big Texan
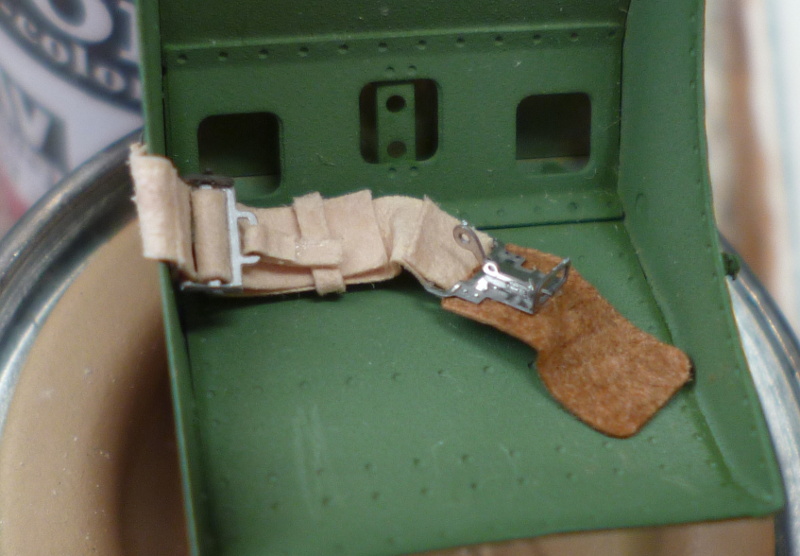
Plan C was in the mail today. Well, part of it; I'm so used to getting stuff like this in pairs in 1/72 scale that I didn't think/check, so I now have one safety harness for two seatsrob_van_riel wrote:Paper/fabric plan C on order, we'll see if that behaves..
I'm not yet sure of how well these will fold into the seat buckets, but the first strap sure looks nice..

Quite a bit of work there; 4 pieces of 'strap' and 3 parts of buckle. Buckle should be taken quite literally here; with the exception of the central locking mechanism, these are real buckles - why fake what you can build for real at a reduced scale. Tricky work too, I estimate all my tools, not to mention my fingers, are about 400% oversized for this sort of thing
-
ShaunW
- NOT the sheep
- Posts: 26188
- Joined: November 26th, 2011, 6:11 pm
- Location: Pontefract West Yorkshire
Re: Rob's big Texan
Oh nice, I like what you are doing here Rob. Those fabric belts will probably be a much nicer representation in this scale than PE in any event (there will be no annoying shiny bits to cover up time after time during the painting for starters - I always miss bits and notice usually once the cockpit is nearly together and the glazing is about to go on or, worse still, is on ), the one that you have completed certainly looks the part. I wonder if Eduard uses nickel perhaps?
Doing - Tamiya 1/35th Universal Carrier.
Work is the curse of the modelling classes!
IPMS#12300
Work is the curse of the modelling classes!
IPMS#12300
-
rob_van_riel
- Modelling Gent and Scholar
- Posts: 3325
- Joined: November 4th, 2012, 11:28 am
- Location: The Netherlands
- Contact:
Re: Rob's big Texan
I'm happy with what I've seen so far, but the real test will be the 'fold into the seat' part. Apparently, the strap material used here loses strength when wet, allowing it to conform nicely. I've used a similar approach with simple paper straps on 54mm figures, with good result, so I have some confidence. Hopefully, I'll know more by the end of today or tomorrow.ShaunW wrote:Oh nice, I like what you are doing here Rob. Those fabric belts will probably be a much nicer representation in this scale than PE in any event (there will be no annoying shiny bits to cover up time after time during the painting for starters - I always miss bits and notice usually once the cockpit is nearly together and the glazing is about to go on or, worse still, is on
I'd considered that, but as far as I know, nickel is magnetic, and this stuff isn't. Apparently, the range of copper alloys (ie, brass) is quite wide, and includes some white materials. I'm guessing they use one of those.I wonder if Eduard uses nickel perhaps?
-
rob_van_riel
- Modelling Gent and Scholar
- Posts: 3325
- Joined: November 4th, 2012, 11:28 am
- Location: The Netherlands
- Contact:
Re: Rob's big Texan
I built up the right lapbelt, stuck it to the seat, and then brought it to a most soggy state indeed. Some pushing and poking convinced it to snuggle down nicely, and it stayed down after a night of drying. I'm calling this a successful test.rob_van_riel wrote:Apparently, the strap material used here loses strength when wet, allowing it to conform nicely. I've used a similar approach with simple paper straps on 54mm figures, with good result, so I have some confidence. Hopefully, I'll know more by the end of today or tomorrow.
Now, time to complete this set, and order the extras.
I case anyone else is as impressed by these sets as I am, they're made by RB Productions from Ireland.