Very little. The weekend was packed with other stuff, so no activity for the past two days. I got the air intakes attached to the fuselage, and the big fuselage seam covered in filler, which should be ready for cleanup now. One of the wings has been mostly cleaned, and now needs the lines between wing and control surfaces restored. Small stuff, really.fredk wrote:Hows this coming along?
Anything more to share yet?
5 days gone already
Rob's Strikemaster *finished*
-
rob_van_riel
- Modelling Gent and Scholar
- Posts: 3325
- Joined: November 4th, 2012, 11:28 am
- Location: The Netherlands
- Contact:
Re: Rob's Strikemaster
-
Stuart

- Raider of the Lost Ark Royal
- Posts: 19451
- Joined: February 25th, 2013, 4:55 pm
- Location: North Wales
- Contact:
Re: Rob's Strikemaster
coming along nicely Rob.
Stuart Templeton I may not be good but I'm slow...
My Blog: https://stuartsscalemodels.blogspot.com/
My Blog: https://stuartsscalemodels.blogspot.com/
-
rob_van_riel
- Modelling Gent and Scholar
- Posts: 3325
- Joined: November 4th, 2012, 11:28 am
- Location: The Netherlands
- Contact:
Re: Rob's Strikemaster
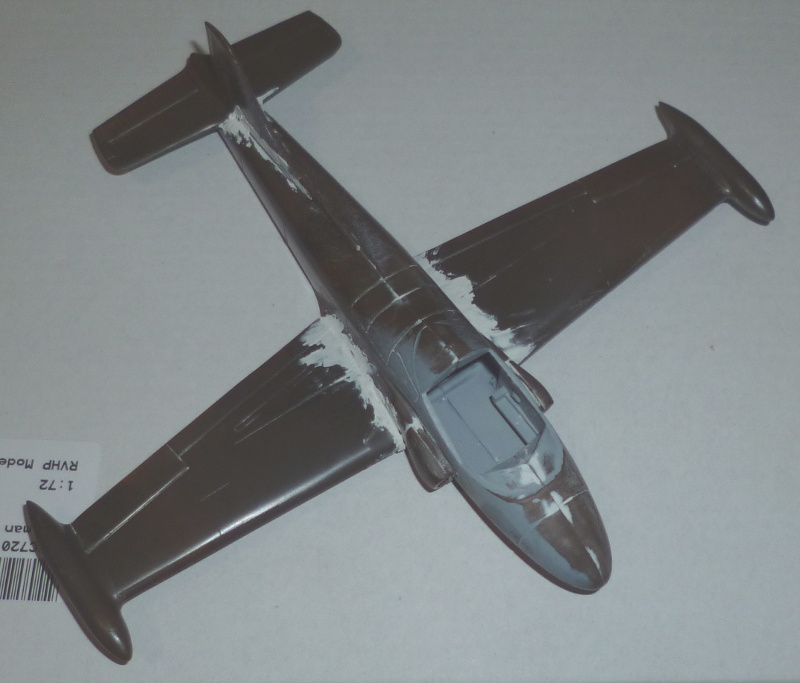
The fuselage is cleaned up, as are the wings, and I've boxed in the wheel wells with green stuff. Fit of the wings is very loose, so I'll have to come up with some cunning plan to get the dihedral right, or at the very least, symmetrical, before I attach the wings.
-
rob_van_riel
- Modelling Gent and Scholar
- Posts: 3325
- Joined: November 4th, 2012, 11:28 am
- Location: The Netherlands
- Contact:
Re: Rob's Strikemaster
The cunning plan for the wings failed to produce perfection, but I think I twiddled it close enough. I'll leave the cement to cure properly before continuing, but it's already clear some filler will be needed. I'll probably stick on the stabilisers first, and do filler and cleanup all in one pass.
-
rob_van_riel
- Modelling Gent and Scholar
- Posts: 3325
- Joined: November 4th, 2012, 11:28 am
- Location: The Netherlands
- Contact:
Re: Rob's Strikemaster
All the major parts are assembled. Once I've cleaned up the current batch of filler, it will be ready for a blast of primer to see what I missed. It's beginning to look the part 
-
rob_van_riel
- Modelling Gent and Scholar
- Posts: 3325
- Joined: November 4th, 2012, 11:28 am
- Location: The Netherlands
- Contact:
Re: Rob's Strikemaster
Some cleaning up today, followed by the predicted primer. Some small amount of work will still be needed at the tail roots, but otherwise I'm happy. A quick dab of putty has gone on the gap between the halves of the cockpit rear wall, such as it is. I hope to fill and close the cockpit at the next session.
-
rob_van_riel
- Modelling Gent and Scholar
- Posts: 3325
- Joined: November 4th, 2012, 11:28 am
- Location: The Netherlands
- Contact:
Re: Rob's Strikemaster
The crew have been installed in their office.
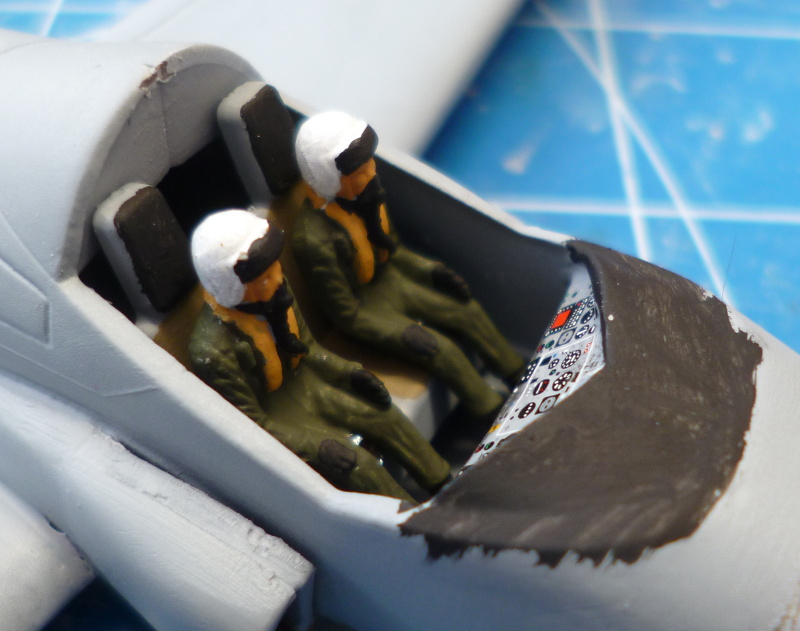
The canopy is now on, and the Clearfix I use to plug up minor gaps is drying. Once that's done, there will be a coat of clear for the canopy, followed by grey along the cockpit edge. Only then will I use Vallejo putty to completely smooth over the canopy to fuselage join. Per implication, not too much picture worthy progress in the next couple of days, but such things take time.
The canopy is now on, and the Clearfix I use to plug up minor gaps is drying. Once that's done, there will be a coat of clear for the canopy, followed by grey along the cockpit edge. Only then will I use Vallejo putty to completely smooth over the canopy to fuselage join. Per implication, not too much picture worthy progress in the next couple of days, but such things take time.
-
shangos70
- Modelling Gent and Scholar
- Posts: 4422
- Joined: May 1st, 2011, 11:14 am
- Location: Doncaster, Socialist Republic of South Yorkshire.
Re: Rob's Strikemaster
Coming along nicely now, where did you get the decal for the i.p? When I did mine I used a paper one from a firm called Hobby Tec I think.
-
rob_van_riel
- Modelling Gent and Scholar
- Posts: 3325
- Joined: November 4th, 2012, 11:28 am
- Location: The Netherlands
- Contact:
Re: Rob's Strikemaster
It came with the kit. This was a special edition put out a few years back, not the original Matchbox edition. One of the benefits of that is that it has a state of the art decal sheet by Cartograph, with a good part of the generic stuff and markings for Saudi Arabia or Omanshangos70 wrote:where did you get the decal for the i.p?
This one will be done in Omani colours, since those are a fairly distinct feature of this particular edition.
-
rob_van_riel
- Modelling Gent and Scholar
- Posts: 3325
- Joined: November 4th, 2012, 11:28 am
- Location: The Netherlands
- Contact:
Re: Rob's Strikemaster
The canopy rim is cleaned up, and the model will start spending time in the paintshop from Monday.
I'v succumbed to the temptation to improve the model just a bit. I wasn't going to, but the nose wheel doors were just too much; the kit parts are square in cross section No. Just no. Not happening. <shudder>
Some scrap plastic sheet will be substituted.
I'v succumbed to the temptation to improve the model just a bit. I wasn't going to, but the nose wheel doors were just too much; the kit parts are square in cross section
Some scrap plastic sheet will be substituted.
-
ShaunW
- NOT the sheep
- Posts: 26188
- Joined: November 26th, 2011, 6:11 pm
- Location: Pontefract West Yorkshire
Re: Rob's Strikemaster
This is looking good and I am a bit of a fan of the Strikey/Jet Provost T Mk 5. Although I am a classic kit enthusiast, one of the things I can't live with (amongst many others with old kits, though that has more to do with my AMS than the actual kits  ) are u/c doors that are a scale metre thick. Break out the plastic card and replace them. You know it makes sense
Doing - Tamiya 1/35th Universal Carrier.
Work is the curse of the modelling classes!
IPMS#12300
Work is the curse of the modelling classes!
IPMS#12300
-
rob_van_riel
- Modelling Gent and Scholar
- Posts: 3325
- Joined: November 4th, 2012, 11:28 am
- Location: The Netherlands
- Contact:
Re: Rob's Strikemaster
No paint shop on Monday, but the lower surfaces got their colour today. Nothing exiting to report though.
-
rob_van_riel
- Modelling Gent and Scholar
- Posts: 3325
- Joined: November 4th, 2012, 11:28 am
- Location: The Netherlands
- Contact:
Re: Rob's Strikemaster
The insides of the wheel wells, such as they are, have been painted, and the top sides have received a coat of matt Dark Earth. Since that is perhaps the most fingerprint sensitive colour I know of, I'll have to shoot some gloss varnish over it before continuing; I'll have to mask the camo pattern, and that involves groping all over the plane.
-
rob_van_riel
- Modelling Gent and Scholar
- Posts: 3325
- Joined: November 4th, 2012, 11:28 am
- Location: The Netherlands
- Contact:
Re: Rob's Strikemaster
Main painting is completed; just minor bits on the undercarriage, and the anti-glare panel to go.
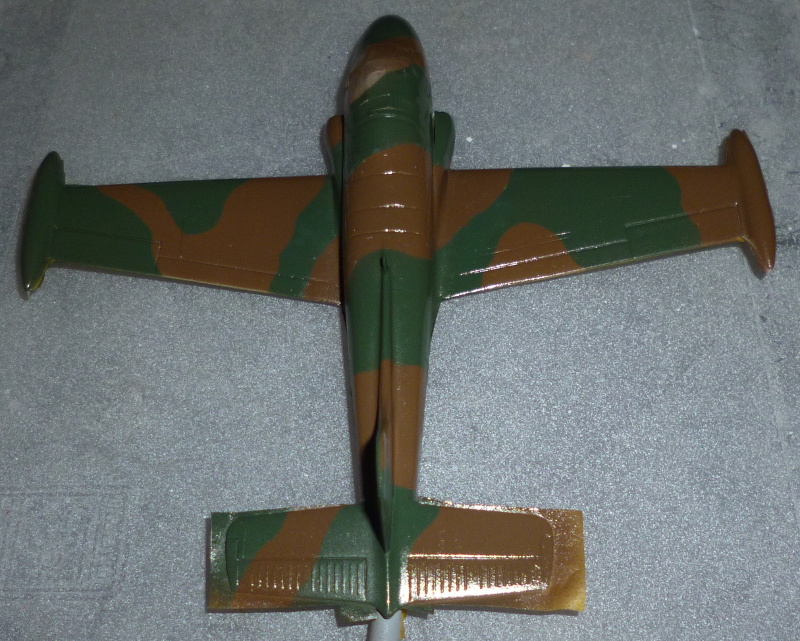
The Dark Earth actually looks this horribly bright. I hope this is due to the gloss varnish, and that it will revert to it's proper dull and dusty shade once hit with matt varnish. If not, I'm toast as far as this build is concerned
The Dark Earth actually looks this horribly bright. I hope this is due to the gloss varnish, and that it will revert to it's proper dull and dusty shade once hit with matt varnish. If not, I'm toast as far as this build is concerned
-
rob_van_riel
- Modelling Gent and Scholar
- Posts: 3325
- Joined: November 4th, 2012, 11:28 am
- Location: The Netherlands
- Contact:
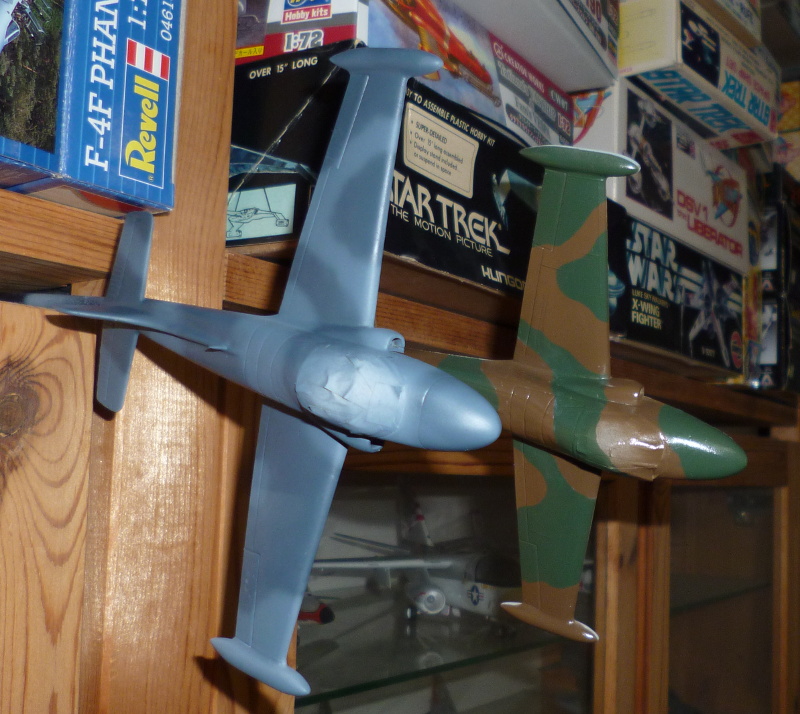
Re: Rob's Strikemaster
I've removed the masking on the lower surfaces. No seepage, but the tape tore of a small patch of paint at the nose. Easily corrected, so no problem. For the final parts of construction, I'll be doubling up all work on this Strikemaster with that on an older version I'm restoring. Here's both of them doing a spot of formation drying prior to a further protective coat of gloss varnish later today, and then the anti-glare panel and finishing touches tomorrow.