Aligning the wing struts on 1/72 Bi Planes
Aligning the wing struts on 1/72 Bi Planes
I have just finished my first bi plane in a long time the Airfix Albatross I had a hell of a time alinging the wing struts a problem I usually have but this seemed worse then usual. Is there a technique that I am not aware of to do this? The main problem seemed to be the struts on the fuselage more then the wings themselves.
-
MerlinJones
Re: Aligning the wing struts on 1/72 Bi Planes
For starters, this is going to look, at first glance, a lot more complicated than it actually is. This is because it is written down, rather than shown and, if you imagine having to write down how to tie your shoelaces, you'd wear slip-ons.
It all involves complex trigonometry, combined with an extended usage of 'log books' and advanced algebra.
You'll also need to invest in a biplane jig and be prepared to sell your soul and I can't go on AND keep a straight face...
Mwa-hahaha-haaaaaa!
Step 1 - Relax...it's supposed to be fun.
Step 2 - Realise that angles remain constant, regardless of scale. 45 degrees in 1/144 is 45 degrees in 1/24, etc..
Step 3 - Buy a protractor, preferably a transparent one...it will prove useful. You'll also help these guys out;
http://www.cracked.com/video_18465_the- ... s-end.html;
Step 4 - Use a glue that doesn't set immediately! I used superglue gel. The advantage of this over polystyrene cement is that I can use Zipkicker accelerator to set the glue solid, as soon as I get my piece exactly where I want it. With glue that takes time to set, or cure, you'll need some sort of jig to hold everything in place whilst the glue sets and hope for the best.
Step 5 - Study the plans and make sure that you know where each strut should go. Some kits provide nice, clear, location points. Some don't. I usually drill small holes to make these more obvious.
Most biplane modellers I know of, myself included, do a lot of alignment by using the Mk.I Eyeball, with repeated referencing of the drawings provided with the kit. Often, the necessary head-on shots are not provided, so a quick trawl of Google Image for a 3-View is usually required.
Normally, I will start off with those shorter struts you refer to as 'the struts on the fuselage', the cabane struts. Their location points are usually well-defined and, being shorter, I find it relatively easier to ensure that they remain symmetrical, when viewed head-on.
The point is to remember that the tops of these struts should line up...I use a lightweight plastic ruler for this, sitting it actually on the struts, or the upper wing is used. I prefer my ruler, because the upper wing sometimes has a built-in dihedral.
My recent build of an Eduard Junkers J1 proved somewhat difficult in the strut department. There were struts located on the lower wing and halfway up the fuselage. The upper wing was partcularly heavy and couldn't be used to guide placement.
As a consequence, I went Back to Basics and used my protractor to ensure that the angles of the struts matched those of the provided plans. For ease, I worked outwards and used my lightweight ruler to ensure that the tops of all struts were at the same height.
Once all of the struts were in place, they were able to bear the weight of the upper wing.
(One advantage of this particular method is that you are left with clear access to both top and bottom of the struts and this can facilitate rigging).
I'm going to be building a pair of Albatros DV's in the near future and will remember to take some hopefully helpful shots.
Regards,
Bruce
-
dadlamassu
- Series 3 and Beyond
- Posts: 34
- Joined: May 1st, 2011, 8:12 pm
Re: Aligning the wing struts on 1/72 Bi Planes
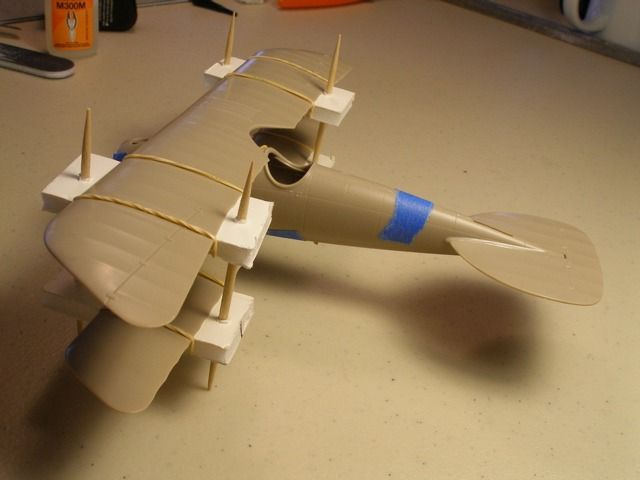
I've made lots of biplanes for my wargames forces and use, as described above, a protractor and the Mk1 eyeball. An added refinement that I use is to make a "holder" for the fuselage/lowerwings out of lego on a large base. Secure the model with tape or blutack, Then make two more holders for the upper wings at a convenient position on the wing and base. Any variations in height can be made with thin lego bricks and fine adjustments with blobs of blutack or similar. Then I start with the cabane struts and work outwards.
But do watch out if you take the Lego from the toybox and the children find out!
But do watch out if you take the Lego from the toybox and the children find out!
-
AndrewR

- In the basement lab
- Posts: 24072
- Joined: April 5th, 2011, 4:13 pm
- Location: Ottawa, Ontario, The Great White North
- Contact:
Re: Aligning the wing struts on 1/72 Bi Planes
With old kits, also make sure that the corresponding struts are the same length on starboard and port sides. Also check that any locating points on the fuselage are actually at the same height on both sides. I have a feeling that might not be the case with the Airfix Albatros 
The Lego jig is invaluable.
With the Matchbox/Revell Gladiator, I glued the interplane struts first, then located the cabanes in the upper wing, which involved considerable trimming to get them to fit!
Cheers
Andrew
The Lego jig is invaluable.
With the Matchbox/Revell Gladiator, I glued the interplane struts first, then located the cabanes in the upper wing, which involved considerable trimming to get them to fit!
Cheers
Andrew
Up in the Great White North
Re: Aligning the wing struts on 1/72 Bi Planes
Thanks for that and yes I do believe the Airfix Albatross does not have the locating points at the same position on both sides of the fuselage! I will see how my next bi plane build goes, I also have a Revell Albatross coming so I will be able to see if that is any easier.
-
AndrewR
- In the basement lab
- Posts: 24072
- Joined: April 5th, 2011, 4:13 pm
- Location: Ottawa, Ontario, The Great White North
- Contact:
Re: Aligning the wing struts on 1/72 Bi Planes
My Airfix Albatros is in a very sad state, as I got it fully rigged, and just needed to decal and put the undercarriage on. Obviously I had put too much stress on one of the interplane struts, because it collapsed.Saxon wrote:Thanks for that and yes I do believe the Airfix Albatross does not have the locating points at the same position on both sides of the fuselage! I will see how my next bi plane build goes, I also have a Revell Albatross coming so I will be able to see if that is any easier.
I can remove it and replace it with some thin brass rod. In principle, I should be able to do this with damaging the rigging, because it's all elastic thread.
Are you getting the 1/72 or 1/48 Revell kit. The 1/48 kit is ex-Eduard, and should be quite nice.
cheers
Andrew
Up in the Great White North
Re: Aligning the wing struts on 1/72 Bi Planes
It's the 1/72 scale Revell, I don't do rigging but if I tried I think I would end up destroying the model lol I felt tempted to change the inter plane strut with something stronger as well which I have done before. I came very close to sending the model on a flight against the brick wall haven't felt that way for a while about a model!AndrewR wrote:My Airfix Albatros is in a very sad state, as I got it fully rigged, and just needed to decal and put the undercarriage on. Obviously I had put too much stress on one of the interplane struts, because it collapsed.Saxon wrote:Thanks for that and yes I do believe the Airfix Albatross does not have the locating points at the same position on both sides of the fuselage! I will see how my next bi plane build goes, I also have a Revell Albatross coming so I will be able to see if that is any easier.
I can remove it and replace it with some thin brass rod. In principle, I should be able to do this with damaging the rigging, because it's all elastic thread.I just haven't got around to trying it yet.
Are you getting the 1/72 or 1/48 Revell kit. The 1/48 kit is ex-Eduard, and should be quite nice.
cheers
Andrew
-
SJPONeill

- Modelling Gent and Scholar
- Posts: 3525
- Joined: May 1st, 2011, 12:01 am
- Location: Near the Spiral, NZ.
- Contact:
Re: Aligning the wing struts on 1/72 Bi Planes
I haven't tried this because I have yet to get a biplane to the point of needing to but might be worth a crack...?

Please critique my posts honestly i.e. say what you think so I can learn and improve...
The World According To Me
The World According To Me
-
MerlinJones
Re: Aligning the wing struts on 1/72 Bi Planes
That looks as if you'd have to insert your struts with tweezers!
-
Viking

- The Bug Has Well And Truly Bitten
- Posts: 216
- Joined: May 1st, 2011, 8:53 am
- Location: land of glen's, of ben's, of hero's
Re: Aligning the wing struts on 1/72 Bi Planes
in general, i build 48th biplanes rather than 72nd, but, as Bruce says, angles etc are independant of scale. I am firm beliver in doing things the other way; i start from the outside and work in. I did try the cabane struts first approach once but ended up with the upper wing sitting higher than it should and the interplane struts then not fitting. Now i use superglue to attach the lower ends of the interplane struts the flip the model upside own and glue the stuts to the top wing (that way i dont ave to balance the upper wing on anything). the cabane struts are then added using tweezers and the old mark 1 eyeball.
it works for me.
it works for me.
Completed: not counting. Bought: trying not to let Mrs Viking count
-
AndrewR
- In the basement lab
- Posts: 24072
- Joined: April 5th, 2011, 4:13 pm
- Location: Ottawa, Ontario, The Great White North
- Contact:
Re: Aligning the wing struts on 1/72 Bi Planes
I'm trying this approach on the Revell SE5a, and so far it's working well. I can also rig without the upper wing in place using elastic cord, so the method is doubly useful.Viking wrote:in general, i build 48th biplanes rather than 72nd, but, as Bruce says, angles etc are independant of scale. I am firm beliver in doing things the other way; i start from the outside and work in. I did try the cabane struts first approach once but ended up with the upper wing sitting higher than it should and the interplane struts then not fitting. Now i use superglue to attach the lower ends of the interplane struts the flip the model upside own and glue the stuts to the top wing (that way i dont ave to balance the upper wing on anything). the cabane struts are then added using tweezers and the old mark 1 eyeball.
it works for me.
Now that brings tears to the eyes...MerlinJones wrote:That looks as if you'd have to insert your struts with tweezers!
Cheers
Andrew
Up in the Great White North