New Airfix Provost with tricky decals.

Military or civil, triplanes, biplanes or monoplanes, props, jets or helicopters...models in here.
Post Reply
User avatar
Chuck E
Established 1949
Posts: 2421
Joined: May 3rd, 2011, 8:05 pm
Location: Darlington. Home of the Railways

New Airfix Provost with tricky decals.

Post by Chuck E »

I have been building a couple of the new Jut Provosts from Airfix.

The kit is absolutely first class and I will buy more later for the spare decals that I have for them. I'm not sure if any of you are on with one at the moment, but I was hoping for a little feedback.

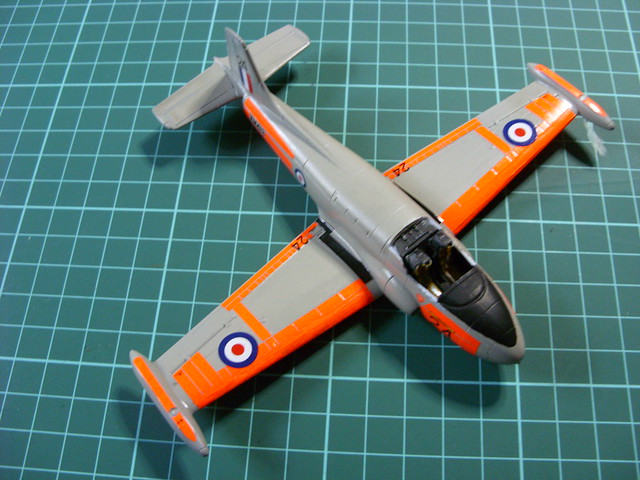
The decals are superb and adhere well . . . apart from those extra thick DayGlo ones. I have almost had to stick them to the glossy grey surface with Kleer. They show a major resistance to being bent. This was impossible for the wrap around decal on the leading edges, so I cut them into thin strips and applied one above and one below. Once aligned and stuck down, you can still see the edge. I filled in the gap with 2 coats of acrylic white and then a single coat of Xtracolour X253 Leuchtorange. This fixed that issue without a hitch. The decals on flat surfaces were held down using Humbrol Decalfix, as shown in their video. The wing tip tanks were a pain. It took nearly 15 minutes for the decal to float free and it was applied over a primer of the liquid, pressed gently down and then sealed with another generous coat. That is how it stayed overnight and I came down to find that the decal had reverted to a flat plank resting on the tank. No persuasion would induce the decals to lay flat and it was akin to trying to bend 1/4" ply around a milk bottle using only wet porridge. Every time to removed the pressure, it just bounced back. I wrote off to Airfix to get spare decals for the broken ones. No joy. No spares for these brittle decals. I have now painted the tanks white and applied the bands with a cocktail stick. Once dry, I repainted the Light Aircraft Grey around the edges to tidy them up. I have bought a second model and used some of the decals from that, but they are just as stiff and just as brittle. I have tried Micro Set and Sol as well, but still no joy.

Has anyone else had this problem???????

Image
So many models, so little time.
shangos70
Modelling Gent and Scholar
Posts: 4421
Joined: May 1st, 2011, 11:14 am
Location: Doncaster, Socialist Republic of South Yorkshire.

Re: New Airfix Provost with tricky decals.

Post by shangos70 »

I had read of issues with the decals and saw a post from Jonathan Mock which was on a facebook group.He designed the scheme, recommending the use of quite hot water and setting solutions with maybe a drop of detergent in the water.
Either way it looks like a great result, I have 2 stashed but have the aftermarket sheet.
User avatar
MarkyM607
Modelling Gent and Scholar
Posts: 9153
Joined: January 5th, 2013, 1:16 pm
Location: Cambs

Re: New Airfix Provost with tricky decals.

Post by MarkyM607 »

I'm building the T.3 now, just picked the other scheme (luckily it seems!!). Haven't finished painting but good to hear problems before I would have got to them!.
Hoping to return to modelling sometime this year!! :lol:
Owner of Marky's Model Emporium since 2013!.
User avatar
skypirate
Modelling Gent and Scholar
Posts: 7295
Joined: May 1st, 2011, 6:13 am
Location: Port Macquarie, Australia

Re: New Airfix Provost with tricky decals.

Post by skypirate »

Chuck E wrote:it was akin to trying to bend 1/4" ply around a milk bottle using only wet porridge.
I hope you are not speaking from experience!
But very interesting, thanks. I have just bought this kit for the Xtradecal sheet. I wonder if their dayglo strips perform better, but I am unlikely to choose such a scheme.

cheers,

David
User avatar
Chuck E
Established 1949
Posts: 2421
Joined: May 3rd, 2011, 8:05 pm
Location: Darlington. Home of the Railways

Re: New Airfix Provost with tricky decals.

Post by Chuck E »

I'm painting them in now. Just wondering whether to build another one with the Xtradecal sheet, in the similar scheme. I could remove the paint from this one and do a camo scheme.
So many models, so little time.
Post Reply

Return to “Aviation Modelling”