Last night I managed to attach the upper wing (using the 4 inner struts only) using a Tamiya bi-plane wing support (or, more accurately, 6 jars of Tamiya paint strategically positioned around the wings to hold them true). The DH2 has no stagger so all is quite straight forward.
This morning I checked and all was OK, well if you call the struts being out of alignment OK! Fool that I am, I trusted that the positioning holes for the wing struts were square and true, they are NOT. It seems you can either have wings square and true with struts at a variety of angles or, straighten up the struts (which can be done) and have the wings out of true by 5 possibly 10 degrees!! I have disassembled the wings. Plan now is to measure out the securing holes square, fill the original holes (the ones misaligned) and drill new fixing holes. That, of course, means the rigging holes will have to be re-done. Fortunately, you will not make that mistake because I have made it for you! Another one pace forward, 2 paces back.
TeeELLs kitchen crafting kit creations
-
TeeELL

- Modelling Gent and Scholar
- Posts: 11589
- Joined: December 28th, 2015, 4:38 pm
- Location: North Wiltshire
Re: TeeELLs kitchen crafting kit creations
Tony
The older I get the better I was!
Current build:
Airfix 1:72 Javelin FAW9
Particular modelling interests:
Cuban Airforce aircraft, 29(F) Sqn aircraft, Aircraft I’ve flown
The older I get the better I was!
Current build:
Airfix 1:72 Javelin FAW9
Particular modelling interests:
Cuban Airforce aircraft, 29(F) Sqn aircraft, Aircraft I’ve flown
-
TeeELL
- Modelling Gent and Scholar
- Posts: 11589
- Joined: December 28th, 2015, 4:38 pm
- Location: North Wiltshire
Re: TeeELLs kitchen crafting kit creations
After careful measurement only one positioning hole appears to be out of position! Strange given that twisting the upper wing appeared to allow all the 4 struts to align. My plan is to re-drill the one hole (upper wing port side forward hole is approx 0.5mm out of position towards the wing tip - doesn't seem much!) open out the other holes slightly and, with the aircraft in a jig, position each strut in alignment. I may also use a fine brass tube as temporary cabane struts.
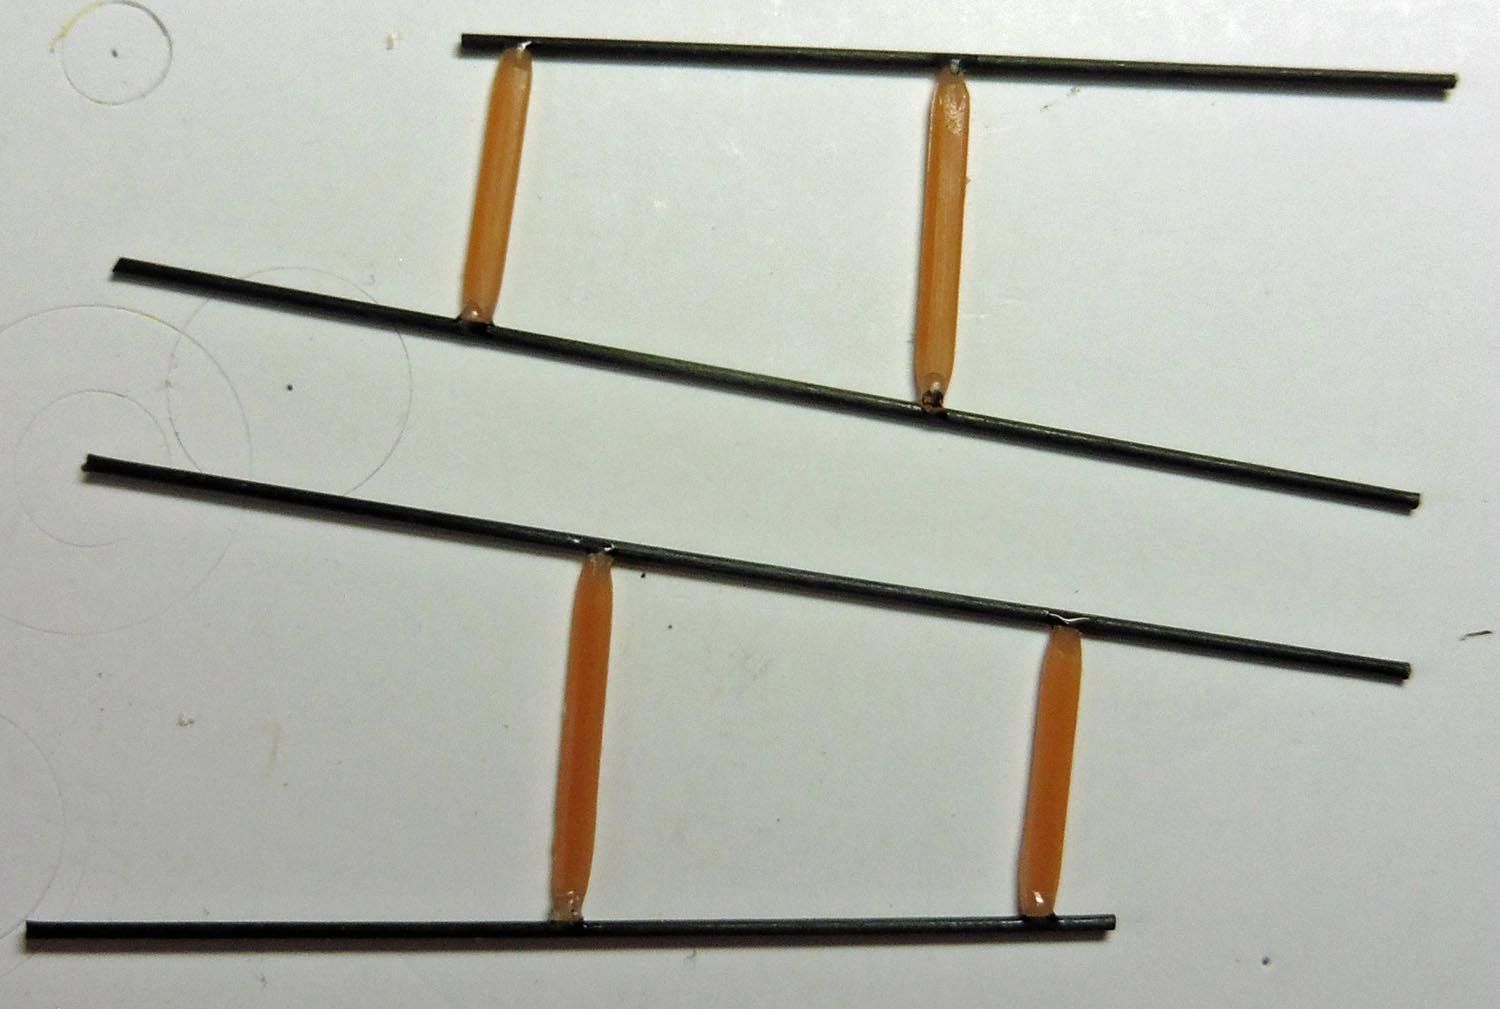
The 'Tamiya paint jar' jig is not going to cut it for this job, so I have constructed something a little more workable. The fit is such that I only need some shim either side to hold the wings central.
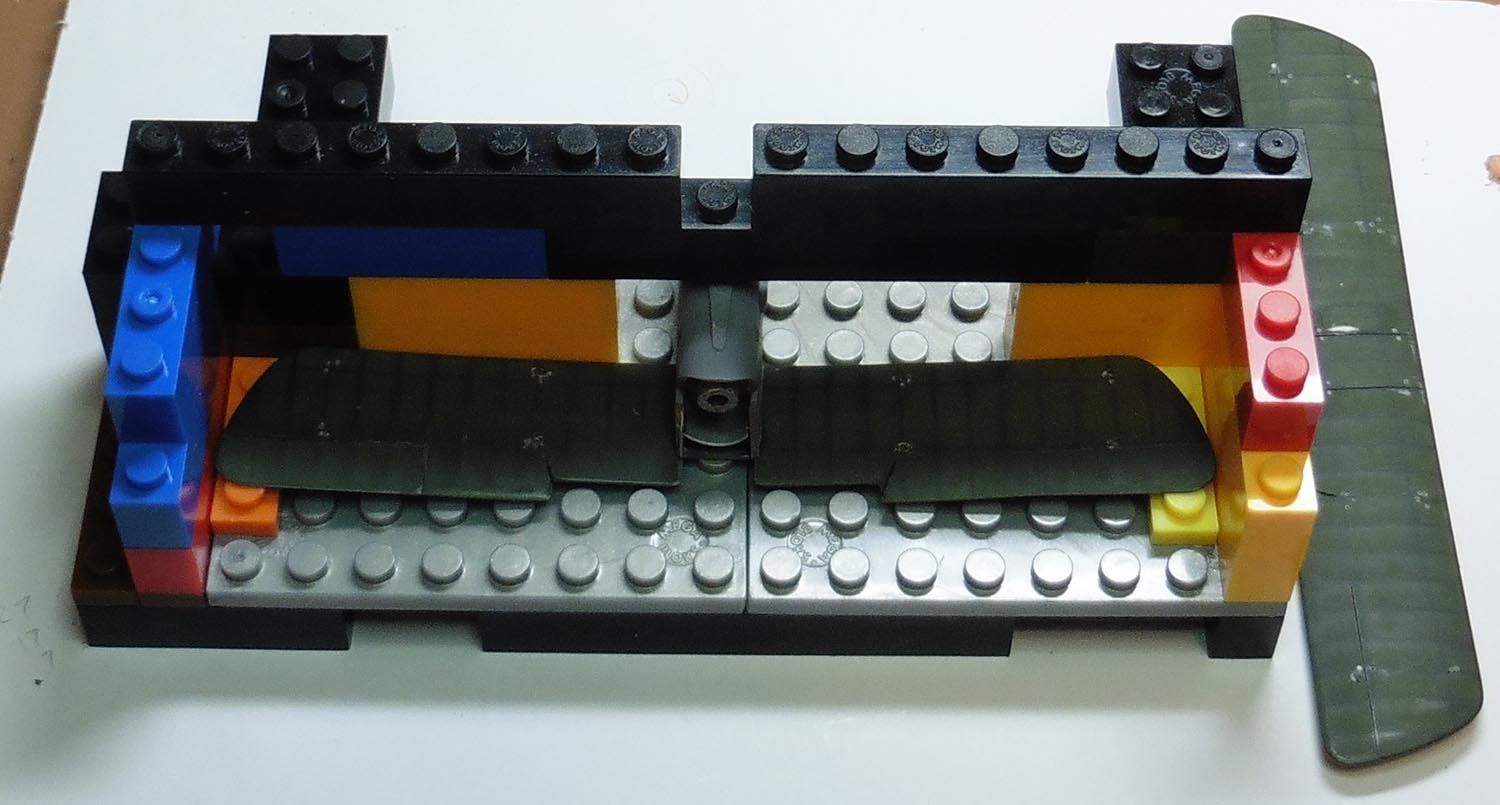
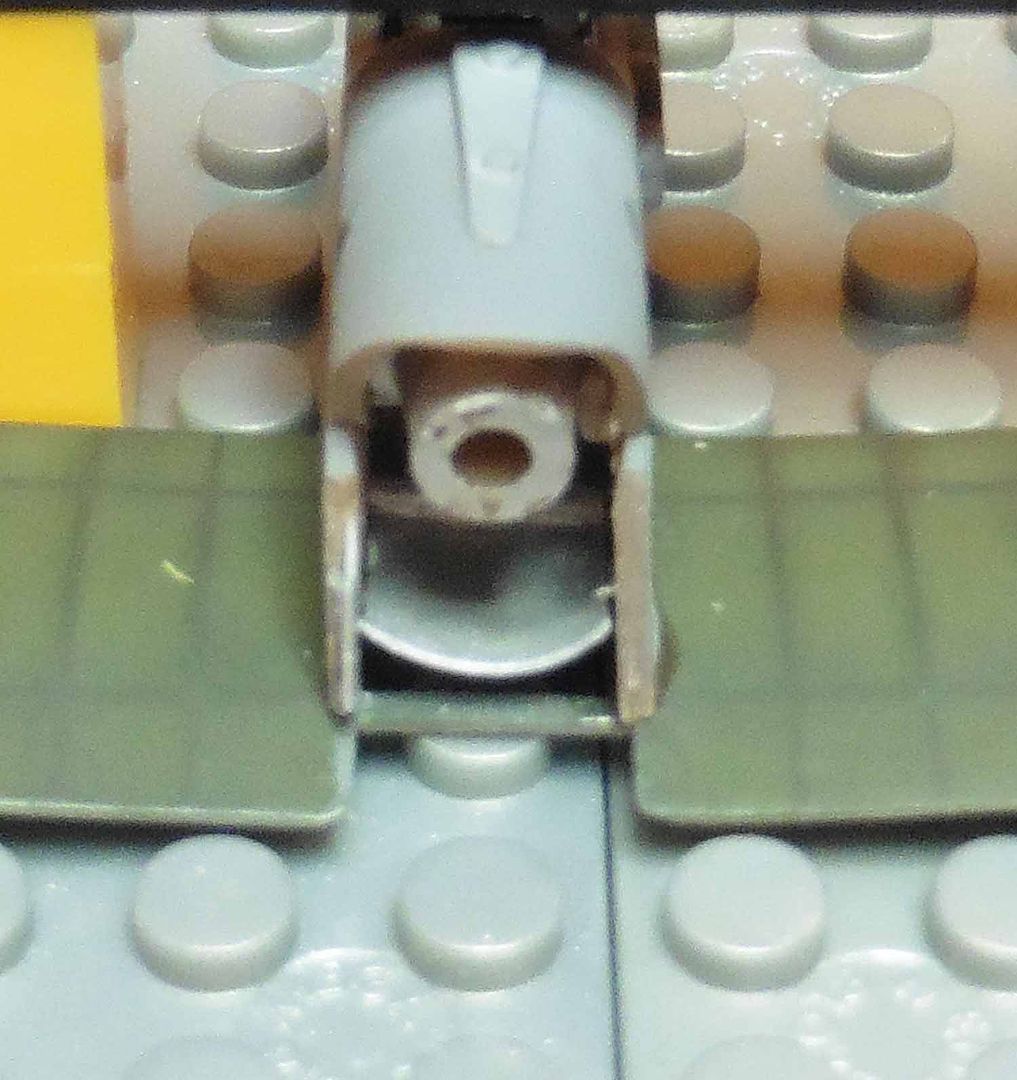
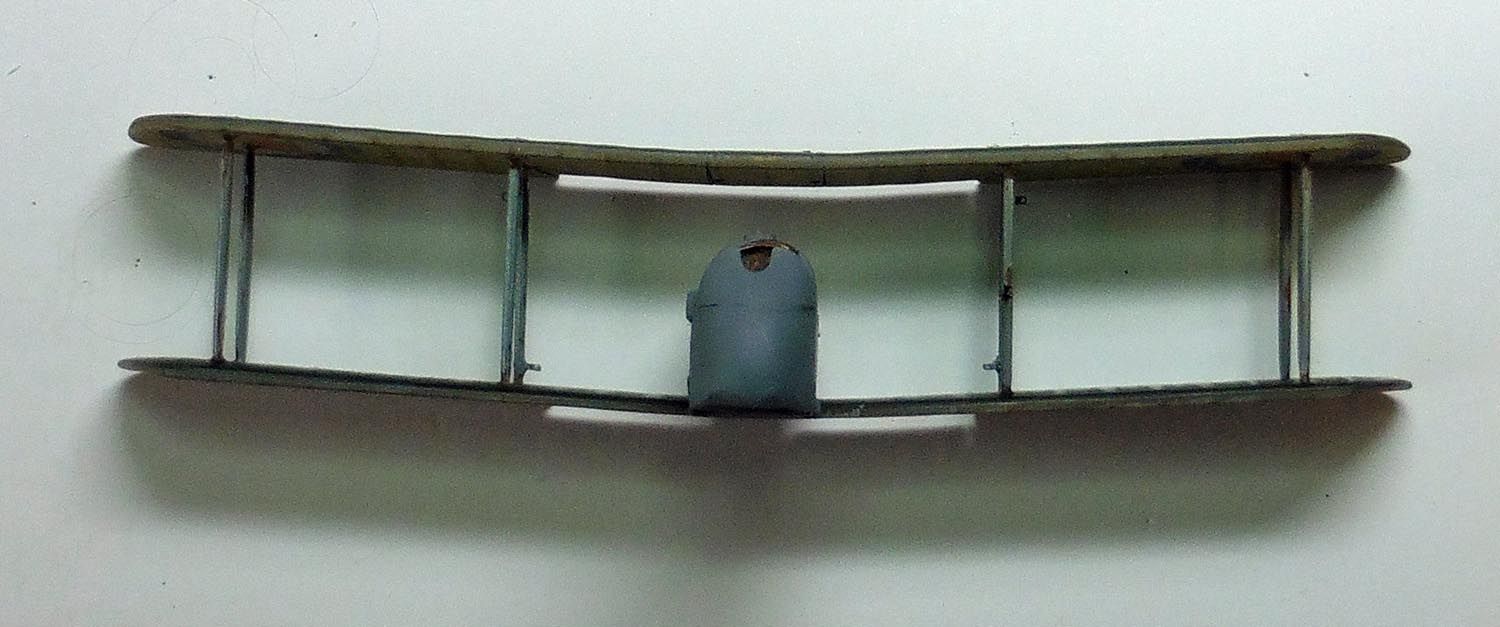
I have also added the curved aluminium shield that sits below the engine. Sorry about the focus.
This was made by taping one end of a trapezoid of my thinnest plasticard around a brass rod and running boiling water over it.
The 'Tamiya paint jar' jig is not going to cut it for this job, so I have constructed something a little more workable. The fit is such that I only need some shim either side to hold the wings central.
I have also added the curved aluminium shield that sits below the engine. Sorry about the focus.
This was made by taping one end of a trapezoid of my thinnest plasticard around a brass rod and running boiling water over it.
Tony
The older I get the better I was!
Current build:
Airfix 1:72 Javelin FAW9
Particular modelling interests:
Cuban Airforce aircraft, 29(F) Sqn aircraft, Aircraft I’ve flown
The older I get the better I was!
Current build:
Airfix 1:72 Javelin FAW9
Particular modelling interests:
Cuban Airforce aircraft, 29(F) Sqn aircraft, Aircraft I’ve flown
-
ShaunW
- NOT the sheep
- Posts: 26180
- Joined: November 26th, 2011, 6:11 pm
- Location: Pontefract West Yorkshire
Re: TeeELLs kitchen crafting kit creations
Lego is very useful for making modelling jigs and I've seen a number of members use it on here over the years. I must get down to the local Smyths or Toys R Us at some point to see if it is possible to still buy Lego as individual bricks and what have you rather than as a set to make a specific "model". I've heard that it doesn't come cheap though.
Doing - Tamiya 1/35th Universal Carrier.
Work is the curse of the modelling classes!
IPMS#12300
Work is the curse of the modelling classes!
IPMS#12300
-
TeeELL
- Modelling Gent and Scholar
- Posts: 11589
- Joined: December 28th, 2015, 4:38 pm
- Location: North Wiltshire
Re: TeeELLs kitchen crafting kit creations
With the top wing mounted in the machine vice on my lathe I decided to use the indexing system to ensure each hole was square to its neighbour in both axis. It took moments to do.
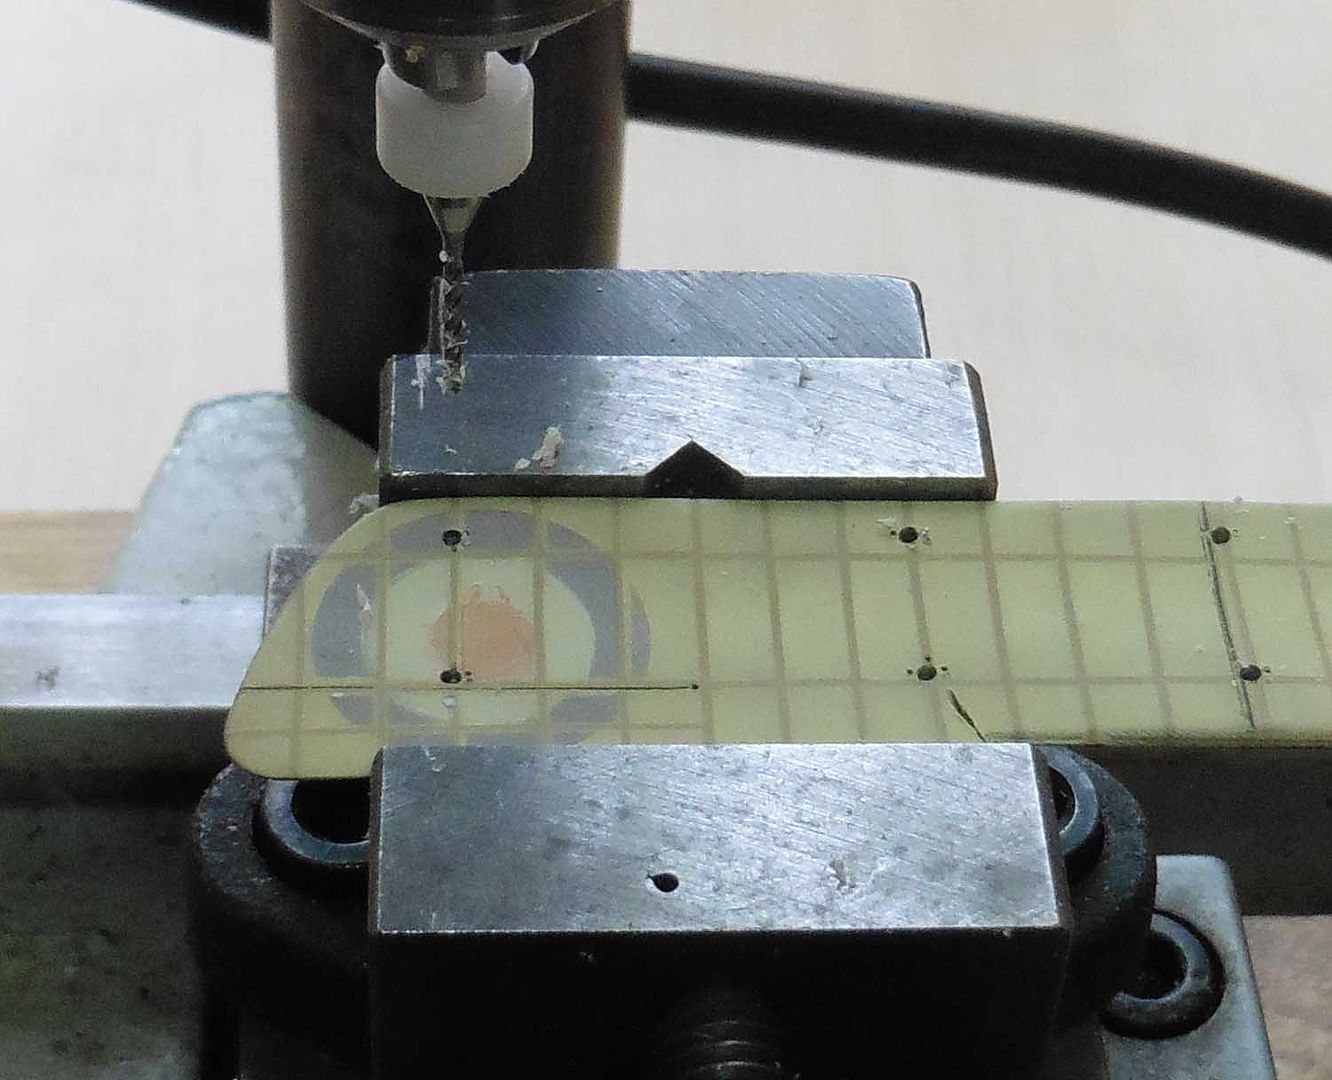
A swap to a 0.3mm drill and the 'new' rigging holes were made.
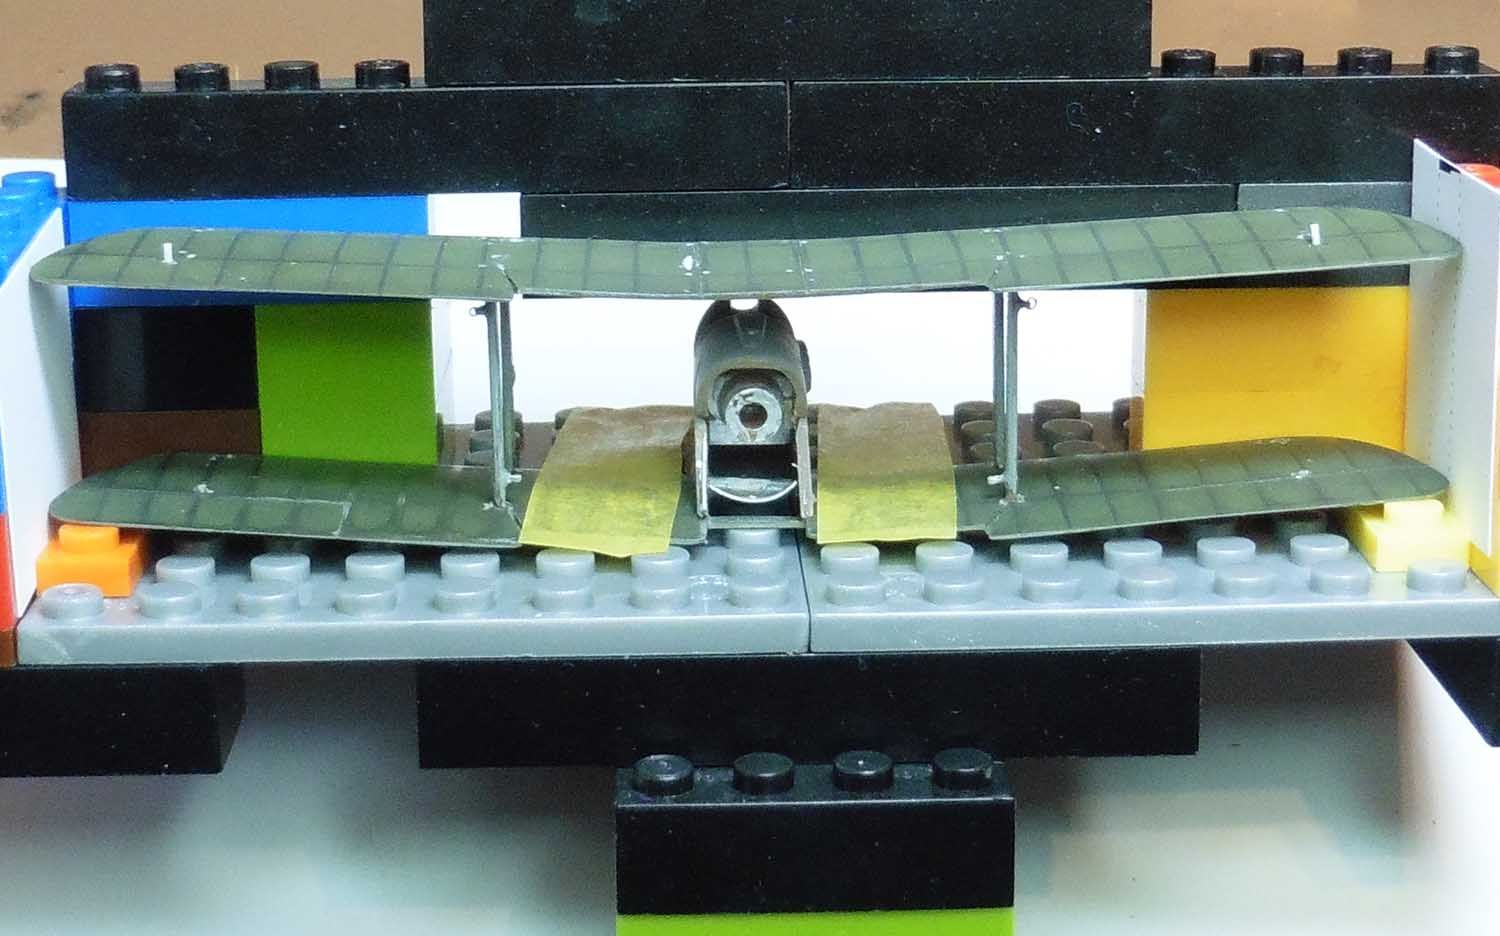
With the DH2 set in the jig, I used my 'Blue-light' glue to fill the strut receiving holes in the top wing. I dipped the bottom of the struts in some more of the glue and positioned them in the lower wing receiving holes. In its liquid state the glue has sufficient strength to hold the struts whilst the top wing is positioned. With the top wing forward against the jig and tilted slightly I positioned the inner front struts. I then rotated the rear of the wing down and positioned the rear struts. Everything was checked for square and aligned and the 'Blue-light' zapped the glue to set it. All in all a fairly painless exercise (so far!!). Of course I now have to remove the model and set up the receiving holes for the outer struts.
A swap to a 0.3mm drill and the 'new' rigging holes were made.
With the DH2 set in the jig, I used my 'Blue-light' glue to fill the strut receiving holes in the top wing. I dipped the bottom of the struts in some more of the glue and positioned them in the lower wing receiving holes. In its liquid state the glue has sufficient strength to hold the struts whilst the top wing is positioned. With the top wing forward against the jig and tilted slightly I positioned the inner front struts. I then rotated the rear of the wing down and positioned the rear struts. Everything was checked for square and aligned and the 'Blue-light' zapped the glue to set it. All in all a fairly painless exercise (so far!!). Of course I now have to remove the model and set up the receiving holes for the outer struts.
Tony
The older I get the better I was!
Current build:
Airfix 1:72 Javelin FAW9
Particular modelling interests:
Cuban Airforce aircraft, 29(F) Sqn aircraft, Aircraft I’ve flown
The older I get the better I was!
Current build:
Airfix 1:72 Javelin FAW9
Particular modelling interests:
Cuban Airforce aircraft, 29(F) Sqn aircraft, Aircraft I’ve flown
-
TeeELL
- Modelling Gent and Scholar
- Posts: 11589
- Joined: December 28th, 2015, 4:38 pm
- Location: North Wiltshire
Re: TeeELLs kitchen crafting kit creations
With all the joints 'zapped' the fuselage and main-planes are remarkable stable, of course some rigging will add to the strength; do it right and it is surprising how 'strong' the finished aircraft feels. I will press on with the tail booms and cabane struts (probably going to have to fabricate the cabanes as the original are, I think, too short, as they didn't attach where the real things do).
I think cyno will be the glue of choice for attaching the struts to the carbon fibre booms.
Catch you later!
I think cyno will be the glue of choice for attaching the struts to the carbon fibre booms.
Catch you later!
Tony
The older I get the better I was!
Current build:
Airfix 1:72 Javelin FAW9
Particular modelling interests:
Cuban Airforce aircraft, 29(F) Sqn aircraft, Aircraft I’ve flown
The older I get the better I was!
Current build:
Airfix 1:72 Javelin FAW9
Particular modelling interests:
Cuban Airforce aircraft, 29(F) Sqn aircraft, Aircraft I’ve flown
-
JamesPerrin

- Looks like his avatar
- Posts: 13669
- Joined: April 5th, 2011, 8:09 pm
- Location: W. Yorkshire
- Contact:
Re: TeeELLs kitchen crafting kit creations
Some beautiful modelling here but how I wish I known how to construct a drilling guide like yours for thin pieces.
Classic British Kits SIG Leader Better to fettle than to fill
(2024 A:B 5:2) (2023 13:8:7) (2022 21:11) (2021 15:8) (2020 8:4:4)
(2024 A:B 5:2) (2023 13:8:7) (2022 21:11) (2021 15:8) (2020 8:4:4)
-
iggie

- Modelling Gent and Scholar
- Posts: 23417
- Joined: July 31st, 2013, 11:04 am
- Location: North Somercotes, Lincolnshire
- Contact:
Re: TeeELLs kitchen crafting kit creations
Great work Tony!
Best wishes
Jim
If you can walk away from a landing, it's a good landing. If you use the airplane the next day, it's an outstanding landing
"Never put off till tomorrow, what you can do the day after tomorrow"
Jim
If you can walk away from a landing, it's a good landing. If you use the airplane the next day, it's an outstanding landing
"Never put off till tomorrow, what you can do the day after tomorrow"
-
Sunray
- Active Participant
- Posts: 611
- Joined: March 18th, 2014, 4:01 pm
- Location: Penshaw, North East, England
- Contact:
Re: TeeELLs kitchen crafting kit creations
I knew keeping all that Lego would come in handy one day. Excellent stuff.
Cheers
Ian
Please click on the web link below to have a look at all my photo's.
https://www.flickr.com/photos/ecirpnai/albums
Ian
Please click on the web link below to have a look at all my photo's.
https://www.flickr.com/photos/ecirpnai/albums
-
TeeELL
- Modelling Gent and Scholar
- Posts: 11589
- Joined: December 28th, 2015, 4:38 pm
- Location: North Wiltshire
Re: TeeELLs kitchen crafting kit creations
James,
I have an EMCO Unimat 3 lathe with pillar drill/milling attachment - harks back to when I was a railway modeller. I can use it to accurately drill by referencing the hand wheels in the X and Y axis.
An expensive piece of kit for aircraft modelling but I've had it 30+ years. The greatest advantage is being able to run it at very slow speed so the drills do not melt the plastic.
Tony
The older I get the better I was!
Current build:
Airfix 1:72 Javelin FAW9
Particular modelling interests:
Cuban Airforce aircraft, 29(F) Sqn aircraft, Aircraft I’ve flown
The older I get the better I was!
Current build:
Airfix 1:72 Javelin FAW9
Particular modelling interests:
Cuban Airforce aircraft, 29(F) Sqn aircraft, Aircraft I’ve flown
-
TeeELL
- Modelling Gent and Scholar
- Posts: 11589
- Joined: December 28th, 2015, 4:38 pm
- Location: North Wiltshire
Re: TeeELLs kitchen crafting kit creations
Continuing in my quest for learning/unlearning I maintained my steady progress of one step forward and 2 rearwards. Having successfully attached the upper and lower wings, with everything square I found that, despite measuring and trimming each wing strut, the distance between the wing tips of the port upper and lower wings and those of the starboard were slightly different - not enough to be noticeable though (fingers crossed behind back!!!).
The next stage was to deconstruct then fabricate the tail boom, based upon a correct drawing. The first action was to use a very fine razor saw to cut one of the booms off (the upper, if I remember correctly). Using the drawings I positioned the carbon fibre replacement on top of the first strut and used my 'Blue-light' glue to fix it.

The second strut was then removed and set to one side. The other boom was removed and the replacement glued into position. I found that it was still necessary to construct the tail booms slightly higher than 'true' as I really needed to have removed an additional 1.5mm from the length of the wing struts (bare that in mind if you are making one of these). The rear strut required a really tiny amount of plastic removing to have it positioned correctly. With the first tail boom finished I tackled the second.
So far, only forward steps but ............
I made the mistake of not opening up the slots in the wings that accept the tail booms before affixing the wings so now I am carefully filing slots in a relatively delicate construction using my fairly indelicate ham fists. No surprises but I managed to dislodge struts. Only one course of action, place everything back into the lego jig and get everything back in position - then leave it alone and have a glass of wine. I decided to 'walk away' for the evening.
This morning, I have re-secured the wing struts with 'Blue-light' glue and filed the slots in the wings. I am constructing a jig such that I can assemble the tail booms, at the correct angle using the Revell attachment on the horizontal stabiliser and fabricating the cross strut on the lower boom. After that I will offer-up the back end to the fuselage and trip the front end of the booms to achieve the correct 'sit' before a bit more 'Blue-light' action to fix them in place.

This is just a 'look see' image.
The next stage was to deconstruct then fabricate the tail boom, based upon a correct drawing. The first action was to use a very fine razor saw to cut one of the booms off (the upper, if I remember correctly). Using the drawings I positioned the carbon fibre replacement on top of the first strut and used my 'Blue-light' glue to fix it.
The second strut was then removed and set to one side. The other boom was removed and the replacement glued into position. I found that it was still necessary to construct the tail booms slightly higher than 'true' as I really needed to have removed an additional 1.5mm from the length of the wing struts (bare that in mind if you are making one of these). The rear strut required a really tiny amount of plastic removing to have it positioned correctly. With the first tail boom finished I tackled the second.
So far, only forward steps but ............
I made the mistake of not opening up the slots in the wings that accept the tail booms before affixing the wings so now I am carefully filing slots in a relatively delicate construction using my fairly indelicate ham fists. No surprises but I managed to dislodge struts. Only one course of action, place everything back into the lego jig and get everything back in position - then leave it alone and have a glass of wine. I decided to 'walk away' for the evening.
This morning, I have re-secured the wing struts with 'Blue-light' glue and filed the slots in the wings. I am constructing a jig such that I can assemble the tail booms, at the correct angle using the Revell attachment on the horizontal stabiliser and fabricating the cross strut on the lower boom. After that I will offer-up the back end to the fuselage and trip the front end of the booms to achieve the correct 'sit' before a bit more 'Blue-light' action to fix them in place.
This is just a 'look see' image.
Tony
The older I get the better I was!
Current build:
Airfix 1:72 Javelin FAW9
Particular modelling interests:
Cuban Airforce aircraft, 29(F) Sqn aircraft, Aircraft I’ve flown
The older I get the better I was!
Current build:
Airfix 1:72 Javelin FAW9
Particular modelling interests:
Cuban Airforce aircraft, 29(F) Sqn aircraft, Aircraft I’ve flown
-
TeeELL
- Modelling Gent and Scholar
- Posts: 11589
- Joined: December 28th, 2015, 4:38 pm
- Location: North Wiltshire
Re: TeeELLs kitchen crafting kit creations
James, in this model my 'drilling guide' for the rigging holes was done by eye - that is why they are not that well located. When I undertake the Eduard model I plan to use the referencing system I described in my earlier reply to you. Trouble with the DH 2 is that is had twin 'flying wires' that were positioned very close to one another. I am inclined to think that in 1/72 a single, thicker rigging wire would give a correct appearance?
Tony
The older I get the better I was!
Current build:
Airfix 1:72 Javelin FAW9
Particular modelling interests:
Cuban Airforce aircraft, 29(F) Sqn aircraft, Aircraft I’ve flown
The older I get the better I was!
Current build:
Airfix 1:72 Javelin FAW9
Particular modelling interests:
Cuban Airforce aircraft, 29(F) Sqn aircraft, Aircraft I’ve flown
-
TeeELL
- Modelling Gent and Scholar
- Posts: 11589
- Joined: December 28th, 2015, 4:38 pm
- Location: North Wiltshire
Re: TeeELLs kitchen crafting kit creations
OK people,
The Revell kit is fighting all the way, I have just attempted to put fuselage and tail booms together but the dimensions are all wrong. For the sake of those of you who might wish to see how to correct the errors, I will make a further set of tail booms to see how they will look when constructed to match the dimensions of the kit. A major part of the difficulty is the error in the height of the wing struts. They definately need to be reduced to 19.5mm overall, giving approx 18.5mm wing surface to wing surface. I will persever but I am using up time that could be allocated to building the Eduard DH2!
The Revell kit is fighting all the way, I have just attempted to put fuselage and tail booms together but the dimensions are all wrong. For the sake of those of you who might wish to see how to correct the errors, I will make a further set of tail booms to see how they will look when constructed to match the dimensions of the kit. A major part of the difficulty is the error in the height of the wing struts. They definately need to be reduced to 19.5mm overall, giving approx 18.5mm wing surface to wing surface. I will persever but I am using up time that could be allocated to building the Eduard DH2!
Tony
The older I get the better I was!
Current build:
Airfix 1:72 Javelin FAW9
Particular modelling interests:
Cuban Airforce aircraft, 29(F) Sqn aircraft, Aircraft I’ve flown
The older I get the better I was!
Current build:
Airfix 1:72 Javelin FAW9
Particular modelling interests:
Cuban Airforce aircraft, 29(F) Sqn aircraft, Aircraft I’ve flown
-
iggie
- Modelling Gent and Scholar
- Posts: 23417
- Joined: July 31st, 2013, 11:04 am
- Location: North Somercotes, Lincolnshire
- Contact:
Re: TeeELLs kitchen crafting kit creations
I do honestly admire your attention to detail and the meticulous research.....
Best wishes
Jim
If you can walk away from a landing, it's a good landing. If you use the airplane the next day, it's an outstanding landing
"Never put off till tomorrow, what you can do the day after tomorrow"
Jim
If you can walk away from a landing, it's a good landing. If you use the airplane the next day, it's an outstanding landing
"Never put off till tomorrow, what you can do the day after tomorrow"
-
TeeELL
- Modelling Gent and Scholar
- Posts: 11589
- Joined: December 28th, 2015, 4:38 pm
- Location: North Wiltshire
Re: TeeELLs kitchen crafting kit creations
Iggie, I sometimes wonder if I shouldn't be 'certified'!
Tony
The older I get the better I was!
Current build:
Airfix 1:72 Javelin FAW9
Particular modelling interests:
Cuban Airforce aircraft, 29(F) Sqn aircraft, Aircraft I’ve flown
The older I get the better I was!
Current build:
Airfix 1:72 Javelin FAW9
Particular modelling interests:
Cuban Airforce aircraft, 29(F) Sqn aircraft, Aircraft I’ve flown
-
TeeELL
- Modelling Gent and Scholar
- Posts: 11589
- Joined: December 28th, 2015, 4:38 pm
- Location: North Wiltshire
Re: TeeELLs kitchen crafting kit creations
I have been struggling with the fit of the tail booms and tail section of the DH2. Nothing seemed to line-up correctly, the final struts should be in line with the leading edge of the horizontal stabiliser - they weren't! Finally the bulb illuminated and I checked the stabiliser against the drawing - yet again the centre chord is nigh on 2mm too great! A razor saw and file plus some wet and dry and the stabiliser is now more closely the size of the 'real thing' (as ever, I checked against more than one reference drawing).
Here is the source of one accurate set of drawing that very closely match those found in the Windsock Data file.
https://www.the-blueprints.com/blueprin ... ctions%29/
Getting back to creating a template to construct the tail booms.
Step 1. Draw a centreline and a reference line at right angles
Step 2. Measure the mean distance between your lower and upper wings (mine was 21mm) draw 2 further, parallel lines equidistant either side of the centre-line (ie for me 11.5mm either side)
Step 3. Fit the fin/rudder into your corrected horizontal stabiliser - ensure they are a snug fit by removing any moulding lines etc. Measure the 'drop' of the rudder below the stabiliser (mine was 11.5 mm). Once again draw 2 parallel lines equidistant from the centreline at the appropriate distance (ie mine was 5.75mm either side).
We now have 5 parallel lines we will refer to them as 1 - 5 top to bottom
Step 4. From the vertical reference line draw a line 47mm long connecting the intersection of the vertical reference line and parallel line 1 to parallel line 2.
Step 5. From the vertical reference line draw a line 57 mm long connecting the intersection of the vertical reference line and parallel line 5 to parallel line 4.
You should find a difference of approx. 9.5mm between the 2 intersections.
OK, that's all for now. I will continue with this tomorrow 'cos my brain is hurting !! Lol
Tony
The older I get the better I was!
Current build:
Airfix 1:72 Javelin FAW9
Particular modelling interests:
Cuban Airforce aircraft, 29(F) Sqn aircraft, Aircraft I’ve flown
The older I get the better I was!
Current build:
Airfix 1:72 Javelin FAW9
Particular modelling interests:
Cuban Airforce aircraft, 29(F) Sqn aircraft, Aircraft I’ve flown