Aaarrgh!
My first use of Humbrol gloss 209 on the Gnat seems like a disaster. My initial coat is probably too thick (to achieve a decent depth of colour) and shows no sign of drying at all. I wonder if it is possible to strip the paint without damaging the masked areas, and start again?
On the other hand I have found a silver enamel that I like! Mr Hobby Mr Color 8 seems to tick all my boxes. I thinned it with Mr Color Thinner and it airbrushed fine. I expect that lacquer thinner will also do the job, and I will try that less-expensive alternative at next opportunity. Regular turps is no good for cleanup.
I have not had much experience with Mr Color. I have a small range of paints, but my only other use (was it Light Aircraft Grey?) was unsatisfactory (the cobweb effect), and the Dark Sea Grey does not look anything like it should.
Cheers,
David
Skypirate's Hideaway
-
JamesPerrin

- Looks like his avatar
- Posts: 13695
- Joined: April 5th, 2011, 8:09 pm
- Location: W. Yorkshire
- Contact:
Re: Skypirate's Hideaway
Yep you need to apply multiple coats of 209 (or any other fluescent I've tried) to build up the colour. For my gnat I added ~20% gloss red to give it some body.
Mr Hobby Mr Color paints are lacquers they don't d enamels are far as I know. I use their acrylics with IPA and love them. Tamiya do (or did) enamels but are hard to get outside of Japan I believe. Alclad II have recently started a range of airbrush ready enamels call MilSpec (not cheap) http://www.alclad2-online.co.uk/index.p ... RNZ=651120;
Mr Hobby Mr Color paints are lacquers they don't d enamels are far as I know. I use their acrylics with IPA and love them. Tamiya do (or did) enamels but are hard to get outside of Japan I believe. Alclad II have recently started a range of airbrush ready enamels call MilSpec (not cheap) http://www.alclad2-online.co.uk/index.p ... RNZ=651120;
Classic British Kits SIG Leader Better to fettle than to fill
(2024 A:B 5:2) (2023 13:8:7) (2022 21:11) (2021 15:8) (2020 8:4:4)
(2024 A:B 5:2) (2023 13:8:7) (2022 21:11) (2021 15:8) (2020 8:4:4)
-
iggie

- Modelling Gent and Scholar
- Posts: 23438
- Joined: July 31st, 2013, 11:04 am
- Location: North Somercotes, Lincolnshire
- Contact:
Re: Skypirate's Hideaway
I always put a coat of white under any florescent colour, and then build up the colour with thin coats; mind you I'm using acrylic so possibly not the same with enamels
I hope you can get it recovered ok!
I hope you can get it recovered ok!
Best wishes
Jim
If you can walk away from a landing, it's a good landing. If you use the airplane the next day, it's an outstanding landing
"Never put off till tomorrow, what you can do the day after tomorrow"
Jim
If you can walk away from a landing, it's a good landing. If you use the airplane the next day, it's an outstanding landing
"Never put off till tomorrow, what you can do the day after tomorrow"
-
skypirate

- Modelling Gent and Scholar
- Posts: 7303
- Joined: May 1st, 2011, 6:13 am
- Location: Port Macquarie, Australia
Re: Skypirate's Hideaway
I am dodging the Gnat for the time being. Looks like I will have to strip the paint. Blast!
So I started decals on the VC10. First I have added a few tiny decals cut from black strip to sort of look like like the various vents on the engine nacelles.
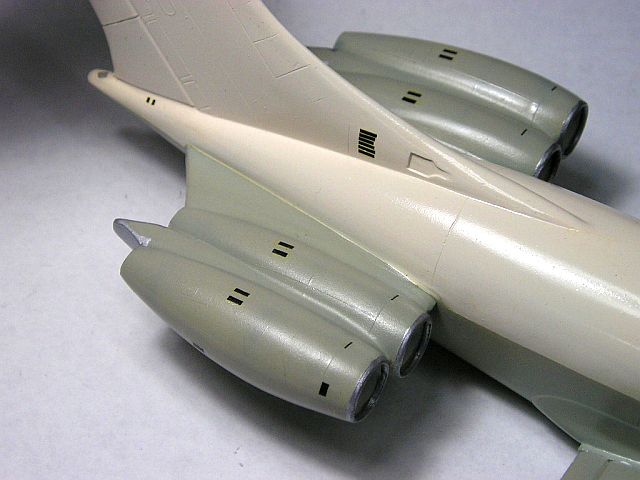
A few more dots of black paint will go on to represent circular vents. And I need to tidy up the grille on the fin and do another one on the other side.
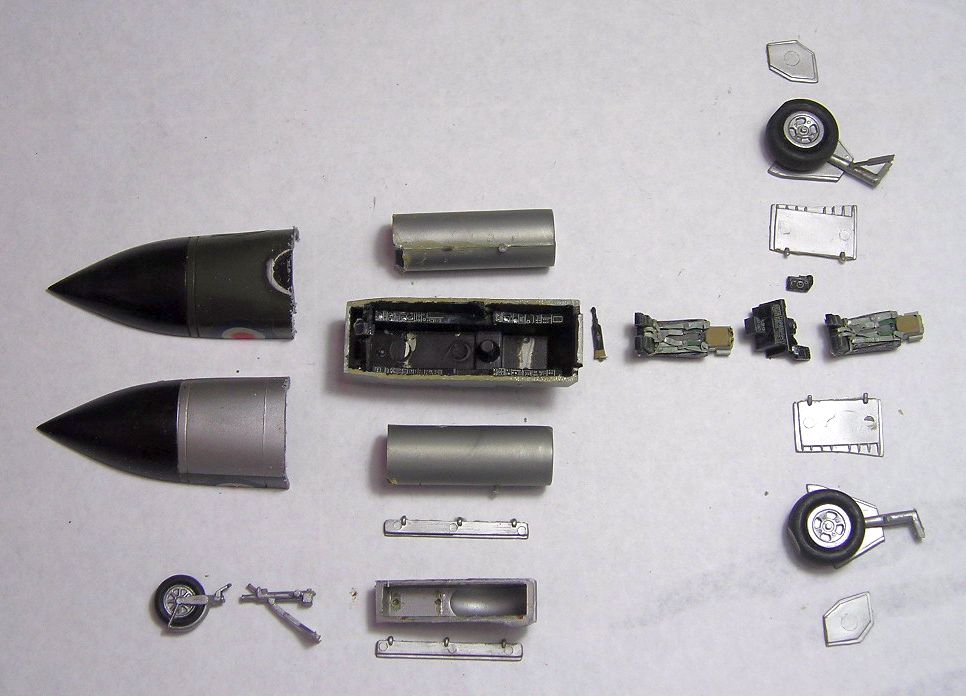
And a new challenge has arisen. (This is not my secret what-if project). I have taken on the Mister Craft Javelin FAW.7 kit and will finally be able to use the SAM decals from around 1982! Hope they still work! This kit is quite basic, but at least I won't have to rescribe the panel lines - they are all done! Well mostly. Looks a bit bare on the topside of the fuselage. I have demolished my old Airfix FAW.9 which was looking very sad with discolored decals, and rescued many parts to improve the Mister Craft kit.
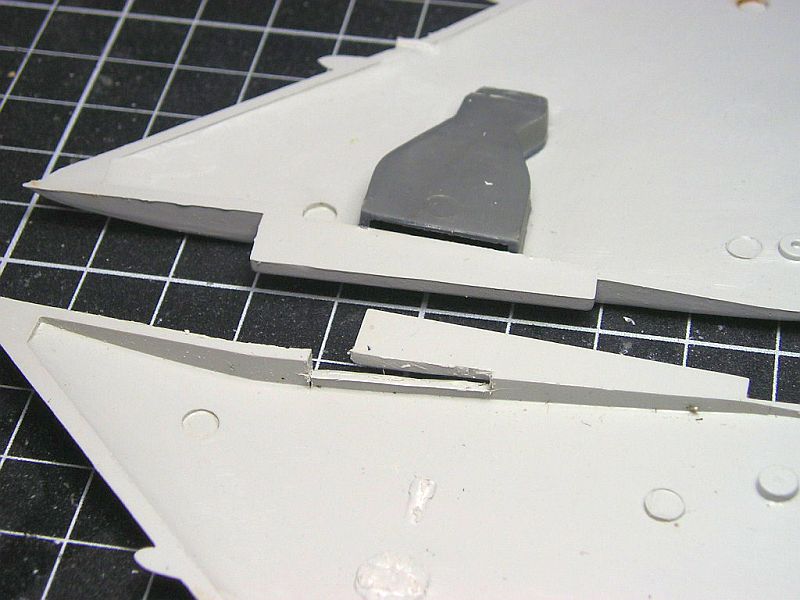
Here are the Airfix wheel wells going in. One is installed.

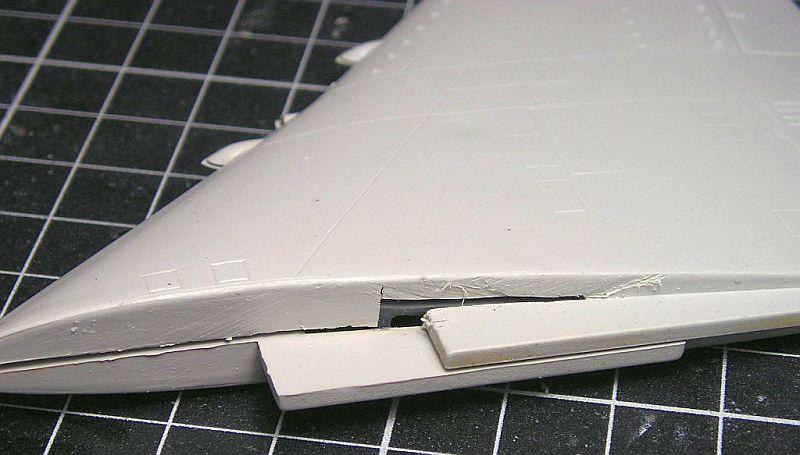
And here is the fettling necessary to allow the wings to close up around those foreign wells while preserving integrity of the plastic as much as possible.
Voila!
The next bit of surgery which will make or break this model concerns the length of the nose and the replacement of the cockpit tub and nosewheel bay.
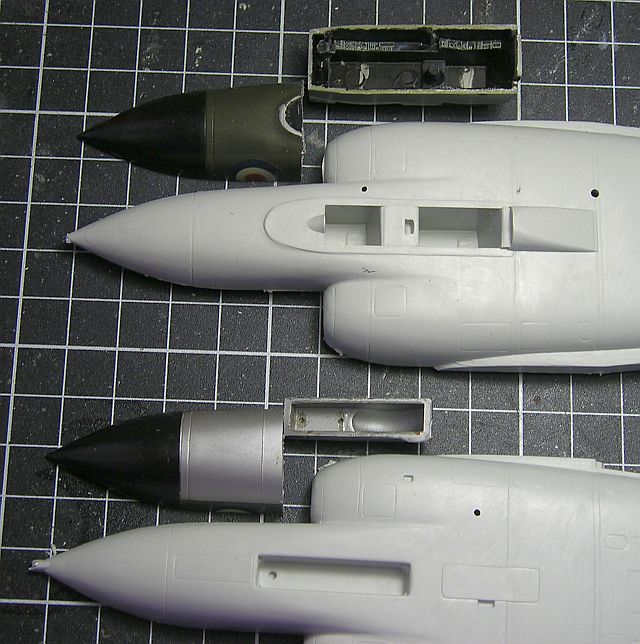
It looks to me that the nose is a bit short for a Mk.7, so I will try to graft a longer bit of Airfix nose on - if it fits the circumference! If not....... Hmmm. I should track down that project that James Perrin carried out so well.
Thanks for looking,
David
So I started decals on the VC10. First I have added a few tiny decals cut from black strip to sort of look like like the various vents on the engine nacelles.
A few more dots of black paint will go on to represent circular vents. And I need to tidy up the grille on the fin and do another one on the other side.
And a new challenge has arisen. (This is not my secret what-if project). I have taken on the Mister Craft Javelin FAW.7 kit and will finally be able to use the SAM decals from around 1982! Hope they still work! This kit is quite basic, but at least I won't have to rescribe the panel lines - they are all done! Well mostly. Looks a bit bare on the topside of the fuselage. I have demolished my old Airfix FAW.9 which was looking very sad with discolored decals, and rescued many parts to improve the Mister Craft kit.
Here are the Airfix wheel wells going in. One is installed.
And here is the fettling necessary to allow the wings to close up around those foreign wells while preserving integrity of the plastic as much as possible.
Voila!
The next bit of surgery which will make or break this model concerns the length of the nose and the replacement of the cockpit tub and nosewheel bay.
It looks to me that the nose is a bit short for a Mk.7, so I will try to graft a longer bit of Airfix nose on - if it fits the circumference! If not....... Hmmm. I should track down that project that James Perrin carried out so well.
Thanks for looking,
David
-
JamesPerrin
- Looks like his avatar
- Posts: 13695
- Joined: April 5th, 2011, 8:09 pm
- Location: W. Yorkshire
- Contact:
Re: Skypirate's Hideaway
Happy to oblige, http://uamf.org.uk/viewtopic.php?f=19&t=5971;
Can't see the images at the moment as postimage seem to be playing up, but I look forward to seeing what you can do with this.
Can't see the images at the moment as postimage seem to be playing up, but I look forward to seeing what you can do with this.
Classic British Kits SIG Leader Better to fettle than to fill
(2024 A:B 5:2) (2023 13:8:7) (2022 21:11) (2021 15:8) (2020 8:4:4)
(2024 A:B 5:2) (2023 13:8:7) (2022 21:11) (2021 15:8) (2020 8:4:4)
-
DavidWomby

- Modelling Gent and Scholar
- Posts: 11765
- Joined: May 1st, 2011, 8:09 pm
- Location: Florida, USA
Re: Skypirate's Hideaway
Ditto on the images but I'll watch the Javelin with interest. I assume it's the same mould as the ZTS Plastyk on that lurks in my stash.
David
David
-
The Great Auk

- Modelling Gent and Scholar
- Posts: 2041
- Joined: August 16th, 2014, 12:35 pm
- Location: Extinction Isle
Re: Skypirate's Hideaway
In Chrome, if you right click the image and select Open Image in New Tab you can see them.
That's some excellent work! I've been enjoying your VC-10 immensely and think that's some of the best cheat line masking I've ever seen. Will watch with interest.
The Great Auk
That's some excellent work! I've been enjoying your VC-10 immensely and think that's some of the best cheat line masking I've ever seen. Will watch with interest.
The Great Auk
-
ShaunW
- NOT the sheep
- Posts: 26188
- Joined: November 26th, 2011, 6:11 pm
- Location: Pontefract West Yorkshire
Re: Skypirate's Hideaway
I couldn't see the images earlier today but now they're back. Excellent work, David and I'm really looking forward to more on that wonderful VC-10. I've never been a huge fan of the Javelin but nevertheless I will follow your build with interest as I usually learn something from watching you!
Doing - Tamiya 1/35th Universal Carrier.
Work is the curse of the modelling classes!
IPMS#12300
Work is the curse of the modelling classes!
IPMS#12300
-
skypirate
- Modelling Gent and Scholar
- Posts: 7303
- Joined: May 1st, 2011, 6:13 am
- Location: Port Macquarie, Australia
Re: Skypirate's Hideaway
Thanks for the link, James.
Here is a picture of the VC10 cheatline decal going on. This is truly nerve-wracking.
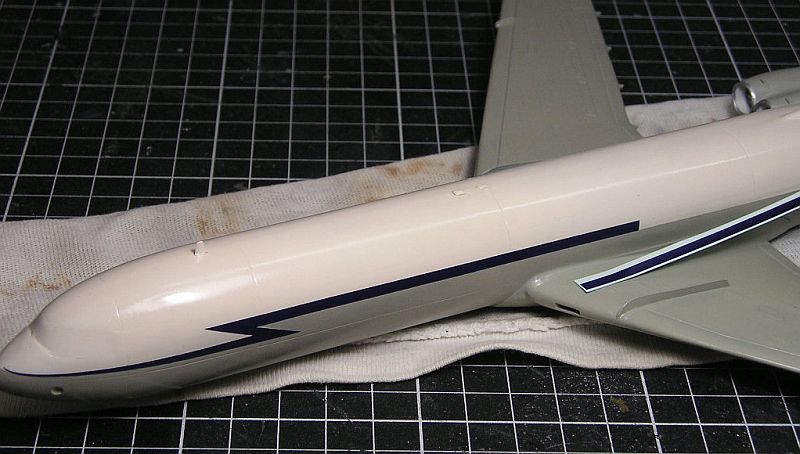
I sensibly cut the decal into manageable pieces, but it still split in a couple of places. It turns out that my masking was just about 1.5 mm too low. This shows up where the cheatline climbs up around the engine pylon.
One side is done. I think I will lie down for a bit!
Cheers,
David
Here is a picture of the VC10 cheatline decal going on. This is truly nerve-wracking.
I sensibly cut the decal into manageable pieces, but it still split in a couple of places. It turns out that my masking was just about 1.5 mm too low. This shows up where the cheatline climbs up around the engine pylon.
One side is done. I think I will lie down for a bit!
Cheers,
David
-
iggie
- Modelling Gent and Scholar
- Posts: 23438
- Joined: July 31st, 2013, 11:04 am
- Location: North Somercotes, Lincolnshire
- Contact:
Re: Skypirate's Hideaway
Looking good David! Shame about the masking being a tad low; can you touch it in after you've applied the decals?
Best wishes
Jim
If you can walk away from a landing, it's a good landing. If you use the airplane the next day, it's an outstanding landing
"Never put off till tomorrow, what you can do the day after tomorrow"
Jim
If you can walk away from a landing, it's a good landing. If you use the airplane the next day, it's an outstanding landing
"Never put off till tomorrow, what you can do the day after tomorrow"
-
ShaunW
- NOT the sheep
- Posts: 26188
- Joined: November 26th, 2011, 6:11 pm
- Location: Pontefract West Yorkshire
Re: Skypirate's Hideaway
It is looking good, David. This is a challenging thing to do, in the past I've done similar with civil airliner schemes and found it devilishly difficult to line up paint to decal cheat line.
Doing - Tamiya 1/35th Universal Carrier.
Work is the curse of the modelling classes!
IPMS#12300
Work is the curse of the modelling classes!
IPMS#12300
-
JamesPerrin
- Looks like his avatar
- Posts: 13695
- Joined: April 5th, 2011, 8:09 pm
- Location: W. Yorkshire
- Contact:
Re: Skypirate's Hideaway
Brain surgeons will never understand how stressful our hobby can be. 
Classic British Kits SIG Leader Better to fettle than to fill
(2024 A:B 5:2) (2023 13:8:7) (2022 21:11) (2021 15:8) (2020 8:4:4)
(2024 A:B 5:2) (2023 13:8:7) (2022 21:11) (2021 15:8) (2020 8:4:4)
-
skypirate
- Modelling Gent and Scholar
- Posts: 7303
- Joined: May 1st, 2011, 6:13 am
- Location: Port Macquarie, Australia
Re: Skypirate's Hideaway
No chance, Jim. That part of the cheatline over the engine pylon is very thin. It is not obvious if judiciously photographed from the right angle!iggie wrote:Looking good David! Shame about the masking being a tad low; can you touch it in after you've applied the decals?
Here is the cheatline being coaxed into position around the pylon on the other side.
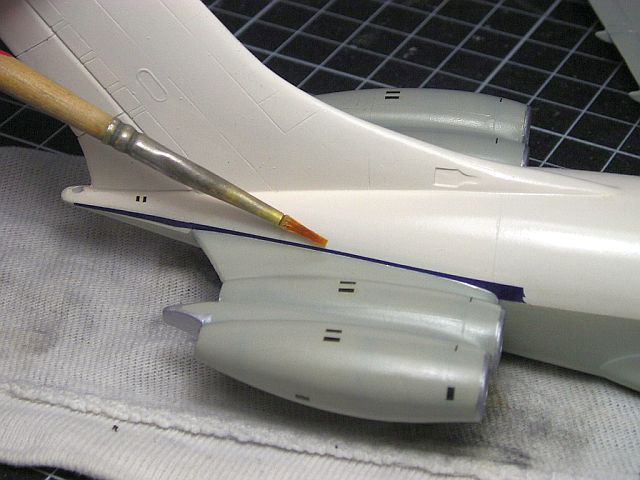
That side done, too. Some touching up required. Notice I removed the decal grille I built up on the fin. The decal sheet provides a much better one!
Cheers,
David
-
skypirate
- Modelling Gent and Scholar
- Posts: 7303
- Joined: May 1st, 2011, 6:13 am
- Location: Port Macquarie, Australia
Re: Skypirate's Hideaway
With acknowledgements to James Perrin's research, I have further examined the Mister Craft Javelin Mk.7 kit.
The nose dimensions are the same as the Airfix FAW.9, which is a good sign, since those marks shared the same airframe apart from the afterburning engine in the Mk.9. And to give Mister Craft credit, apart from the engraved panel lines, the kit provides markings and alternative parts for a Mk.7 and a Mk.9. So I may not have to cut up the nose at all! But I do want to replace the cockpit tub and the nosewheel bay, and the Airfix nose looks less chunky and more svelte (if that word can be used in describing the Javelin!), so I reckon it is worth the effort. I will have to do the same careful measuirng that James did to ensure that the canopy will fit after surgery!
Cheers,
David
-
iggie
- Modelling Gent and Scholar
- Posts: 23438
- Joined: July 31st, 2013, 11:04 am
- Location: North Somercotes, Lincolnshire
- Contact:
Re: Skypirate's Hideaway
Good Lord; that is narrow! Hopefully all went well and both sides are on safely nowskypirate wrote:No chance, Jim. That part of the cheatline over the engine pylon is very thin. It is not obvious if judiciously photographed from the right angle!iggie wrote:Looking good David! Shame about the masking being a tad low; can you touch it in after you've applied the decals?
Here is the cheatline being coaxed into position around the pylon on the other side.
That side done, too. Some touching up required. Notice I removed the decal grille I built up on the fin. The decal sheet provides a much better one!
Cheers,
David
Best wishes
Jim
If you can walk away from a landing, it's a good landing. If you use the airplane the next day, it's an outstanding landing
"Never put off till tomorrow, what you can do the day after tomorrow"
Jim
If you can walk away from a landing, it's a good landing. If you use the airplane the next day, it's an outstanding landing
"Never put off till tomorrow, what you can do the day after tomorrow"