New Airbrush Woes

Hints here for painting, decalling, weathering and displaying your finished models.
Post Reply
User avatar
Jaime
Modelling Gent and Scholar
Posts: 1218
Joined: January 26th, 2013, 10:36 pm

New Airbrush Woes

Post by Jaime »

So, I finally took the plunge and splashed out on a Harder & Steenbeck Evolution CR Plus airbrush and a Sparmax AC-27 compressor.

Before purchasing I did a lot of online research, including the articles on this forum, and got advice from the suppliers.

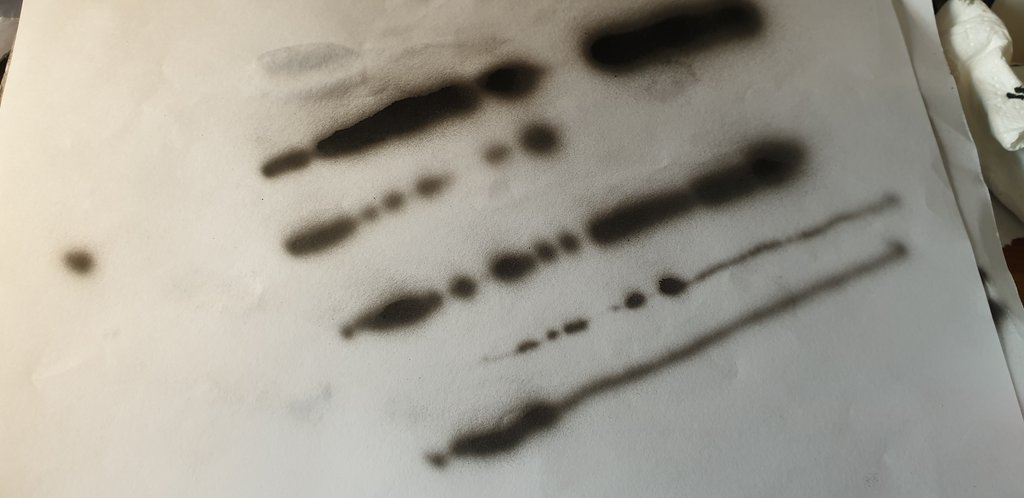
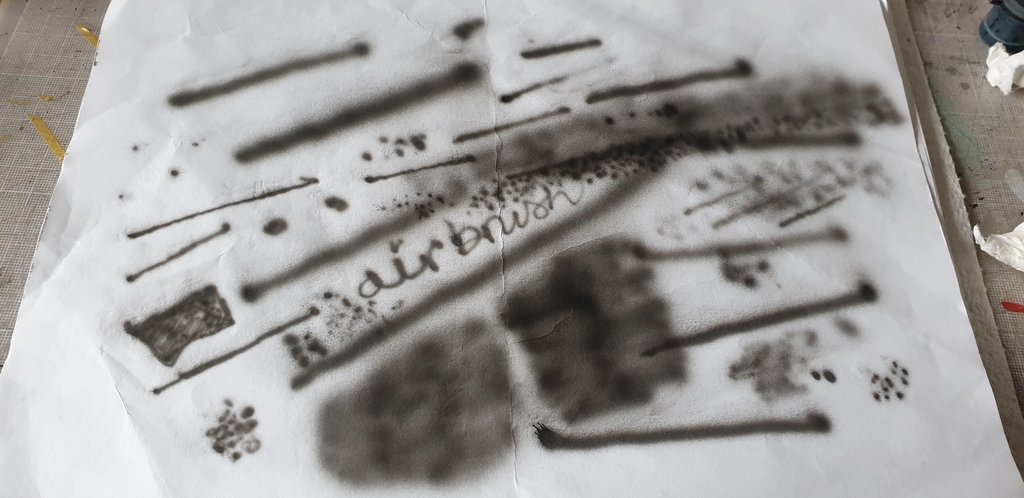
However, I'm really frustrated with the results on paper. I can't get consistent output and have tried various pressures from below 10 to 40. Lines are never continuous and have horrible spidery edges, gaps and blots. I bought the airbrush to do new techniques such as pre-shading but no way I could do that with what's coming out of the airbrush at the moment.

The images below show what I mean - does anyone have any advice and is there anything obvious you can be gleaned from the output?

Image

Image

Image
2021
Complete: Airfix 1/400 Mary Rose, 1/72: Airfix Swordfish Mk1 Floatplane, Airfix R.A.F. R.E.8, Airfix Hannover CL.111a, Mitsubishi A6M2b Zero, Curtiss P40B Warhawk
User avatar
montessa315
Modelling Gent and Scholar
Posts: 1564
Joined: May 1st, 2011, 9:34 am
Location: Rugby - UK

Re: New Airbrush Woes

Post by montessa315 »

What paint are you using and what size needle in the airbrush?

Being very close to the paper the paint looks too thin and too high a pressure.
If its acrylic I find it does not like too lower a pressure as it dries on the end of the needle and then spatters, could also do with a retarder in it.

The equipment you have is good quality.


Alan........
_______________________________________________________________________
If you always do what you've always done, you'll always get what you've always got.
User avatar
Jaime
Modelling Gent and Scholar
Posts: 1218
Joined: January 26th, 2013, 10:36 pm

Re: New Airbrush Woes

Post by Jaime »

Thanks Alan. It's a 0.4 needle and I'm using Humbrol acrylics thinned with Humbrol acrylic thinners. I tried to get the milky consistency but maybe too thin. I've tried all sorts of pressures. It's very frustrating.
2021
Complete: Airfix 1/400 Mary Rose, 1/72: Airfix Swordfish Mk1 Floatplane, Airfix R.A.F. R.E.8, Airfix Hannover CL.111a, Mitsubishi A6M2b Zero, Curtiss P40B Warhawk
User avatar
PaulBradley
Staring out the window
Posts: 21220
Joined: April 6th, 2011, 3:08 pm
Location: Flagstaff, AZ

Re: New Airbrush Woes

Post by PaulBradley »

Firstly, I airbrush at between 15 and 20 PSI - anything over that is too strong.

Secondly, I thin paints to the consistency of skimmed milk - my rule of thumb is two drips off of the stirring stick when I lift it out of the paint.

Thirdly, I airbrush at between 4 and 6 inches from the model - too close and you will get the spiders, too far and it'll dry before hitting the model.

The other thing to remember is to start each spraying stroke off the model, then sweep gently across the model with each stroke, ending off the model. Starting ON the model will lead to blotches. And this is why masking is important to protect other parts of your model from overspray.

Practise on an old model first, so you can get the hang of it. And I always have an old model in my spray booth to test the consistency of the paint before committing to the real model. If I need to thin or thicken, I can do so without ruining my latest masterpiece.
Paul

За демократію і незалежний Україну

"For Democracy and a Free Ukraine"
User avatar
iggie
Modelling Gent and Scholar
Posts: 23438
Joined: July 31st, 2013, 11:04 am
Location: North Somercotes, Lincolnshire
Contact:

Re: New Airbrush Woes

Post by iggie »

I don't airbrush that often lately but irrespective of paint manufacturer (acrylic) I only thin with Tamiya thinner (X20A) to a milk like consistency, and add a drop or two of Winsor and Newton flow enhancer for good measure
Best wishes

Jim
If you can walk away from a landing, it's a good landing. If you use the airplane the next day, it's an outstanding landing
"Never put off till tomorrow, what you can do the day after tomorrow"
User avatar
JohnRatzenberger
Why is he so confused ?
Posts: 15736
Joined: April 5th, 2011, 3:42 pm
Location: Living on a sandbar - Nags Head, NC.

Re: New Airbrush Woes

Post by JohnRatzenberger »

What Paul says. Your test sprays are starting / stopping on the paper and causing much of that problem. Once you have got the start-off / keep moving / stop-off motion in hand then you can focus on something else, like thinness, air pressure, etc - too hard to change too many things at once.
John Ratzenberger :???:
It's my model and I'll do what I want with it.
User avatar
Jaime
Modelling Gent and Scholar
Posts: 1218
Joined: January 26th, 2013, 10:36 pm

Re: New Airbrush Woes

Post by Jaime »

Thanks everyone - great advice.

As you can see, my latest practice effort is much improved & I was getting enough control that I could have a little dabble at a mottling effect.

Image

The paint wasn't so thin this time and pressure was around 15psi.

Do you guys tend to mix your paint & thinners in the airbrush bowl or in a separare pot beforehand?
2021
Complete: Airfix 1/400 Mary Rose, 1/72: Airfix Swordfish Mk1 Floatplane, Airfix R.A.F. R.E.8, Airfix Hannover CL.111a, Mitsubishi A6M2b Zero, Curtiss P40B Warhawk
User avatar
iggie
Modelling Gent and Scholar
Posts: 23438
Joined: July 31st, 2013, 11:04 am
Location: North Somercotes, Lincolnshire
Contact:

Re: New Airbrush Woes

Post by iggie »

Separate pot for me 8-)
Best wishes

Jim
If you can walk away from a landing, it's a good landing. If you use the airplane the next day, it's an outstanding landing
"Never put off till tomorrow, what you can do the day after tomorrow"
User avatar
JohnRatzenberger
Why is he so confused ?
Posts: 15736
Joined: April 5th, 2011, 3:42 pm
Location: Living on a sandbar - Nags Head, NC.

Re: New Airbrush Woes

Post by JohnRatzenberger »

Happy that helped :)

If small volume, that is it'll be used for this application, then mix right in the airbrush bowl.

For more than that, hosing down something big, multiple coats, then I tend to mix a separate pot.
John Ratzenberger :???:
It's my model and I'll do what I want with it.
User avatar
Clashcityrocker
Modelling Gent and Scholar
Posts: 10823
Joined: May 1st, 2011, 12:31 am
Location: Adelaide. South Australia

Re: New Airbrush Woes

Post by Clashcityrocker »

A noticeable improvement. For cheap mixing cups I use the plastic shot glasses that you can buy from discount outlets. I think last time was 100 for $3

Nigel
User avatar
dogsbody
Onto the Clever Stuff, Now.
Posts: 134
Joined: May 1st, 2011, 12:18 am
Location: The Backside of Beyond ( Northeast Alberta, Canada )

Re: New Airbrush Woes

Post by dogsbody »

I have returned to airbrushing after only trying it once over 20 years ago. My first attempt on a piece of file card didn't look great. After a little fiddling with the hose and the moisture trap, I did a little on my paint mule. Not too shabby! I'm quite happy with it now. I've been using Gunze-Sangyo Aqueous paints through my Badger 150IL airbrush. It only has a medium tip/needle.
I thin the paint about 40-60 with Mr. Color. Levelling Thinner.

Remember, I've only done this twice in the last week. Only on the right wing.

Image

Image


Chris
"What young man could possibly be bored
with a uniform to wear,
a fast aeroplane to fly,
and something to shoot at?"
User avatar
PaulBradley
Staring out the window
Posts: 21220
Joined: April 6th, 2011, 3:08 pm
Location: Flagstaff, AZ

Re: New Airbrush Woes

Post by PaulBradley »

That looks fine, Chris! And welcome back!
Paul

За демократію і незалежний Україну

"For Democracy and a Free Ukraine"
User avatar
dogsbody
Onto the Clever Stuff, Now.
Posts: 134
Joined: May 1st, 2011, 12:18 am
Location: The Backside of Beyond ( Northeast Alberta, Canada )

Re: New Airbrush Woes

Post by dogsbody »

PaulBradley wrote:That looks fine, Chris! And welcome back!

Thanks, Paul.


Chris
"What young man could possibly be bored
with a uniform to wear,
a fast aeroplane to fly,
and something to shoot at?"
User avatar
wokka
Modelling Gent and Scholar
Posts: 4575
Joined: March 22nd, 2019, 1:20 pm
Location: Germany

Re: New Airbrush Woes

Post by wokka »

I agree with Paul, that does look fine. Something I've learnt from experience and especially after using gloss white or red is to always check the gun is working OK before spraying. This I do by putting a bit of water in the bowl and seeing how it sprays, a couple of times I've found it wasn't spraying well and after stripping down found a bit of old paint or dust blocking the nozzle.
It's only pain, work through it.
Post Reply

Return to “Finishing Tips”