Heller Mercedes 170 Va "Lieferwagen" - Finished

Time to pimp them rides!
Post Reply
User avatar
harti20
Onto the Clever Stuff, Now.
Posts: 114
Joined: November 16th, 2021, 3:06 pm

Heller Mercedes 170 Va "Lieferwagen" - Finished

Post by harti20 »

​Hi all

As written in the W.I.P. on the McLaren P1, I needed something different from the carbon decals. So what could be more obvious than to get a model from the first half of the last century out of storage, which is guaranteed not to need any carbon 👍 
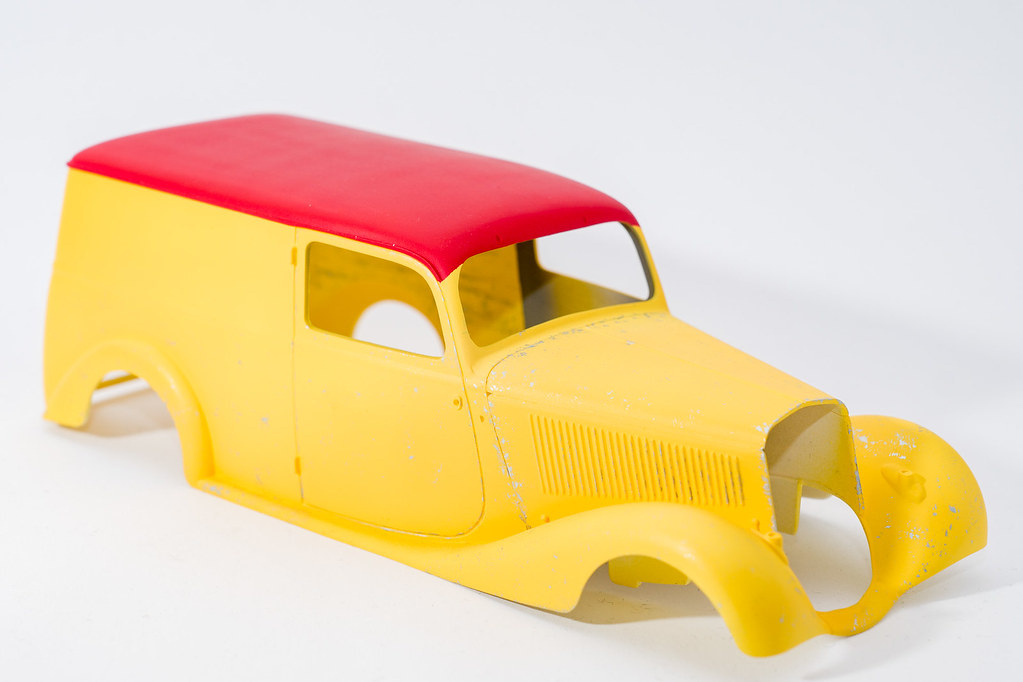
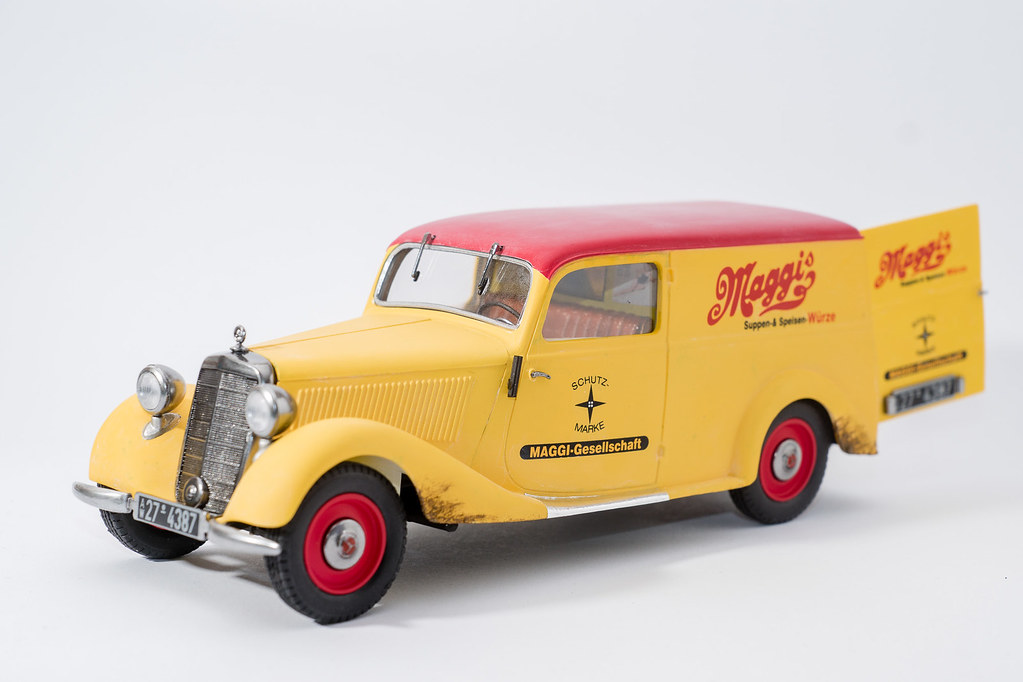
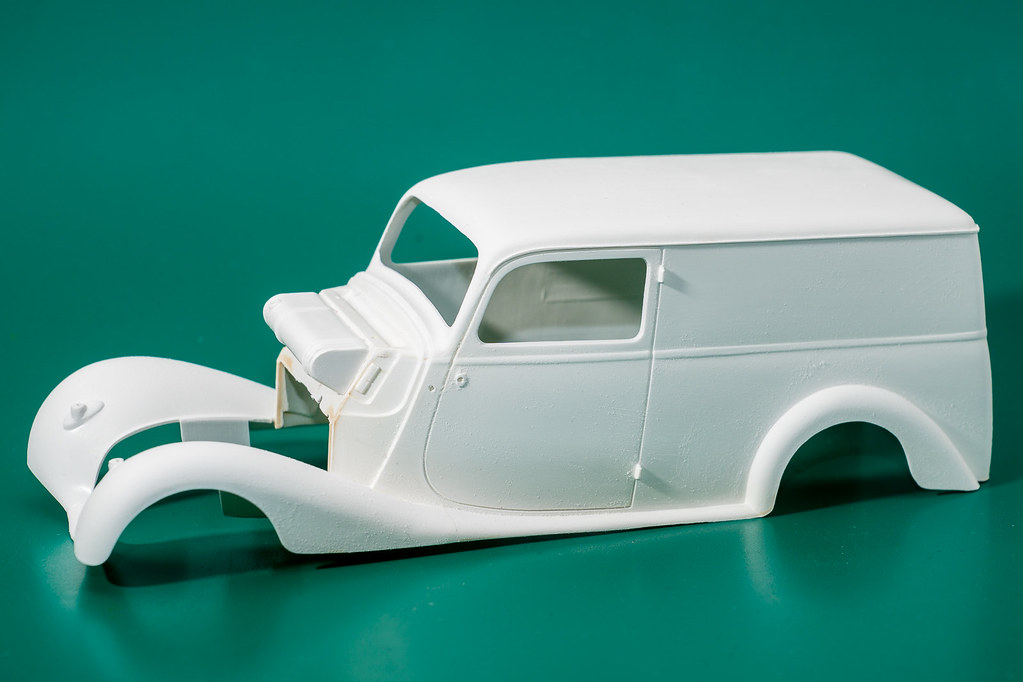
Since a GroupBuild was started on March 1st in a facebook group about "German cars", I decided to build the Mercedes 170 Va, which has been hanging around in my stash for a few years now, waiting to be built I will build it mostly ooB, even if one or the other small refinement can't be completely excluded  

The first step was to clean the frame and to fill the crevices (or should I rater say canyons?). Three different fillers were used:

my standard putty from ZeroPaints, which I actually like very much, because it can usually be sanded over quite soon (light gray)
GreenStuff, since I wanted to try out a 2-component compound, which, as you know, should not shrink (green)
a 2K plastic filler from the hardware store (dark gray)
Image

So far I have not really got along with GreenStuff. On the one hand, the compound is quite hard and sticky after mixing, so that it sticks almost more to the fingers than to the model (in the meantime, I've read in various forums that water on the fingers should help). On the other hand, it also happened to me with more than one filled crevice that the entire GreenStuff lump fell out of the hole again during the sanding process and I had to start all over again.

The ZeroPaints putty could be sanded again after about half an hour (if it was only applied thinly), but as usual it shrunk a bit, so again, with larger crevices, it had to be applied several times.

The 2K filler from the hardware store last but not least was quite creamy and therefore easy to get into the depressions. It also hardened relatively quickly and could be sanded quite soon. However, it hardened so quickly that after a little more than 5 minutes, the mixed compound had more or less the firmness of butter straight from the cold-set refrigerator and could therefore no longer be used... In addition, the odor nuisance was also quite intense here...

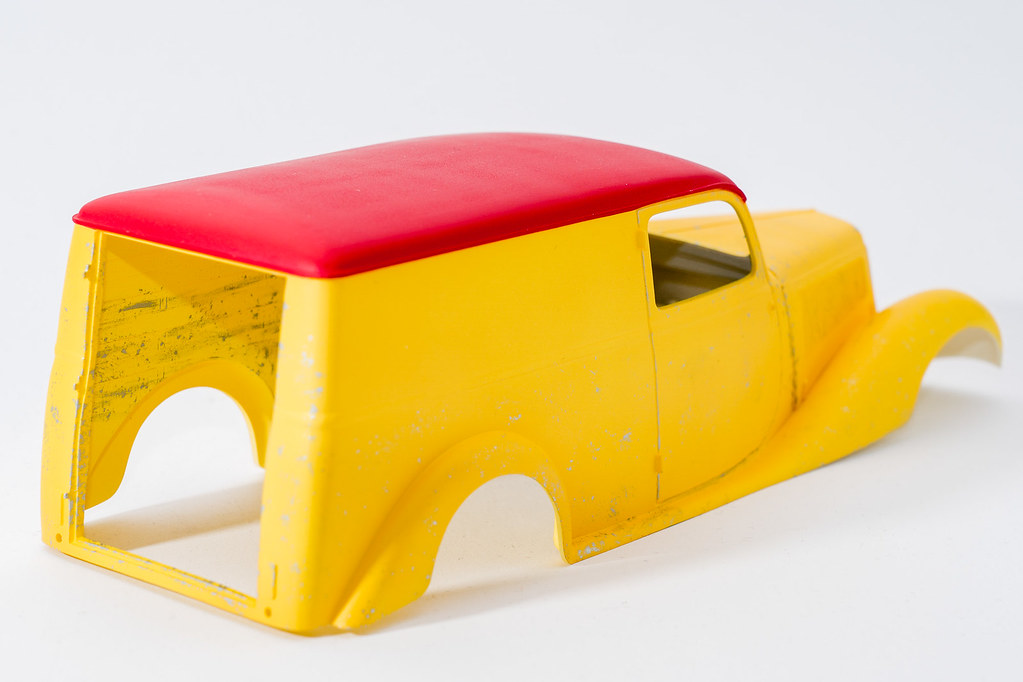
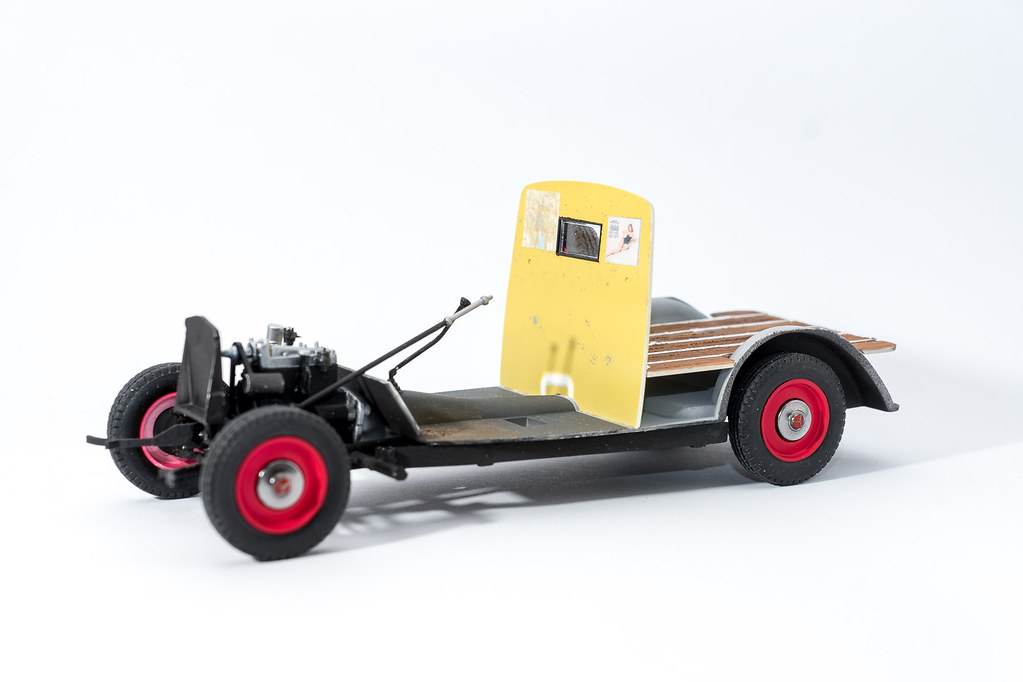
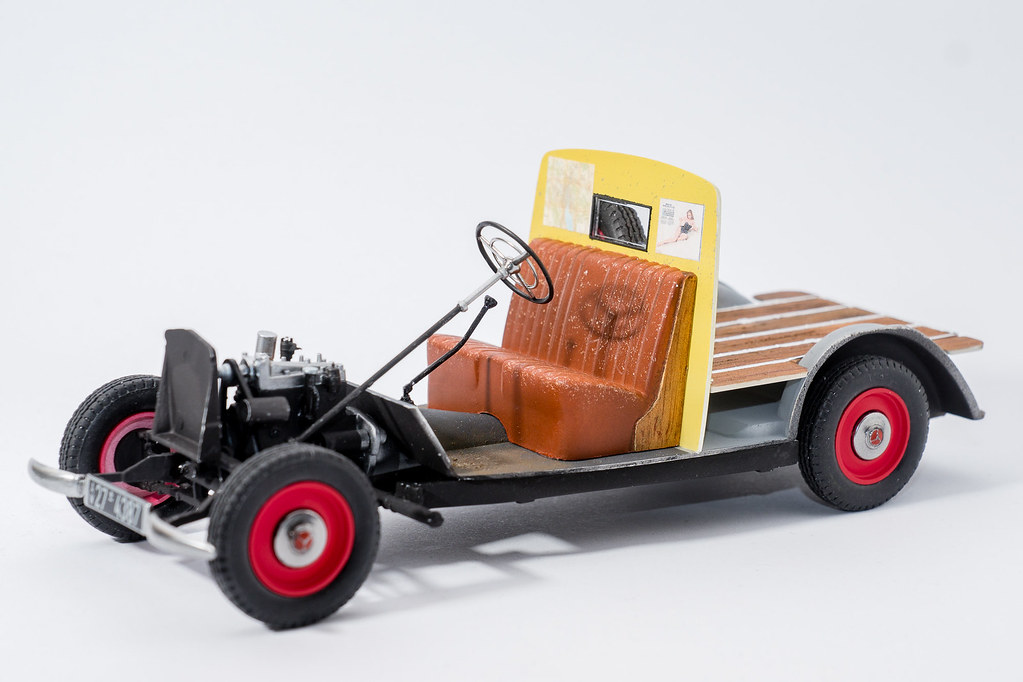
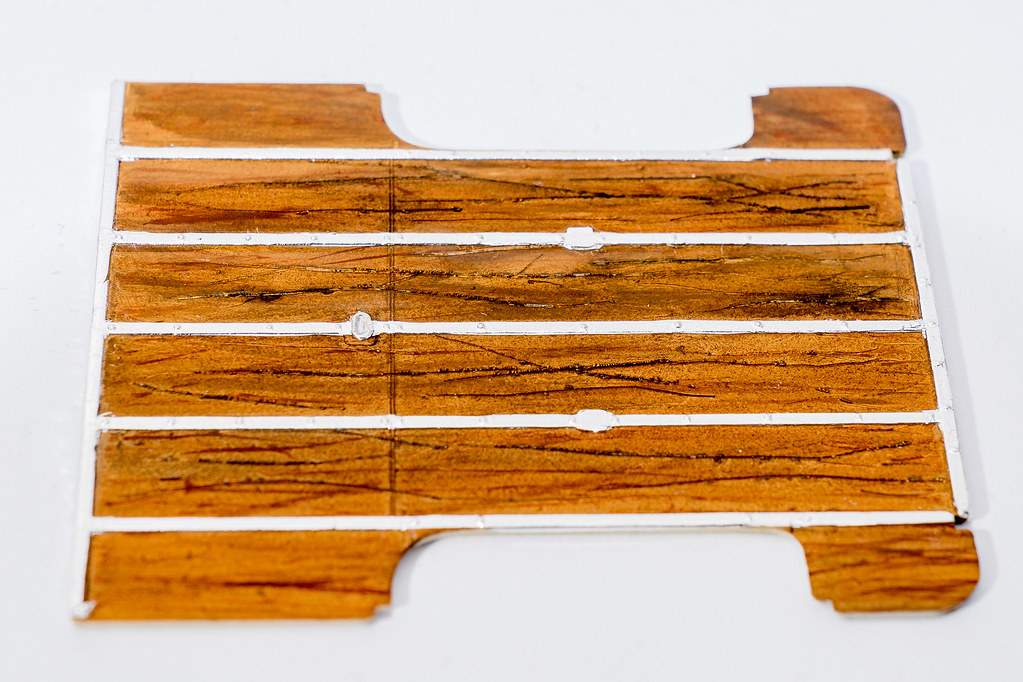
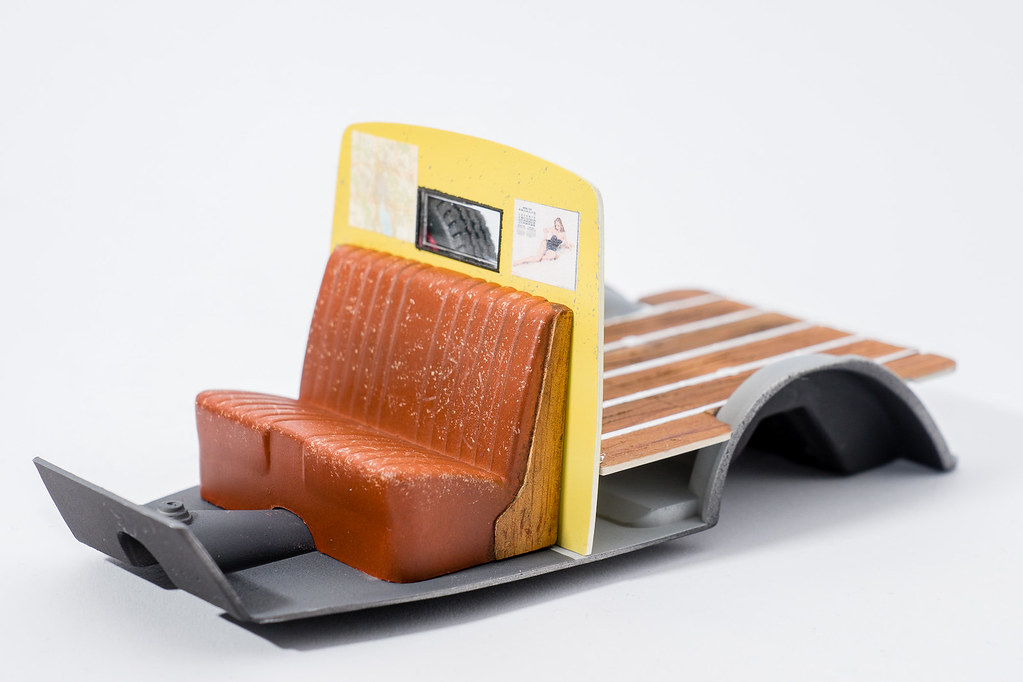
Then I made a mock up of the cargo compartment. The fitting accuracy  so far is good to excellent, especially for such an old kit. But what is quite normal for a kit that has its origins in the 70s, are sometimes quite heavy casting burrs, which have to be removed on practically every part.
Image

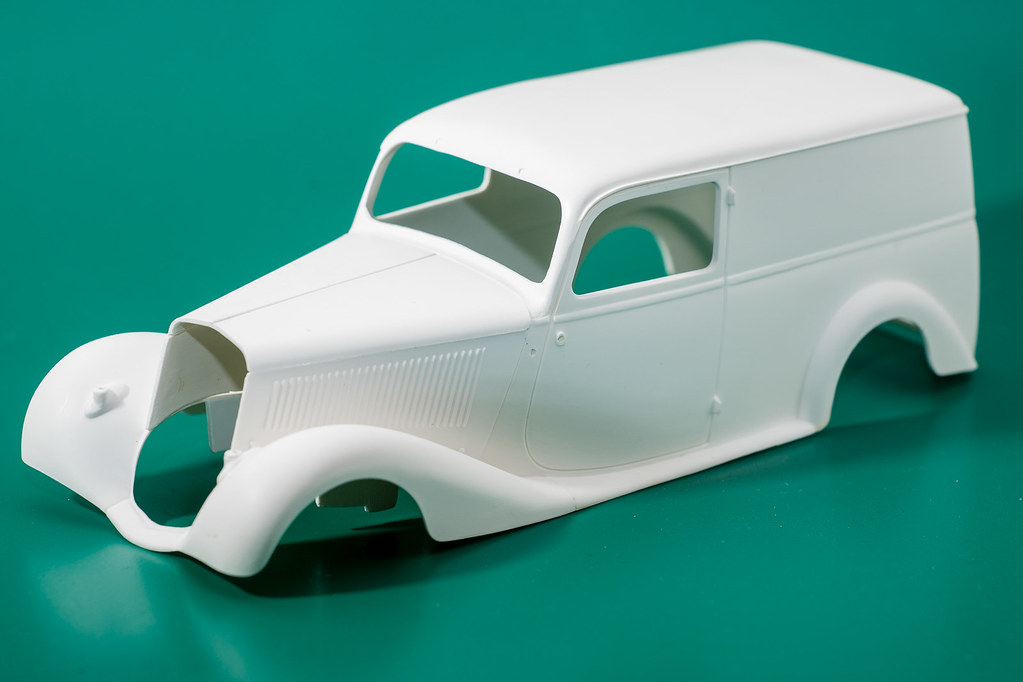
Meanwhile I have assembled the frame as far as possible and painted it.
Image

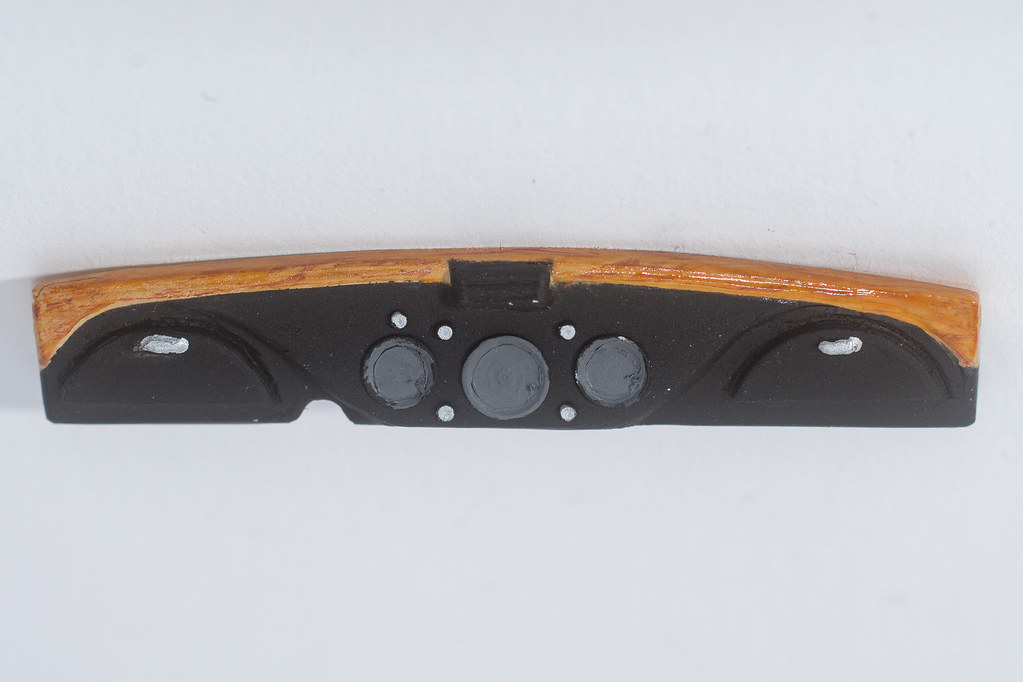
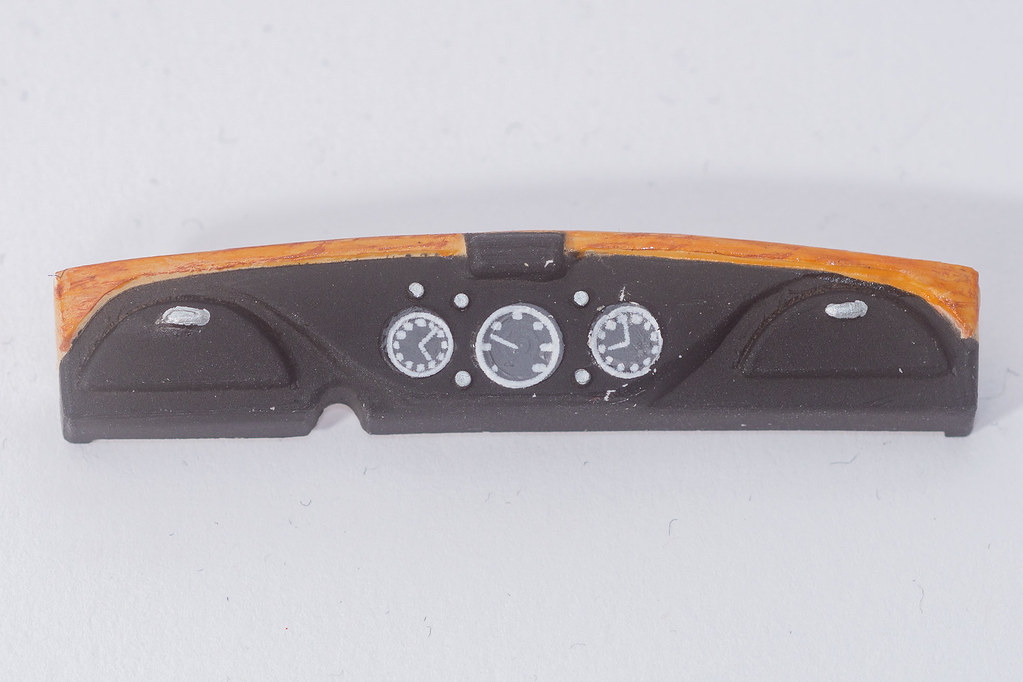
Together with the frame I also painted the seat black. The white dots are probably sanding residues from cleaning other parts. On the seat I will try something I recently saw in a youtube video to give a slightly worn leather look. However, it was a 1/12 scale model, so I'm not quite sure if it's transferable to 1/24. What I will not do with this model is to cover the seat with genuine leather.
Image

So much for the beginning I hope to have piquied your interest in this W.I.P. and am looking forward to your comments, critics and plaudits  
Urs

User avatar
harti20
Onto the Clever Stuff, Now.
Posts: 114
Joined: November 16th, 2021, 3:06 pm

Re: Heller Mercedes 170 Va "Lieferwagen"

Post by harti20 »


Hi all :)

There was a minor drawback on the seat this week. Currently it's soaking in Dowanol to strip the paint. My experiment to mimic leather didn't work that well, so I decided to start over. The main problem was not the technique itself, but more lack of experience on my side. Therefore I'll give it another try, but the color will change from black to brown  

 On the body I attached the front fenders and sanded the whole body to prepare it for primer, but forgot to clean the sanding dust before the photo shooting... 🤔
Image

The engine got some more paint and parts installed. But right after taking the photo, it fell to pieces, so this picture depicts some point in future  :-D
Image

My highlight of this week's work is definitely the floor of the cargo area. Therefore I first made some longitudinal scratches with a fine scriber, then painted the whole area beige, but made sure it didn't get a smooth coverage. After that I painted some (more or less) fine lines with a long, thin paintbrush using Mahogany and US Brown from Vallejo ModelAir. Right after that I applied a coat of Tamiya's Clear Orange by airbrush. After letting it cure for a few minutes I applied pigments in the colors Burnt Umber and Dark Grey and fixed them with a dark brown wash. To finish it off, I accentuated the scratches by applying some Tamiya Panel Line Brown and Black. The metal railings have been made by using BMF. Once again I was very disappointed by the quality of this foil. I think, the next time I would use leaf primer and usual aluminium foil.
Image

 That's all for this week's update :)
Urs

User avatar
JamesPerrin
Looks like his avatar
Posts: 13695
Joined: April 5th, 2011, 8:09 pm
Location: W. Yorkshire
Contact:

Re: Heller Mercedes 170 Va "Lieferwagen"

Post by JamesPerrin »

Subject wise I think you've got as far as you can from your previous builds and still be on for wheels. Definitely an interesting subject.
Classic British Kits SIG Leader Better to fettle than to fill
(2024 A:B 5:2) (2023 13:8:7) (2022 21:11) (2021 15:8) (2020 8:4:4)
User avatar
harti20
Onto the Clever Stuff, Now.
Posts: 114
Joined: November 16th, 2021, 3:06 pm

Re: Heller Mercedes 170 Va "Lieferwagen"

Post by harti20 »

Hi all :)
JamesPerrin wrote: March 27th, 2023, 6:23 pm Subject wise I think you've got as far as you can from your previous builds and still be on for wheels. Definitely an interesting subject.
That's right, but I just love these old cars and their shapes. It's really a pitty that there aren't more modern kits of vintage cars. Luckily there is ICM who from time to time brings something new (or old??) :)

This week I continued my attempt to mimic leather. I think it's much better than in the first attempt, but I'm still not really convinced. But I think I'll leave it now as I don't know what it is exactly that is disturbing me. First I painted the seat in Vallejo ModelAir Burnt Umber. After that I used a small piece of sponge to dab on some Vallejo ModelAir Radome Tan. When I had finished dabbing, I applied some diluted oil paint (burnt sienna, IIRC) and let that dry for about 15 minutes, then I gently brushed over it with a soft, dry brush to blend everything in.

On the wall I dabbed on some Vallejo ModelAir Steel to achieve some chipping effect. In order for the driver to find the address he attached a map of the city on one side and to know what day it is, a calendar on the other side :)
The body of the driver's compartment hasn't been weathered so far, that's next on my todo-list for this build. Also the small compartment underneath the cargo area will get some weathering. I'm still looking for an idea what I could put inside this compartment. On the original car they stored the spare tire there, but  with this model this won't be possible because the compartment is too small for that. Maybe I'll add some tools down there. For the cargo area I plan to add some barrels and boxes and bags with vegetables inside. But this will only follow once the car has been finished as this has priority because of the groupbuild on facebook where I have to finish the model by end of may.
Image

Image

When unpacking the kit, I was wondering how it would work out with the engine hood, as it was moulded as one single piece, completely flat. The building instructions wanted you to bend the side walls down. The bending was surprisingly easy as the moulding seems to be very thin along the bending line. But the side walls feathered back a little, so the hood wouldn't really close. So I decided to glue it on permanently. Therefore nothing underneath the hood will ever be seen again once the model is assembled. For this reason I won't put too much effort in completing the engine. One challenge will be the radiator grill as it lacks about half a millimeter on each side which leaves quite noticeably gaps. My plan now is to add thin sheet to the sides of the grill, fill and sand it smooth and re-chrome it afterwards.
Image

That's all for this week's update. I wish you a good week and happy easter.
​​​​​​​Urs
User avatar
harti20
Onto the Clever Stuff, Now.
Posts: 114
Joined: November 16th, 2021, 3:06 pm

Re: Heller Mercedes 170 Va "Lieferwagen"

Post by harti20 »


Hi all

Long time no update on this build, but that doesn't mean that I didn't do anything

First I finished the undercarriage and the engine. As I had to permanently glue the engine hood to the body, I won't invest too much time in this part, as nobody will see it ever again once the body sits on the frame (unless somebody turns the model upside down...🤬)
Image

Then I started weathering the body. After I was done with that and showed the pictures in another forum, somebody asked me whether the body was really made out of metal in these days? A short research later I knew, that he was right: the engine hood and the fenders had been the only parts made of metal, while (especially in 1946) the cabin, the doors and the floors had been made out of plywood...

Image

 Image

As I wasn't really too happy with the outcome anyway I decided to overpaint the weathering with the base color.
Image

Now I will airbrush some slightly lighter yellow by using a stencil mask for weathered paint. After that I'll apply the decals and then add some more weathering by using Tamiya's X-21 as shown in this video:
https://www.youtube.com/watch?v=tAY3DBxHF1w

Meanwhile I also started work on the dashboard. There I'll have to add the decals and make the metal trims around the gauges. Unless I'll try something I've never done before, but that will be dependent on the progress I make on the body. As mentioned in the opening post, this build is part of a groupbuild on facebook, closing by the end of may, so I think I might be running out of time when looking into my agendo for the next few weeks.
Image

That's all for this update :)
Urs

User avatar
harti20
Onto the Clever Stuff, Now.
Posts: 114
Joined: November 16th, 2021, 3:06 pm

Re: Heller Mercedes 170 Va "Lieferwagen"

Post by harti20 »

Hi all
This week I applied the decals to the body. As the kit is quite old, I first tested with a decal I won't need for my version, whether I would run into any kind of problems and was surprised by the quality of the decals. Also when applying the "right" decals on the body there was absolutely no issue, quite the opposite was the case: they sticked very well to the body, the film was very thin and there was almost no transparent border around them, so the writing looked as it was painted on.
Image

Image

After letting the decals dry overnight, I fixed them with some matte clear coat and waited a few hours before trying the technique shown in the video I linked in my last post. For this I thinned Tamiya X-21 with a few drops 99% isopropyle alcohol and painted it on with a brush. After a few minutes it looked like this
Image

Then the paint was rubbed off with a stiff brush and left a thin white residue which looks as if the paint had faded over time. I just saw on the photo, that I'll have to go over it with the brush on some spots, as there remained too much white. Over all I think I acheived a very subtle effect, maybe just a little too subtle in my opinion. But I think I'll leave it this way before making it worse. The residue also flattened the paint a little what I really like on this model as I didn't want it to be glossy at all.
Image

Image

In addition to decaling and weathering the body I continued work on the undercarriage, so the body can be installed once it's finished.
Image

Now I'll add some street dust to the lower part of the body and maybe some small lumps of earth on the lower part of the fenders, re-chrome the chrome parts and paint / install some smaller parts and then this build will be over already  It was a real fun build from start to end, without any hassle. The sink marks and flash are on the usual side for such an old kit and can be fixed easily. The only (minor) downside IMO are the chrome parts, as they have to be re-chromed because of the positioning of the gates. But as I re-chrome these parts on every build, I wouldn't count that as a real concern.
That's it for today's update :)
​​​​​​​Urs
User avatar
JamesPerrin
Looks like his avatar
Posts: 13695
Joined: April 5th, 2011, 8:09 pm
Location: W. Yorkshire
Contact:

Re: Heller Mercedes 170 Va "Lieferwagen"

Post by JamesPerrin »

The fading effect very works well, though you need to have the right combination of paints underneath or it could have gone very wrong :shock: Nice work
Classic British Kits SIG Leader Better to fettle than to fill
(2024 A:B 5:2) (2023 13:8:7) (2022 21:11) (2021 15:8) (2020 8:4:4)
User avatar
harti20
Onto the Clever Stuff, Now.
Posts: 114
Joined: November 16th, 2021, 3:06 pm

Re: Heller Mercedes 170 Va "Lieferwagen"

Post by harti20 »

Hi all
JamesPerrin wrote: May 8th, 2023, 5:42 pm The fading effect very works well, though you need to have the right combination of paints underneath or it could have gone very wrong :shock: Nice work
Thank you very much :)
Unfortunately the faded effect wasn't really visible on the roof, where I wanted it the most. So I tried with applying some white pigments with a brush, what worked out fine. But I had to notice that the pigments come right off at the slightest touch, so I tried to seal them by applying a flat clear coat over them. That only made the effect disappear completely. I don't know whether I blew off all the pigments of whether they got dissolved in the clear... Finally I ended up applying some Tamiya Weathering Set H, "Peach" color. That really did the trick. It also comes off when touching it, but not too much and, more important, not visible on the model, only on the fingers  So I left it as it is, as I usually don't touch my models on the roof, once they're finished.

That brings me to the main topic of today's update: My Mercedes is finished. It was real fun building a kit somehow different to the way I usually build, trying new things. Not everything worked out the way I had imagined in the beginning, but over all I'm quite happy with the outcome

First the moulded in door handles and window cranks got removed and replaced by scratch built ones
Image

Then I completed the dashboard. My initial plan was to drill holes for the round instruments, insert a metal tubing of a corresponding diameter, insert a fitting rod inside the tubing and apply the decals to the rod. But as I couldn't find any matching tubing for all of the instruments, I applied the decals to the kit part instead. But on another build I will definitely try it with tubing  
Image

After that I applied some dirt right behind the wheels
Image

and completed the undercarriage
Image

Image

In the storage compartment I installed some wooden stripes from thin veneers I had at hand
Image

The rear lights were installed. The rectangular ones had been made out of some old blister, painted with quite a lot of Tamiya Clear Red to give them some thickness. The round ones are transparent resin parts from Decalcas, also painted with Tamiya Clear Red.
Image

Then finally marriage could take place and the last few fiddly bits and parts could be installed.
Image

Image

I'm calling this build done and thank all of you for your comments and plaudits during this build and hope that you will join my next project too :)
Urs

User avatar
general rocket
Modelling Gent and Scholar
Posts: 2791
Joined: May 1st, 2011, 4:42 pm
Location: Telford

Re: Heller Mercedes 170 Va "Lieferwagen" - Finished

Post by general rocket »

A really nice bit of work.
I wish, that I knew what was doing!
User avatar
JamesPerrin
Looks like his avatar
Posts: 13695
Joined: April 5th, 2011, 8:09 pm
Location: W. Yorkshire
Contact:

Re: Heller Mercedes 170 Va "Lieferwagen" - Finished

Post by JamesPerrin »

Really like that, great job on the ageing and wear.
Classic British Kits SIG Leader Better to fettle than to fill
(2024 A:B 5:2) (2023 13:8:7) (2022 21:11) (2021 15:8) (2020 8:4:4)
hardcastle
Getting well comfy!
Posts: 82
Joined: February 4th, 2018, 6:01 am
Location: Durban South Africa

Re: Heller Mercedes 170 Va "Lieferwagen" - Finished

Post by hardcastle »

Great work.
Tim Hardcastle

Not a rivet counter, but always trying to model better, despite little time
IPMS-KZN South Africa
User avatar
Clashcityrocker
Modelling Gent and Scholar
Posts: 10823
Joined: May 1st, 2011, 12:31 am
Location: Adelaide. South Australia

Re: Heller Mercedes 170 Va "Lieferwagen" - Finished

Post by Clashcityrocker »

Nicely built and finished.

Nigel
Post Reply

Return to “Cars, Trucks, Bikes, Locos and other civvie vehicles”