
Fantastic job, Shaun. That's really "above and beyond!". I'm not sure my sanity will stand trying to follow this brilliant example on The Mountain... Keep it up, though...
bestest,
M.
Shaun's builds
Moderator: JamesPerrin
-
ShaunW
- NOT the sheep
- Posts: 26188
- Joined: November 26th, 2011, 6:11 pm
- Location: Pontefract West Yorkshire
Re: Shaun's builds
Many thanks Matt - I keep taking the pills  The Mountain has a serious amount of pipework. The best bet I feel is to try and get the gist of the thing rather than try to replicate everything, for there lies the path to AMS madness
Doing - Tamiya 1/35th Universal Carrier.
Work is the curse of the modelling classes!
IPMS#12300
Work is the curse of the modelling classes!
IPMS#12300
-
ShaunW
- NOT the sheep
- Posts: 26188
- Joined: November 26th, 2011, 6:11 pm
- Location: Pontefract West Yorkshire
Re: Shaun's builds
It's the weekend again, so that means a bit more progress.
This afternoon I concentrated on the handrails. After a bit of mulling and chewing, I decided to use 0.5mm Plastruct rod for the job as it is a bit easier to work than brass wire. The body side rails are now done and the job ended up being easier than I expected. I started by inserting mounting posts into the pre-drilled holes in the body, which were then adjusted to length by eye before being glued. After measuring up, a length of rod was then carefully glued along the mounting posts to create the handrails.
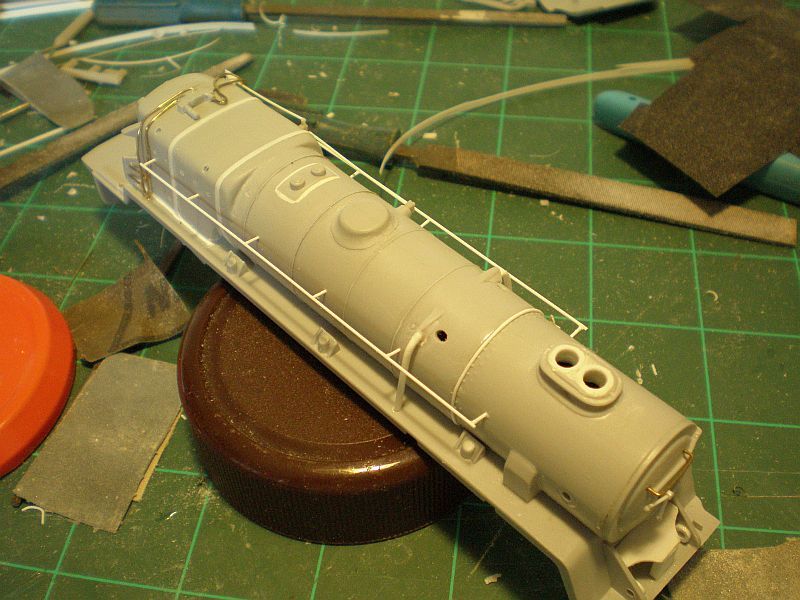
At the front end of the loco, I turned my attention to the bargeboard affairs that flank the main body. As a matter of interest why do some locos sport these?
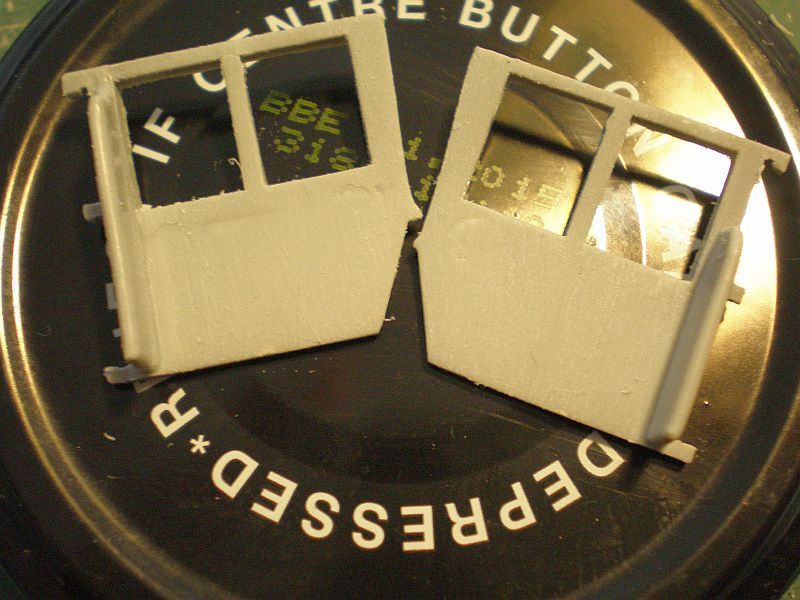
I thought it worthwhile to thin the boards out as they are too thick OOB IMHO, much the same way as undercarriage doors often are in old aircraft kits. Photos show that the boards are made of thin sheet on the full-size. I used files and sandpaper to thin the parts down to a better scale thickness. The photo below shows OOB on the left and the thinned out part on the right
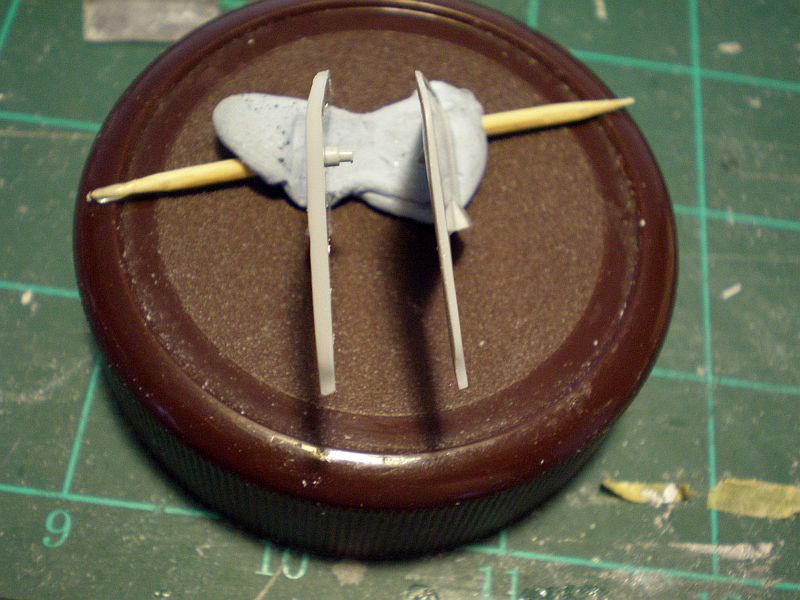
After that little exercise, I added the handrails to the boards in the same way as I made up the main body rails
Thanks for looking.
This afternoon I concentrated on the handrails. After a bit of mulling and chewing, I decided to use 0.5mm Plastruct rod for the job as it is a bit easier to work than brass wire. The body side rails are now done and the job ended up being easier than I expected. I started by inserting mounting posts into the pre-drilled holes in the body, which were then adjusted to length by eye before being glued. After measuring up, a length of rod was then carefully glued along the mounting posts to create the handrails.

At the front end of the loco, I turned my attention to the bargeboard affairs that flank the main body. As a matter of interest why do some locos sport these?
I thought it worthwhile to thin the boards out as they are too thick OOB IMHO, much the same way as undercarriage doors often are in old aircraft kits. Photos show that the boards are made of thin sheet on the full-size. I used files and sandpaper to thin the parts down to a better scale thickness. The photo below shows OOB on the left and the thinned out part on the right

After that little exercise, I added the handrails to the boards in the same way as I made up the main body rails

Thanks for looking.
Doing - Tamiya 1/35th Universal Carrier.
Work is the curse of the modelling classes!
IPMS#12300
Work is the curse of the modelling classes!
IPMS#12300
-
splash

- Senior Service Rotorhead
- Posts: 13828
- Joined: May 1st, 2011, 11:02 am
- Location: Somerset England
Re: Shaun's builds
The barge boards your referring to are smoke deflectors, they are designed to lift the smoke and steam up and away from the sides to give the drivers a clearer view forward.
Thinning them down should really improve the looks.
Keep up the brilliant work.
Regards Splash
Thinning them down should really improve the looks.
Keep up the brilliant work.
Regards Splash
My work bench is starting to look like Portsmouth Naval Dockyard.
-
ShaunW
- NOT the sheep
- Posts: 26188
- Joined: November 26th, 2011, 6:11 pm
- Location: Pontefract West Yorkshire
Re: Shaun's builds
Cheers Splash and thanks for the info re the smoke deflectors, I've often wondered what their purpose was. My knowledge of locos is slowly improving thanks to this build!
Doing - Tamiya 1/35th Universal Carrier.
Work is the curse of the modelling classes!
IPMS#12300
Work is the curse of the modelling classes!
IPMS#12300
-
ShaunW
- NOT the sheep
- Posts: 26188
- Joined: November 26th, 2011, 6:11 pm
- Location: Pontefract West Yorkshire
Re: Shaun's builds
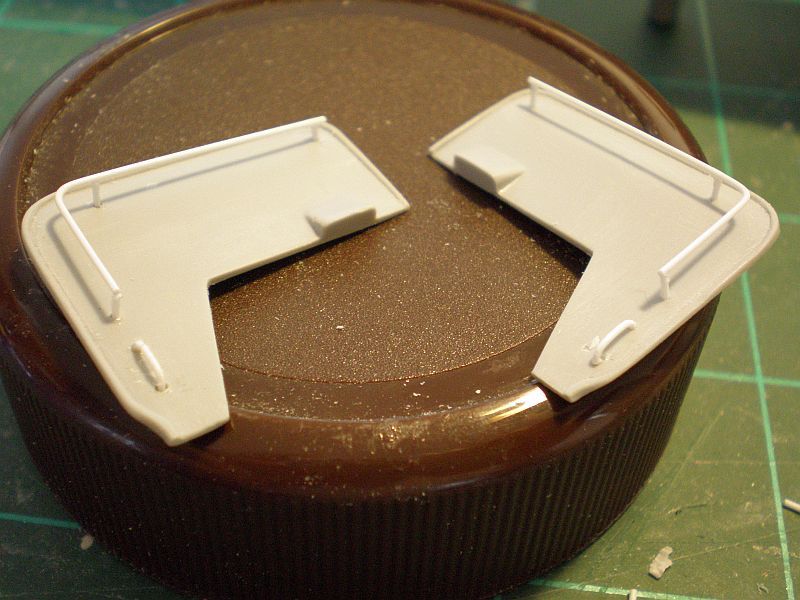
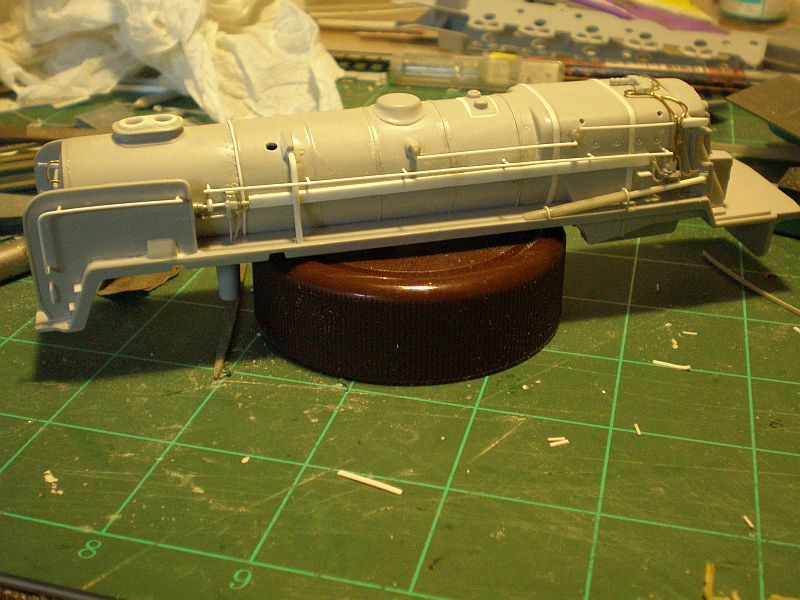
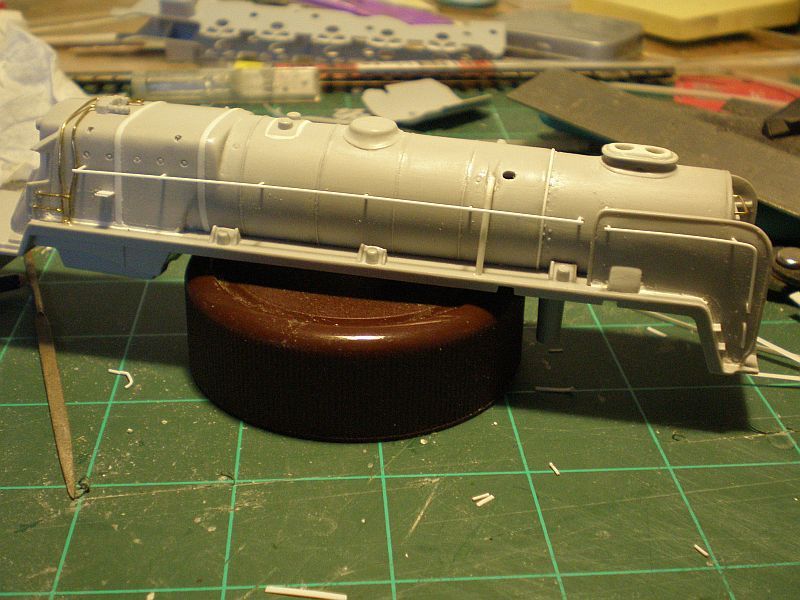
This afternoon, yes all of it, was spent fitting the smoke deflectors. A fiddly time consuming job that tapped deep into my reserves of patience as the deflectors were a poor fit and then I made up the bracing bars using photos and a bit of imagination for the top bars which I couldn't find sharp photos of. I also fitted the steps on either side, made up from plastic card, which replace the moulded on items.
And this is what she looks like now. Apart from one or two small items still to be fitted, that is as far as I am going with replacing the moulded on upper body detail.
And that leaves the cab interior. This is what is given in the box
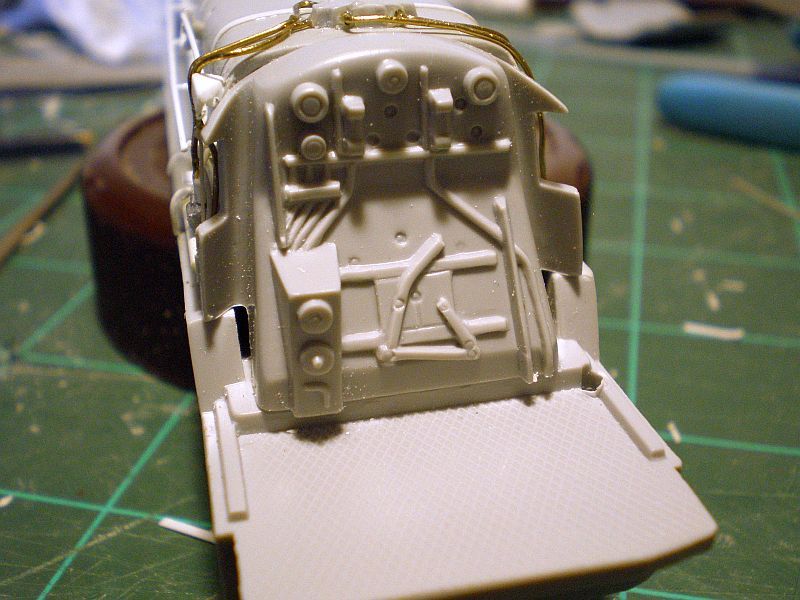
Not a complete disaster especially when taking into account the age of the kit and is certainly better than what is provided in the cockpits of most, if not all, aircraft kits from the same era. I think there is room for a bit of improvement and I'll see what I can glean from photos on the net. I don't intend to go too far detailing the cab as the view into the interior looks quite restricted once the cab sides and roof are attached.
Thanks for looking.

And this is what she looks like now. Apart from one or two small items still to be fitted, that is as far as I am going with replacing the moulded on upper body detail.


And that leaves the cab interior. This is what is given in the box

Not a complete disaster especially when taking into account the age of the kit and is certainly better than what is provided in the cockpits of most, if not all, aircraft kits from the same era. I think there is room for a bit of improvement and I'll see what I can glean from photos on the net. I don't intend to go too far detailing the cab as the view into the interior looks quite restricted once the cab sides and roof are attached.
Thanks for looking.
Doing - Tamiya 1/35th Universal Carrier.
Work is the curse of the modelling classes!
IPMS#12300
Work is the curse of the modelling classes!
IPMS#12300
Re: Shaun's builds
The work that you and others are showing is making me feel very inferior with my paltry efforts on a few buildings.
Trying to Build kits and not Buy kits
-
ShaunW
- NOT the sheep
- Posts: 26188
- Joined: November 26th, 2011, 6:11 pm
- Location: Pontefract West Yorkshire
Re: Shaun's builds
Your efforts with the buildings are far from paltry Chris. At my glacial rate of building I'll be lucky if I get much more done in the way of other subjects by November! I wouldn't mind doing another loco though or maybe a classic biplane for the airfield.
Doing - Tamiya 1/35th Universal Carrier.
Work is the curse of the modelling classes!
IPMS#12300
Work is the curse of the modelling classes!
IPMS#12300
-
ShaunW
- NOT the sheep
- Posts: 26188
- Joined: November 26th, 2011, 6:11 pm
- Location: Pontefract West Yorkshire
Re: Shaun's builds
I've had a bit of a busy weekend so didn't get the chance to do as much on this as I would have liked. Still, a bit of bench time was found and I started to add a little detail to the cab.
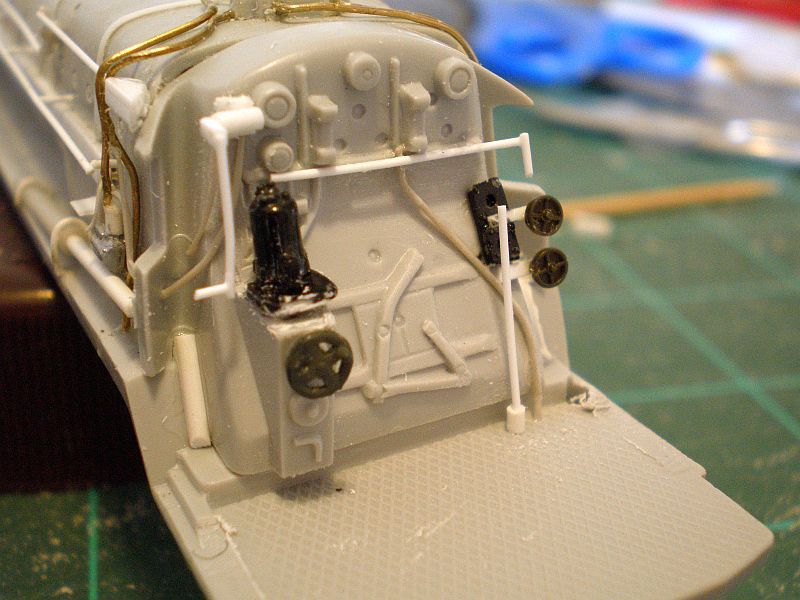
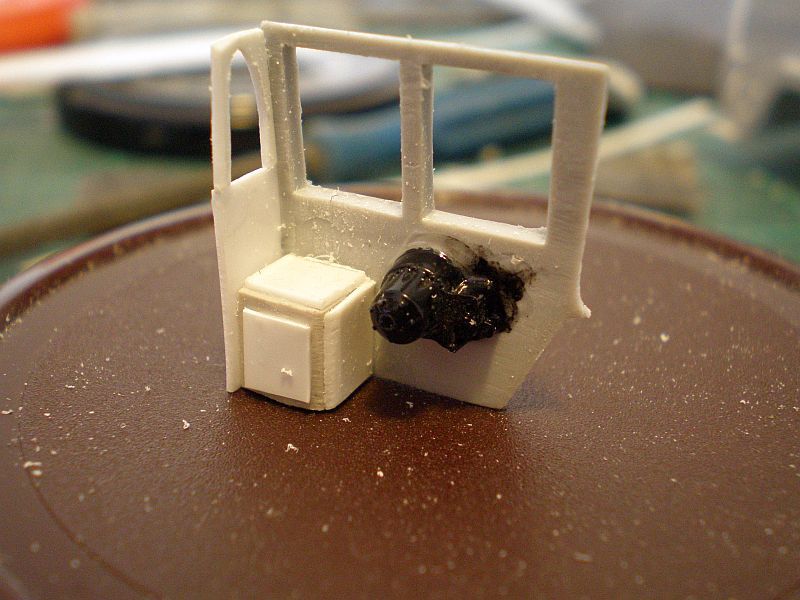
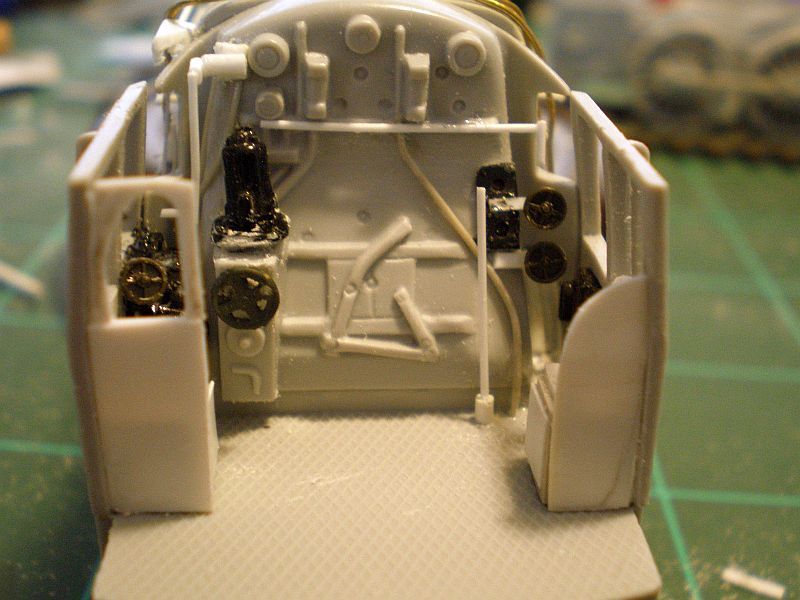
After making reference to photos on Google Images, I started at the front and added levers and what have you from 0.5mm Plastruct rod, the black parts are from the ever useful Dragon 1/48th Ta 152 engine sprues, control wheel at bottom left is from an old Airfix 88mm gun that is kicking around in my spares collection and the other two control wheels originate from, I think, the sprues of a 1/35th tank kit but I cannot recall their intended purpose - not as control wheels I feel.
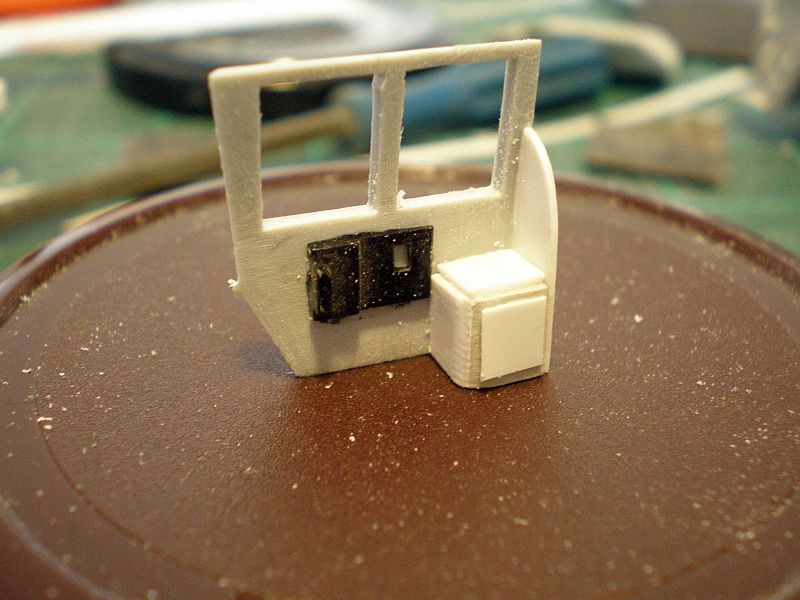
The cab sides also needed a bit of tarting up. The pic below shows the OOB appearance, save for the moulded on handrails which I removed shortly before the photo was taken.
I felt that the rear partition parts were too thick and the left hand side one was inaccurate. I replaced the partitions on both sides with plastic card and added a window section in the left hand side, which will be glazed in due course. Crew seats were made up from box section plastic and scraps of plastic card. The Ta-152 provided more gizmology parts for the walls of the cab - not 100% accurate, but better than nowt.
I don't intend to add a great deal more to the cab as the view into there will be quite restricted once the roof is added and the tender is connected. As tomorrow is my day off, hopefully I will be able to get a bit more done.
Thanks for looking.
After making reference to photos on Google Images, I started at the front and added levers and what have you from 0.5mm Plastruct rod, the black parts are from the ever useful Dragon 1/48th Ta 152 engine sprues, control wheel at bottom left is from an old Airfix 88mm gun that is kicking around in my spares collection and the other two control wheels originate from, I think, the sprues of a 1/35th tank kit but I cannot recall their intended purpose - not as control wheels I feel.

The cab sides also needed a bit of tarting up. The pic below shows the OOB appearance, save for the moulded on handrails which I removed shortly before the photo was taken.

I felt that the rear partition parts were too thick and the left hand side one was inaccurate. I replaced the partitions on both sides with plastic card and added a window section in the left hand side, which will be glazed in due course. Crew seats were made up from box section plastic and scraps of plastic card. The Ta-152 provided more gizmology parts for the walls of the cab - not 100% accurate, but better than nowt.


I don't intend to add a great deal more to the cab as the view into there will be quite restricted once the roof is added and the tender is connected. As tomorrow is my day off, hopefully I will be able to get a bit more done.
Thanks for looking.
Doing - Tamiya 1/35th Universal Carrier.
Work is the curse of the modelling classes!
IPMS#12300
Work is the curse of the modelling classes!
IPMS#12300
-
splash
- Senior Service Rotorhead
- Posts: 13828
- Joined: May 1st, 2011, 11:02 am
- Location: Somerset England
Re: Shaun's builds
That's looking more impressive every update.
Regards Splash
Regards Splash
My work bench is starting to look like Portsmouth Naval Dockyard.
-
PaulBradley

- Staring out the window
- Posts: 21220
- Joined: April 6th, 2011, 3:08 pm
- Location: Flagstaff, AZ
Re: Shaun's builds
Very smart, Shaun.
Paul
За демократію і незалежний Україну
"For Democracy and a Free Ukraine"
За демократію і незалежний Україну
"For Democracy and a Free Ukraine"
-
ShaunW
- NOT the sheep
- Posts: 26188
- Joined: November 26th, 2011, 6:11 pm
- Location: Pontefract West Yorkshire
Re: Shaun's builds
Many thanks boys. I finished up the cab and started on the wheels today - plenty of flash to clean from between the spokes!
Doing - Tamiya 1/35th Universal Carrier.
Work is the curse of the modelling classes!
IPMS#12300
Work is the curse of the modelling classes!
IPMS#12300
-
ShaunW
- NOT the sheep
- Posts: 26188
- Joined: November 26th, 2011, 6:11 pm
- Location: Pontefract West Yorkshire
Re: Shaun's builds
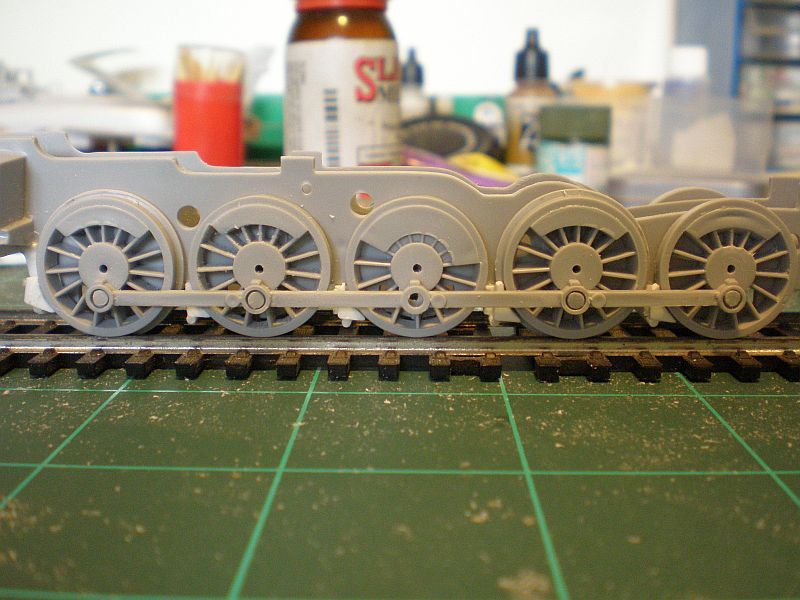
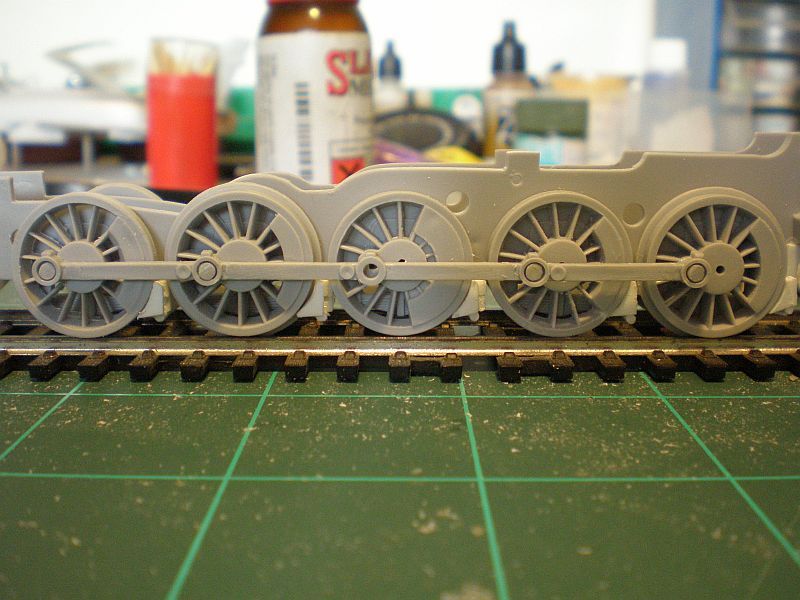
And a little more progress has been made. I've now started to turn my attention to the running gear. First job was to clean up the wheels as there was a considerable amount of flash clogging up the spokes and I then drilled holes into the hub centres as per photos of the real thing. I then decided to torture myself with more scratch building in the form of brake shoes added to the leading edges of the main wheels. The shoes were made from thick plastic card which was mounted onto plastic strip topped with 1.5mm plastic rod, running across the underside of the chassis. This is not 100% accurate but I think captures the feel of the real thing. The front brakes (far left wheel in upper photo and far right wheel in lower photo) were treated to more accurate hangers as they are more visible. The hangers were made from plastic strip drilled to accept 1.5mm plastic rod which was then fitted through the holes, axle-like, across the chassis underside and upon which the brake shoes were mounted. As you can see, I have made a start on the connecting rods and the centre wheels are still free to rotate and are awaiting the fitting of cams to accept more connecting rods.
The cab has now been mounted to the body and a little more detail has been added. The roof will be left off and painted separately to allow access to the cab interior for detail painting and the addition of glazing.
Thanks for looking.


The cab has now been mounted to the body and a little more detail has been added. The roof will be left off and painted separately to allow access to the cab interior for detail painting and the addition of glazing.

Thanks for looking.
Doing - Tamiya 1/35th Universal Carrier.
Work is the curse of the modelling classes!
IPMS#12300
Work is the curse of the modelling classes!
IPMS#12300
-
ShaunW
- NOT the sheep
- Posts: 26188
- Joined: November 26th, 2011, 6:11 pm
- Location: Pontefract West Yorkshire
Re: Shaun's builds
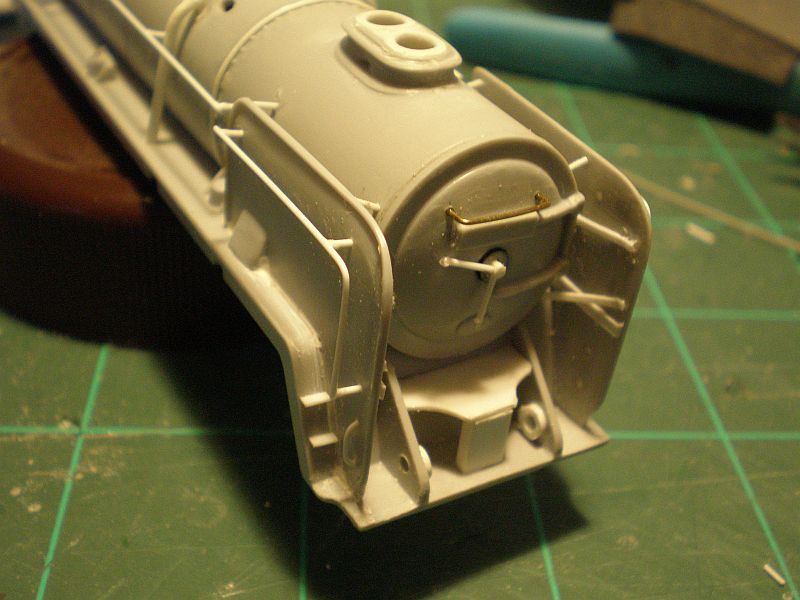
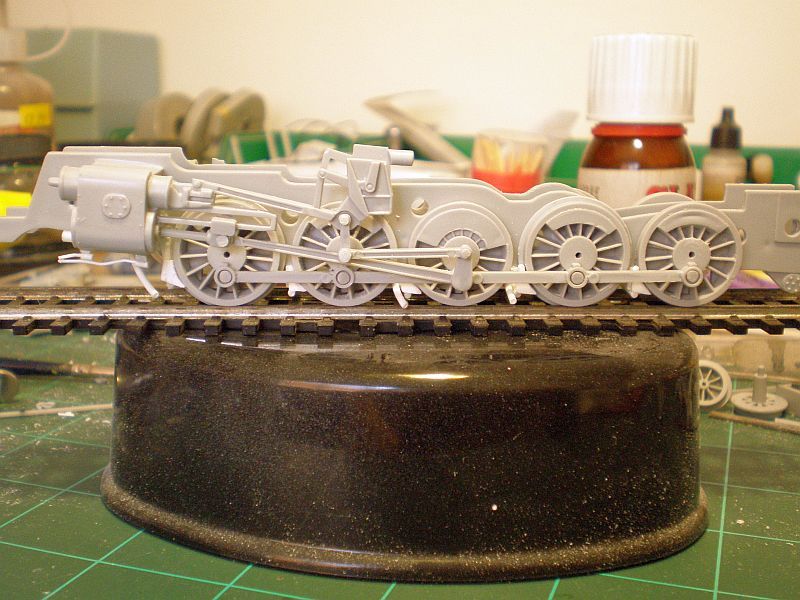
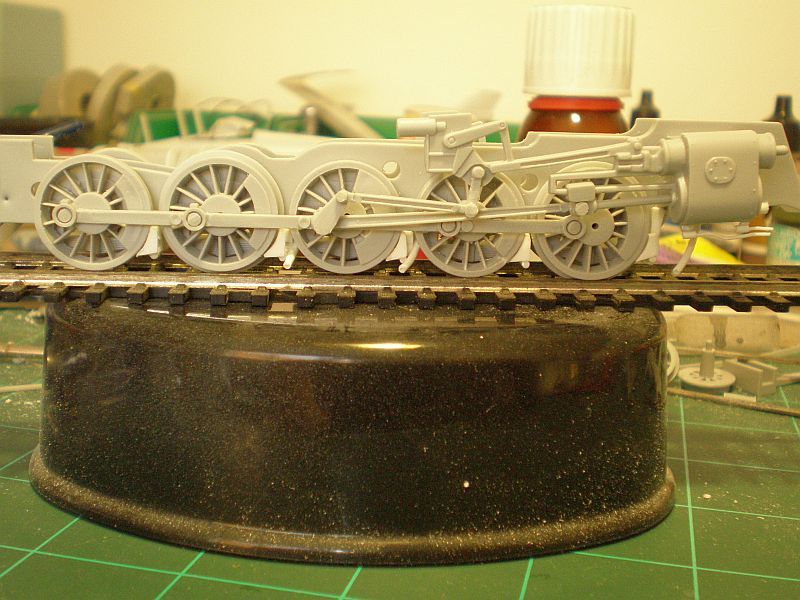
Over the weekend I've finished up the connecting rods, which were actually nicely engineered and fit a lot better than I was expecting them to. After looking at photos on Google, I decided to add a bit more kerb appeal by adding some of the chassis steam pipes. Under the main piston housings at the front, pipes were made from 0.5mm rod inserted into pre-drilled 1.5mm rod housings. I then added further pipes, made from the 1.5mm rod drilled out with a 0.7mm bit held in a pin vice, to the undersides of the piston housings and after the second and centre wheels.
After test fitting the body top and chassis, I think I will keep the two apart for painting to aid handling and getting paint into all of the nooks and crannies. I'm going to leave the loco now and take a look at the tender.
Thanks for looking.


After test fitting the body top and chassis, I think I will keep the two apart for painting to aid handling and getting paint into all of the nooks and crannies. I'm going to leave the loco now and take a look at the tender.
Thanks for looking.
Doing - Tamiya 1/35th Universal Carrier.
Work is the curse of the modelling classes!
IPMS#12300
Work is the curse of the modelling classes!
IPMS#12300
-
ShaunW
- NOT the sheep
- Posts: 26188
- Joined: November 26th, 2011, 6:11 pm
- Location: Pontefract West Yorkshire
Re: Shaun's builds
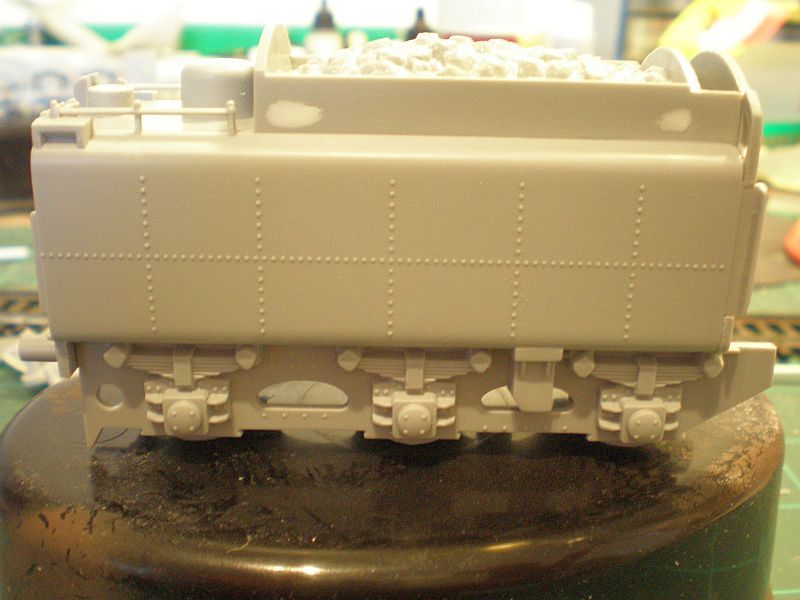
I didn't get a lot of time today but I did manage to build up the tender. The fit is not brilliant and the rivet detail is a bit on the heavy side for my tastes, so that will receive a light sanding for starters. Filler is required at various points around the bodywork:
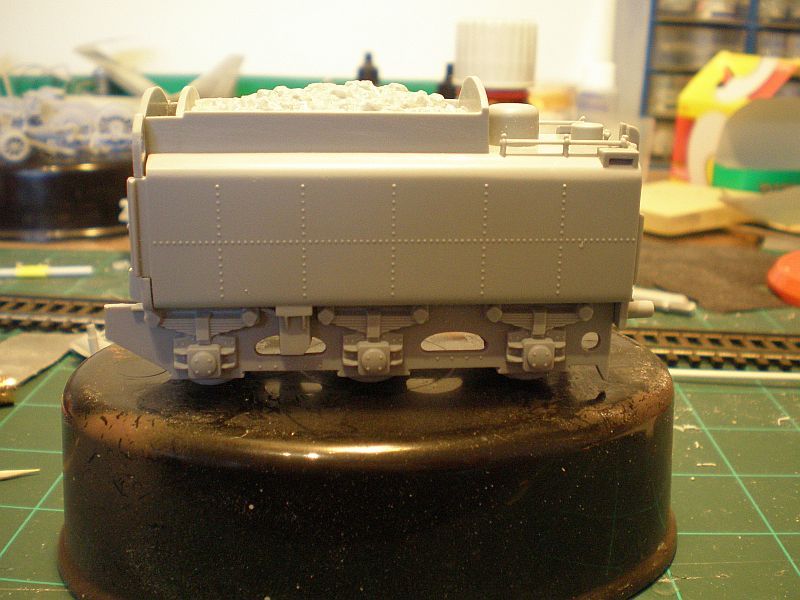
Filler at the top on this side was to address a couple of deep sink marks:
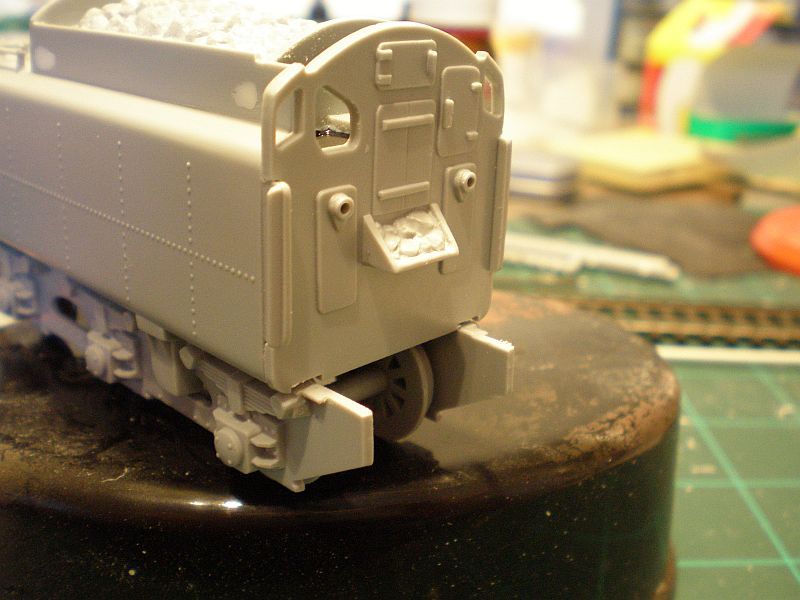
At the rear there is a fair amount of moulded on detail, including the access ladder and side grab rails that I aim to replace as per the loco:
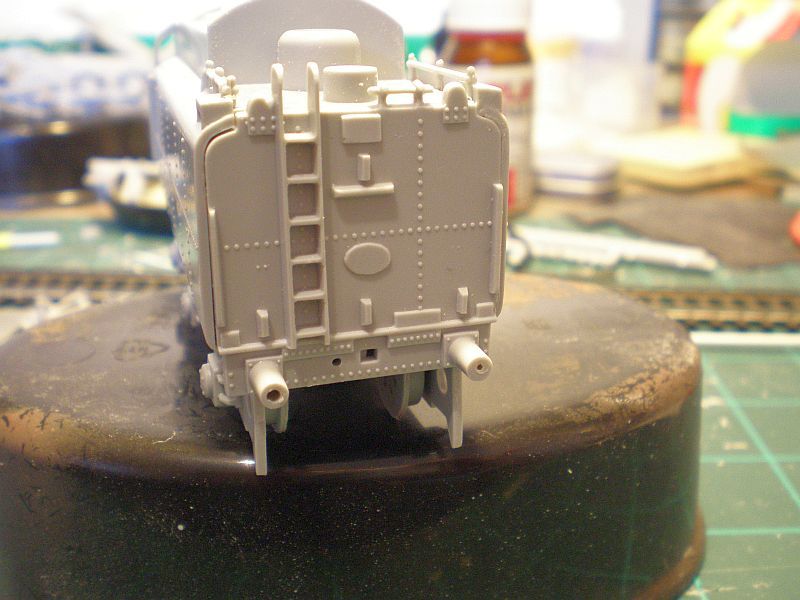
Ditto the front. The side grab rails are mounted on plates that, after considering photos, appear to be too short. I will therefore sand the whole lot down and replace with plastic card and wire or rod handles:
A bit more work to be getting on with then!
Thanks for looking.

Filler at the top on this side was to address a couple of deep sink marks:

At the rear there is a fair amount of moulded on detail, including the access ladder and side grab rails that I aim to replace as per the loco:

Ditto the front. The side grab rails are mounted on plates that, after considering photos, appear to be too short. I will therefore sand the whole lot down and replace with plastic card and wire or rod handles:

A bit more work to be getting on with then!
Thanks for looking.
Doing - Tamiya 1/35th Universal Carrier.
Work is the curse of the modelling classes!
IPMS#12300
Work is the curse of the modelling classes!
IPMS#12300