Thanks for the info guys, and also for posting the foto's. From this and other foto's I've found, it seems just about any type of tyre has at some point been fitted to the Harvard. Also, the hubs seem to vary quite a bit.
I'll be doing some further digging on the French T-6Gs, in hopes of finding some more precise info. Of course, even if that shows I need different wheels, the whole affair will be moot unless I can find replacement wheels or figure out a way to put the type profile on these...
Rob's big Texan
-
rob_van_riel
- Modelling Gent and Scholar
- Posts: 3325
- Joined: November 4th, 2012, 11:28 am
- Location: The Netherlands
- Contact:
-
rob_van_riel
- Modelling Gent and Scholar
- Posts: 3325
- Joined: November 4th, 2012, 11:28 am
- Location: The Netherlands
- Contact:
Re: Rob's big Texan
Yay! Found some helpful snaps.rob_van_riel wrote:I'll be doing some further digging on the French T-6Gs, in hopes of finding some more precise info.
Current T-6 dressed up as an Algerian war plane:

And better yet, what is almost certainly a period foto of these aircraft:
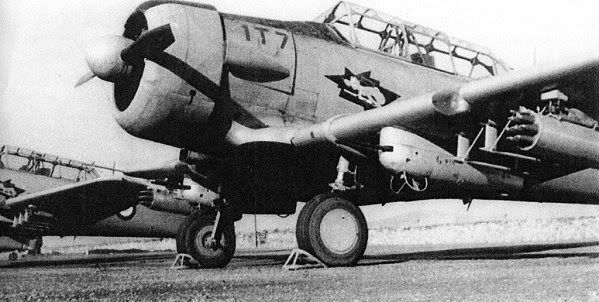
Both have what I think is circumferential thread, but whatever it's called, it's clear what I need. Now, for a way to make it happen...
-
rob_van_riel
- Modelling Gent and Scholar
- Posts: 3325
- Joined: November 4th, 2012, 11:28 am
- Location: The Netherlands
- Contact:
Re: Rob's big Texan
If the document below is correct, Mustangs used the same tires. I smell possibilitiesrob_van_riel wrote:Both have what I think is circumferential thread, but whatever it's called, it's clear what I need. Now, for a way to make it happen...
http://www.triplanebuilder.com/uploads/ ... ns__1_.pdf
-
rob_van_riel
- Modelling Gent and Scholar
- Posts: 3325
- Joined: November 4th, 2012, 11:28 am
- Location: The Netherlands
- Contact:
Re: Rob's big Texan
Found 'em:rob_van_riel wrote:Mustangs used the same tires. I smell possibilities
http://www.hussarproductions.com/hsr32001.html
-
splash

- Senior Service Rotorhead
- Posts: 13828
- Joined: May 1st, 2011, 11:02 am
- Location: Somerset England
Re: Rob's big Texan
Could you not laminate different size discs to get the same effect then use the master for resin copies?
My work bench is starting to look like Portsmouth Naval Dockyard.
-
rob_van_riel
- Modelling Gent and Scholar
- Posts: 3325
- Joined: November 4th, 2012, 11:28 am
- Location: The Netherlands
- Contact:
Re: Rob's big Texan
Possibly. It would take some figuring out how to cut the discs correctly, and how to line them up neatly, but I suppose it could be done. Making the moulds would be routine. On the other hand, I'll only ever need one pair of wheels, so I'm rather inclined just to pay someone for them.splash wrote:Could you not laminate different size discs to get the same effect then use the master for resin copies?
That said, I will probably try to rig up a sort of improvised lathe with the dremel, and cut the required grooves directly into the kit wheels. I now know I have a backup plan should I mess up, so I can go wild (and stingy, in keeping with national tradition
-
rob_van_riel
- Modelling Gent and Scholar
- Posts: 3325
- Joined: November 4th, 2012, 11:28 am
- Location: The Netherlands
- Contact:
Re: Rob's big Texan
The improvised "lathe". Nothing more that a small power tool clamped to the table, and a pin in a pinvise.rob_van_riel wrote:I will probably try to rig up a sort of improvised lathe with the dremel, and cut the required grooves directly into the kit wheels.

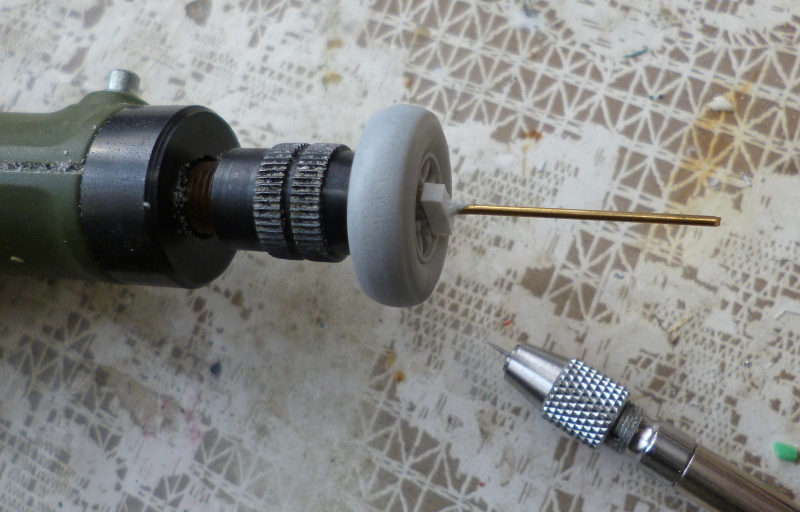
The lines cut by the pin turned out to be too thin. They looked great, until I sanded the burrs of, and then they were all but gone, so I switched to a small diamond file. That got the job done well enough.
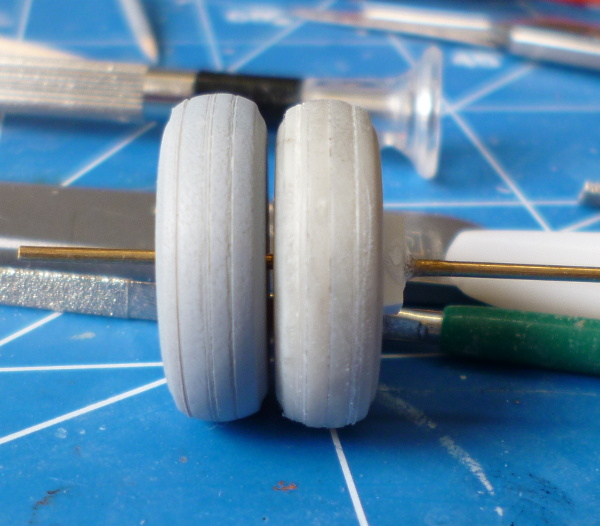
No buying wheels involved after all

Re: Rob's big Texan
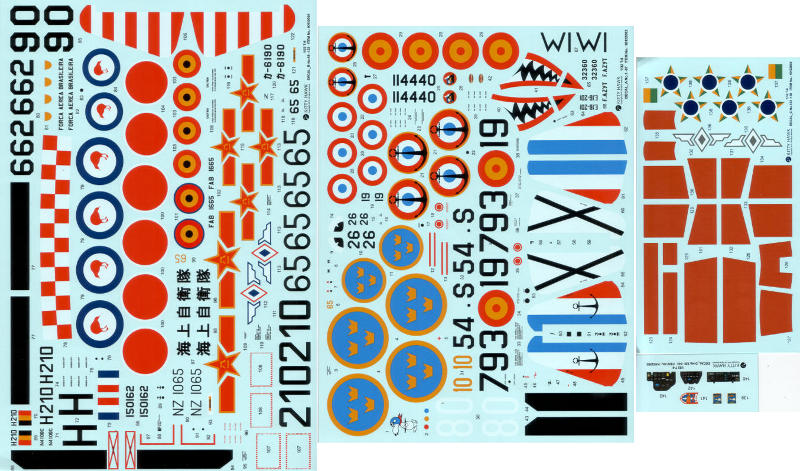
Are those Japanese Hinomarus??rob_van_riel wrote:
Sorry, but if it was me building that, I couldn't resist the urge to do it like this:

Daren
Half-assed Spitfire builder!
Half-assed Spitfire builder!
-
rob_van_riel
- Modelling Gent and Scholar
- Posts: 3325
- Joined: November 4th, 2012, 11:28 am
- Location: The Netherlands
- Contact:
Re: Rob's big Texan
They certainly are.DazDaMan wrote:Are those Japanese Hinomarus??
Hehe, that is a nice one too. The Japanese markings included with the kit are for an overall yellow machine, which I must admit was quite tempting, as were several of the other markings included (these chaps know how to sell you multiple instances of the same kitSorry, but if it was me building that, I couldn't resist the urge to do it like this:
Now, having said all that, I also have the 1/72 Heller kit in the stash, and that comes with exactly the same markings. Your faux Zero may well be a serious contender for that one, if ever I get around to it
Re: Rob's big Texan
Now you've given me an idea!rob_van_riel wrote:
Now, having said all that, I also have the 1/72 Heller kit in the stash, and that comes with exactly the same markings. Your faux Zero may well be a serious contender for that one, if ever I get around to it
Daren
Half-assed Spitfire builder!
Half-assed Spitfire builder!
-
SJPONeill

- Modelling Gent and Scholar
- Posts: 3525
- Joined: May 1st, 2011, 12:01 am
- Location: Near the Spiral, NZ.
- Contact:
Re: Rob's big Texan
Your homemade lathe is a simple and eloquent solution to the problem of the smooth tires, Rob...somewhat inspirational as well as I'm tempted now to find a similar project to try that out...
Please critique my posts honestly i.e. say what you think so I can learn and improve...
The World According To Me
The World According To Me
-
rob_van_riel
- Modelling Gent and Scholar
- Posts: 3325
- Joined: November 4th, 2012, 11:28 am
- Location: The Netherlands
- Contact:
Re: Rob's big Texan
Thank you.SJPONeill wrote:Your homemade lathe is a simple and eloquent solution to the problem of the smooth tires, Rob...somewhat inspirational as well as I'm tempted now to find a similar project to try that out...
Whole generations of metal- and woodworkers have used similar techniques to create marvellous pieces of work, so you should be able to find some inspiring project.
-
JohnRatzenberger

- Why is he so confused ?
- Posts: 15736
- Joined: April 5th, 2011, 3:42 pm
- Location: Living on a sandbar - Nags Head, NC.
Re: Rob's big Texan
With the wheels sorted, any further progress ?
John Ratzenberger 
It's my model and I'll do what I want with it.
It's my model and I'll do what I want with it.
-
rob_van_riel
- Modelling Gent and Scholar
- Posts: 3325
- Joined: November 4th, 2012, 11:28 am
- Location: The Netherlands
- Contact:
Re: Rob's big Texan
Very little, but this was not unexpected. Unless I'm enjoying a vacation, I can't reliably keep up with GBs (one of the reasons I don't take part in all that many of them), and up until now, that wasn't the case. On the other hand, three weeks of vacation starting now should speed things up considerablyjRatz wrote:With the wheels sorted, any further progress ?
That's not to say there hasn't been any progress at all, but I feel silly posting about joining up two or three parts resulting in a nice sub-sub-subassembly.
-
rob_van_riel
- Modelling Gent and Scholar
- Posts: 3325
- Joined: November 4th, 2012, 11:28 am
- Location: The Netherlands
- Contact:
Re: Rob's big Texan
Speaking of which, I'd built it the front half of the engine, and although not spectacular, I was rather satisfied with it.rob_van_riel wrote:but I feel silly posting about joining up two or three parts resulting in a nice sub-sub-subassembly.
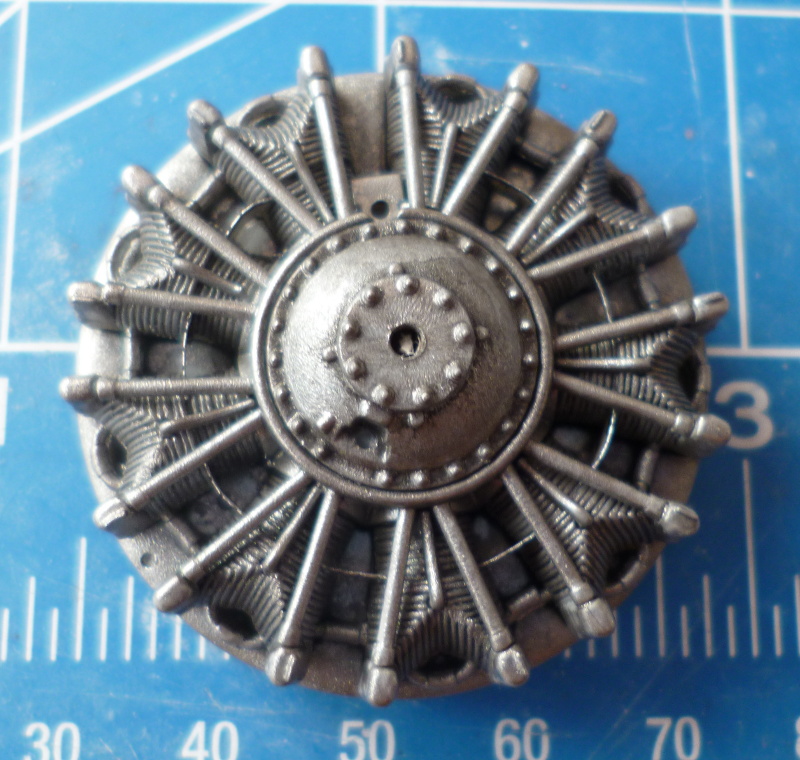
But there was this minor issue of some parts being indicated as blue, which seemed wierd, so I went looking for pictures of the real thing..
http://1.bp.blogspot.com/-I1raRef95ew/T ... vard+5.JPG;
Nothing like that sort of picture to take you down a few pegs
Still, I should be able to jazz the plastic bit up a bit, and the picture explains the blue nicely. It also got me looking at the remaining parts for the front in a bit more detail, at which point I realised I'd messed up. The instructions are correct, but they rather desperately understate a very important detail about the alignment of the various parts:
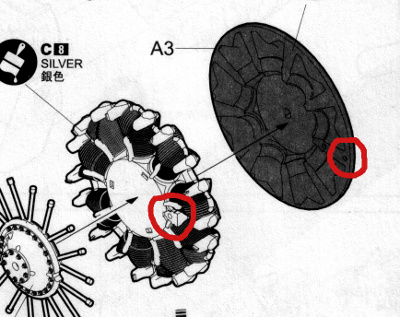
See those minute details in the red circles? If you don't get them lined up (and I should note everything appears to fit just fine if you don't) the engine will end up rotated, since all the other alignments are hard; it just won't fit when rotated. It should be immediately obvious that did not line up the parts correctly, and there's now no way to fix this. I'll have to come up with a way of rotating the entire assembly to get the engine the right way up after all. AAARRRGGHHH!!