Lone Modeller's Tray
-
JamesPerrin

- Looks like his avatar
- Posts: 13695
- Joined: April 5th, 2011, 8:09 pm
- Location: W. Yorkshire
- Contact:
Re: Lone Modeller's Tray
Really taking shape now, early on I was scratching my head as to where it was going. It's going to be something special
Classic British Kits SIG Leader Better to fettle than to fill
(2024 A:B 5:2) (2023 13:8:7) (2022 21:11) (2021 15:8) (2020 8:4:4)
(2024 A:B 5:2) (2023 13:8:7) (2022 21:11) (2021 15:8) (2020 8:4:4)
-
shangos70
- Modelling Gent and Scholar
- Posts: 4422
- Joined: May 1st, 2011, 11:14 am
- Location: Doncaster, Socialist Republic of South Yorkshire.
Re: Lone Modeller's Tray
Really great work, an education in scratch building.
-
Lone Modeller
- Modelling Gent and Scholar
- Posts: 5345
- Joined: April 1st, 2013, 6:45 pm
Re: Lone Modeller's Tray
Evening All,
Thanks James and Shangos for dropping by: I am pleased that you like what I have done so far. This base seems to be taking longer to make than the aeroplane did!
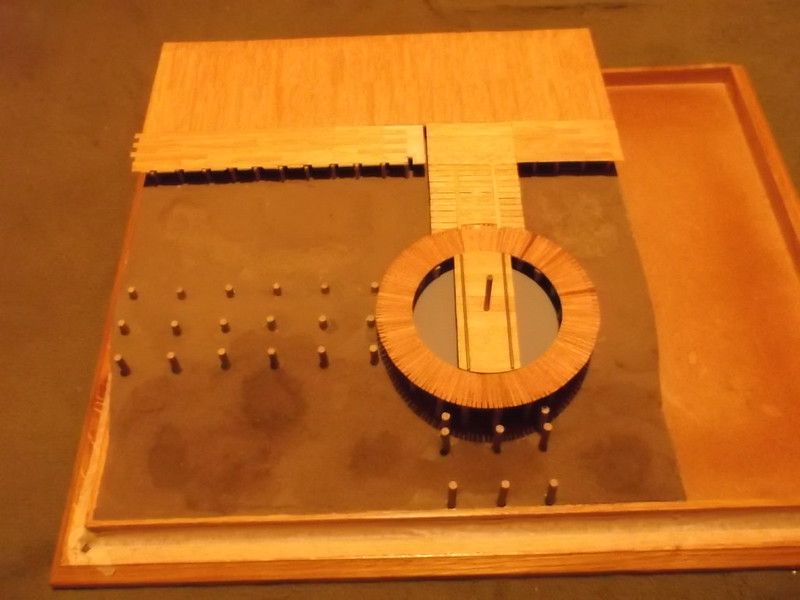
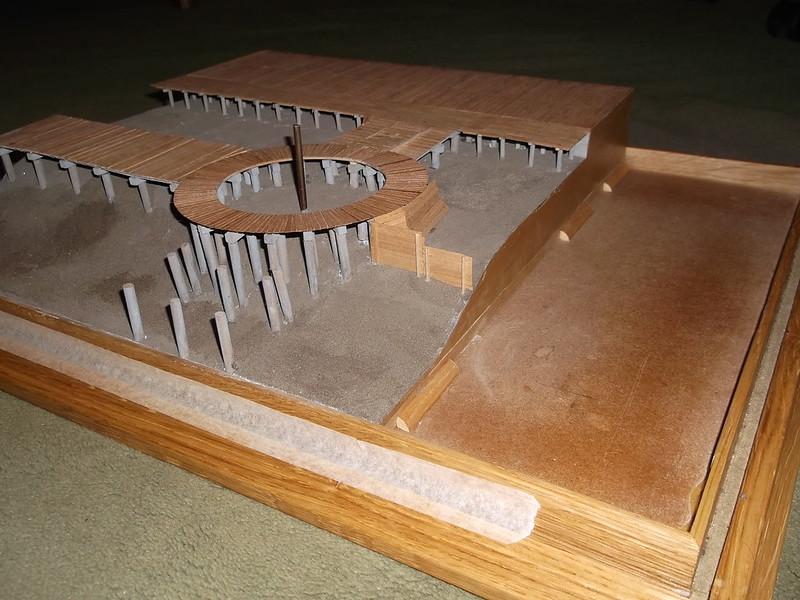
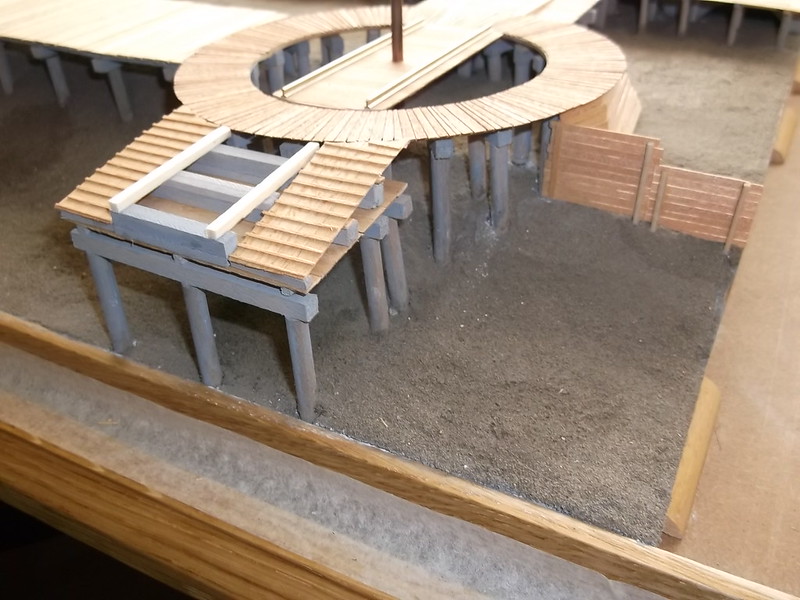
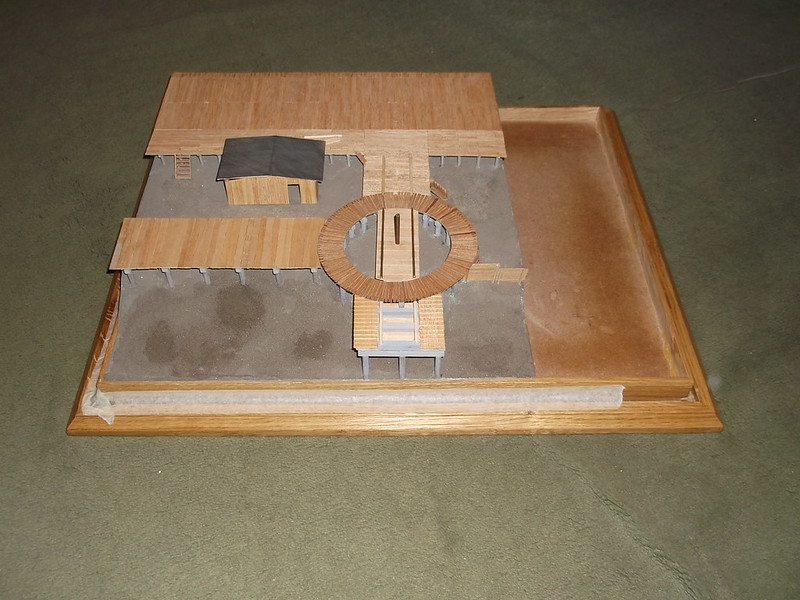
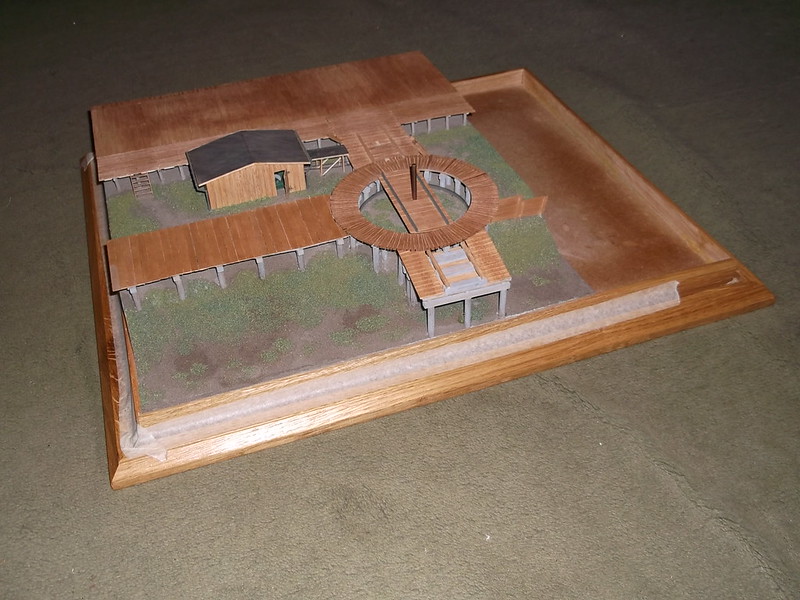
There was a wooden platform that was built in 1915 on the lake side of the hangar - which is why I have put a line of posts along there. The original posts that I put in were the same diameter as the others but I felt that because this platform was only for people to walk on, the originals were probably smaller, so I replaced mine with smaller dowels This necessitated some small filling jobs to be done and some more sand needed to be scattered to conceal the repairs - hence the delay in getting the platforms made.
My first intention was to lay the wood strips directly on to the cross beams as per the original structure but I was not sure whether I would be able to get a level and even surface if I did. So I decided to cut pieces of thin basswood sheet which were the same width as the upright posts and then cut small recesses in the sides of the basswood where each post would be. Planking was glued to the basswood as per the original i.e lengths were cut to make it look as though they extended over two post bays. I then cut short pieces of obechi to represent the cross members between the posts which were the actual supports for the planks on the real platform: these were glued to the underside of the stripwood. When I turned the platform over I could glue the pieces of obechi to the tops of the posts and the structure looks as though it has complete cross pieces, and the basswood is not visible. The planking though is level and even. I repeated this method for the long section of platform on the left side of the ramp.
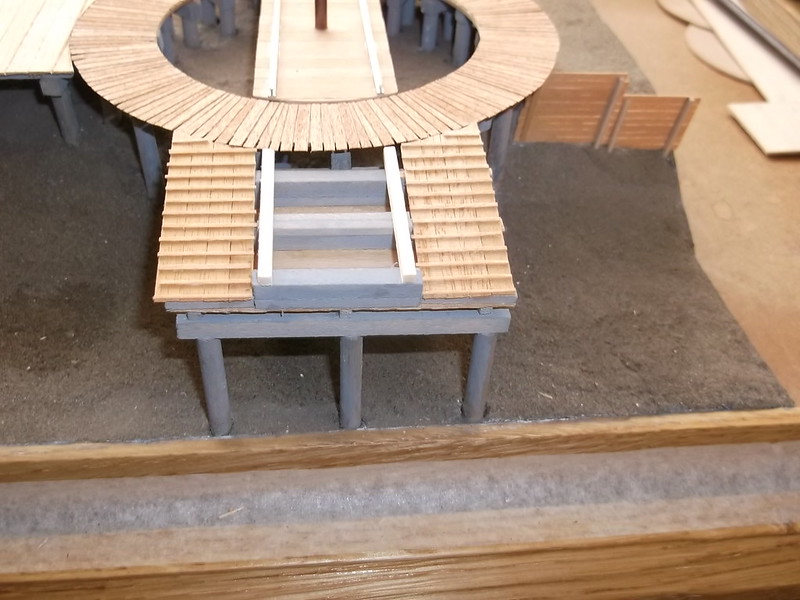
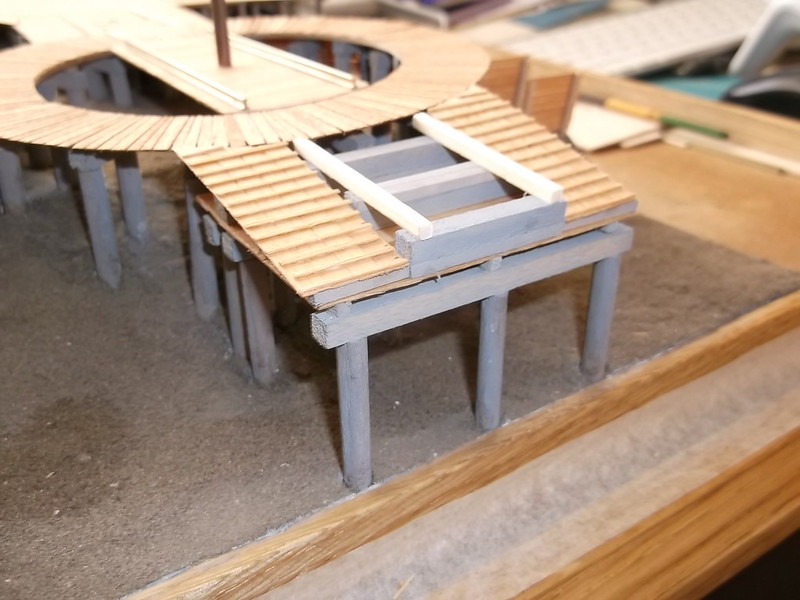
The large platform/ramp to the left of the turntable had longitudinal beams on each side and in the middle. To represent this I again used the basswood strip along the centre of the platform but added lengths of square obechi along each edge. At the end of the platform on the edge of the display I simply cut another recess in the basswood in the centre and put a short piece of obechi to sit on the end post: it represents the middle beam which would have run across the tops of the central line of posts. The curved pieces of planking which are in contact with the circular platform around the turntable were simply cut to fit and carefully glued into place on the ends of the longitudinal obechi strips.
Finally I added two planks at the corner of the walking platform and ramp to the turntable: these are clearly visible in contemporary photos and had been laid and fixed at some time when the structure was being used.
In the above the short section of platform to the right of the ramp is in place: the left section has been laid on the posts while some minor adjustments were being worked out. The following photos show the completed platforms, (and the old carpet in the room where I work!
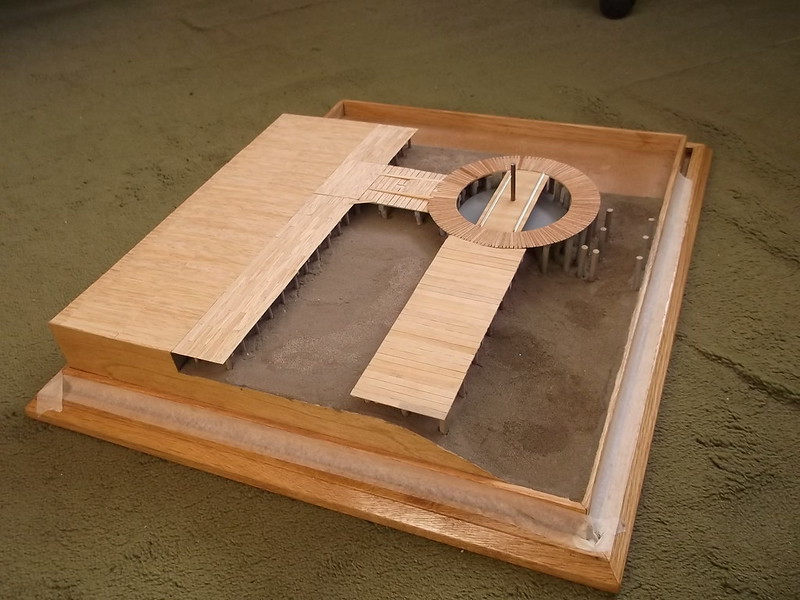
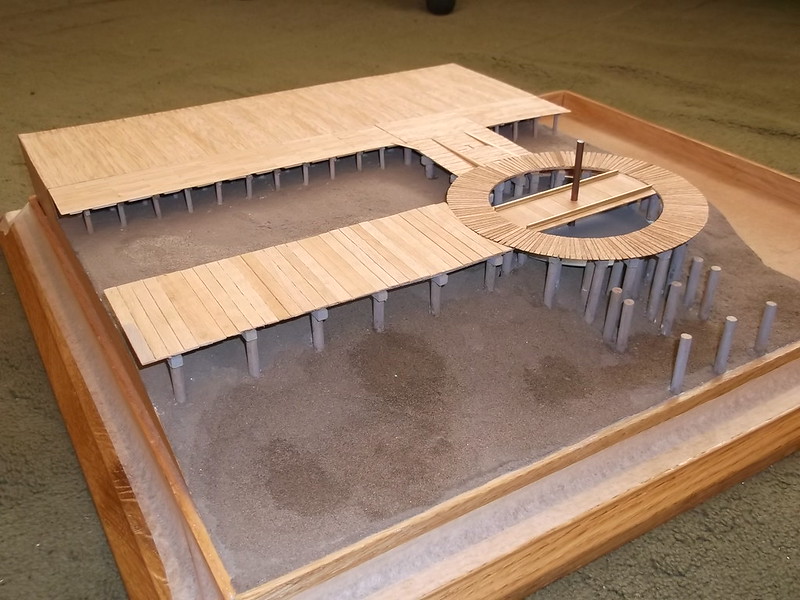
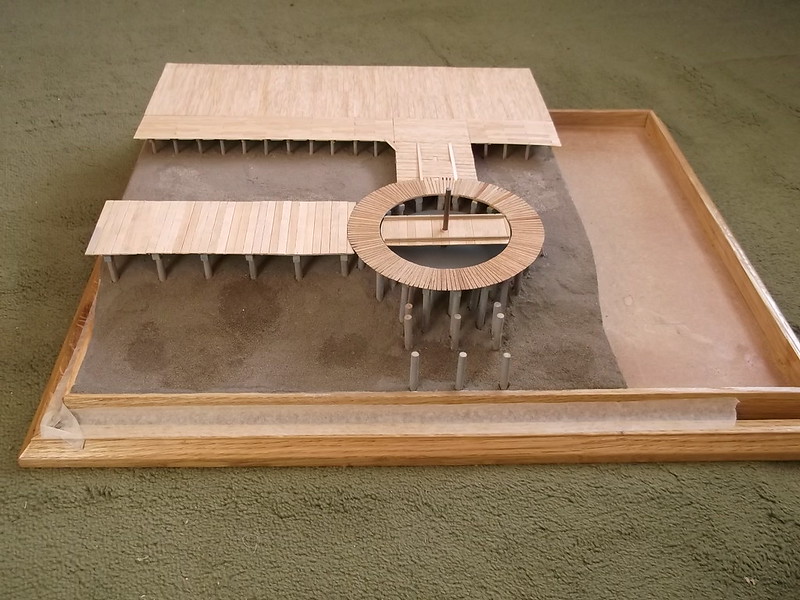
The dark patches on the slope in front of the side platform are where I have added more sand which is a slightly different colour in order to break up the uniformity of the base. Some of this will be covered in grass flock later so that these areas will be less stark (I hope). The ridges which were caused by the joints in the plaster bandage and were visible before the platforms were put in place are now very much less prominent: even I have to look for them and there is still the shed and grass to add, so I think that they will ultimately "disappear".
Thanks for looking.
Thanks James and Shangos for dropping by: I am pleased that you like what I have done so far. This base seems to be taking longer to make than the aeroplane did!
There was a wooden platform that was built in 1915 on the lake side of the hangar - which is why I have put a line of posts along there. The original posts that I put in were the same diameter as the others but I felt that because this platform was only for people to walk on, the originals were probably smaller, so I replaced mine with smaller dowels This necessitated some small filling jobs to be done and some more sand needed to be scattered to conceal the repairs - hence the delay in getting the platforms made.
My first intention was to lay the wood strips directly on to the cross beams as per the original structure but I was not sure whether I would be able to get a level and even surface if I did. So I decided to cut pieces of thin basswood sheet which were the same width as the upright posts and then cut small recesses in the sides of the basswood where each post would be. Planking was glued to the basswood as per the original i.e lengths were cut to make it look as though they extended over two post bays. I then cut short pieces of obechi to represent the cross members between the posts which were the actual supports for the planks on the real platform: these were glued to the underside of the stripwood. When I turned the platform over I could glue the pieces of obechi to the tops of the posts and the structure looks as though it has complete cross pieces, and the basswood is not visible. The planking though is level and even. I repeated this method for the long section of platform on the left side of the ramp.
The large platform/ramp to the left of the turntable had longitudinal beams on each side and in the middle. To represent this I again used the basswood strip along the centre of the platform but added lengths of square obechi along each edge. At the end of the platform on the edge of the display I simply cut another recess in the basswood in the centre and put a short piece of obechi to sit on the end post: it represents the middle beam which would have run across the tops of the central line of posts. The curved pieces of planking which are in contact with the circular platform around the turntable were simply cut to fit and carefully glued into place on the ends of the longitudinal obechi strips.
Finally I added two planks at the corner of the walking platform and ramp to the turntable: these are clearly visible in contemporary photos and had been laid and fixed at some time when the structure was being used.
In the above the short section of platform to the right of the ramp is in place: the left section has been laid on the posts while some minor adjustments were being worked out. The following photos show the completed platforms, (and the old carpet in the room where I work!
The dark patches on the slope in front of the side platform are where I have added more sand which is a slightly different colour in order to break up the uniformity of the base. Some of this will be covered in grass flock later so that these areas will be less stark (I hope). The ridges which were caused by the joints in the plaster bandage and were visible before the platforms were put in place are now very much less prominent: even I have to look for them and there is still the shed and grass to add, so I think that they will ultimately "disappear".
Thanks for looking.
-
Clashcityrocker

- Modelling Gent and Scholar
- Posts: 10823
- Joined: May 1st, 2011, 12:31 am
- Location: Adelaide. South Australia
Re: Lone Modeller's Tray
Awesome. (no need to say anything else)
Nigel
Nigel
-
Kitaholic

- Modelling Gent and Scholar
- Posts: 3765
- Joined: November 10th, 2014, 7:53 pm
- Location: 5 mins from SMW
Re: Lone Modeller's Tray
Stunning work
Regards
Gord
Desperately trying to find his MOJO, don't know where I left it
Gord
Desperately trying to find his MOJO, don't know where I left it
-
ShaunW
- NOT the sheep
- Posts: 26188
- Joined: November 26th, 2011, 6:11 pm
- Location: Pontefract West Yorkshire
Re: Lone Modeller's Tray
Outstanding. Watching this base come together has been a real education!
Doing - Tamiya 1/35th Universal Carrier.
Work is the curse of the modelling classes!
IPMS#12300
Work is the curse of the modelling classes!
IPMS#12300
-
Softscience

- Staring out the window
- Posts: 7491
- Joined: April 5th, 2011, 4:34 pm
- Location: Maryland, near Washington DC
Re: Lone Modeller's Tray
ShaunW wrote:Outstanding. Watching this base come together has been a real education!
Agreed! I wish we had film of your progress.
-
Lone Modeller
- Modelling Gent and Scholar
- Posts: 5345
- Joined: April 1st, 2013, 6:45 pm
Re: Lone Modeller's Tray
Evening All,
Thanks Nigel, Kitaholic, Shaun and Ralph for the very generous comments. I am sorry Ralph but I do not have a video camera and I am not sure how I would hold the camera while I was making some of these parts! I just hope that stills will do.....
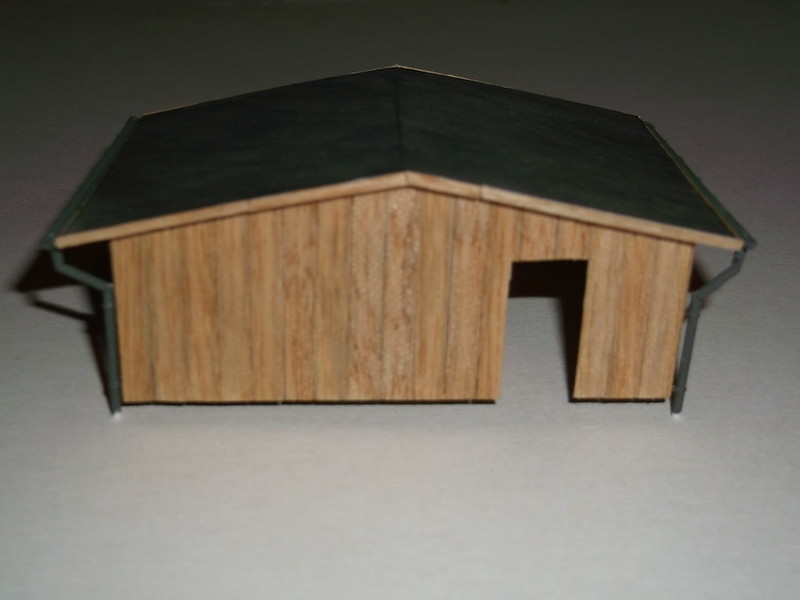
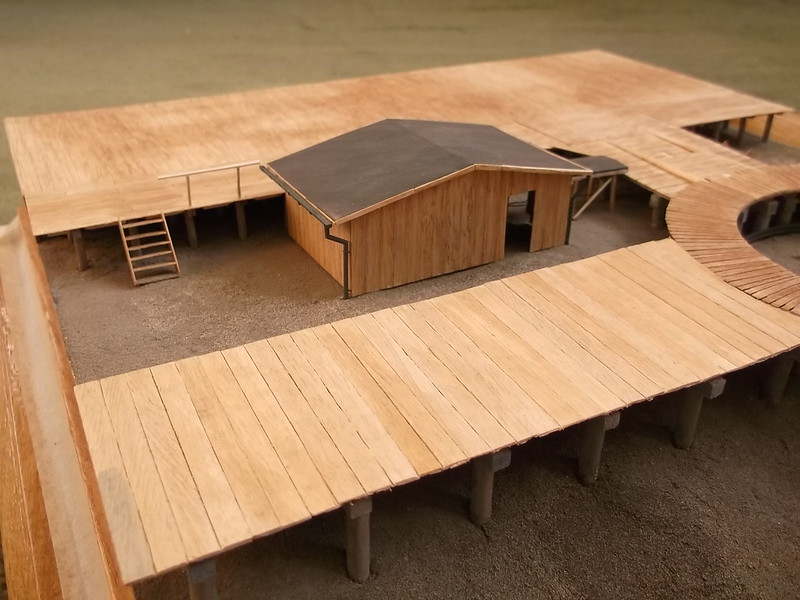
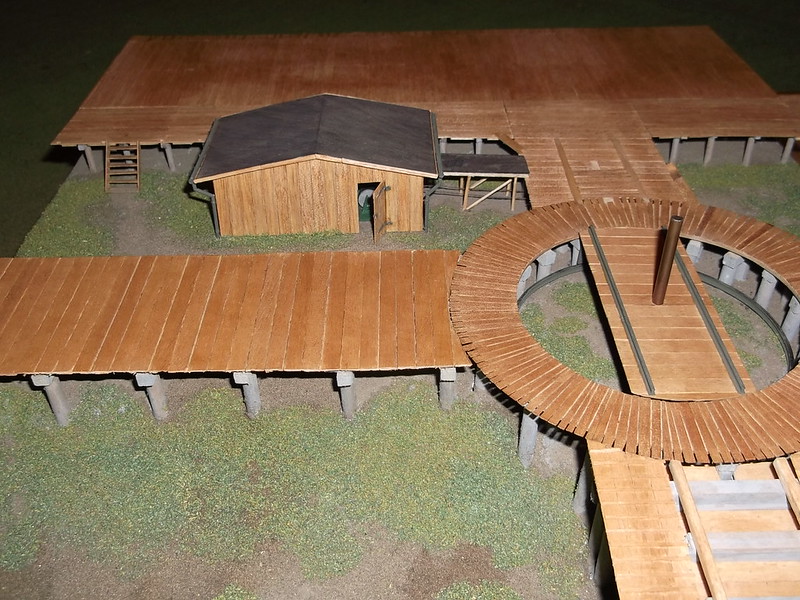
I have tried to make the shed which probably housed a winch to pull the aircraft to and from the lakeside on the ramp system which forms the groundwork for this diorama. I do not know what the dimensions were because I do not have any drawings: I have had to guess them by looking at several photos and trying to work out sizes by comparison with objects of known size, such as planking etc. The construction is simple: make a frame from obechi strip and then add planks in the form of 3mm strip wood. The first attempt looks like this and I admit that I am not happy with it because I am certain that it is too small:
I thought that the shed was square but I am now of the opinion that it was rectangular, so I will make two new parts - front (with the gap for a door) and rear (blank face): both are on the left in the photos.
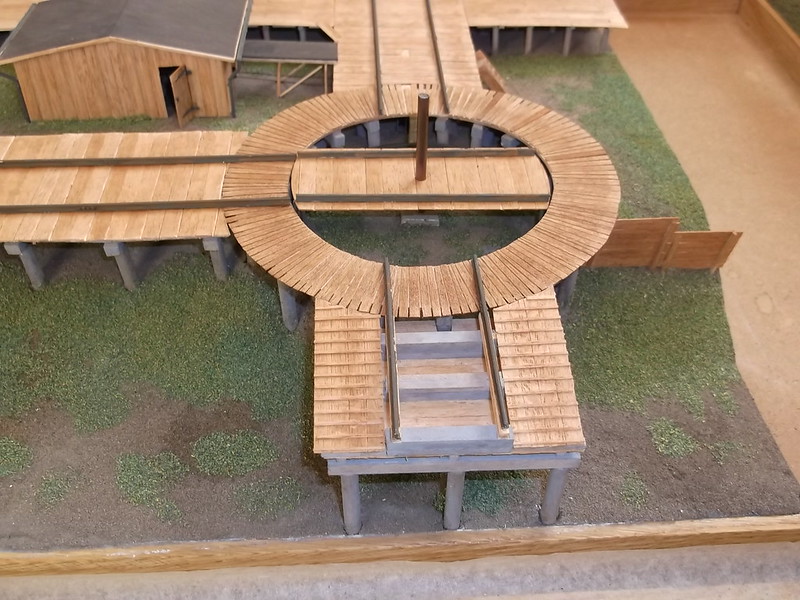
I have also been working on a screen which is visible in the photos and was somewhat crudely nailed to the pillars on the side of the turntable platform. I do not know what the function of this feature was - probably some form of windbreak. I glued small lengths of obechi into the base and rested the upper ends on the edge of the platform. Then I could glue strip wood to represent the planks that formed the screen - a bit rough to try to represent what is visible in the photographs. Finally I put in the low fence panels which ran at 90 degrees from the platform:
Thanks for looking.
Thanks Nigel, Kitaholic, Shaun and Ralph for the very generous comments. I am sorry Ralph but I do not have a video camera and I am not sure how I would hold the camera while I was making some of these parts! I just hope that stills will do.....
I have tried to make the shed which probably housed a winch to pull the aircraft to and from the lakeside on the ramp system which forms the groundwork for this diorama. I do not know what the dimensions were because I do not have any drawings: I have had to guess them by looking at several photos and trying to work out sizes by comparison with objects of known size, such as planking etc. The construction is simple: make a frame from obechi strip and then add planks in the form of 3mm strip wood. The first attempt looks like this and I admit that I am not happy with it because I am certain that it is too small:
I thought that the shed was square but I am now of the opinion that it was rectangular, so I will make two new parts - front (with the gap for a door) and rear (blank face): both are on the left in the photos.
I have also been working on a screen which is visible in the photos and was somewhat crudely nailed to the pillars on the side of the turntable platform. I do not know what the function of this feature was - probably some form of windbreak. I glued small lengths of obechi into the base and rested the upper ends on the edge of the platform. Then I could glue strip wood to represent the planks that formed the screen - a bit rough to try to represent what is visible in the photographs. Finally I put in the low fence panels which ran at 90 degrees from the platform:
Thanks for looking.
-
Lone Modeller
- Modelling Gent and Scholar
- Posts: 5345
- Joined: April 1st, 2013, 6:45 pm
Re: Lone Modeller's Tray
Evening All,
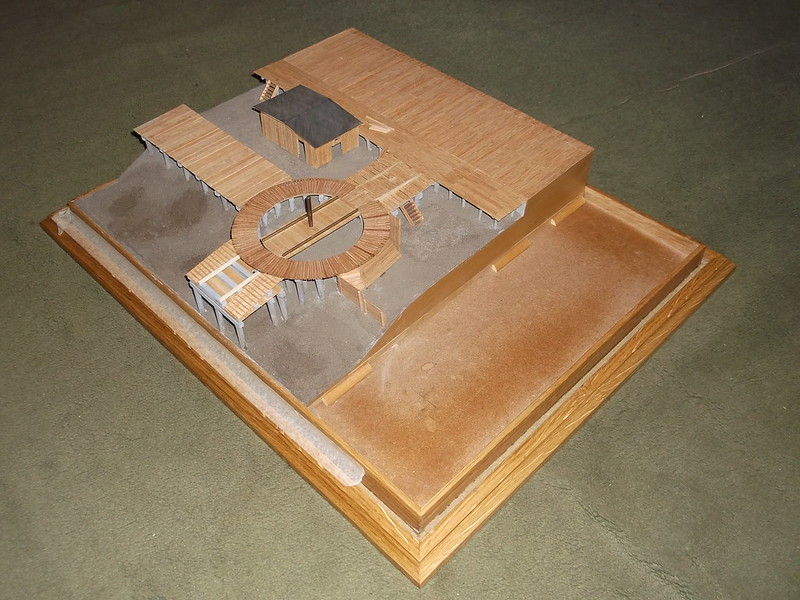
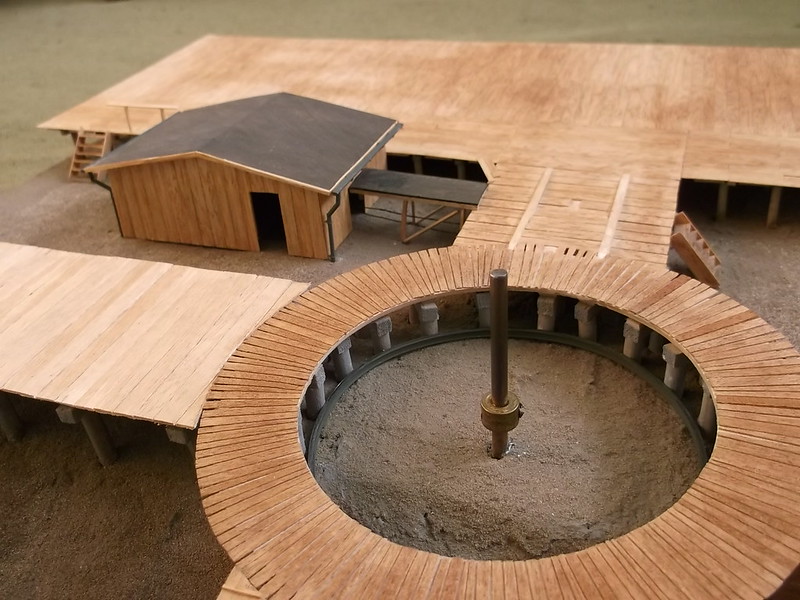
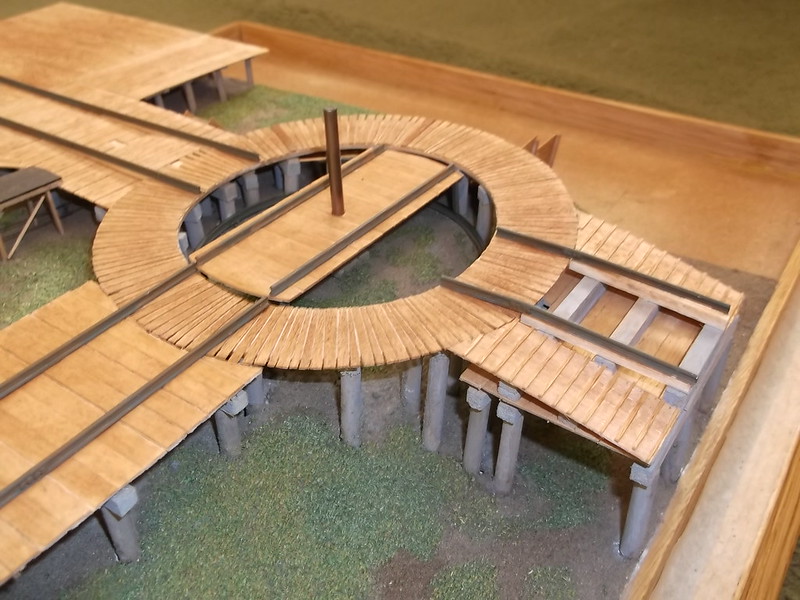
I wrote earlier that I was not sure what the ground would have looked like under the turntable, so I had put in a plastic disc to represent some form of platform. I have since found out that in fact such a disc would not have been there in reality so I have removed it from my model and replaced it with sand.
I have also redesigned and rebuilt the shed with longer front and rear faces. The roof was made from plastic card and painted matt black and then given a three light washes of dark brown to tone the black down. I had bought some guttering and down pipes for an OO railway water tower, but when I looked at the gutters I saw that they had flat tops, whereas they should have had shallow grooves. I looked at some 80 thou rod and decided that if I filed it to a half section I could then file out my own shallow grooves to better represent the guttering, and I could drill holes to represent the drains. Down pipes were cut from the same sized rod, bent to shape and glued to the gutter sections. After the shed had been assembled I could put the roof on and then the gutters and pipes:
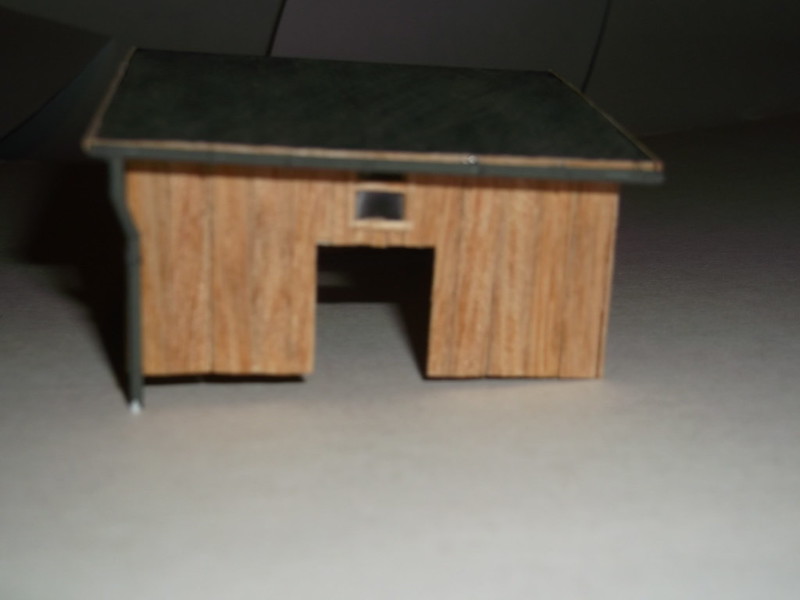
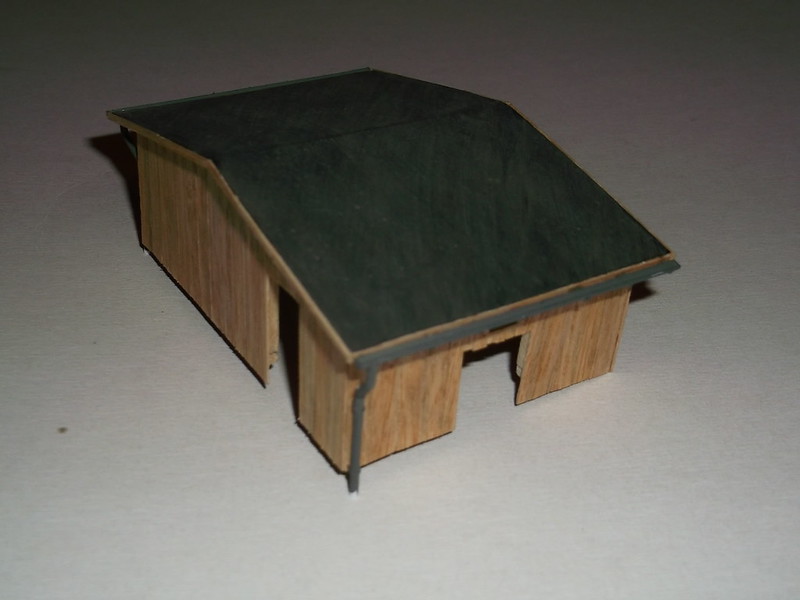
The hole in the front is for a door and on the side is a window and opening which probably was where winch cables passed. I have brushed the wood with a wash of dark brown acrylic. The drain pipes are slightly longer than the shed sides so that I can insert the ends into holes which I will drill into the base later.
I have also finished the short section of ramp which was on the lake side of the turntable. The ramp which the aircraft was launched on sloped to the lake: the rails which supported the carriage were laid on thick longitudinal beams which in turn were laid across transverse beams. The transverse beams rested on vertical posts which had been pile driven into the ground. There were two platforms, one on each side of the rails, so that ground crew could walk down the launch ramp to the lake. In the immediate vicinity of the turntable the crew platforms sloped at a steeper angle than the rails and had transverse beams to provide footholds: all of this detail is visible in the different photos in the DataFile although it took me some time to work it out! The large transverse beams which supported the rails were glued into place first: these were made from obechi strip. The longitudinal rail supports were also obechi strip. Under the crew platforms there was transverse planking as found on the other platforms and the turntable, but on top of these there had been laid supporting beams: these were continuations of the beams supporting the rails, but were thinner, so I used obechi for these too. The steeply sloping platforms were made from 3mm stripwood glued to the obechi underneath, and the footholds were from thin obechi strip:
The structure is now pretty much complete but I still have to make the trolley for the aircraft, weather the wood, put in some vegetation on the ground and make some pulleys for the ramps etc.
Thanks for looking.
I wrote earlier that I was not sure what the ground would have looked like under the turntable, so I had put in a plastic disc to represent some form of platform. I have since found out that in fact such a disc would not have been there in reality so I have removed it from my model and replaced it with sand.
I have also redesigned and rebuilt the shed with longer front and rear faces. The roof was made from plastic card and painted matt black and then given a three light washes of dark brown to tone the black down. I had bought some guttering and down pipes for an OO railway water tower, but when I looked at the gutters I saw that they had flat tops, whereas they should have had shallow grooves. I looked at some 80 thou rod and decided that if I filed it to a half section I could then file out my own shallow grooves to better represent the guttering, and I could drill holes to represent the drains. Down pipes were cut from the same sized rod, bent to shape and glued to the gutter sections. After the shed had been assembled I could put the roof on and then the gutters and pipes:
The hole in the front is for a door and on the side is a window and opening which probably was where winch cables passed. I have brushed the wood with a wash of dark brown acrylic. The drain pipes are slightly longer than the shed sides so that I can insert the ends into holes which I will drill into the base later.
I have also finished the short section of ramp which was on the lake side of the turntable. The ramp which the aircraft was launched on sloped to the lake: the rails which supported the carriage were laid on thick longitudinal beams which in turn were laid across transverse beams. The transverse beams rested on vertical posts which had been pile driven into the ground. There were two platforms, one on each side of the rails, so that ground crew could walk down the launch ramp to the lake. In the immediate vicinity of the turntable the crew platforms sloped at a steeper angle than the rails and had transverse beams to provide footholds: all of this detail is visible in the different photos in the DataFile although it took me some time to work it out! The large transverse beams which supported the rails were glued into place first: these were made from obechi strip. The longitudinal rail supports were also obechi strip. Under the crew platforms there was transverse planking as found on the other platforms and the turntable, but on top of these there had been laid supporting beams: these were continuations of the beams supporting the rails, but were thinner, so I used obechi for these too. The steeply sloping platforms were made from 3mm stripwood glued to the obechi underneath, and the footholds were from thin obechi strip:
The structure is now pretty much complete but I still have to make the trolley for the aircraft, weather the wood, put in some vegetation on the ground and make some pulleys for the ramps etc.
Thanks for looking.
-
gnomemeansgnome

- Modelling Gent and Scholar
- Posts: 5269
- Joined: July 16th, 2013, 4:03 pm
- Location: No Fun City
Re: Lone Modeller's Tray
This is such great work.
Ego no habeo consilium.
ICBM = Insatiable Collector and Builder of Models
ICBM = Insatiable Collector and Builder of Models
-
Lone Modeller
- Modelling Gent and Scholar
- Posts: 5345
- Joined: April 1st, 2013, 6:45 pm
Re: Lone Modeller's Tray
Evening All,
Thanks GMG for the encouraging comment: this has taken a good deal longer to make that I originally anticipated and it is good to know that some people are following.
I drilled some holes in the base so that the down pipes from the shed gutters could fit into them and the shed was put into place. I did assemble a winding gear from plastic rod and card but forgot to photograph it, and in any even it cannot be seen with the shed in place so it does not matter after all. I made a second set of steps and glued these into place: the set on the launch ramp are visible in photographs, but the second set by the winding shed are my best guess: ground crew had to be able to get to the shed somehow. I also made a cover for the winch cables between the shed and launch ramp - once again this is clearly visible in the photographs and was made from obechi strip and plastic card painted black, and given a dark brown acrylic wash. I have also started to make two rails which are on the edge of the platform between the shed and the left side of the display. Once again this is based on contemporary photographs and my modeller's license as I cannot be certain of the exact details.
 [
[
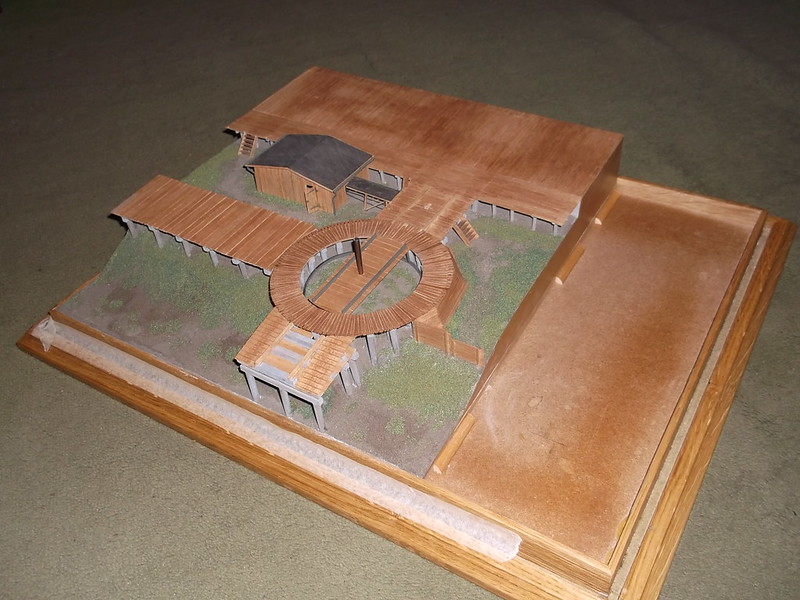
I have added some darker areas to parts of the sand base to give a variation in colour: natural soils would not have quite such round areas but as these are going to be covered in grass flock they will not be visible. I then dry brushed all of the wood surfaces with a mixture of dark grey and dark brown acrylic washes: I have tried to vary the density to show areas of greater wear and footfall. A door was added to the shed. Now I could add the grass flock which I mixed from several different packs. I brushed watered down white PVA glue over the sand base and liberally scattered the flock, including areas of neat flock from individual packs to give as varied a background as possible. Once again I deliberately left some areas clear where people would have walked: this too is visible on some of the photos of the original site.
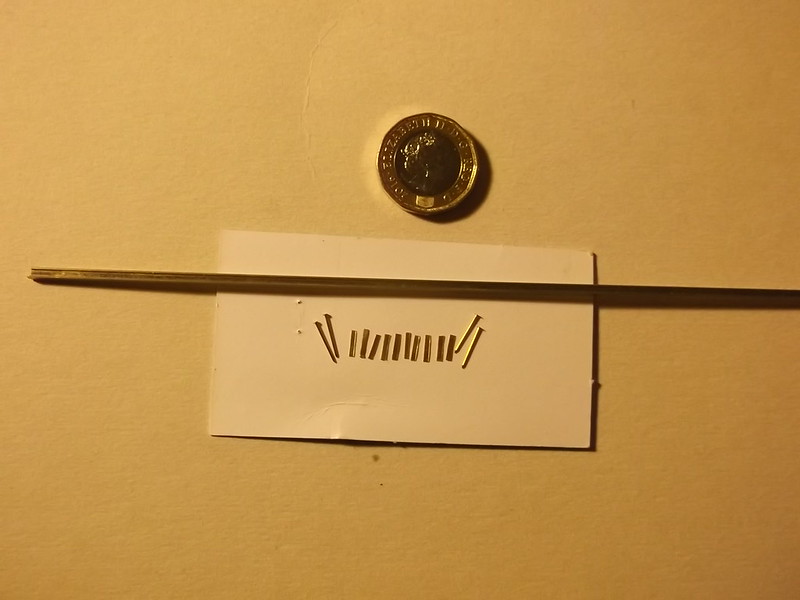
I have now got to put on the rails. I am using 00 guage flexible track for the rails - they are rather brassy but some paint and washes will tone them down. First though I have cut some fishplates (joining pieces) from thin brass strip and will glue these to the sides of the rail at intrevals of three scale meters - again a distance estimated from photographs. The parts look like this before assembly:
More later when I have finished the rails and made some furniture and the carrying frame for the flying boat.
Thanks for looking.
Thanks GMG for the encouraging comment: this has taken a good deal longer to make that I originally anticipated and it is good to know that some people are following.
I drilled some holes in the base so that the down pipes from the shed gutters could fit into them and the shed was put into place. I did assemble a winding gear from plastic rod and card but forgot to photograph it, and in any even it cannot be seen with the shed in place so it does not matter after all. I made a second set of steps and glued these into place: the set on the launch ramp are visible in photographs, but the second set by the winding shed are my best guess: ground crew had to be able to get to the shed somehow. I also made a cover for the winch cables between the shed and launch ramp - once again this is clearly visible in the photographs and was made from obechi strip and plastic card painted black, and given a dark brown acrylic wash. I have also started to make two rails which are on the edge of the platform between the shed and the left side of the display. Once again this is based on contemporary photographs and my modeller's license as I cannot be certain of the exact details.
[I have added some darker areas to parts of the sand base to give a variation in colour: natural soils would not have quite such round areas but as these are going to be covered in grass flock they will not be visible. I then dry brushed all of the wood surfaces with a mixture of dark grey and dark brown acrylic washes: I have tried to vary the density to show areas of greater wear and footfall. A door was added to the shed. Now I could add the grass flock which I mixed from several different packs. I brushed watered down white PVA glue over the sand base and liberally scattered the flock, including areas of neat flock from individual packs to give as varied a background as possible. Once again I deliberately left some areas clear where people would have walked: this too is visible on some of the photos of the original site.
I have now got to put on the rails. I am using 00 guage flexible track for the rails - they are rather brassy but some paint and washes will tone them down. First though I have cut some fishplates (joining pieces) from thin brass strip and will glue these to the sides of the rail at intrevals of three scale meters - again a distance estimated from photographs. The parts look like this before assembly:
More later when I have finished the rails and made some furniture and the carrying frame for the flying boat.
Thanks for looking.
-
ShaunW
- NOT the sheep
- Posts: 26188
- Joined: November 26th, 2011, 6:11 pm
- Location: Pontefract West Yorkshire
Re: Lone Modeller's Tray
This is just superb. I'm running out of superlatives for this, LM, but without a doubt it is one of the best diorama builds I've seen on here.
Doing - Tamiya 1/35th Universal Carrier.
Work is the curse of the modelling classes!
IPMS#12300
Work is the curse of the modelling classes!
IPMS#12300
-
JamesPerrin
- Looks like his avatar
- Posts: 13695
- Joined: April 5th, 2011, 8:09 pm
- Location: W. Yorkshire
- Contact:
Re: Lone Modeller's Tray
OK I think you win the prize for being the first person to build scale guttering on this forum! Looking better and better.
Classic British Kits SIG Leader Better to fettle than to fill
(2024 A:B 5:2) (2023 13:8:7) (2022 21:11) (2021 15:8) (2020 8:4:4)
(2024 A:B 5:2) (2023 13:8:7) (2022 21:11) (2021 15:8) (2020 8:4:4)
-
Lone Modeller
- Modelling Gent and Scholar
- Posts: 5345
- Joined: April 1st, 2013, 6:45 pm
Re: Lone Modeller's Tray
Evening All,
Thanks Shaun and James for the very kind comments. I am really looking forward to receiving the prize!
At last the end is in sight: I have been finishing some pieces which have I have been working on and off during the build, and have almost all of the final details completed.
First up is the frame and trolley on which the aircraft was carried on the rails. I looked at as many photos as I could and came to the conclusion that frames were made individually for each aircraft. What I have produced is the best match that I can make to the photographic evidence available. The trolley was made from brass rod soldered together to make a rectangle, axles were from 60 thou plastic rod and the wheels from N guage Graham Farish accessories. I pushed the wheels off the Farish axles and back on to the longer plastic rod ones.
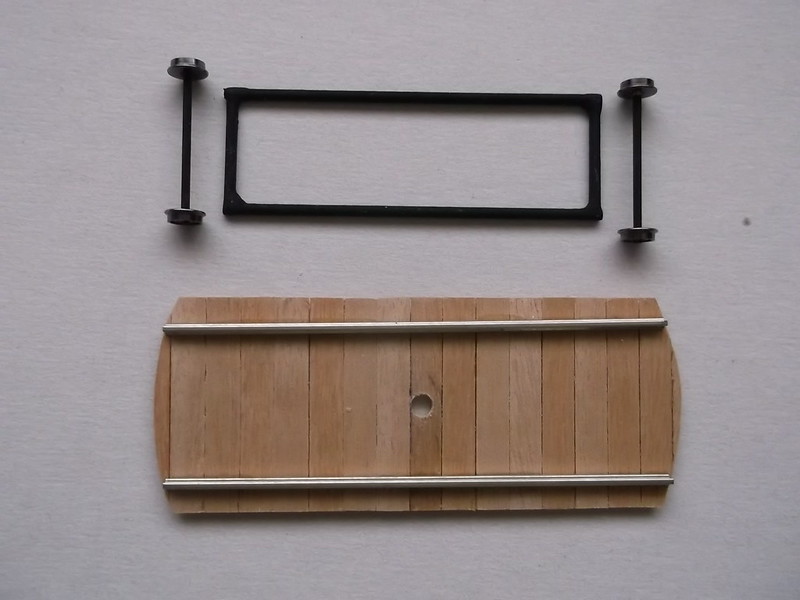
The main sections were made from I section plastic strip and the large pads at the rear were carved from scrap balsa wood and given a couple of coats of talcum powder and dope filler before being painted. The leather straps were from 10 x 20 thou Evergreen strip.
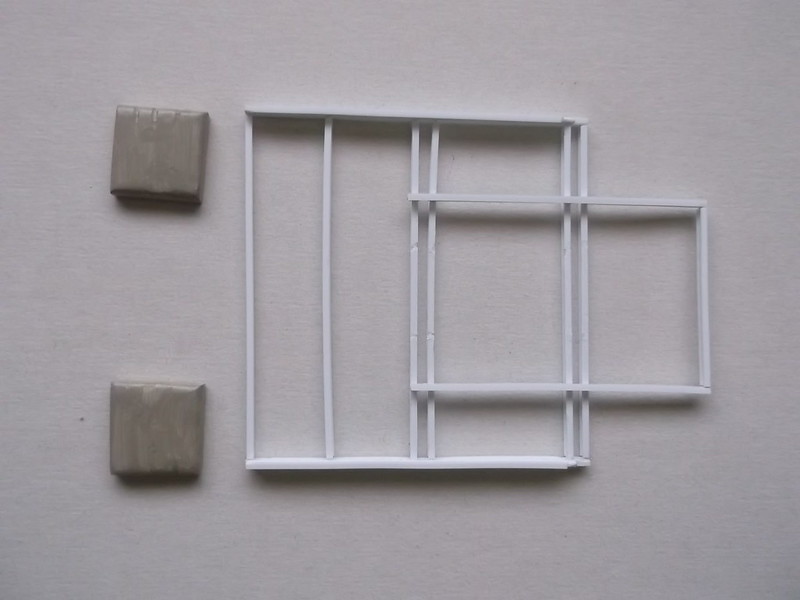
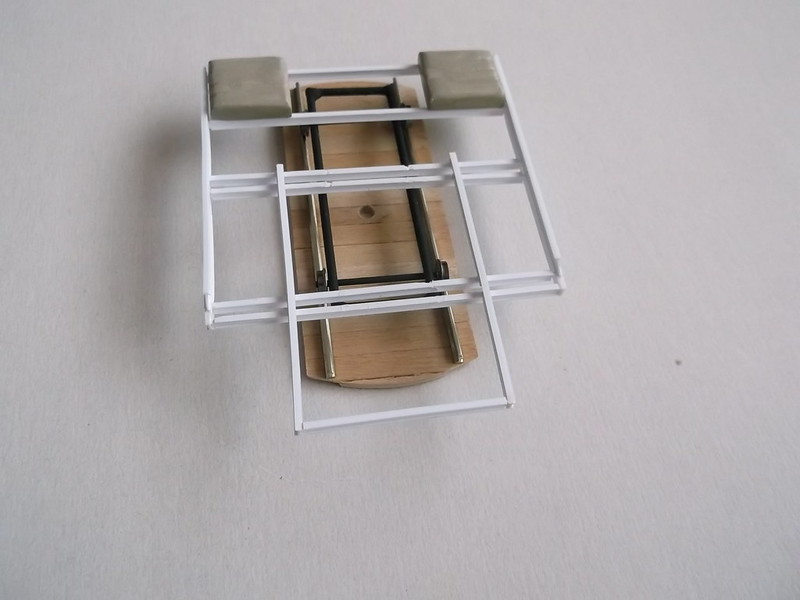
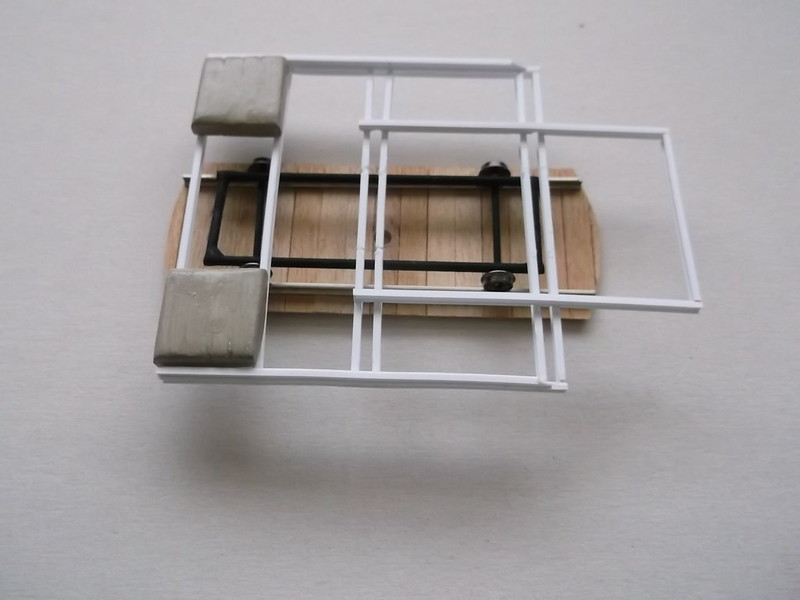
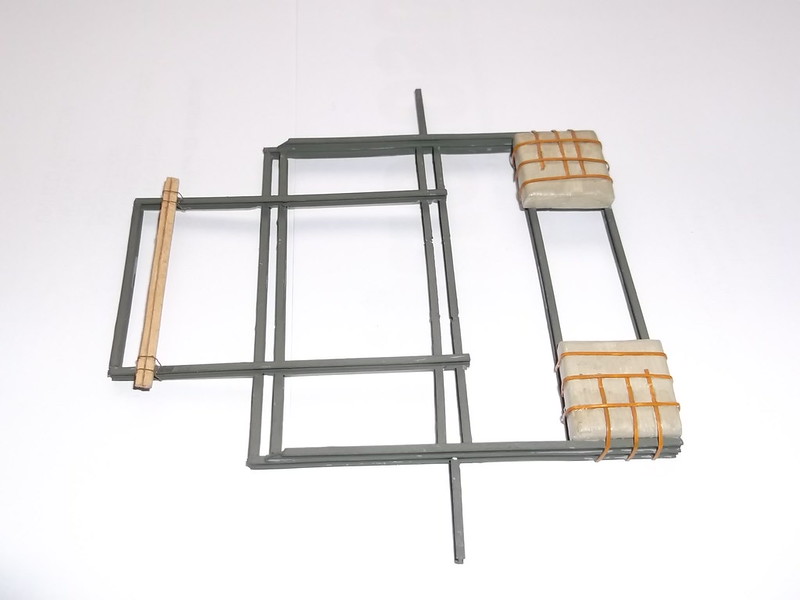
The wood in the last photo was visible in the contemporary photos - I used obechi strip to represent these beams. The arms on the sides were to allow ground crew to push the assembly on the turntable.
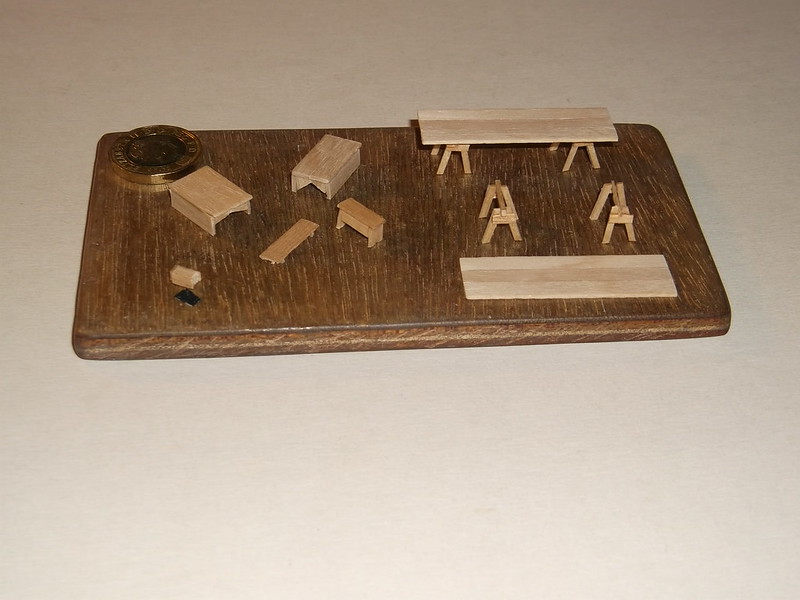
I made some furniture which again is visible in various photos: this will be distributed over the hangar floor based on photographic evidence and will help to fill what will otherwise be large voids in the display. A couple of boxes, two trestle tables (the tops were made from mixing sticks), and some beams of wood. I have also constructed a box camera which will be present in the display.
The rails have the fish plates added and have been painted and dry brushed with some rust, and are now fixed in place on the base:
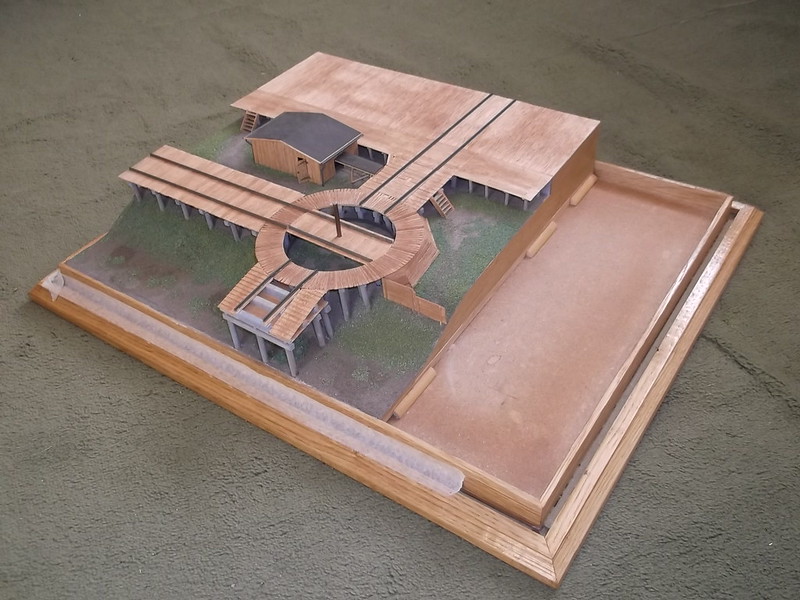
All that remains to add now are the pulleys on the ramp, the furniture on the hangar floor, the trolley to the turntable and some figures. Then I can mount the aircraft!
Thanks for looking.
Thanks Shaun and James for the very kind comments. I am really looking forward to receiving the prize!
At last the end is in sight: I have been finishing some pieces which have I have been working on and off during the build, and have almost all of the final details completed.
First up is the frame and trolley on which the aircraft was carried on the rails. I looked at as many photos as I could and came to the conclusion that frames were made individually for each aircraft. What I have produced is the best match that I can make to the photographic evidence available. The trolley was made from brass rod soldered together to make a rectangle, axles were from 60 thou plastic rod and the wheels from N guage Graham Farish accessories. I pushed the wheels off the Farish axles and back on to the longer plastic rod ones.
The main sections were made from I section plastic strip and the large pads at the rear were carved from scrap balsa wood and given a couple of coats of talcum powder and dope filler before being painted. The leather straps were from 10 x 20 thou Evergreen strip.
The wood in the last photo was visible in the contemporary photos - I used obechi strip to represent these beams. The arms on the sides were to allow ground crew to push the assembly on the turntable.
I made some furniture which again is visible in various photos: this will be distributed over the hangar floor based on photographic evidence and will help to fill what will otherwise be large voids in the display. A couple of boxes, two trestle tables (the tops were made from mixing sticks), and some beams of wood. I have also constructed a box camera which will be present in the display.
The rails have the fish plates added and have been painted and dry brushed with some rust, and are now fixed in place on the base:
All that remains to add now are the pulleys on the ramp, the furniture on the hangar floor, the trolley to the turntable and some figures. Then I can mount the aircraft!
Thanks for looking.
-
gnomemeansgnome
- Modelling Gent and Scholar
- Posts: 5269
- Joined: July 16th, 2013, 4:03 pm
- Location: No Fun City
Re: Lone Modeller's Tray
This dio just keeps getting better and better.
Ego no habeo consilium.
ICBM = Insatiable Collector and Builder of Models
ICBM = Insatiable Collector and Builder of Models