Lone Modeller's Tray

-
B4en

- Modelling Gent and Scholar
- Posts: 1145
- Joined: February 8th, 2014, 9:58 am
- Location: South Yorkshire
Re: Lone Modeller's Tray
That turret is magnificent! Great to see some woodshaping going on.
The past, present, and future walked into a bar. It was tense.
-
Lone Modeller
- Modelling Gent and Scholar
- Posts: 5345
- Joined: April 1st, 2013, 6:45 pm
Re: Lone Modeller's Tray
Evening All,
Thanks again to all of you who dropped by and left such wonderful comments - I really do appreciate them all.
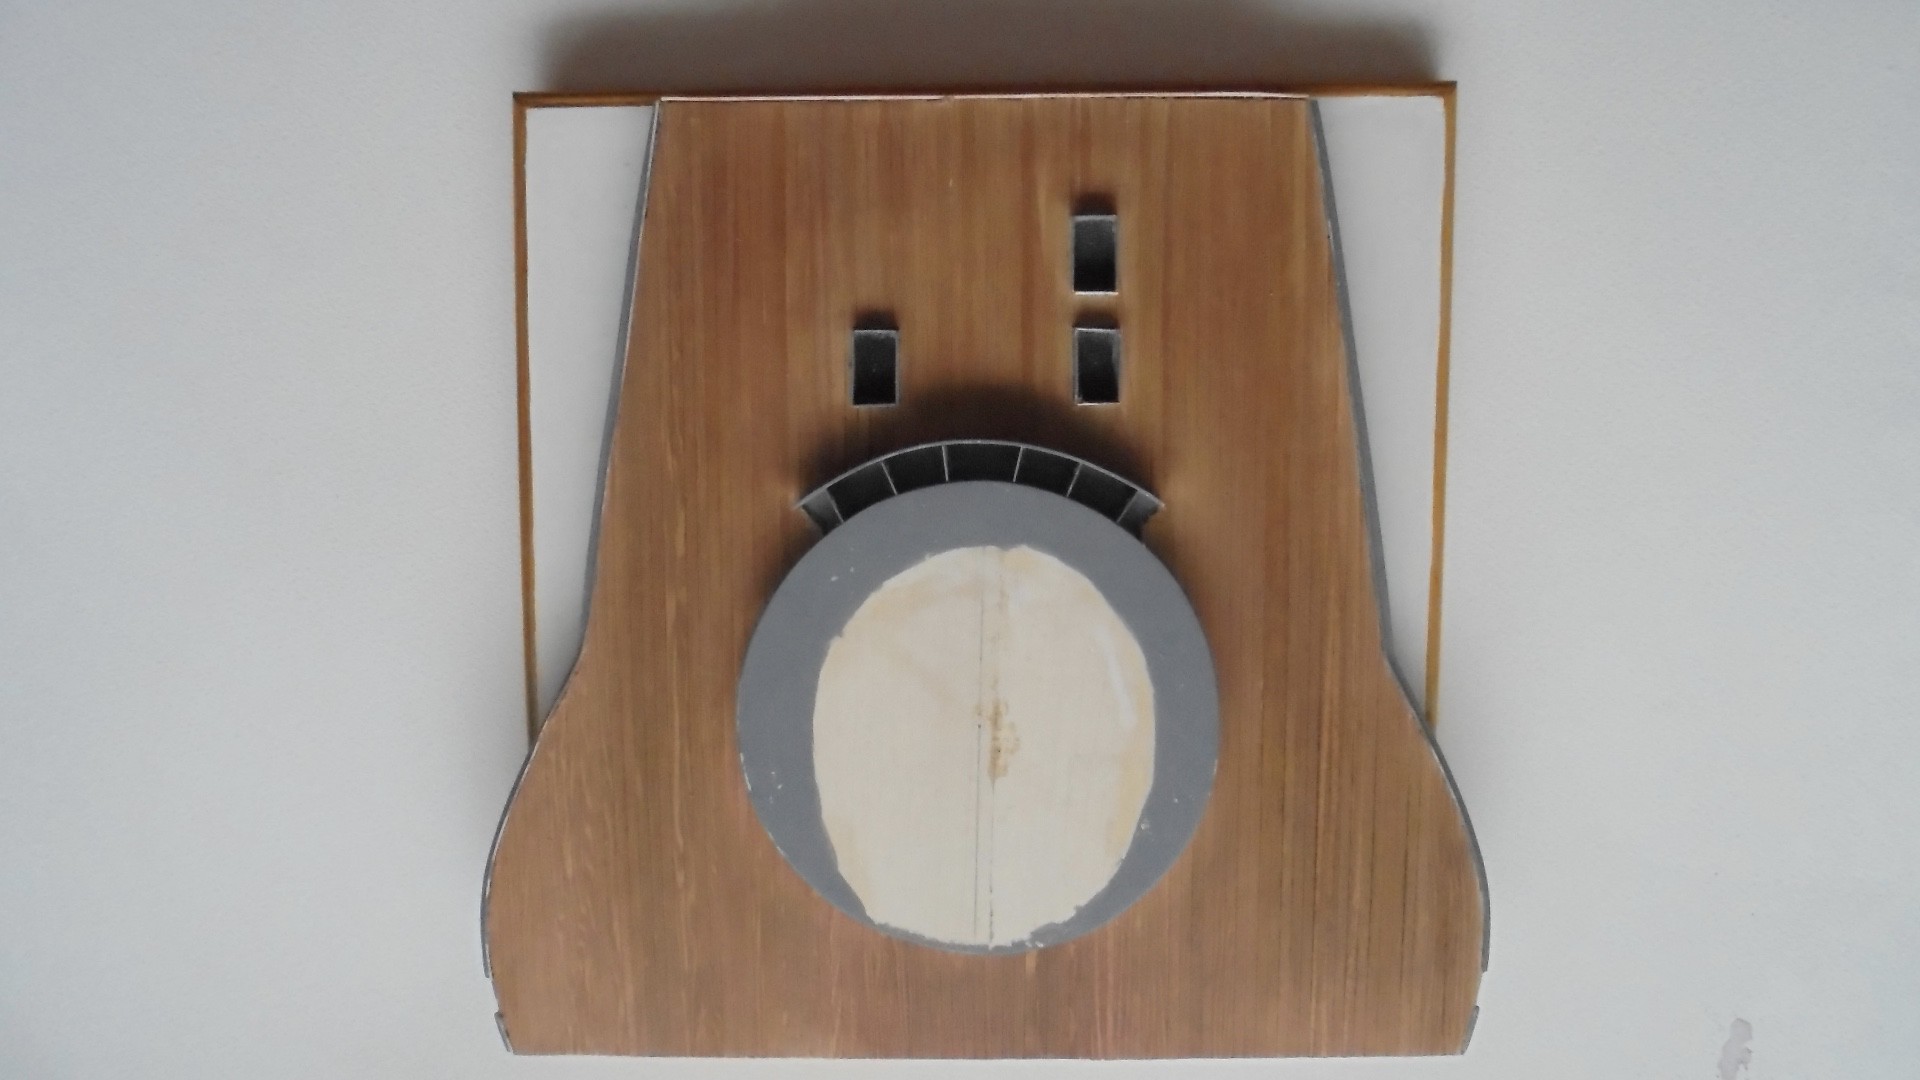
I have been studying the many photographs that were taken in early May 1912 on and of HMS Hibernia to try to get to grips with the details of the deck and fittings. In one of the photos and on the scale drawings there are some oblongs in front of the turre, and I could not work out what they were. A friend helped me to solve the problem when he showed me a photograph of another pre-WW1 battleship foredeck: they were ventilator openings to the focsle (crew quarters) in the front end of the ship. Having solved that problem I felt able to proceed with the basic deck/barbette assembly.
I covered the edges of the pieces of wood which will represent the ship sides with thin plastic sheet and painted them Tamiya Dark Sea Grey as I have been advised that this is probably close to the grey of RN ships of that era: these were glued to the base. I glued strips of 20 x 30 Evergreen strip to to represent the metal step on the edges of the deck and painted these and the wood grey as above:

I decided that the basswood needed more support underneath, so before I attached the decking I reinforced the base with some more support:
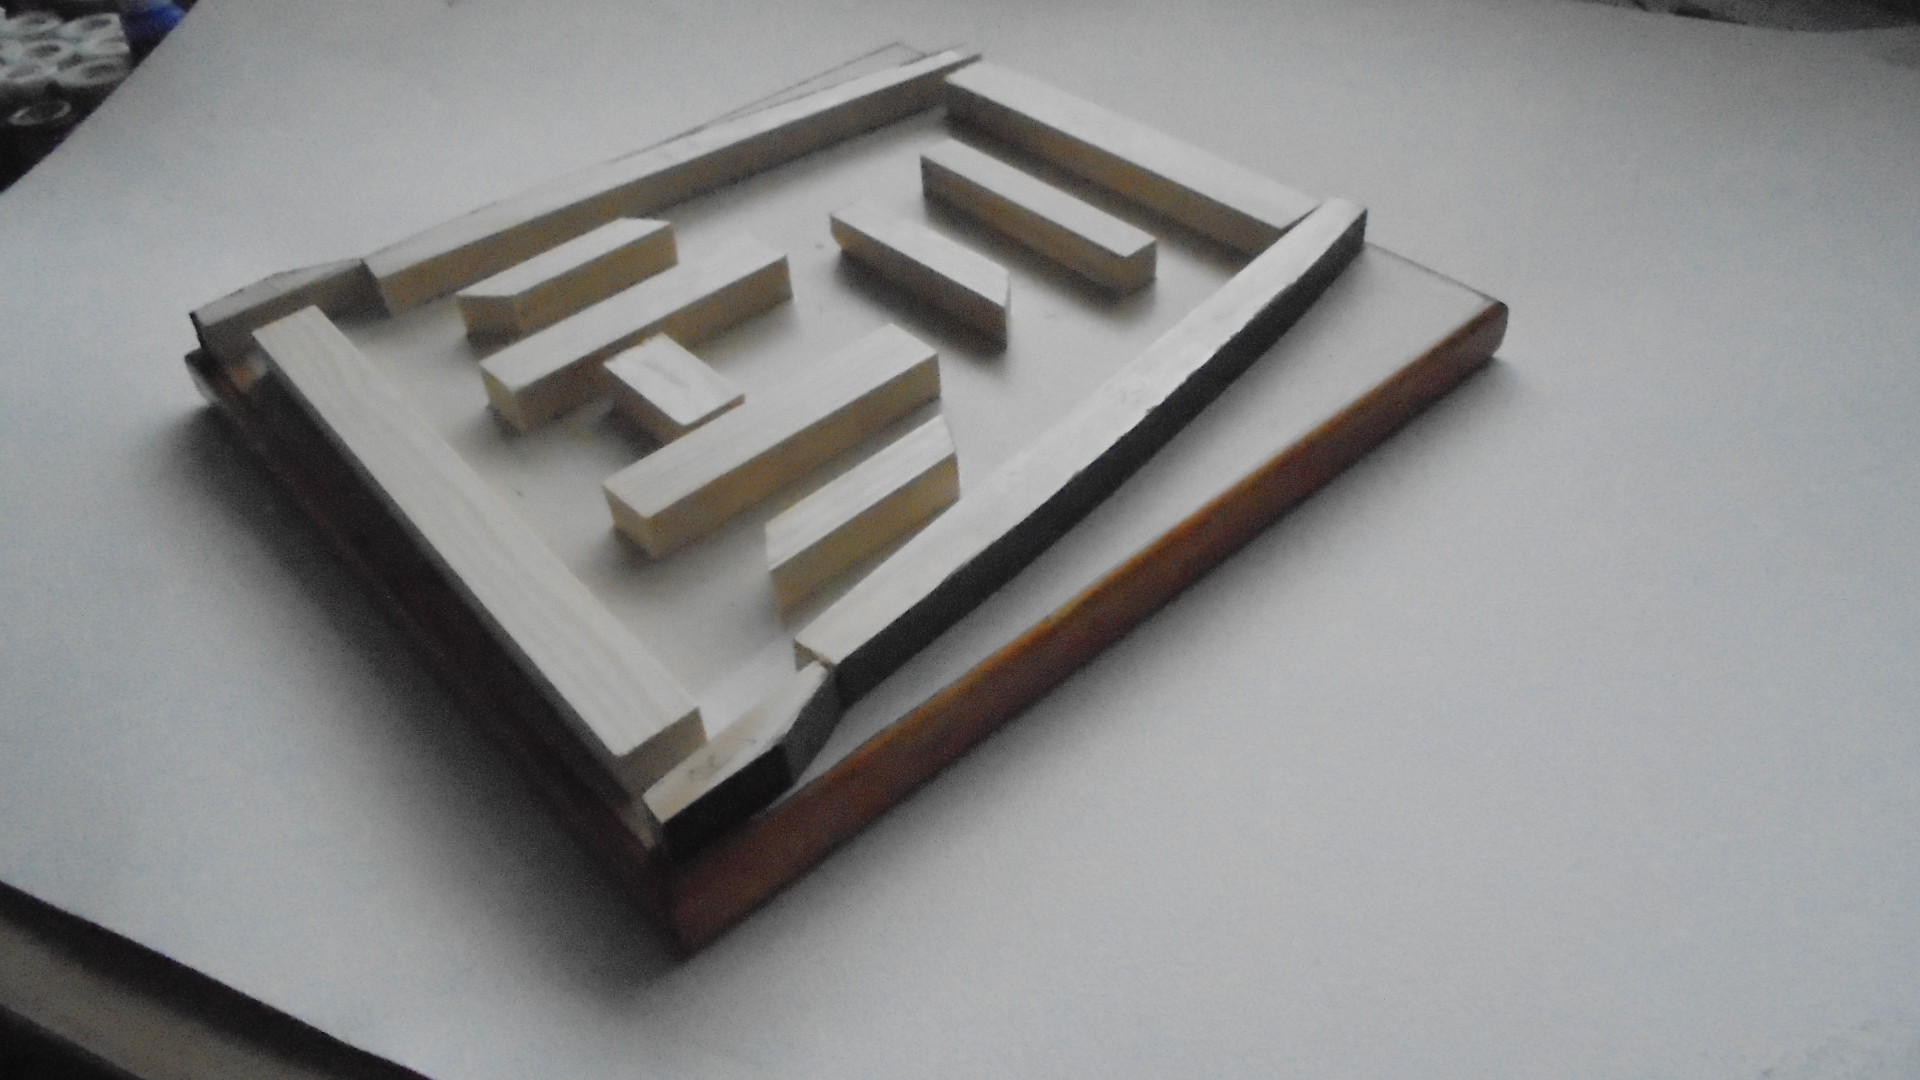
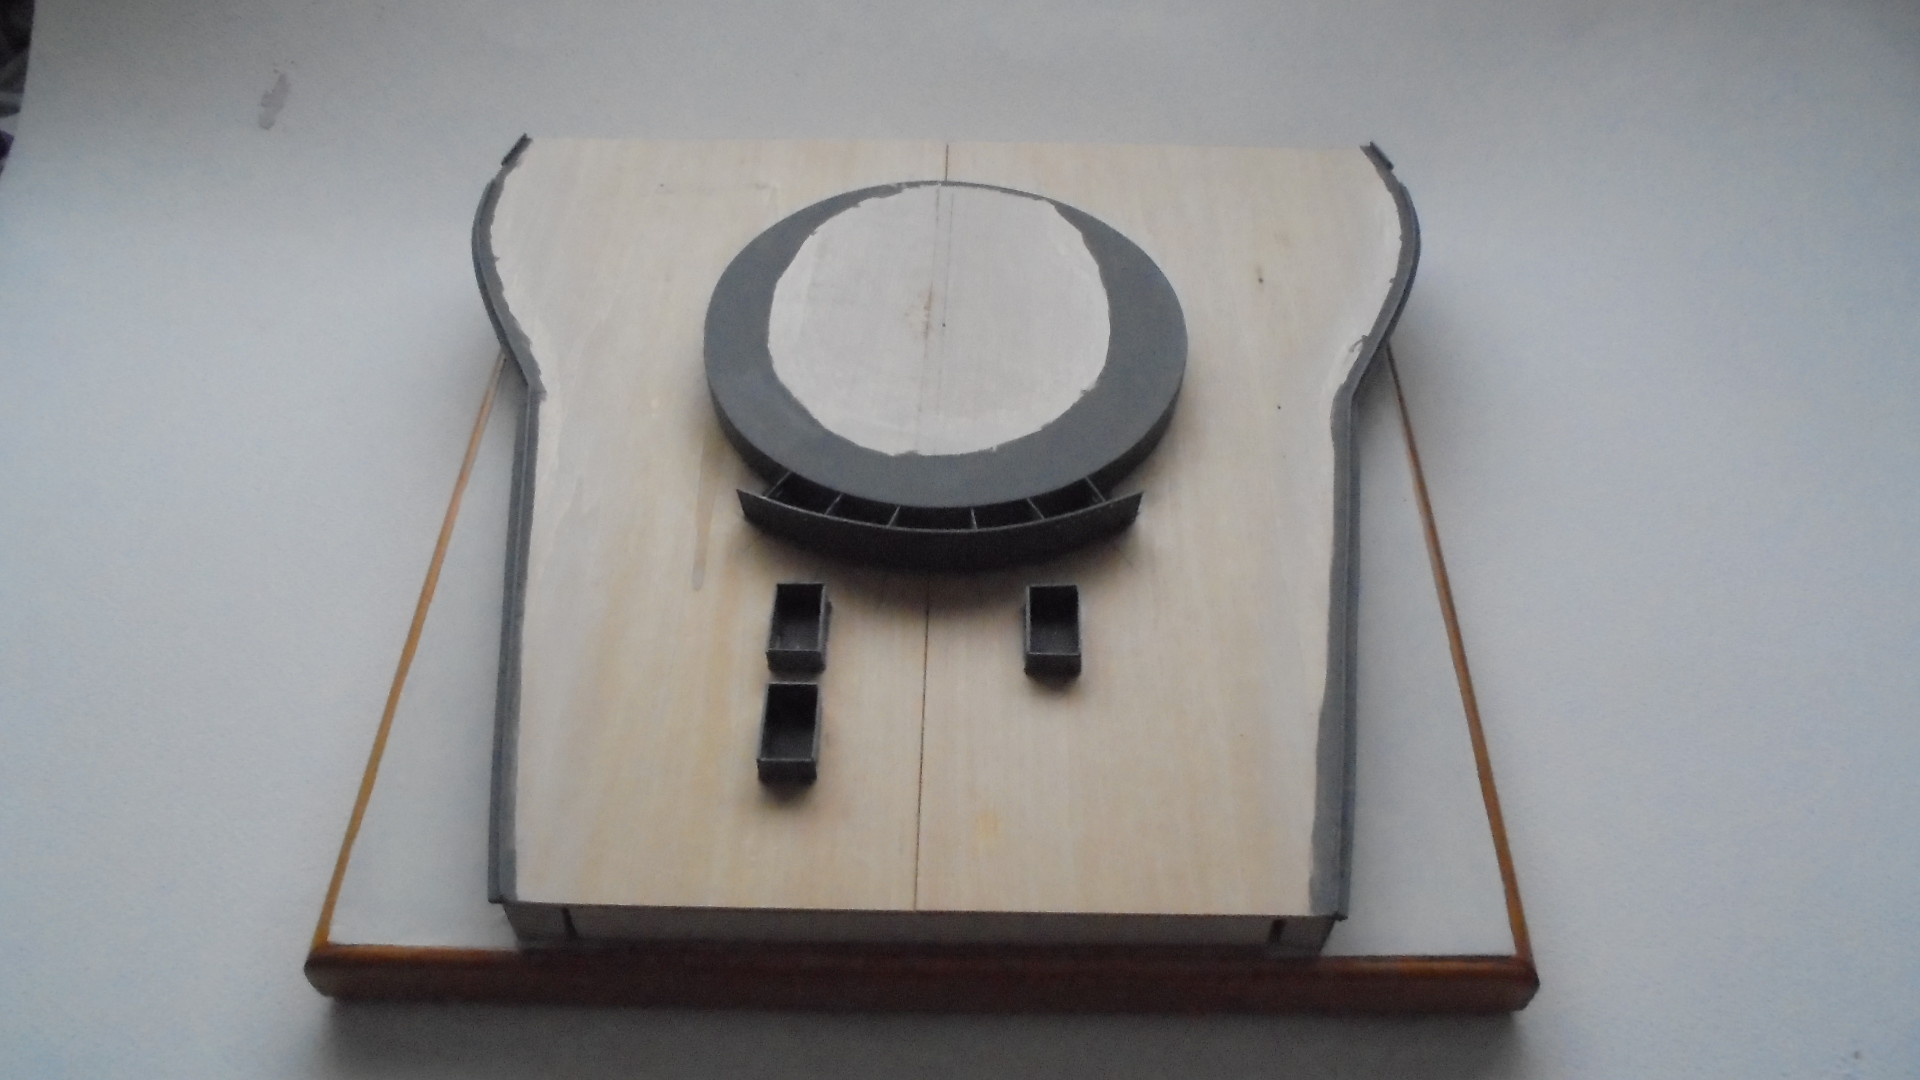
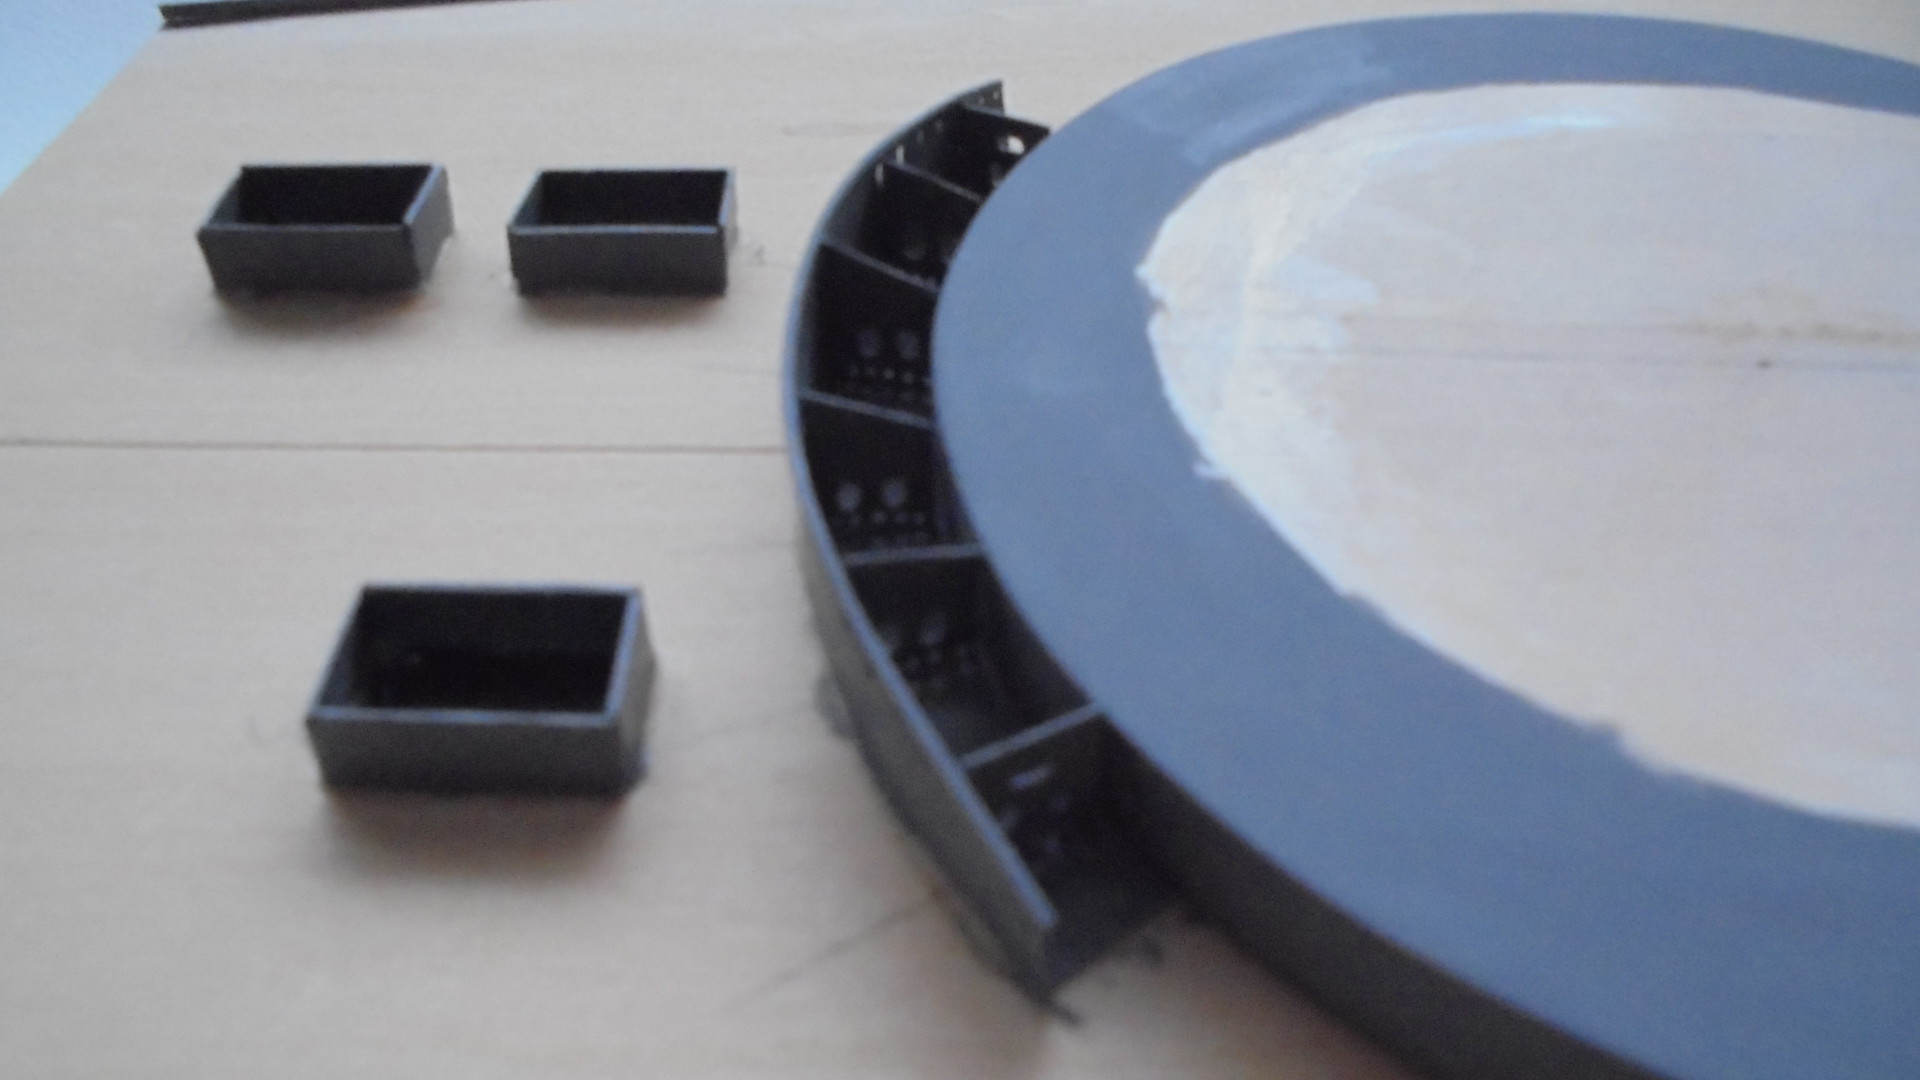
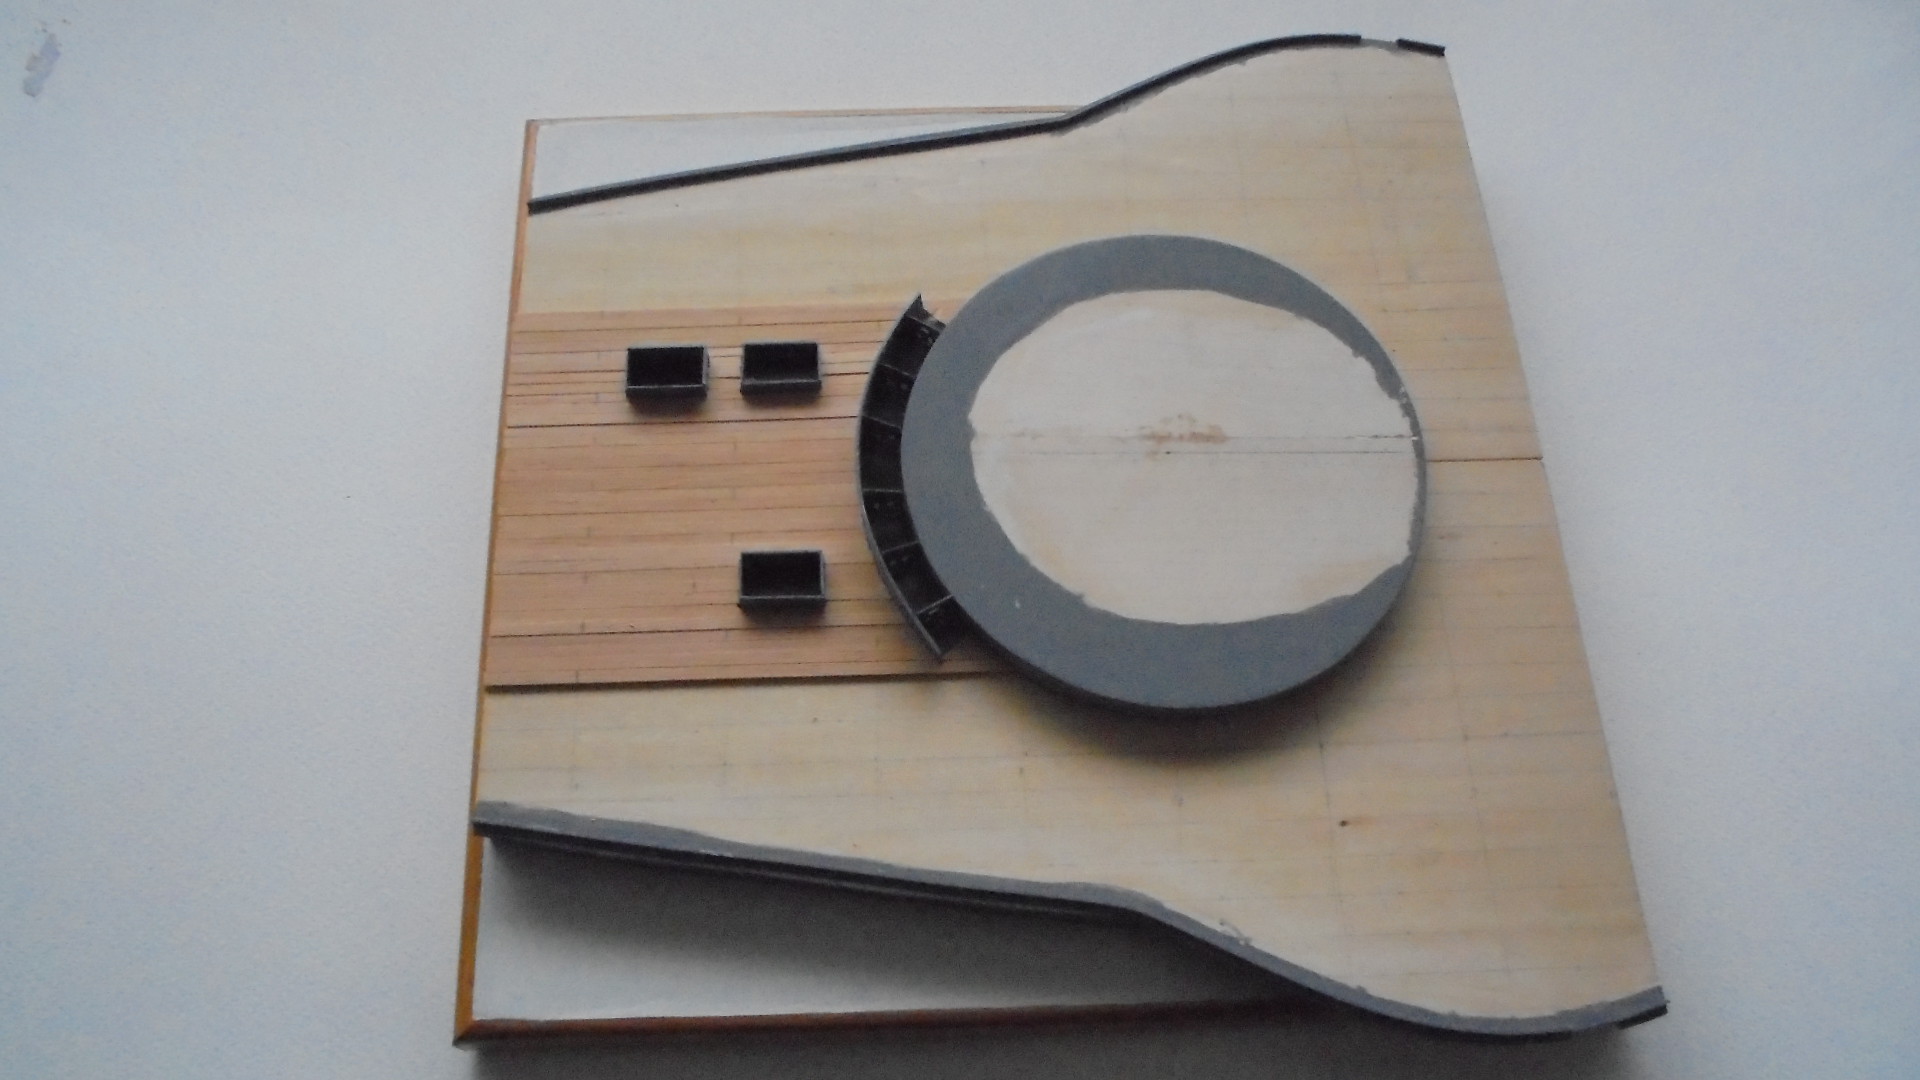
When the deck pieces were well set I added the barbette, which had also been painted, and the breakwater in front of the barbette. The latter was cut form 15 thou card with holes drilled as observed on a photograph, and the bracing pieces also as observed on a photograph and ship plans. The vents for the crew quarters were also made from 15 thou card and painted grey, except the bottoms which are black as I have no intention of trying to replicate the internals of the ship! The covers will be added later in the open position.

The next part will be to add the deck planking and start on the bridge which will form the rear of the model and support for the rear of the launch ramp.
Thanks for looking.
Thanks again to all of you who dropped by and left such wonderful comments - I really do appreciate them all.
I have been studying the many photographs that were taken in early May 1912 on and of HMS Hibernia to try to get to grips with the details of the deck and fittings. In one of the photos and on the scale drawings there are some oblongs in front of the turre, and I could not work out what they were. A friend helped me to solve the problem when he showed me a photograph of another pre-WW1 battleship foredeck: they were ventilator openings to the focsle (crew quarters) in the front end of the ship. Having solved that problem I felt able to proceed with the basic deck/barbette assembly.
I covered the edges of the pieces of wood which will represent the ship sides with thin plastic sheet and painted them Tamiya Dark Sea Grey as I have been advised that this is probably close to the grey of RN ships of that era: these were glued to the base. I glued strips of 20 x 30 Evergreen strip to to represent the metal step on the edges of the deck and painted these and the wood grey as above:
I decided that the basswood needed more support underneath, so before I attached the decking I reinforced the base with some more support:
When the deck pieces were well set I added the barbette, which had also been painted, and the breakwater in front of the barbette. The latter was cut form 15 thou card with holes drilled as observed on a photograph, and the bracing pieces also as observed on a photograph and ship plans. The vents for the crew quarters were also made from 15 thou card and painted grey, except the bottoms which are black as I have no intention of trying to replicate the internals of the ship! The covers will be added later in the open position.
The next part will be to add the deck planking and start on the bridge which will form the rear of the model and support for the rear of the launch ramp.
Thanks for looking.
-
JamesPerrin

- Looks like his avatar
- Posts: 13695
- Joined: April 5th, 2011, 8:09 pm
- Location: W. Yorkshire
- Contact:
Re: Lone Modeller's Tray
Fascinating stuff.
Classic British Kits SIG Leader Better to fettle than to fill
(2024 A:B 5:2) (2023 13:8:7) (2022 21:11) (2021 15:8) (2020 8:4:4)
(2024 A:B 5:2) (2023 13:8:7) (2022 21:11) (2021 15:8) (2020 8:4:4)
-
Stuart

- Raider of the Lost Ark Royal
- Posts: 19451
- Joined: February 25th, 2013, 4:55 pm
- Location: North Wales
- Contact:
Re: Lone Modeller's Tray
Just superb work LM!
Stuart Templeton I may not be good but I'm slow...
My Blog: https://stuartsscalemodels.blogspot.com/
My Blog: https://stuartsscalemodels.blogspot.com/
-
Andy Dighton

- Modelling Gent and Scholar
- Posts: 2572
- Joined: November 25th, 2019, 7:21 pm
- Location: Kent.
Re: Lone Modeller's Tray
Excellent stuff as always LM. Looks very much like a guitar in the making at the moment. 
Best wishes
Andy
My post war RAF display team page. https://uamf.org.uk/viewtopic.php?f=201&t=19491"
XX172 Life of a BAe Hawk 1977-2006. https://uamf.org.uk/viewtopic.php?f=201&t=23975
Andy
My post war RAF display team page. https://uamf.org.uk/viewtopic.php?f=201&t=19491"
XX172 Life of a BAe Hawk 1977-2006. https://uamf.org.uk/viewtopic.php?f=201&t=23975
-
Stamford

- Modelling Gent and Scholar
- Posts: 2240
- Joined: May 1st, 2011, 7:42 am
- Location: Klågerup Sweden
Re: Lone Modeller's Tray
Not content with scratchbuilding the aircraft he starts on the ship to carry it! Very impressive skills.
running at the edge of their world
-
ShaunW
- NOT the sheep
- Posts: 26188
- Joined: November 26th, 2011, 6:11 pm
- Location: Pontefract West Yorkshire
Re: Lone Modeller's Tray
Marvellous, I love your scratch building work, LM.
Doing - Tamiya 1/35th Universal Carrier.
Work is the curse of the modelling classes!
IPMS#12300
Work is the curse of the modelling classes!
IPMS#12300
-
B4en
- Modelling Gent and Scholar
- Posts: 1145
- Joined: February 8th, 2014, 9:58 am
- Location: South Yorkshire
Re: Lone Modeller's Tray
That's some wonderful work LM. Very ambitious! 
Out of interest LM have you ever come across the 'Oakington Aeroplane'? It was built in 1909 for a Daily Mail competition by two fellows named Grose and Feary but never flew - I think due to a poor engine? A friend's father had a photo of it on his wall when I was a kid. There was a local project going for a while to build a replica but that seems to have faded away - at least their website seems to be gone at the moment.
Out of interest LM have you ever come across the 'Oakington Aeroplane'? It was built in 1909 for a Daily Mail competition by two fellows named Grose and Feary but never flew - I think due to a poor engine? A friend's father had a photo of it on his wall when I was a kid. There was a local project going for a while to build a replica but that seems to have faded away - at least their website seems to be gone at the moment.
The past, present, and future walked into a bar. It was tense.
-
Softscience

- Staring out the window
- Posts: 7491
- Joined: April 5th, 2011, 4:34 pm
- Location: Maryland, near Washington DC
Re: Lone Modeller's Tray
the way you shaped the turret blows my mind. I simply could never get things to look so tidy and symmetrical.
-
Migrant

- Happily Landed after Many Circuits and Bumps
- Posts: 2428
- Joined: April 5th, 2011, 8:33 pm
- Location: Calgary, Canada
Re: Lone Modeller's Tray
True craftsmanship LM, the deck and turret look superb so far.
-
iggie

- Modelling Gent and Scholar
- Posts: 23438
- Joined: July 31st, 2013, 11:04 am
- Location: North Somercotes, Lincolnshire
- Contact:
Re: Lone Modeller's Tray
Marvellous work as always, despite a total change in subject matter!
Best wishes
Jim
If you can walk away from a landing, it's a good landing. If you use the airplane the next day, it's an outstanding landing
"Never put off till tomorrow, what you can do the day after tomorrow"
Jim
If you can walk away from a landing, it's a good landing. If you use the airplane the next day, it's an outstanding landing
"Never put off till tomorrow, what you can do the day after tomorrow"
-
Lone Modeller
- Modelling Gent and Scholar
- Posts: 5345
- Joined: April 1st, 2013, 6:45 pm
Re: Lone Modeller's Tray
Apologies for the long delay in a reply Ben, but no I had not heard of this type before your note: there were many experimental designs in the period 1905 -1914 ,(and indeed after), many of which were rather bizarre. I have looked it up and there does not seem to be a great dela of information, but as you suggest, lack of power seems to have been responsible for its lack of success. We should remember that power plants were frequently the cause of failure of many designs at this time because the internal combustion engine was not particularly reliable, and remained unreliable for most of the WW1 period, a fact that few seem to know.B4en wrote: ↑February 25th, 2024, 7:11 am Out of interest LM have you ever come across the 'Oakington Aeroplane'? It was built in 1909 for a Daily Mail competition by two fellows named Grose and Feary but never flew - I think due to a poor engine? A friend's father had a photo of it on his wall when I was a kid. There was a local project going for a while to build a replica but that seems to have faded away - at least their website seems to be gone at the moment.
Those early designs were interesting because they included experiments with almost every concept imaginable in terms of aerodynamics and flight: many of them were unsuccessful because of material failings of the time, not the concept itself. It is both amazing and interesting that some design ideas at least were successful later in the 20th century when materials and knowledge and understanding of aerodynamics improved.
I would be very interested if a group have been able to reconstruct the 'Oakington Aeroplane' to find out if it would have been a viable design with a more powerful and reliable engine.
-
Lone Modeller
- Modelling Gent and Scholar
- Posts: 5345
- Joined: April 1st, 2013, 6:45 pm
Re: Lone Modeller's Tray
Evening All,
Many thanks indeed to all who left such positive comments at the end of my last post: I have been seriously distracted in the last month and have not had a great deal of time either to comment or to do a great deal on the current project. Added to which what I have done has been time consuming and laborious, so what follows is not a great deal but did take a lot of time and effort, both of which have been in short supply of late.
I used 1/16 x 1/16 inch (2mm x 2mm) pine strip to make the deck planking. For those who like me know little or nothing about the construction of armoured warships, the decks were covered in wood: teak in the case of British warships. This was because these ships operated in oceans and seas around the world, which meant that in the tropics and sub-tropical waters a bare steel deck would become so hot during the day that sailors would not be able to walk on it. In addition the crew quarters below the decks would have been unbearably hot. In Arctic and Southern Ocean waters in winter, ice would rapidly build up on the very cold bare steel decks and rapidly make the ship top heavy and unstable. Wood acts as an insulator and thus helps to keep the ship cool in the tropics and slows the build-up of ice on the ship in high latitude seas and oceans.
After that lesson in marine construction I glued the strips of pine to the lime base, starting at the front centre and working outwards:
After several sessions and what seemed at the time like an eternity I had managed to cover the whole of the deck area:

Making the strip fit the different curves of the barbette, edge of the deck and fill the gaps between the ventilation hatches involved another steep learning curve for me.
The decks of those old warships were teak as stated above, but the wood rapidly discoloured in the salt air and under the influence of the sun. In addition sailors were expected to scrub the decks with honeystone, an abrasive stone which was supposed to make the decks white: an affectation of senior naval officers, some of whom seemed to think that they were still living in the age of sail. Indeed it could be said that if the Royal Navy prior to 1914 had spent more time practising gunnery and other military activity than burnishing the brass and decks of the warships, they may have been more effective, even successful, when they finally engaged the enemy. However that may have been, the decks of warships were not the colour of pine strip, so I had to find a way of representing discoloured teak. Colour photographs of modern preserved battleship wood decks show that they are a dull grey.
I stained the pine with a dark red wood stain (Peruvian mahogony), to try to represent the teak deck when new:
In the process I managed to remove several areas of the acryllic grey on the barbette and ventilation covers, so these will need to be repainted later. When the woodstain was dry I used a wash of Revell Hellgrau(76) mixed with white: I applied many coats of this until I had something close to the grey in my reference photographs:

The slightly uneven colours are what I wanted to achieve: the deck areas of these ships was huge and the variation in colour on the originals was considerable. Now all I have to do is to repaint the barbette and ventilation covers before I attach the turret and guns and start to make the bridge structure which will form the rear of the display.
Thanks for looking.
Many thanks indeed to all who left such positive comments at the end of my last post: I have been seriously distracted in the last month and have not had a great deal of time either to comment or to do a great deal on the current project. Added to which what I have done has been time consuming and laborious, so what follows is not a great deal but did take a lot of time and effort, both of which have been in short supply of late.
I used 1/16 x 1/16 inch (2mm x 2mm) pine strip to make the deck planking. For those who like me know little or nothing about the construction of armoured warships, the decks were covered in wood: teak in the case of British warships. This was because these ships operated in oceans and seas around the world, which meant that in the tropics and sub-tropical waters a bare steel deck would become so hot during the day that sailors would not be able to walk on it. In addition the crew quarters below the decks would have been unbearably hot. In Arctic and Southern Ocean waters in winter, ice would rapidly build up on the very cold bare steel decks and rapidly make the ship top heavy and unstable. Wood acts as an insulator and thus helps to keep the ship cool in the tropics and slows the build-up of ice on the ship in high latitude seas and oceans.
After that lesson in marine construction I glued the strips of pine to the lime base, starting at the front centre and working outwards:
After several sessions and what seemed at the time like an eternity I had managed to cover the whole of the deck area:
Making the strip fit the different curves of the barbette, edge of the deck and fill the gaps between the ventilation hatches involved another steep learning curve for me.
The decks of those old warships were teak as stated above, but the wood rapidly discoloured in the salt air and under the influence of the sun. In addition sailors were expected to scrub the decks with honeystone, an abrasive stone which was supposed to make the decks white: an affectation of senior naval officers, some of whom seemed to think that they were still living in the age of sail. Indeed it could be said that if the Royal Navy prior to 1914 had spent more time practising gunnery and other military activity than burnishing the brass and decks of the warships, they may have been more effective, even successful, when they finally engaged the enemy. However that may have been, the decks of warships were not the colour of pine strip, so I had to find a way of representing discoloured teak. Colour photographs of modern preserved battleship wood decks show that they are a dull grey.
I stained the pine with a dark red wood stain (Peruvian mahogony), to try to represent the teak deck when new:
In the process I managed to remove several areas of the acryllic grey on the barbette and ventilation covers, so these will need to be repainted later. When the woodstain was dry I used a wash of Revell Hellgrau(76) mixed with white: I applied many coats of this until I had something close to the grey in my reference photographs:
The slightly uneven colours are what I wanted to achieve: the deck areas of these ships was huge and the variation in colour on the originals was considerable. Now all I have to do is to repaint the barbette and ventilation covers before I attach the turret and guns and start to make the bridge structure which will form the rear of the display.
Thanks for looking.
-
Stuart
- Raider of the Lost Ark Royal
- Posts: 19451
- Joined: February 25th, 2013, 4:55 pm
- Location: North Wales
- Contact:
Re: Lone Modeller's Tray
Well I now know more about the decks of British warships than I ever needed to  excellent post LM - very interesting! I love the weathered look you've managed to achieve on that deck!
Stuart Templeton I may not be good but I'm slow...
My Blog: https://stuartsscalemodels.blogspot.com/
My Blog: https://stuartsscalemodels.blogspot.com/