There are certainly times when it makes my head spin!Clashcityrocker wrote:This will be a revolving, evolving project
Very nice neat work.
Nigel
Lone Modeller's Tray
-
Lone Modeller
- Modelling Gent and Scholar
- Posts: 5345
- Joined: April 1st, 2013, 6:45 pm
Re: Lone Modeller's Tray
-
ShaunW
- NOT the sheep
- Posts: 26188
- Joined: November 26th, 2011, 6:11 pm
- Location: Pontefract West Yorkshire
Re: Lone Modeller's Tray
This is excellent to watch, LM and you are really making great use of wood as a medium here to produce this turntable. My own woodworking skills are sadly lacking and I doubt very much that I would be able to replicate what you are doing!
Doing - Tamiya 1/35th Universal Carrier.
Work is the curse of the modelling classes!
IPMS#12300
Work is the curse of the modelling classes!
IPMS#12300
-
iggie

- Modelling Gent and Scholar
- Posts: 23438
- Joined: July 31st, 2013, 11:04 am
- Location: North Somercotes, Lincolnshire
- Contact:
Re: Lone Modeller's Tray
Superb work throughout LM; absolutely brilliant!
Best wishes
Jim
If you can walk away from a landing, it's a good landing. If you use the airplane the next day, it's an outstanding landing
"Never put off till tomorrow, what you can do the day after tomorrow"
Jim
If you can walk away from a landing, it's a good landing. If you use the airplane the next day, it's an outstanding landing
"Never put off till tomorrow, what you can do the day after tomorrow"
-
Lone Modeller
- Modelling Gent and Scholar
- Posts: 5345
- Joined: April 1st, 2013, 6:45 pm
Re: Lone Modeller's Tray
Shaun I can assure you that what I am doing is not as difficult as it looks. I have not used wood much in the past, (except to make moulds), and the tools that I am using are basic to say the least - the circle cutter, a scalpel/modelling knife and a strip of brass for a straight edge. Other than that it is measurement, drill holes in foam, saw some dowels and cut some bass wood. The bit that really takes the time is the measurement - I seem to measure something one day and everything has changed the next! What was that about measure twice and cut once? Well in my case it does not seem to matter how many time I measure, I have the feeling that I need to cut three times before I get it right!ShaunW wrote:This is excellent to watch, LM and you are really making great use of wood as a medium here to produce this turntable. My own woodworking skills are sadly lacking and I doubt very much that I would be able to replicate what you are doing!
-
Lone Modeller
- Modelling Gent and Scholar
- Posts: 5345
- Joined: April 1st, 2013, 6:45 pm
Re: Lone Modeller's Tray
Thank you Iggie for the very kind remark. It is much appreciated.iggie wrote:Superb work throughout LM; absolutely brilliant!
-
Lone Modeller
- Modelling Gent and Scholar
- Posts: 5345
- Joined: April 1st, 2013, 6:45 pm
Re: Lone Modeller's Tray
Evening All,
Apologies for the long delay since the last post: my computer decided that it did not want to re-start after I had been away for a couple of days so I have been off-line while it was fixed. Never mind it gave me more time to get on with this project!
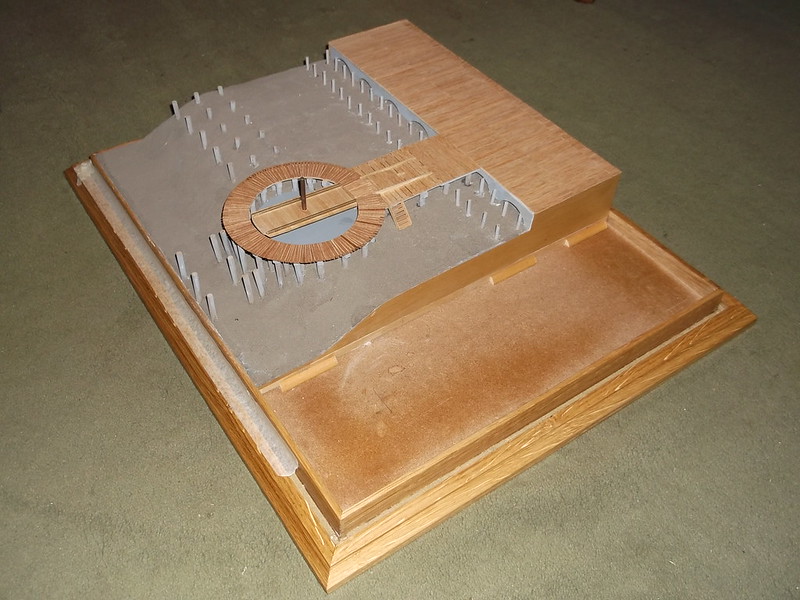
The first thing that I did since the last posting was to add the basswood sheet to the rear of the display. This has two purposes:
to act as the hangar floor area in the display;
to cover the space where the battery holder and switch for the turntable motor will be kept.
I constructed a frame to hold the basswood sheet - simply lengths of square section obechi to make sufficient support to hold the bass wood sheet. Lines were drawn on the sheet so that I could cut some wood strip to make the planking of the hangar floor:
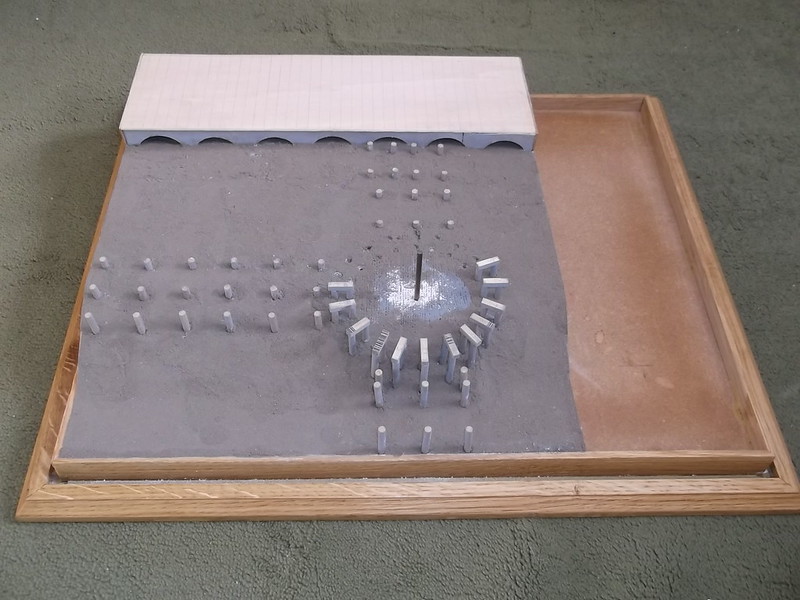
I also finished the turntable platform:
Planking the hangar floor was straightforward if time consuming. I used 5mm x 1mm Tanganyka wood strip - the same material as I used for the turntable platform. The strips were added in two rows as shown the contemporary photographs. I also put in the posts for the platform in front of the hangar and the cross members which will support the planking in due course. The turntable platform is just resting in place at the moment as I need to use it to get levels for other parts of the display. In fact I have put all of the posts in their respective holes but not all are permanently fixed as I need to make sure that they are all at the correct heights before I finally glue them into place:
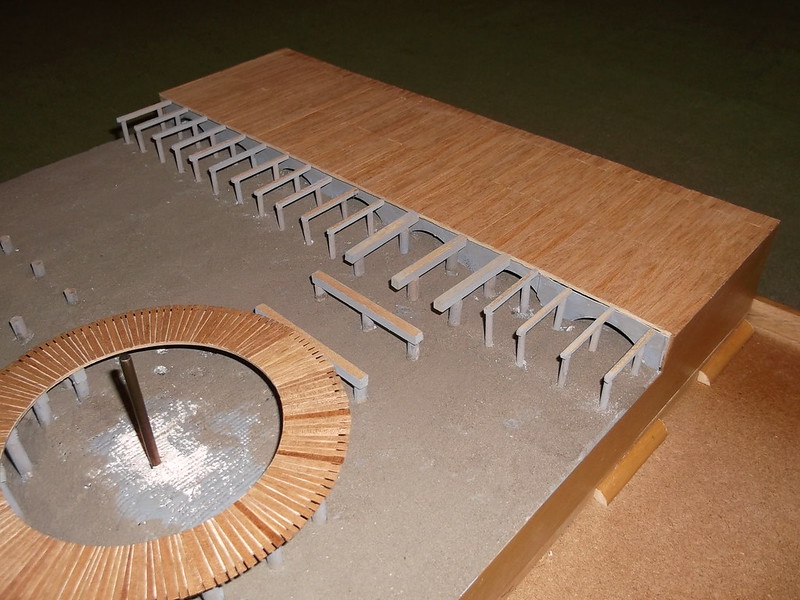
The post line in front of the turntable platform represents the start of the slipway to Lake Constance, the posts on one side represent some sort of parking area(?). Hopefully the layout and main features of the display are beginning to become clearer now.
Thanks for looking.
Apologies for the long delay since the last post: my computer decided that it did not want to re-start after I had been away for a couple of days so I have been off-line while it was fixed. Never mind it gave me more time to get on with this project!
The first thing that I did since the last posting was to add the basswood sheet to the rear of the display. This has two purposes:
to act as the hangar floor area in the display;
to cover the space where the battery holder and switch for the turntable motor will be kept.
I constructed a frame to hold the basswood sheet - simply lengths of square section obechi to make sufficient support to hold the bass wood sheet. Lines were drawn on the sheet so that I could cut some wood strip to make the planking of the hangar floor:
I also finished the turntable platform:
Planking the hangar floor was straightforward if time consuming. I used 5mm x 1mm Tanganyka wood strip - the same material as I used for the turntable platform. The strips were added in two rows as shown the contemporary photographs. I also put in the posts for the platform in front of the hangar and the cross members which will support the planking in due course. The turntable platform is just resting in place at the moment as I need to use it to get levels for other parts of the display. In fact I have put all of the posts in their respective holes but not all are permanently fixed as I need to make sure that they are all at the correct heights before I finally glue them into place:
The post line in front of the turntable platform represents the start of the slipway to Lake Constance, the posts on one side represent some sort of parking area(?). Hopefully the layout and main features of the display are beginning to become clearer now.
Thanks for looking.
-
JohnRatzenberger

- Why is he so confused ?
- Posts: 15736
- Joined: April 5th, 2011, 3:42 pm
- Location: Living on a sandbar - Nags Head, NC.
Re: Lone Modeller's Tray
Fascinating.
Because I cannot judge elevations from the photos, I have a question that you may have already thought about.
If you were to push the aircraft onto the side ramp, toward the parking area, will the wingtips/floats clear the main platform ?
Because I cannot judge elevations from the photos, I have a question that you may have already thought about.
If you were to push the aircraft onto the side ramp, toward the parking area, will the wingtips/floats clear the main platform ?
John Ratzenberger 
It's my model and I'll do what I want with it.
It's my model and I'll do what I want with it.
-
Lone Modeller
- Modelling Gent and Scholar
- Posts: 5345
- Joined: April 1st, 2013, 6:45 pm
Re: Lone Modeller's Tray
John,
The side platform is at the same level as the turntable and the hangar floor. The short ramp between the hangar and turntable did have a slope on it and the rails were mounted on blocks to keep them level - not visible in the construction yet but it will become clearer later I hope! The only way in which an aircraft could have been put on to the side platform and not had either the tail unit or wing tips extend into the front of the hangar would have been to have left the aircraft facing the hangar. I do not know exactly how this system worked but it seems that the turntable was built so that aircraft could be built in the hangar facing the lake, let down the launch ramp and then were retrieved by pulling them back nose first. The machine was then be turned around on the turntable and reversed into the hangar. I think that the side platform may have been built for the time when the Rs II was being tested on Lake Constance while the Rs III was being built in the hangar. There would not have been sufficient room to store both aircraft in the hangar at the same time. There was also an Rs IV built later in 1918 while the Rs III was being tested, so the situation could have arisen whereby a machine being tested on the lake had to be taken off and stored while the other was still in the hangar. I have not seen any photographic evidence that an aircraft was ever pushed on to the side platform: it may be that the Zeppelin museum may have more information on this. The modern Zeppelin museum is at Seemoos, which is a few kilometres from Friederichshafen, and is on the same site as the hangar and slipway which I am trying to portray. Sadly my German is not good enough to ask them if they know what was happening, or if there is more photographic evidence: I suspect that there is. I only have access to the DataFile and photos published on the net.
The side platform is at the same level as the turntable and the hangar floor. The short ramp between the hangar and turntable did have a slope on it and the rails were mounted on blocks to keep them level - not visible in the construction yet but it will become clearer later I hope! The only way in which an aircraft could have been put on to the side platform and not had either the tail unit or wing tips extend into the front of the hangar would have been to have left the aircraft facing the hangar. I do not know exactly how this system worked but it seems that the turntable was built so that aircraft could be built in the hangar facing the lake, let down the launch ramp and then were retrieved by pulling them back nose first. The machine was then be turned around on the turntable and reversed into the hangar. I think that the side platform may have been built for the time when the Rs II was being tested on Lake Constance while the Rs III was being built in the hangar. There would not have been sufficient room to store both aircraft in the hangar at the same time. There was also an Rs IV built later in 1918 while the Rs III was being tested, so the situation could have arisen whereby a machine being tested on the lake had to be taken off and stored while the other was still in the hangar. I have not seen any photographic evidence that an aircraft was ever pushed on to the side platform: it may be that the Zeppelin museum may have more information on this. The modern Zeppelin museum is at Seemoos, which is a few kilometres from Friederichshafen, and is on the same site as the hangar and slipway which I am trying to portray. Sadly my German is not good enough to ask them if they know what was happening, or if there is more photographic evidence: I suspect that there is. I only have access to the DataFile and photos published on the net.
-
ShaunW
- NOT the sheep
- Posts: 26188
- Joined: November 26th, 2011, 6:11 pm
- Location: Pontefract West Yorkshire
Re: Lone Modeller's Tray
The base is indeed becoming clearer now more of the parts are going on, LM and this really is a great piece of construction work.
Doing - Tamiya 1/35th Universal Carrier.
Work is the curse of the modelling classes!
IPMS#12300
Work is the curse of the modelling classes!
IPMS#12300
-
Lone Modeller
- Modelling Gent and Scholar
- Posts: 5345
- Joined: April 1st, 2013, 6:45 pm
Re: Lone Modeller's Tray
Evening All,
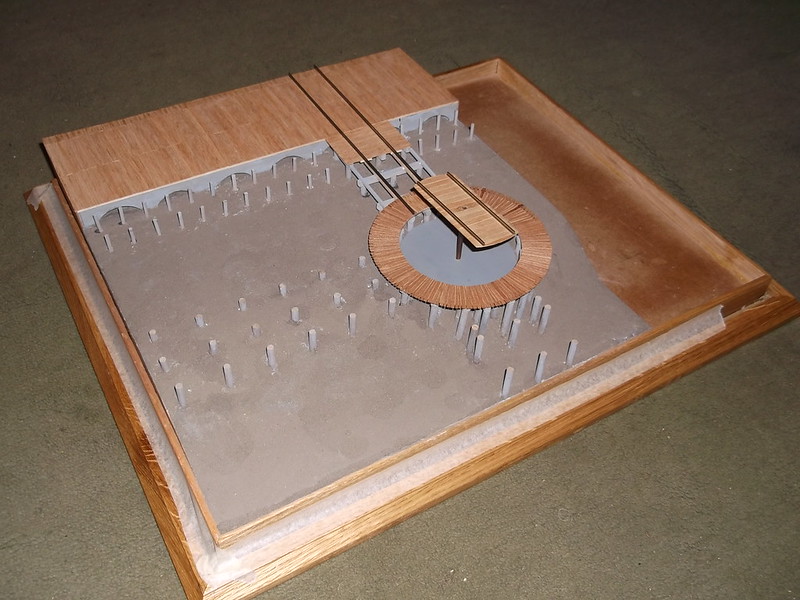
Shaun I am pleased that things are beginning to become clearer at last. I know what I am trying to do because I have the photos in front of me but for those who do not have them I am sure that at times this must all seem more than a little confusing. Now the structures will hopefully become clearer because I will be adding distinct units which should indicate how the whole was organised.
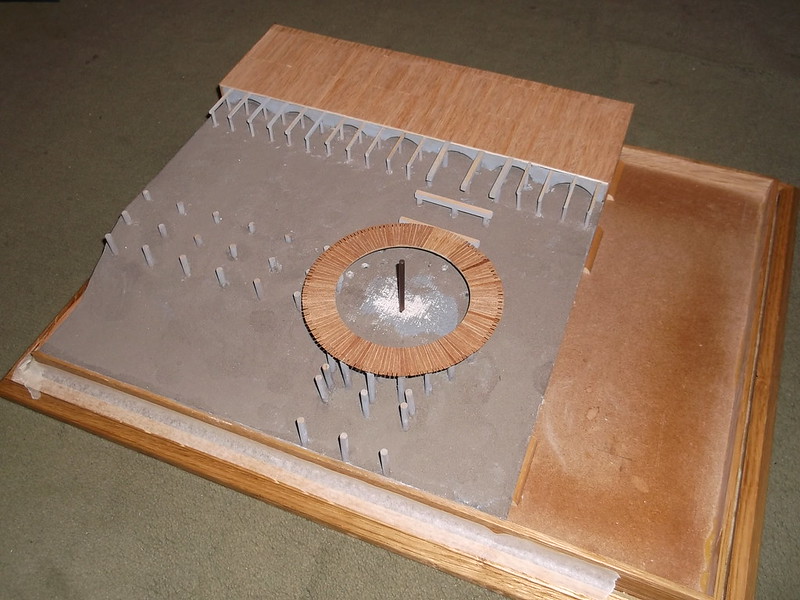
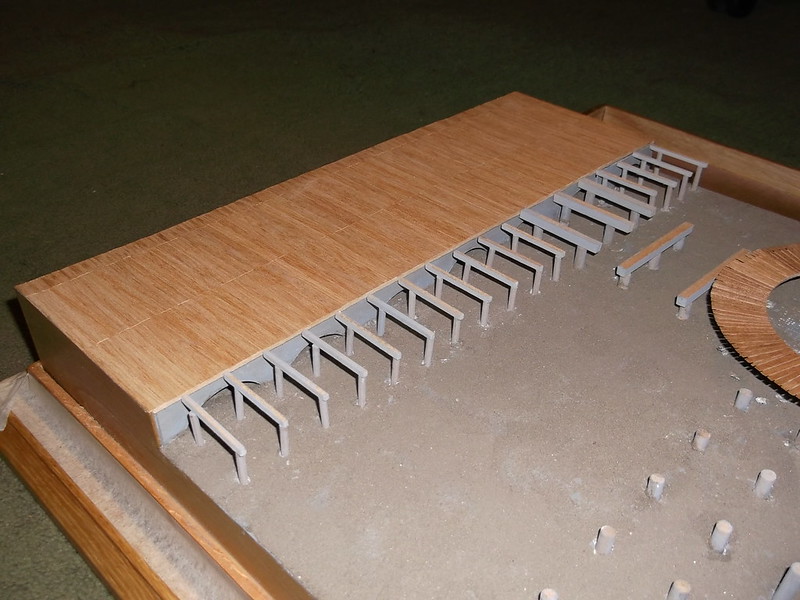
I have decided to put in what I think may have existed under the turntable, namely a flat base which I have painted mid-grey to represent a metal base on which the turntable could revolve. I am not certain whether this is correct and I always have the option to remove it later if I change my mind - which may yet happen! The short ramp from the hangar to the turntable is more complicated than it looks at first sight. The half nearest to the hangar floor was level, but the half nearest to the turntable sloped downwards on the sides but had a second small ramp in the centre. The rails were supported by beams over the half nearest the turntable to keep them level. I hope that the photos which follow will make clearer what I am trying to describe. This is important because it determined how I constructed this part of the structure.
The half of the ramp nearest to the hangar floor was straightforward - simply lay a series of cut stripwood pieces to represent the planks: these were laid on obechi strip which represented the longitudinal bearers which were laid over the goalpost structures:
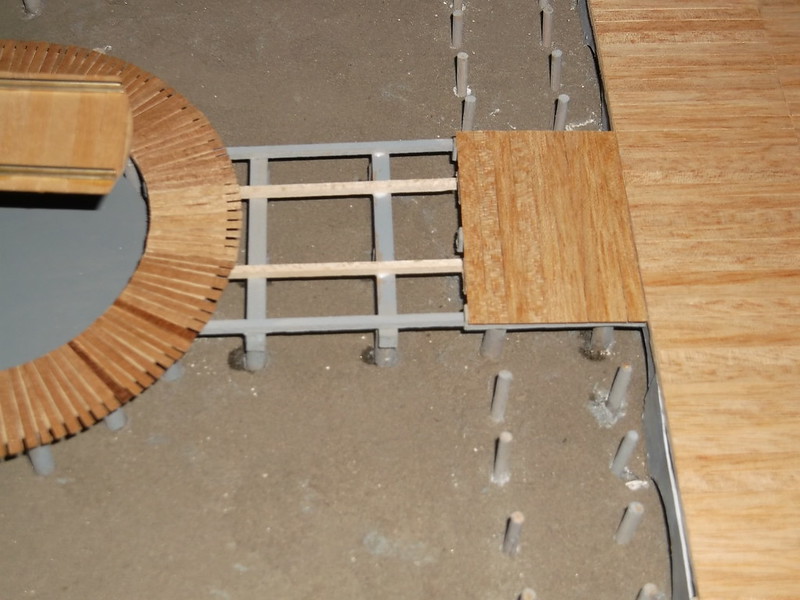
The ramp was checked for level with the hangar floor by laying rails between the latter and the turntable platform:
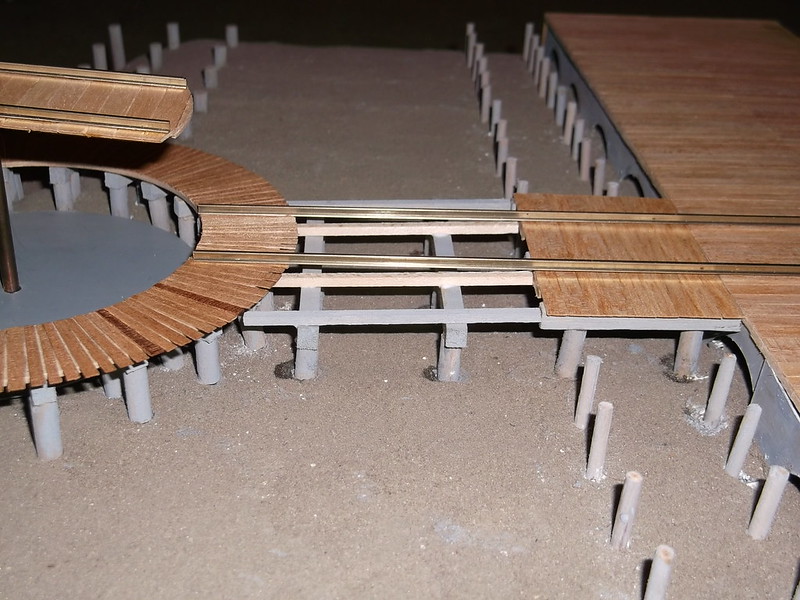
Now the slope of the ramp in the section nearest to the turntable platform can be clearly seen. Here the ramp planks sloped so that they were lower than the turntable platform where the two joined, but the rails were supported by beams which were level between the hangar floor and the turntable. To achieve this I followed what I think was the original method of construction: I laid stripwood crosswise over the obechi strips as a continuation of the ramp built so far. I then made two rail supporting beams from cook's matches which I filed and sanded to a taper and glued these to the sloping part of the ramp. The gap between the beams was in turn filled with short cross pieces of stripwood and this too had a slope at the hangar end. I also left a small cut-out for pulley wheels to be fixed later:
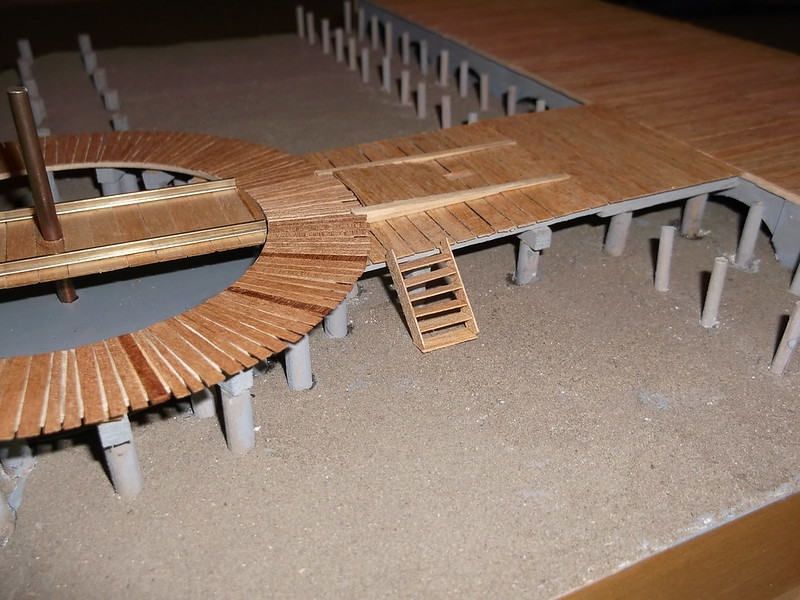
The new structure was tested for alignments by laying the rails over the newly constructed ramp:
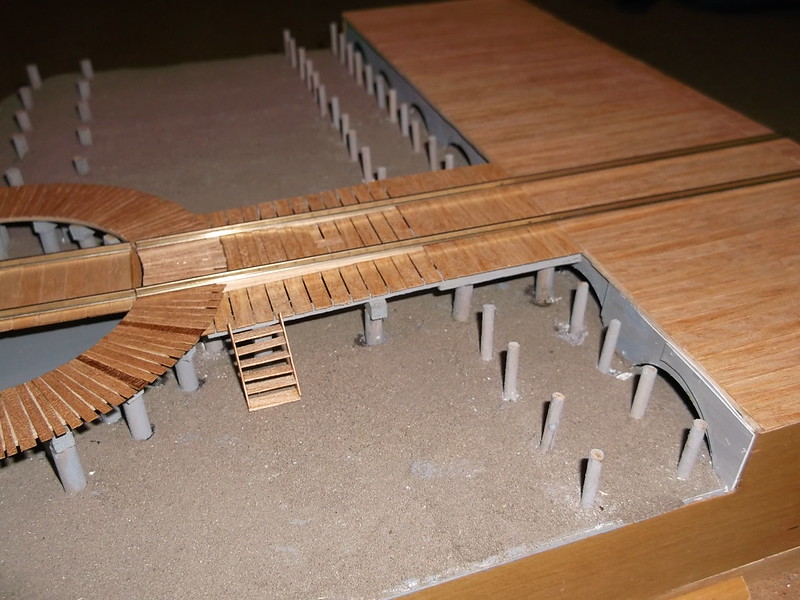
The steps were made from stripwood too and have been placed in position just for effect at the moment. There will be steps there when the base is completed but as there is much more work to do these will now be put on one side until later.
Thanks for looking.
Shaun I am pleased that things are beginning to become clearer at last. I know what I am trying to do because I have the photos in front of me but for those who do not have them I am sure that at times this must all seem more than a little confusing. Now the structures will hopefully become clearer because I will be adding distinct units which should indicate how the whole was organised.
I have decided to put in what I think may have existed under the turntable, namely a flat base which I have painted mid-grey to represent a metal base on which the turntable could revolve. I am not certain whether this is correct and I always have the option to remove it later if I change my mind - which may yet happen! The short ramp from the hangar to the turntable is more complicated than it looks at first sight. The half nearest to the hangar floor was level, but the half nearest to the turntable sloped downwards on the sides but had a second small ramp in the centre. The rails were supported by beams over the half nearest the turntable to keep them level. I hope that the photos which follow will make clearer what I am trying to describe. This is important because it determined how I constructed this part of the structure.
The half of the ramp nearest to the hangar floor was straightforward - simply lay a series of cut stripwood pieces to represent the planks: these were laid on obechi strip which represented the longitudinal bearers which were laid over the goalpost structures:
The ramp was checked for level with the hangar floor by laying rails between the latter and the turntable platform:
Now the slope of the ramp in the section nearest to the turntable platform can be clearly seen. Here the ramp planks sloped so that they were lower than the turntable platform where the two joined, but the rails were supported by beams which were level between the hangar floor and the turntable. To achieve this I followed what I think was the original method of construction: I laid stripwood crosswise over the obechi strips as a continuation of the ramp built so far. I then made two rail supporting beams from cook's matches which I filed and sanded to a taper and glued these to the sloping part of the ramp. The gap between the beams was in turn filled with short cross pieces of stripwood and this too had a slope at the hangar end. I also left a small cut-out for pulley wheels to be fixed later:
The new structure was tested for alignments by laying the rails over the newly constructed ramp:
The steps were made from stripwood too and have been placed in position just for effect at the moment. There will be steps there when the base is completed but as there is much more work to do these will now be put on one side until later.
Thanks for looking.
-
Softscience

- Staring out the window
- Posts: 7491
- Joined: April 5th, 2011, 4:34 pm
- Location: Maryland, near Washington DC
Re: Lone Modeller's Tray
This is incredible.
Are you an architect by trade? This looks like the architectural models I used to see the architecture kids bring in, way back when I was an undergrad.
Are you an architect by trade? This looks like the architectural models I used to see the architecture kids bring in, way back when I was an undergrad.
-
Clashcityrocker

- Modelling Gent and Scholar
- Posts: 10827
- Joined: May 1st, 2011, 12:31 am
- Location: Adelaide. South Australia
Re: Lone Modeller's Tray
Lovely work.
Nigel
Nigel
-
iggie
- Modelling Gent and Scholar
- Posts: 23438
- Joined: July 31st, 2013, 11:04 am
- Location: North Somercotes, Lincolnshire
- Contact:
Re: Lone Modeller's Tray
Astounding work.....!!
Best wishes
Jim
If you can walk away from a landing, it's a good landing. If you use the airplane the next day, it's an outstanding landing
"Never put off till tomorrow, what you can do the day after tomorrow"
Jim
If you can walk away from a landing, it's a good landing. If you use the airplane the next day, it's an outstanding landing
"Never put off till tomorrow, what you can do the day after tomorrow"
-
ShaunW
- NOT the sheep
- Posts: 26188
- Joined: November 26th, 2011, 6:11 pm
- Location: Pontefract West Yorkshire
Re: Lone Modeller's Tray
Now it's really clear, LM and that really is fantastic work featuring excellent attention to detail and modelling ability beyond my own skill set. Wood strips and cook's matches? you could try a model of Tower Bridge next, fully operating of course! 
Doing - Tamiya 1/35th Universal Carrier.
Work is the curse of the modelling classes!
IPMS#12300
Work is the curse of the modelling classes!
IPMS#12300
-
Lone Modeller
- Modelling Gent and Scholar
- Posts: 5345
- Joined: April 1st, 2013, 6:45 pm
Re: Lone Modeller's Tray
Thank you gentlemen for your very kind remarks which are much appreciated.
Ralph: I was not an architect, I am a retired geography teacher! I started converting models when I was still in my teens and made several using carved balsa and talcum powder and dope filler..... I have posted photos of an Avro Manchester built in that way in the late 1970's In truth this is my first attempt to build a base, although I had planned several in an earlier incarnation as a modeller, but I never got around to it, having instead just scattered a bit of "grass" flock on to a hardboard base. I have not worked in these materials before, which is why I keep changing my mind and am making things up as I go along.
Shaun: remember that there is a motor beneath the turntable which will cause it and the aircraft to rotate.....I hope!! Tower Bridge in cooks matches sounds interesting, just the working bit could be tricky!!