Matchbox 1/12 Vincent Black Shadow *FINISHED*
-
beany

- Fat git, glasses, goatie - Avoid!
- Posts: 4334
- Joined: April 6th, 2011, 11:05 am
- Location: Chellaston, Derby
Re: Matchbox 1/12 Vincent Black Shadow
That's really coming along really nicely James and I know it isn't an easy build.
2024 Acquired: 9 Built: 1
-
JamesPerrin

- Looks like his avatar
- Posts: 13695
- Joined: April 5th, 2011, 8:09 pm
- Location: W. Yorkshire
- Contact:
Re: Matchbox 1/12 Vincent Black Shadow
I've left the wheels to the very end in case I ran out of time before SMW, which would allow me the throw the kit wheels on OOB. One of the reasons for attempting this kit was an excuse to try re-spoking wire wheels and I didn't think 1/32 car wheels were the ideal place to start.
I picked up some tips from one of montessa315 builds from early in the year (unfortunately his image hosting site is down and images aren't available) where he used florists wire. This can be bought cheap and as is sold in 6"/15cm straight lengths. The wire as some issues, it's galvanized and the stuff he obtained was actually rectangular is cross-section. I thought I had this last issue sorted by sourcing some "round" wire but it turned out to be the same. The flat wire is akin to PE replacement spokes in appearance. It has some advantage though that I'll note below.
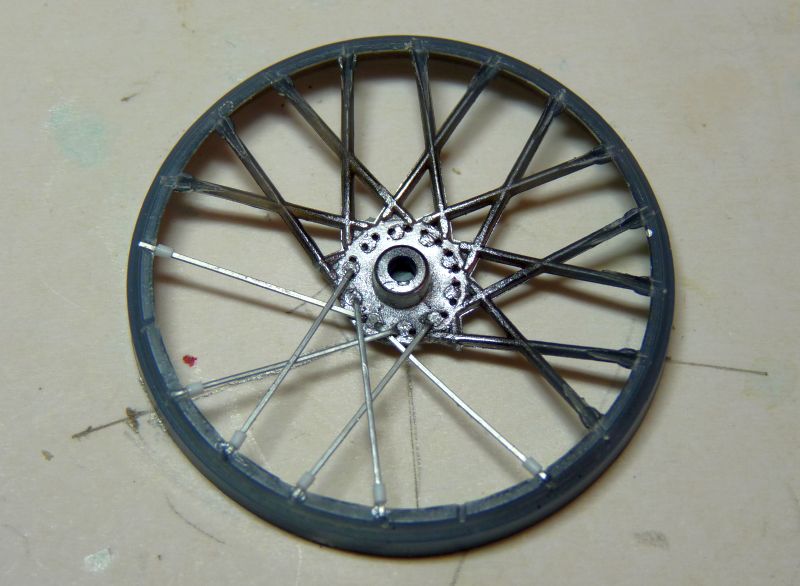
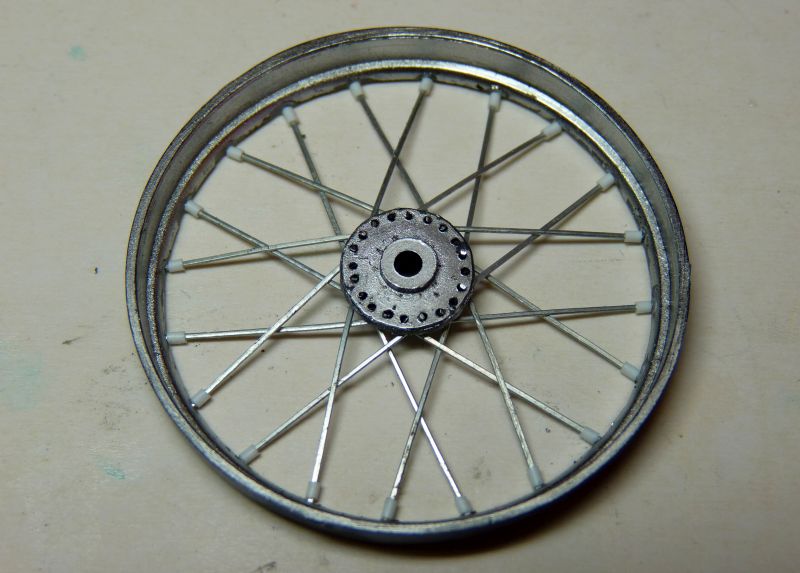
The kits wheels were stripped of their chrome, if you were going to use them this really would be better as the underlying varnish is thick and the seam lines are quite heavy, to the point the make re-spoking a less tedious alternative. The rims actually have 3 values moulded and I think this might be error made by repeating the master template during tooling. I've removed the extras in the pics. Each wheel half has 20 spokes.
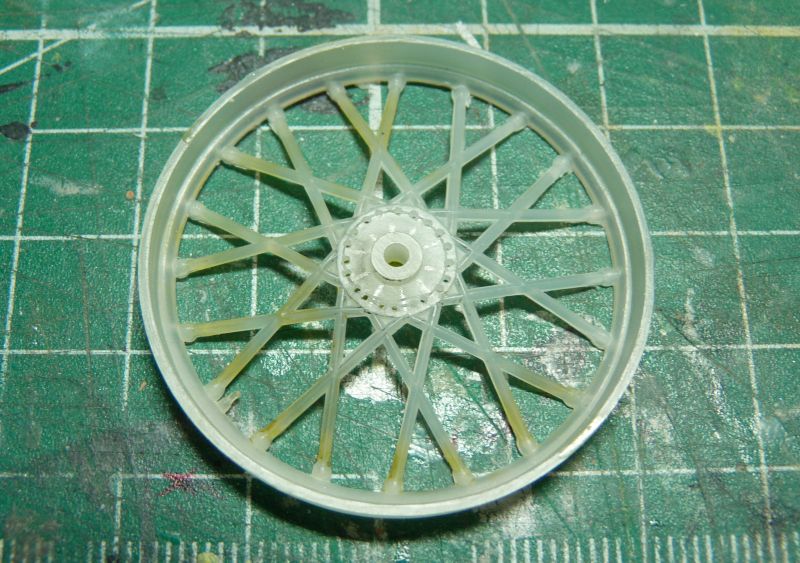
In preparation I marked and then filed grooves into the rim with a triangular file aligned along each spoke. I then drilled the 20 holes in the centre. I supported the hub with some rubber sponge so as not to stress it.
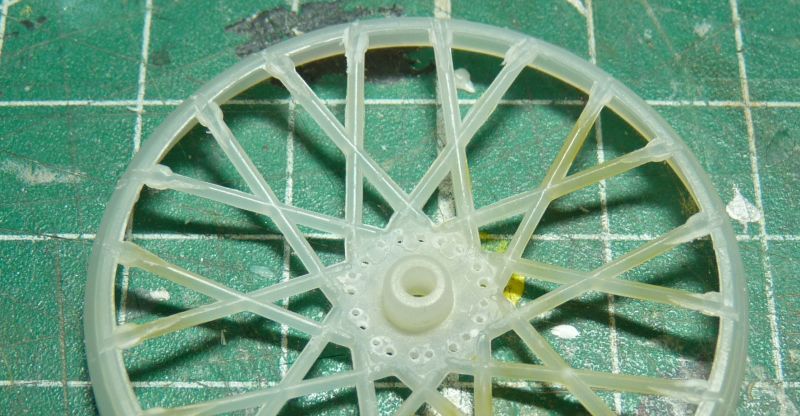
I decided to get some paint on the wheel as this point as the translucent plastic is hard to look at and I felt it might give me an advantage at the end.
The make a total of 80 spokes + a lot of spares I needed some way to replicate tasks accurately and consistently. The latter helps give the impression of the former.
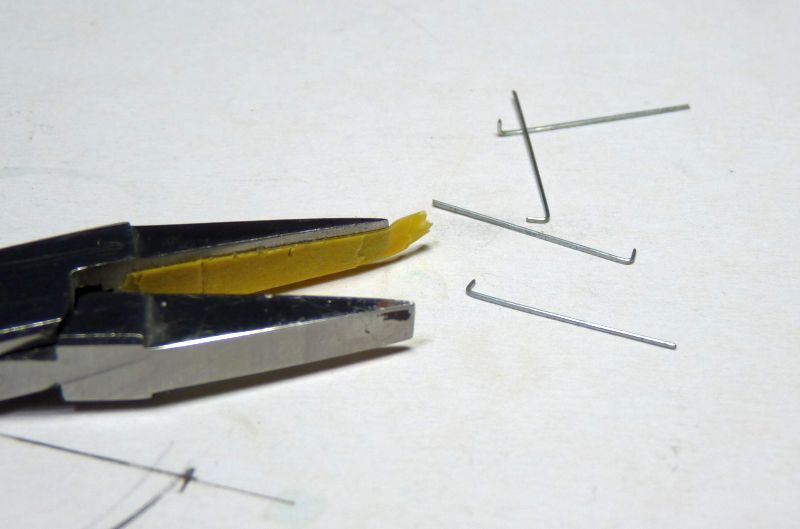
Firstly to cut the spokes to the desired length I cut a narrow straw the size required. I could then stick a up to 3 lengths of wire in at a time and cut them flush with the top of the straw and do this a few times before having to empty out the straw.
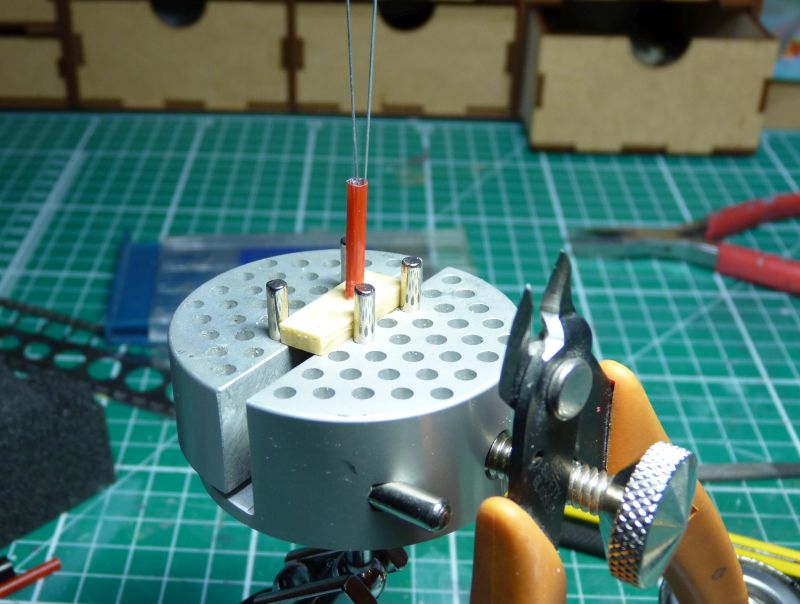
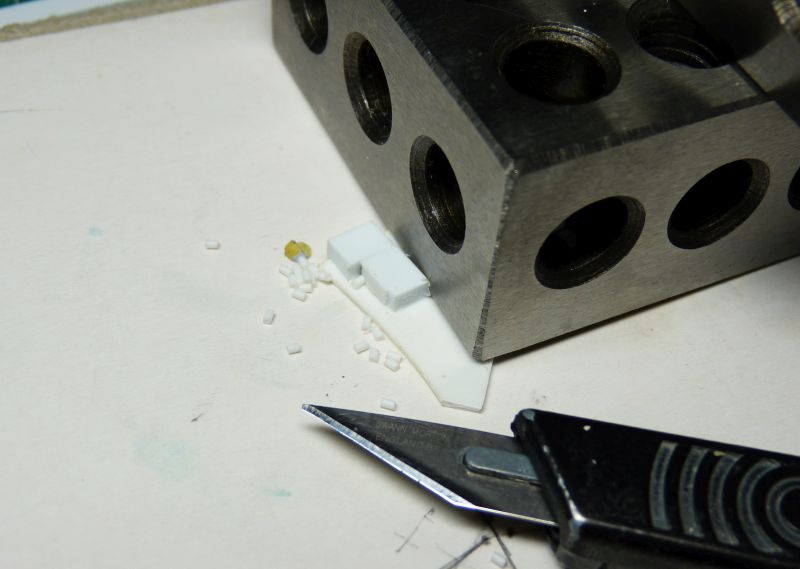
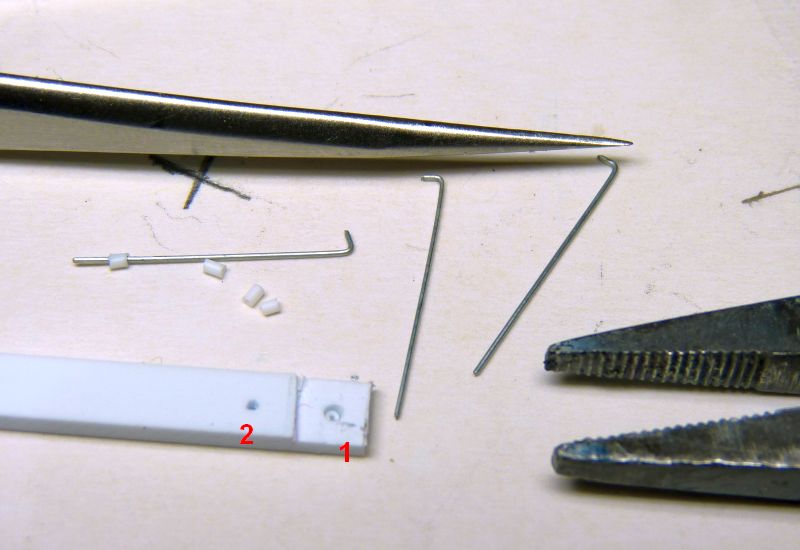
I really wanted to represent the spoke nuts. I've got brass tubing of suitable size but cutting over 80 1mm length in micro tubing wasn't something I relished. I bounced back and forth some ideas with MattBacon and we hit upon the idea of using the vinyl insulation from wire. The wire I'd used for the break cables et al proved to be too small but a USB cable I had spare provided something ideal. It was a tight enough fit that it would grip the spokes. A some jig from scraps are card and held down with a 1-2-3 block was all that was needed to cut a load to the same length.
The hub end of the spoke needed bending over at 90degs. I put a couple of layers of tape in my pliers to make the bend at the same point each time.
Getting the tiny so-and-sos to slide onto the spokes was a nightmare and couldn't be done by hand without repeated stabbing myself with the spokes. The solution was two holes drilled in some plastic card. The "nut" was placed in the large hole (1) and then the spoke inserted while being held in pliers. The was then positioned over the smaller hole (2) which pushed the nut further up leaving the end attached to the rim clear.
Some tweaking was required as the sharp end of the spokes acted like a chisel and could slice through the vinyl a swift swipe with a fine file helped ease them in. It took about 20mins to get 25 done enough for the first attempt.
I had already decided to do the lazy respoking method are removing a few moulded spokes at a time are replacing them with in steps. This means I didn't have to create an accurate jig hold the rim and hub in perfect alignment. However it meant careful clean up at each stage with the risk of damaging the new spokes. It also made it more difficult to produce a consistent overlapping pattern - read that as I didn't bother!
The flat nature of the wire at 0.3mm helped when it came to the overlaps at this would not have worked with 0.5mm wire. I have subsequent found straight lengths of 0.3mm spring and piano wire online that may be suitable but they may well be a lot harder to cut than this stuff.
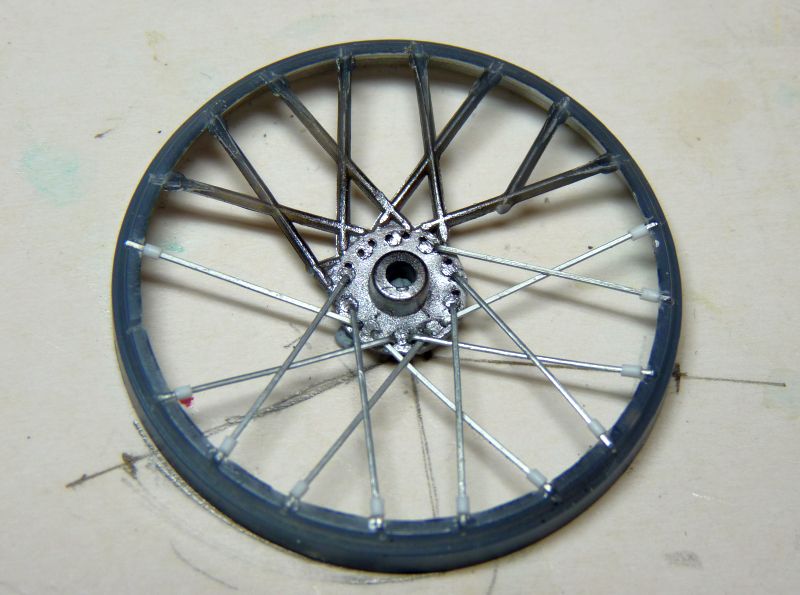
I really pleased the final piece. I still plan to leave the spoke unpainted ( it could make the overlaps look merged ), but I thing the rims need to be redone as the finish on the plastic is very rough. Just need to do the other 3 now!
I picked up some tips from one of montessa315 builds from early in the year (unfortunately his image hosting site is down and images aren't available) where he used florists wire. This can be bought cheap and as is sold in 6"/15cm straight lengths. The wire as some issues, it's galvanized and the stuff he obtained was actually rectangular is cross-section. I thought I had this last issue sorted by sourcing some "round" wire but it turned out to be the same. The flat wire is akin to PE replacement spokes in appearance. It has some advantage though that I'll note below.
The kits wheels were stripped of their chrome, if you were going to use them this really would be better as the underlying varnish is thick and the seam lines are quite heavy, to the point the make re-spoking a less tedious alternative. The rims actually have 3 values moulded and I think this might be error made by repeating the master template during tooling. I've removed the extras in the pics. Each wheel half has 20 spokes.
In preparation I marked and then filed grooves into the rim with a triangular file aligned along each spoke. I then drilled the 20 holes in the centre. I supported the hub with some rubber sponge so as not to stress it.
I decided to get some paint on the wheel as this point as the translucent plastic is hard to look at and I felt it might give me an advantage at the end.
The make a total of 80 spokes + a lot of spares I needed some way to replicate tasks accurately and consistently. The latter helps give the impression of the former.
Firstly to cut the spokes to the desired length I cut a narrow straw the size required. I could then stick a up to 3 lengths of wire in at a time and cut them flush with the top of the straw and do this a few times before having to empty out the straw.
I really wanted to represent the spoke nuts. I've got brass tubing of suitable size but cutting over 80 1mm length in micro tubing wasn't something I relished. I bounced back and forth some ideas with MattBacon and we hit upon the idea of using the vinyl insulation from wire. The wire I'd used for the break cables et al proved to be too small but a USB cable I had spare provided something ideal. It was a tight enough fit that it would grip the spokes. A some jig from scraps are card and held down with a 1-2-3 block was all that was needed to cut a load to the same length.
The hub end of the spoke needed bending over at 90degs. I put a couple of layers of tape in my pliers to make the bend at the same point each time.
Getting the tiny so-and-sos to slide onto the spokes was a nightmare and couldn't be done by hand without repeated stabbing myself with the spokes. The solution was two holes drilled in some plastic card. The "nut" was placed in the large hole (1) and then the spoke inserted while being held in pliers. The was then positioned over the smaller hole (2) which pushed the nut further up leaving the end attached to the rim clear.
Some tweaking was required as the sharp end of the spokes acted like a chisel and could slice through the vinyl a swift swipe with a fine file helped ease them in. It took about 20mins to get 25 done enough for the first attempt.
I had already decided to do the lazy respoking method are removing a few moulded spokes at a time are replacing them with in steps. This means I didn't have to create an accurate jig hold the rim and hub in perfect alignment. However it meant careful clean up at each stage with the risk of damaging the new spokes. It also made it more difficult to produce a consistent overlapping pattern - read that as I didn't bother!
The flat nature of the wire at 0.3mm helped when it came to the overlaps at this would not have worked with 0.5mm wire. I have subsequent found straight lengths of 0.3mm spring and piano wire online that may be suitable but they may well be a lot harder to cut than this stuff.
I really pleased the final piece. I still plan to leave the spoke unpainted ( it could make the overlaps look merged ), but I thing the rims need to be redone as the finish on the plastic is very rough. Just need to do the other 3 now!
Classic British Kits SIG Leader Better to fettle than to fill
(2024 A:B 5:2) (2023 13:8:7) (2022 21:11) (2021 15:8) (2020 8:4:4)
(2024 A:B 5:2) (2023 13:8:7) (2022 21:11) (2021 15:8) (2020 8:4:4)
-
PaulBradley

- Staring out the window
- Posts: 21220
- Joined: April 6th, 2011, 3:08 pm
- Location: Flagstaff, AZ
Re: Matchbox 1/12 Vincent Black Shadow
Paul
За демократію і незалежний Україну
"For Democracy and a Free Ukraine"
За демократію і незалежний Україну
"For Democracy and a Free Ukraine"
-
general rocket

- Modelling Gent and Scholar
- Posts: 2791
- Joined: May 1st, 2011, 4:42 pm
- Location: Telford
-
beany
- Fat git, glasses, goatie - Avoid!
- Posts: 4334
- Joined: April 6th, 2011, 11:05 am
- Location: Chellaston, Derby
Re: Matchbox 1/12 Vincent Black Shadow
Superb work James. One day I will get up the courage to that that on one of my 1/8th scale Revell Harleys. Where did you get the florist wire from please so I know where to shop?
2024 Acquired: 9 Built: 1
-
JamesPerrin
- Looks like his avatar
- Posts: 13695
- Joined: April 5th, 2011, 8:09 pm
- Location: W. Yorkshire
- Contact:
Re: Matchbox 1/12 Vincent Black Shadow
Cheers Al, from Ebay, also have a look at 0.3mm spring steel/piano wire straight lengths as these will be shiner and rounder.
Classic British Kits SIG Leader Better to fettle than to fill
(2024 A:B 5:2) (2023 13:8:7) (2022 21:11) (2021 15:8) (2020 8:4:4)
(2024 A:B 5:2) (2023 13:8:7) (2022 21:11) (2021 15:8) (2020 8:4:4)
-
beany
- Fat git, glasses, goatie - Avoid!
- Posts: 4334
- Joined: April 6th, 2011, 11:05 am
- Location: Chellaston, Derby
Re: Matchbox 1/12 Vincent Black Shadow
Thanks James - one packet of 0.3mm Florist Stub Wire duly ordered via eBay.JamesPerrin wrote: ↑October 18th, 2022, 3:49 pmCheers Al, from Ebay, also have a look at 0.3mm spring steel/piano wire straight lengths as these will be shiner and rounder.
2024 Acquired: 9 Built: 1
-
iggie

- Modelling Gent and Scholar
- Posts: 23438
- Joined: July 31st, 2013, 11:04 am
- Location: North Somercotes, Lincolnshire
- Contact:
Re: Matchbox 1/12 Vincent Black Shadow
Superb work James, that's going to look awesome when paired with it's opposite side!
Best wishes
Jim
If you can walk away from a landing, it's a good landing. If you use the airplane the next day, it's an outstanding landing
"Never put off till tomorrow, what you can do the day after tomorrow"
Jim
If you can walk away from a landing, it's a good landing. If you use the airplane the next day, it's an outstanding landing
"Never put off till tomorrow, what you can do the day after tomorrow"
-
JamesPerrin
- Looks like his avatar
- Posts: 13695
- Joined: April 5th, 2011, 8:09 pm
- Location: W. Yorkshire
- Contact:
Re: Matchbox 1/12 Vincent Black Shadow
Thanks. It does
Classic British Kits SIG Leader Better to fettle than to fill
(2024 A:B 5:2) (2023 13:8:7) (2022 21:11) (2021 15:8) (2020 8:4:4)
(2024 A:B 5:2) (2023 13:8:7) (2022 21:11) (2021 15:8) (2020 8:4:4)
-
TeeELL

- Modelling Gent and Scholar
- Posts: 11633
- Joined: December 28th, 2015, 4:38 pm
- Location: North Wiltshire
Re: Matchbox 1/12 Vincent Black Shadow
James,
for future reference, think about using acupuncture needles, the finer ones are 0.2mm, they are bright steel and bend readily.
for future reference, think about using acupuncture needles, the finer ones are 0.2mm, they are bright steel and bend readily.
Tony
The older I get the better I was!
Current build:
Airfix 1:72 Javelin FAW9
Particular modelling interests:
Cuban Airforce aircraft, 29(F) Sqn aircraft, Aircraft I’ve flown
The older I get the better I was!
Current build:
Airfix 1:72 Javelin FAW9
Particular modelling interests:
Cuban Airforce aircraft, 29(F) Sqn aircraft, Aircraft I’ve flown
-
JohnRatzenberger

- Why is he so confused ?
- Posts: 15736
- Joined: April 5th, 2011, 3:42 pm
- Location: Living on a sandbar - Nags Head, NC.
Re: Matchbox 1/12 Vincent Black Shadow
Being the victim of self-stabbing with wire ends, I have noted your little 1-2 device above - Thanks !!
Meanwhile my eyes some recovery time just trying to follow this - I cannot imagine even doing it.
Meanwhile my eyes some recovery time just trying to follow this - I cannot imagine even doing it.
John Ratzenberger 
It's my model and I'll do what I want with it.
It's my model and I'll do what I want with it.
-
JamesPerrin
- Looks like his avatar
- Posts: 13695
- Joined: April 5th, 2011, 8:09 pm
- Location: W. Yorkshire
- Contact:
Re: Matchbox 1/12 Vincent Black Shadow
Cheers all. I made some efficiencies to the process.
Bend two wires at a time. More and it becomes harder to align and grip.
I drilled 4 more of the larger holes so I could load it with 5 spoke nuts at a time and not have to swap between tweezers and pliers all the time.
Bend two wires at a time. More and it becomes harder to align and grip.
I drilled 4 more of the larger holes so I could load it with 5 spoke nuts at a time and not have to swap between tweezers and pliers all the time.
Classic British Kits SIG Leader Better to fettle than to fill
(2024 A:B 5:2) (2023 13:8:7) (2022 21:11) (2021 15:8) (2020 8:4:4)
(2024 A:B 5:2) (2023 13:8:7) (2022 21:11) (2021 15:8) (2020 8:4:4)
Re: Matchbox 1/12 Vincent Black Shadow
Looking good!
Of course there's only one song to listen to while building it
https://youtu.be/j0kJdrfzjAg
Of course there's only one song to listen to while building it
https://youtu.be/j0kJdrfzjAg
-
fredk

- Modelling Gent and Scholar
- Posts: 6196
- Joined: May 1st, 2012, 6:25 am
- Location: Donaghadee, N'rn Ir'n
Re: Matchbox 1/12 Vincent Black Shadow
I'm not sure all those nubs were valves
Racing and semi-racing motorcycles were fitted with special bolts & nuts on the rim to stop the tyre from coming off on hard cornering or hard acceleration. The valve through the rim acted as one and the other two would have been at equidistance around the rim
I fit them to my Austin 7 wheel rims as they are basically the same as motorcycle wheels
Al speling misteaks aer all mi own werk..
Its not just how good your painting is, its how good the touch-ups are too.
Its not just how good your painting is, its how good the touch-ups are too.
-
Impisi

- Modelling Gent and Scholar
- Posts: 2024
- Joined: November 6th, 2020, 10:28 pm
- Location: Germany
Re: Matchbox 1/12 Vincent Black Shadow
Oh Dear, it looks great but thinking of doing it ...