Academy 1/35 Merkava Mk.IV LIC
-
iggie

- Modelling Gent and Scholar
- Posts: 23438
- Joined: July 31st, 2013, 11:04 am
- Location: North Somercotes, Lincolnshire
- Contact:
Re: Academy 1/35 Merkava Mk.IV LIC
Looking suitably menacing!
Best wishes
Jim
If you can walk away from a landing, it's a good landing. If you use the airplane the next day, it's an outstanding landing
"Never put off till tomorrow, what you can do the day after tomorrow"
Jim
If you can walk away from a landing, it's a good landing. If you use the airplane the next day, it's an outstanding landing
"Never put off till tomorrow, what you can do the day after tomorrow"
-
Stuart

- Raider of the Lost Ark Royal
- Posts: 19451
- Joined: February 25th, 2013, 4:55 pm
- Location: North Wales
- Contact:
Re: Academy 1/35 Merkava Mk.IV LIC
Sorry, I've missed most of this FM - I'm very impressed with your work thus far, it really is an impressive beast!
Stuart Templeton I may not be good but I'm slow...
My Blog: https://stuartsscalemodels.blogspot.com/
My Blog: https://stuartsscalemodels.blogspot.com/
-
Clashcityrocker

- Modelling Gent and Scholar
- Posts: 10827
- Joined: May 1st, 2011, 12:31 am
- Location: Adelaide. South Australia
Re: Academy 1/35 Merkava Mk.IV LIC
For such a large tank the gun looks short, or is most of it inside the turret?
Nigel
Nigel
-
flakmonkey

- Modelling Gent and Scholar
- Posts: 3489
- Joined: April 6th, 2011, 9:58 am
- Location: Down in the tube station at midnight
- Contact:
Re: Academy 1/35 Merkava Mk.IV LIC
It's practically the same 120mm smooth bore gun that is used in the M1 Abrams, and much of it is indeed inside very large turret.Clashcityrocker wrote: ↑November 3rd, 2023, 5:21 am For such a large tank the gun looks short, or is most of it inside the turret?
Nigel
Would ya like to learn to fly? Would ya? Would you like to see me try?
-
flakmonkey
- Modelling Gent and Scholar
- Posts: 3489
- Joined: April 6th, 2011, 9:58 am
- Location: Down in the tube station at midnight
- Contact:
Re: Academy 1/35 Merkava Mk.IV LIC
Gentlemen, there is no easy way to do the Merkava's ball and chain armour.
I spent many hours assembling Academy's photo etch and styrene version, which is nice, but it has no weight to it. As a result, you're left with PE all over the place and I found the overall effect entirely unconvincing.
The only way to do this properly is to bite the bullet, and use some jewelry items.
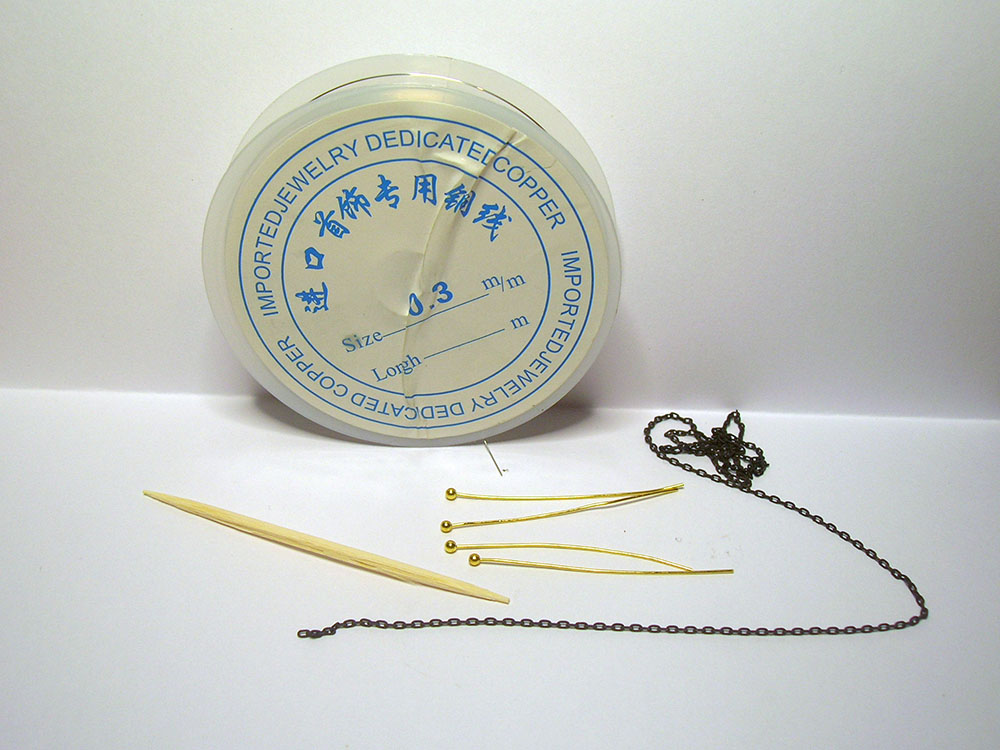
Those little brass pins there are called "ball pins". I winced as I typed that.
The chain is just some random jewelry chain and the wire is 0.3mm jewelry wire. The plan is to assemble each section, using the kit's PE as a guide, using the wire as a handy hanger. I shall make the mounting brackets and face plates from litho plate.
I'll demonstrate the technique in greater detail in due course. Believe it or not it's actually easier than assembling the kit's armour.
Not much easier. But easier.
This will take a little while.
I spent many hours assembling Academy's photo etch and styrene version, which is nice, but it has no weight to it. As a result, you're left with PE all over the place and I found the overall effect entirely unconvincing.
The only way to do this properly is to bite the bullet, and use some jewelry items.
Those little brass pins there are called "ball pins". I winced as I typed that.
The chain is just some random jewelry chain and the wire is 0.3mm jewelry wire. The plan is to assemble each section, using the kit's PE as a guide, using the wire as a handy hanger. I shall make the mounting brackets and face plates from litho plate.
I'll demonstrate the technique in greater detail in due course. Believe it or not it's actually easier than assembling the kit's armour.
Not much easier. But easier.
This will take a little while.
Would ya like to learn to fly? Would ya? Would you like to see me try?
-
iggie
- Modelling Gent and Scholar
- Posts: 23438
- Joined: July 31st, 2013, 11:04 am
- Location: North Somercotes, Lincolnshire
- Contact:
Re: Academy 1/35 Merkava Mk.IV LIC
That's a nice lot of...ahem...balls 
Best wishes
Jim
If you can walk away from a landing, it's a good landing. If you use the airplane the next day, it's an outstanding landing
"Never put off till tomorrow, what you can do the day after tomorrow"
Jim
If you can walk away from a landing, it's a good landing. If you use the airplane the next day, it's an outstanding landing
"Never put off till tomorrow, what you can do the day after tomorrow"
Re: Academy 1/35 Merkava Mk.IV LIC
Like marriage. The old ball and chain.
"We're going to need a bigger boat"
-
B4en

- Modelling Gent and Scholar
- Posts: 1145
- Joined: February 8th, 2014, 9:58 am
- Location: South Yorkshire
Re: Academy 1/35 Merkava Mk.IV LIC
I wondered when you'd give up on those nasty PE chains!  I'll resist the many pun temptations and just say have fun with the tweezers... and get some kneepads for searching the floor.
The past, present, and future walked into a bar. It was tense.
-
Stuart
- Raider of the Lost Ark Royal
- Posts: 19451
- Joined: February 25th, 2013, 4:55 pm
- Location: North Wales
- Contact:
Re: Academy 1/35 Merkava Mk.IV LIC
So it's balls to the balls?
Stuart Templeton I may not be good but I'm slow...
My Blog: https://stuartsscalemodels.blogspot.com/
My Blog: https://stuartsscalemodels.blogspot.com/
-
flakmonkey
- Modelling Gent and Scholar
- Posts: 3489
- Joined: April 6th, 2011, 9:58 am
- Location: Down in the tube station at midnight
- Contact:
Re: Academy 1/35 Merkava Mk.IV LIC
Thanks to everybody who looked at my balls.
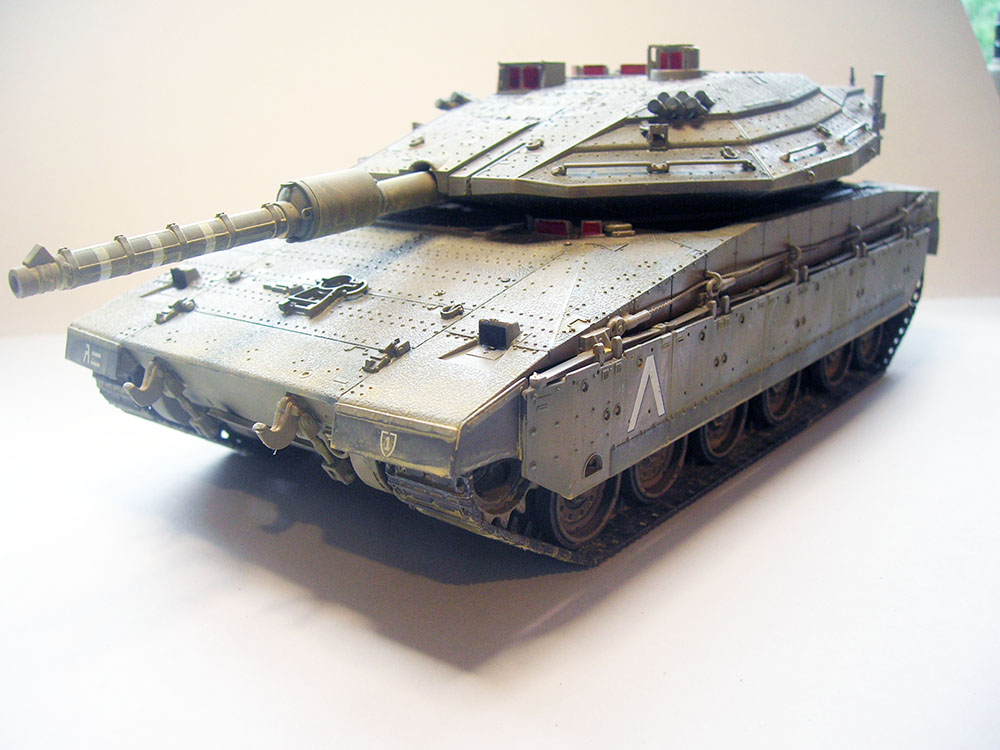
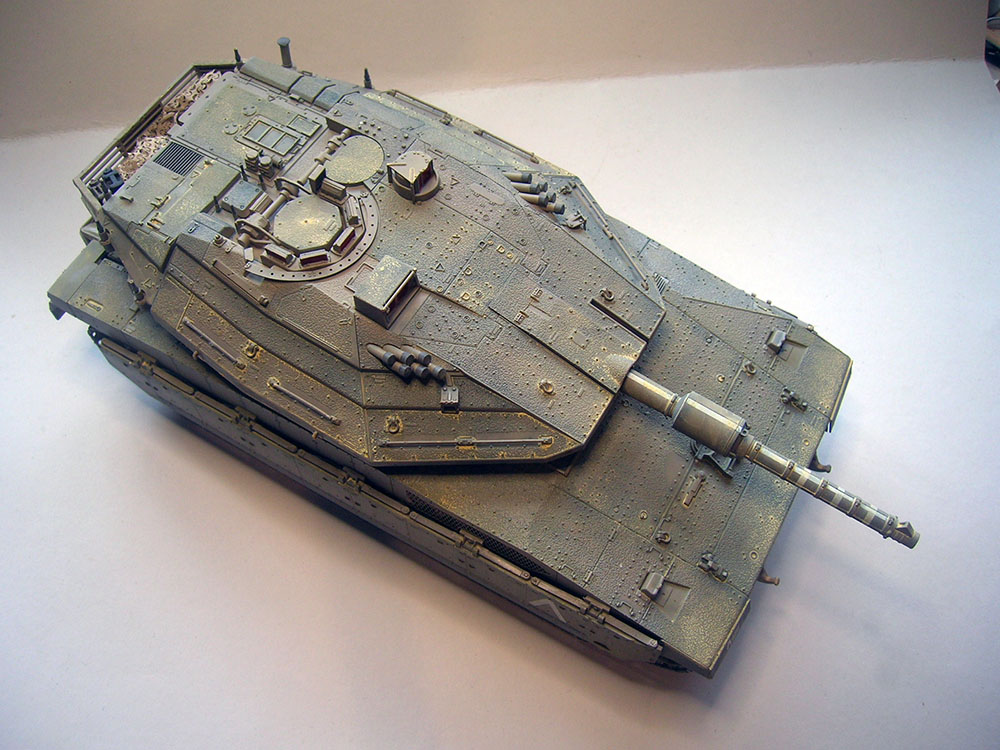
Project ball & chain continues in the background, but in the meantime I have now applied all the decals and completed the detail painting.

I am now almost ready for the filtering and washing. I still need to attach the PE cage armour for the optics and also to replace an antenna base that I clumsily knocked off. Fear not gentle reader, for I have spares.
As far as weathering goes, I shall omit the chipping stage as IDF tankers are held to very strict standards of maintenance which include immediate overpainting of damaged areas. Also bear in mind that the anti slip coating, which covers much of the vehicle, never displays any kind of chipping. Dust? Yes, plenty of that. There will be dust.
These vehicles also rarely display a surfeit of stowage, and so I have restricted myself to a bundle of camo net, a couple of diesel cans and a coolant can, some H2O for the crew, and a roll of barbed wire casually looped over a convenient antenna.

The banners that carry the unit tactical markings are just tissue paper, painted with the unfaded version of Mig Ammo Sinai Grey, and tweaked with diluted Mig Ammo Ultra Glue for shaping.
I am convinced, gentlemen, that there is a special department within the IDF whose sole purpose is to challenge modelers and drive them to the point of insanity. Sweden's Flygvapnet employed a similar department in the 1970s, which gave us the infamous SAAB Viggen splinter camo scheme.
Project ball & chain continues in the background, but in the meantime I have now applied all the decals and completed the detail painting.
I am now almost ready for the filtering and washing. I still need to attach the PE cage armour for the optics and also to replace an antenna base that I clumsily knocked off. Fear not gentle reader, for I have spares.
As far as weathering goes, I shall omit the chipping stage as IDF tankers are held to very strict standards of maintenance which include immediate overpainting of damaged areas. Also bear in mind that the anti slip coating, which covers much of the vehicle, never displays any kind of chipping. Dust? Yes, plenty of that. There will be dust.
These vehicles also rarely display a surfeit of stowage, and so I have restricted myself to a bundle of camo net, a couple of diesel cans and a coolant can, some H2O for the crew, and a roll of barbed wire casually looped over a convenient antenna.
The banners that carry the unit tactical markings are just tissue paper, painted with the unfaded version of Mig Ammo Sinai Grey, and tweaked with diluted Mig Ammo Ultra Glue for shaping.
The PE chains are really not the worst approach to the ball and chain armour, but I found it unsatisfactory. I think the method I have chosen is the best way of doing this essential job.
I am convinced, gentlemen, that there is a special department within the IDF whose sole purpose is to challenge modelers and drive them to the point of insanity. Sweden's Flygvapnet employed a similar department in the 1970s, which gave us the infamous SAAB Viggen splinter camo scheme.
Would ya like to learn to fly? Would ya? Would you like to see me try?
-
B4en
- Modelling Gent and Scholar
- Posts: 1145
- Joined: February 8th, 2014, 9:58 am
- Location: South Yorkshire
Re: Academy 1/35 Merkava Mk.IV LIC
You're approaching the chain problem the same way I would, except I'd have abandoned the flat 2d PE chains sooner. Rest of the build is looking good!flakmonkey wrote: ↑November 8th, 2023, 8:43 pm
The PE chains are really not the worst approach to the ball and chain armour, but I found it unsatisfactory. I think the method I have chosen is the best way of doing this essential job.
The past, present, and future walked into a bar. It was tense.
-
flakmonkey
- Modelling Gent and Scholar
- Posts: 3489
- Joined: April 6th, 2011, 9:58 am
- Location: Down in the tube station at midnight
- Contact:
Re: Academy 1/35 Merkava Mk.IV LIC
At least Academy made the effort, and it's hard to see how a mainstream manufacturer could do much better. Having said that, the PE approach would be better suited to 1/72 than 1/35.
Elsewhere, I have finished the weathering and am now ready to fit the final detail parts, including the home brewed ball and chain armour which is almost complete.

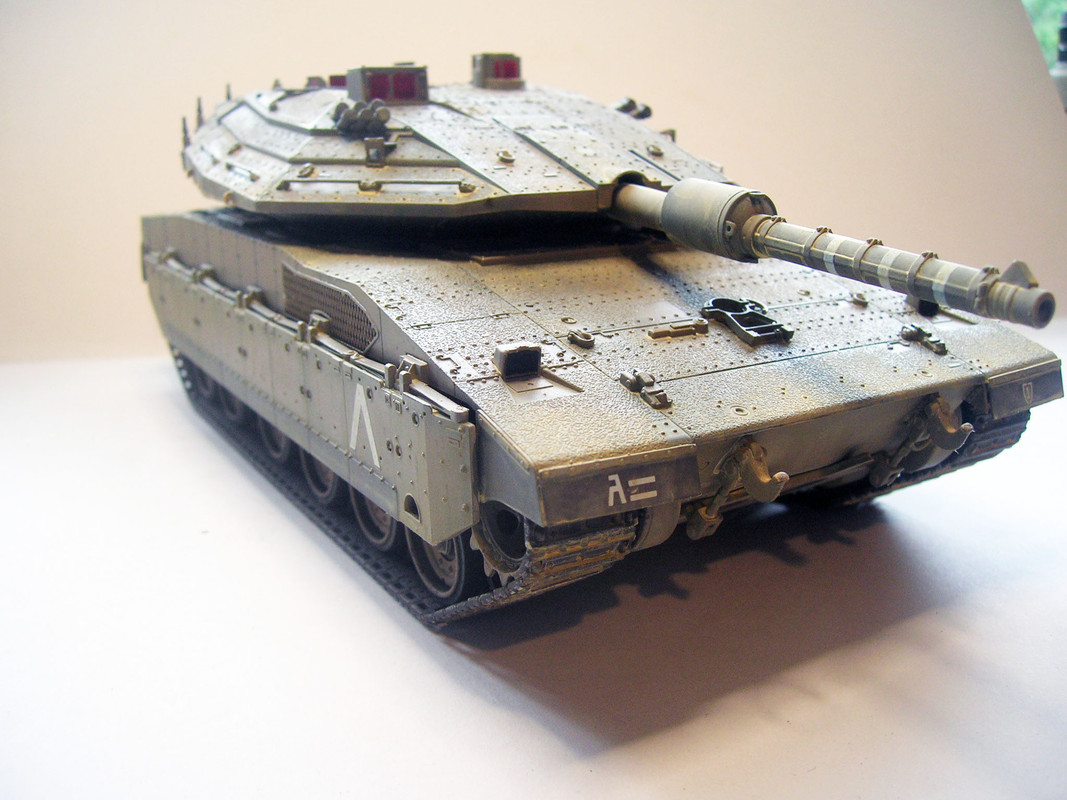
As usual, it's multiple layers of artists oil washes, starting with a very dilute Payne's Grey, and the final layer was a dusty sandy colour that was allowed to collect in the kinds of places dust and sand would collect.
It needs a couple of soft coats of Mig Ammo Ultra Matt Varnish now to complete, and possibly some pastel dust here and there.
Thanks for following along.
Would ya like to learn to fly? Would ya? Would you like to see me try?
-
ShaunW
- NOT the sheep
- Posts: 26188
- Joined: November 26th, 2011, 6:11 pm
- Location: Pontefract West Yorkshire
Re: Academy 1/35 Merkava Mk.IV LIC
This is coming along very nicely indeed. I'm sure those little balls on their chains will really look the part one they're all painted up and will be a significant improvement over the kit PE in 1/35th.
Doing - Tamiya 1/35th Universal Carrier.
Work is the curse of the modelling classes!
IPMS#12300
Work is the curse of the modelling classes!
IPMS#12300
-
iggie
- Modelling Gent and Scholar
- Posts: 23438
- Joined: July 31st, 2013, 11:04 am
- Location: North Somercotes, Lincolnshire
- Contact:
Re: Academy 1/35 Merkava Mk.IV LIC
Just a thought on the subject of balls, but would sink plug chain be about the right scale?
Best wishes
Jim
If you can walk away from a landing, it's a good landing. If you use the airplane the next day, it's an outstanding landing
"Never put off till tomorrow, what you can do the day after tomorrow"
Jim
If you can walk away from a landing, it's a good landing. If you use the airplane the next day, it's an outstanding landing
"Never put off till tomorrow, what you can do the day after tomorrow"
-
flakmonkey
- Modelling Gent and Scholar
- Posts: 3489
- Joined: April 6th, 2011, 9:58 am
- Location: Down in the tube station at midnight
- Contact:
Re: Academy 1/35 Merkava Mk.IV LIC
Unfortunately not. The chain I am using is from Master Tools and is intended for 1/200 ships. It's nominally 1.5x1.0mm per link. It's not expensive at all, it costs less than £5 for two 40cm lengths which is almost twice what you would need.

And, as promised, this is how the ball and chain assemblies go together. We looked previously at materials, which are jewelry ball pins, and 0.3mm jewelry wire. Obviously you also want the chain. Make sure it is brass, as brass can be easily cut with a knife which really does simplify matters.
You'll also want some gel type superglue for the final assembly of the complete sets of armour which we shall look at later in another post.

You'll also want to get your tools together, most or all of which you already have. You will want the narrowest needle nose pliers you can find. I managed to pick up a pair on Amazon very cheaply which are ideal for the job. You will also need some needle nose tweezers, your knife of choice, and your side cutters.

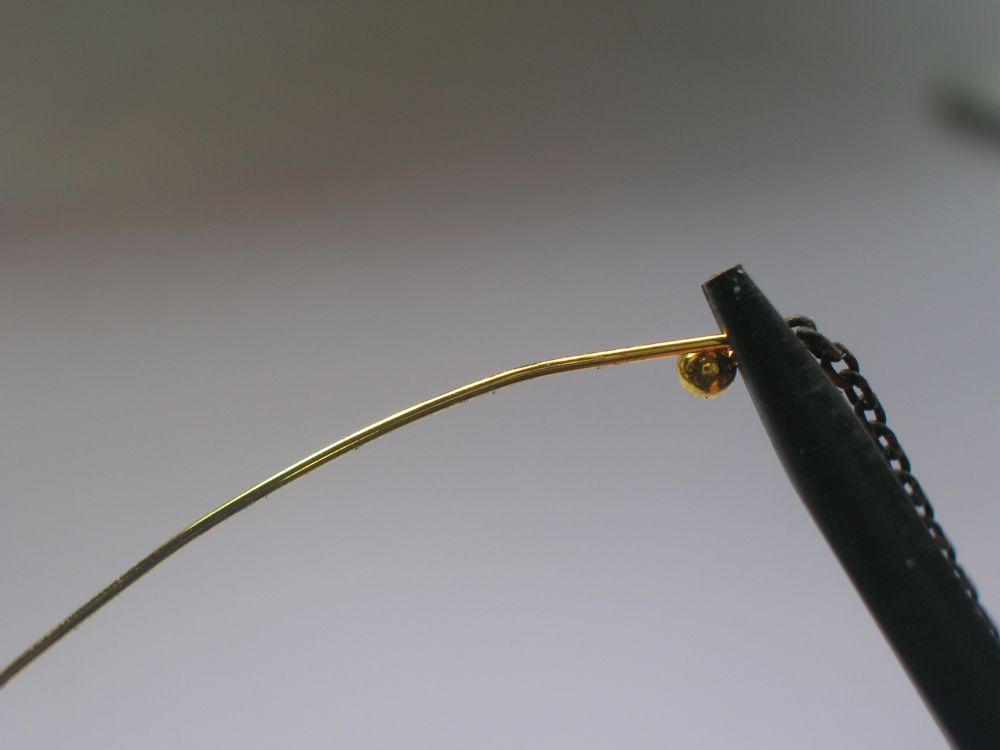
First thing you want to do then, is to form the loop on the ball pin right up close to the ball for the chain to hook onto. Form this around the needle nosed tweezers.
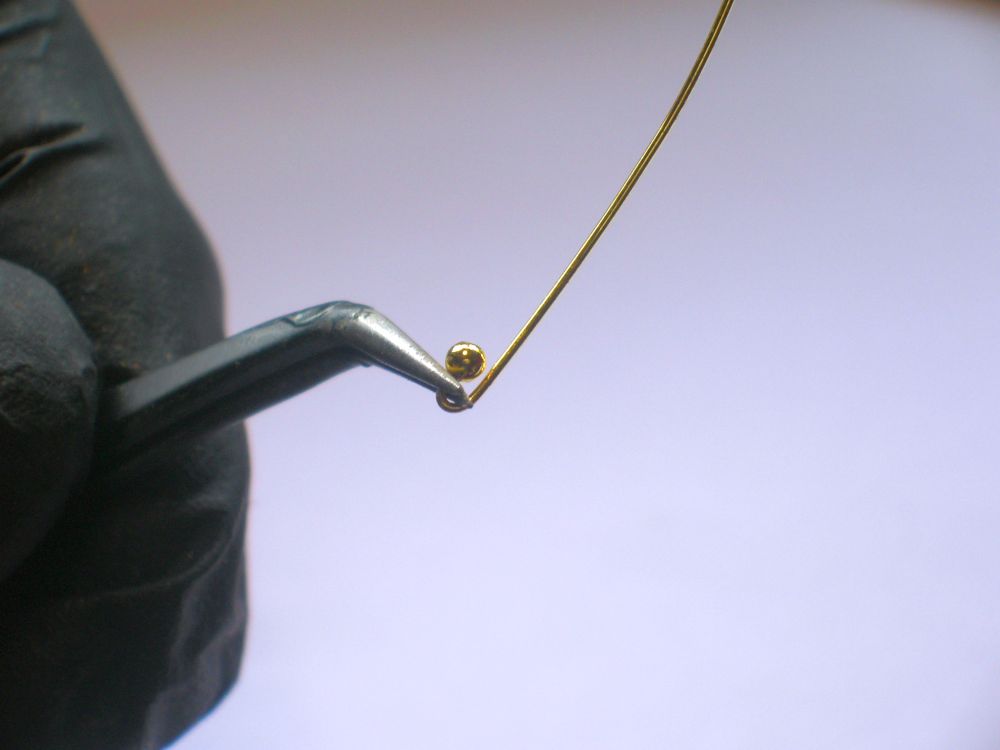
It will look something like this...
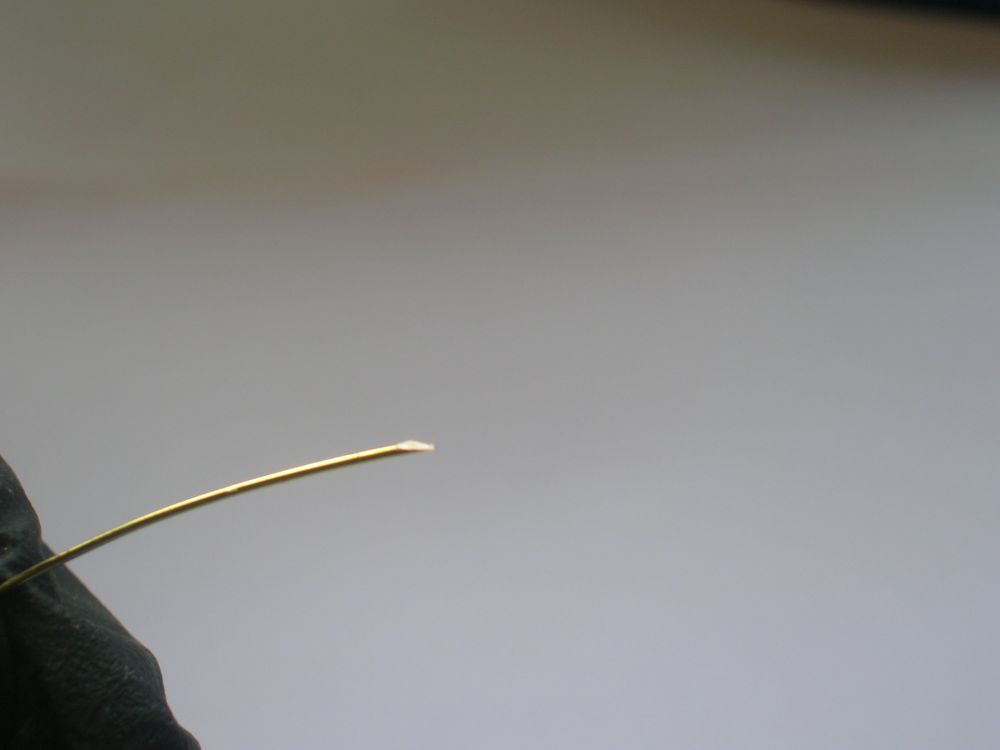
Optional, but highly recommended, is to cut off the end of the tail of the ball pin at a shallow angle to form a pointed end. This makes it much easier to thread the tail through a chain link.

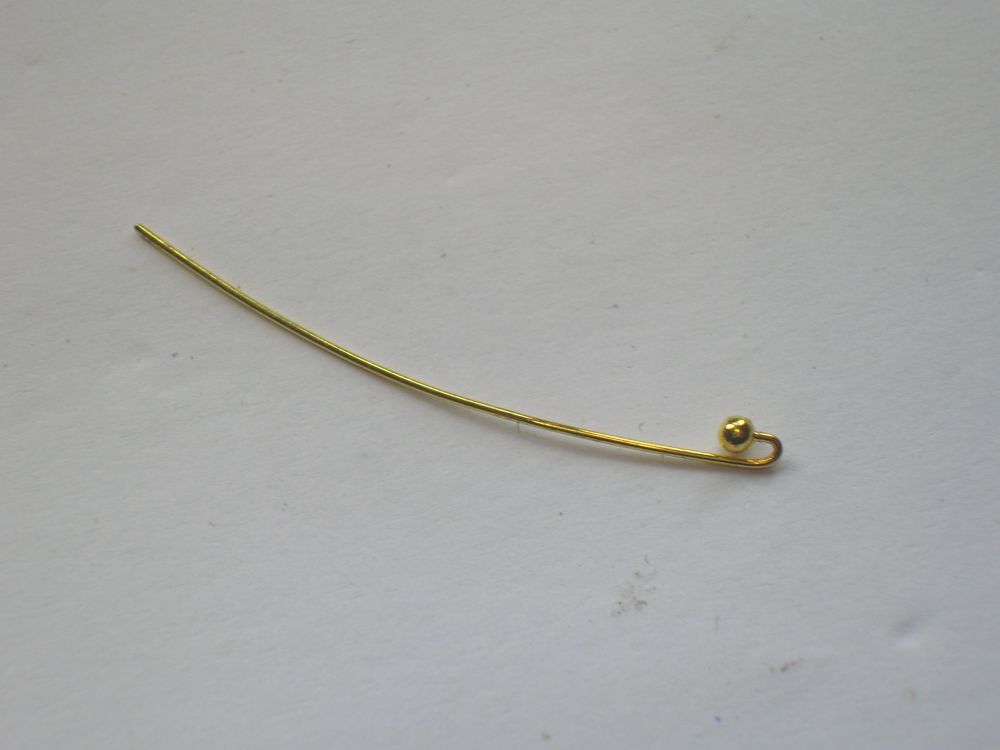
Thread the tail through the chain link, and pull the chain up into the loop. Then take your pliers and squeeze it up gently but firmly to form a kind of half a chain link. Now, don't do what I have done here, which is to remove it from the pliers just yet, because I have only done this to show what you are trying to achieve with this stage.

What you really want to do is, as soon as you have closed up that link, keep it firmly gripped in your pliers and then waggle the excess tail back and forth so that metal work-hardens and snaps off cleanly. You'll be left with something like this...

Cut to length with your knife of choice, give it a shake so that the cut off link drops out, and you're done.
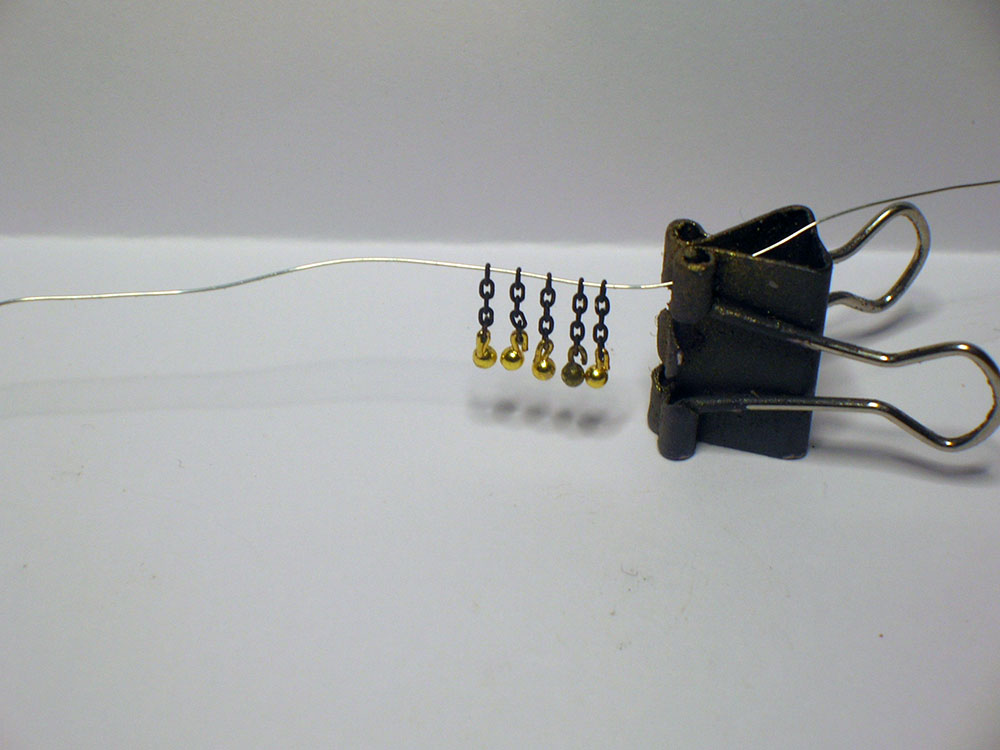
Thread the assembled ball and chain lengths onto some 0.3mm jewelry wire for safe keeping. I made mine in sets of the different required lengths and kept those together on their own wires.
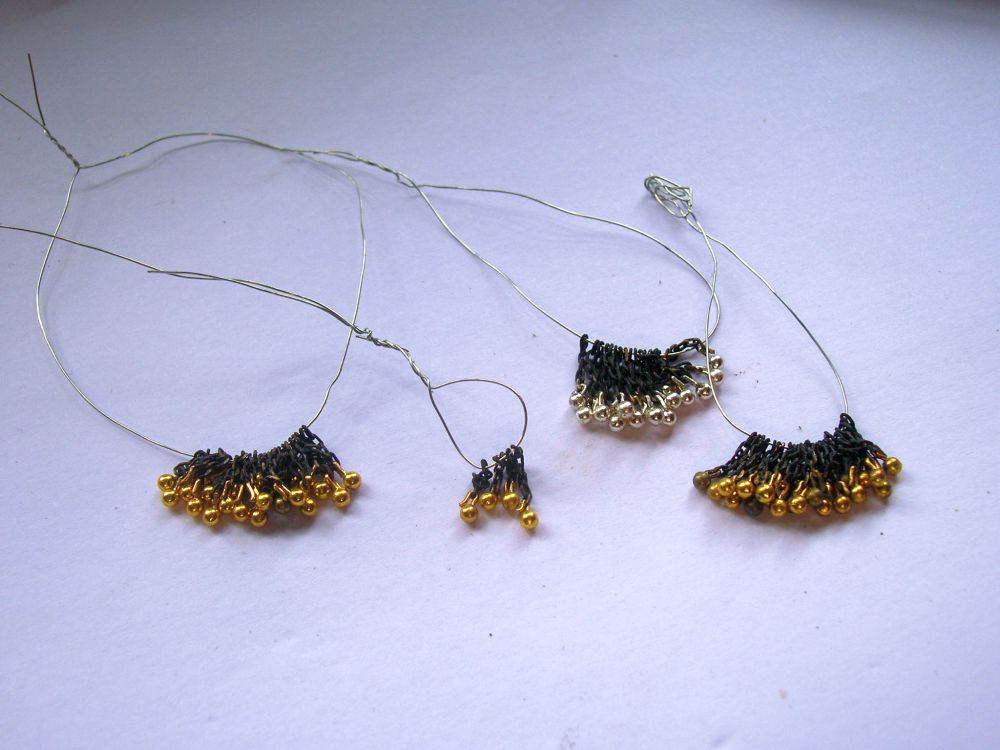
There are 66 lengths there, which is enough to do the whole job.
Elsewhere I have been doing some final detailing, such as these lovely PE embossed number plates. I sprayed them with Liquitex gloss white, left that 12 hours, then brush painted Mig Ammo washable black over the whole thing. That was left for ten or fifteen minutes then with a barely moist q-tip I gently swabbed away the washable black from the raised numbers.

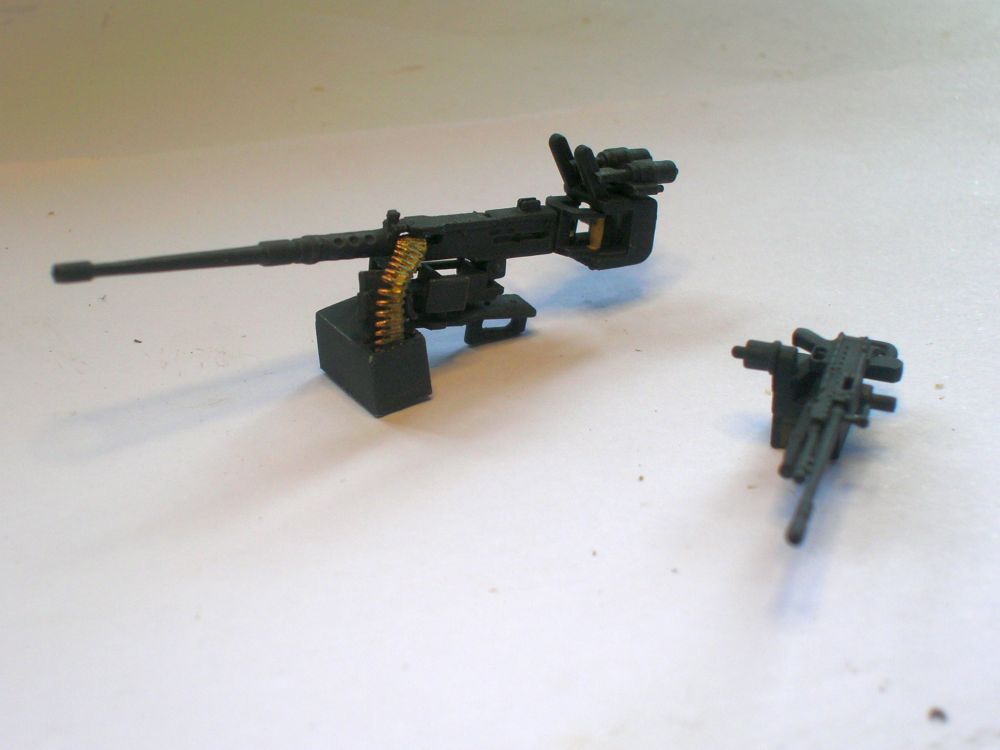
I have also assembled the commander's .30 cal MG and the remote controlled M2HB that sits on top of the gun mantlet. The M2HB's ammo belt is a spare from an M113 kit.
You'd think I'd had enough of chains by now, gentle reader, but there is one more to add. This is the frequently seen length of chain looped across the front towing eyes.
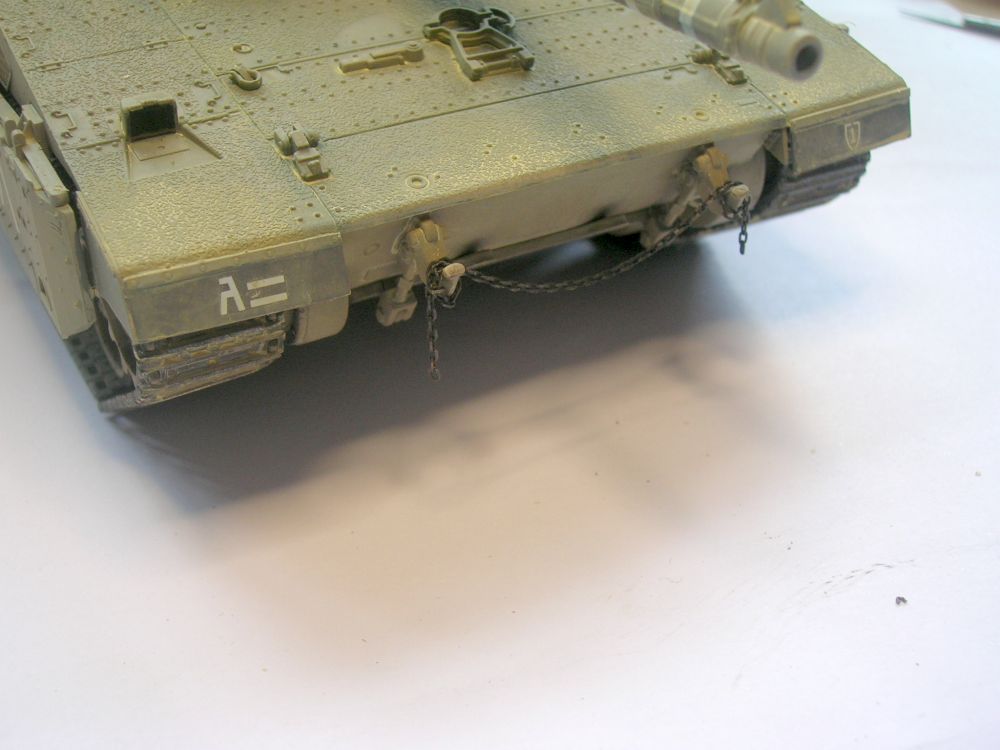
Clearly this is a security measure, and its purpose is, I am sure, to allow the crew to lock their 74 ton beast of war to a convenient lamp post or fence railing to prevent it from being taken by joyriders as they pop into Greggs for a sausage roll or bacon baguette.
Ok, thinking about it, probably not a sausage roll or a bacon baguette, but it's good to see that the IDF practices a doctrine of "lock it or lose it" all the same. Especially useful if you left Kevin the gunner asleep in the turret as you perused Greggs. The last thing you want is Kevin being taken on an armored death joyride by miscreants through the streets of Tel Aviv at a breakneck 32mph.

Would ya like to learn to fly? Would ya? Would you like to see me try?