Mike W's workbench thread
-
giulio_gobbi

- Modelling Gent and Scholar
- Posts: 1971
- Joined: May 4th, 2011, 8:37 pm
- Location: Naples, Italy
- Contact:
Re: Mike W's workbench thread
Well Done. Near To be perfect
Sometimes the talent consists exactly in that: try five dozen times when others stop at three dozen...! (F.Labelle)
I think that modeling is a subtle mix of zen philosophy and absolute crazyness - but in my case I would not dare to specify the respective percentage of each......
I think that modeling is a subtle mix of zen philosophy and absolute crazyness - but in my case I would not dare to specify the respective percentage of each......
-
BlohmWolf

- Modelling Gent and Scholar
- Posts: 2355
- Joined: May 15th, 2013, 11:21 pm
- Location: Down under, TAS.
Re: Mike W's workbench thread
Migrant and Mikeew:
Both real names are Mike.
Both make awesome models
Both go on UAMF
Both photos are very similar in style
Result: This a conspiracy that Mikeew and Migrant are secret twins separated at birth.
Both real names are Mike.
Both make awesome models
Both go on UAMF
Both photos are very similar in style
Result: This a conspiracy that Mikeew and Migrant are secret twins separated at birth.
"Can not finish a model at all"
"You can get more of what you want, with a kind word and a wallet, than just a kind word".
Currently Building: FROG Wildcat, Fokker DR1 Red baron and some other things...
"You can get more of what you want, with a kind word and a wallet, than just a kind word".
Currently Building: FROG Wildcat, Fokker DR1 Red baron and some other things...
-
AndrewR

- In the basement lab
- Posts: 24119
- Joined: April 5th, 2011, 4:13 pm
- Location: Ottawa, Ontario, The Great White North
- Contact:
Re: Mike W's workbench thread
Fortunately they don't resemble Danny Di Vito and Arnold Schwarzenegger. 
Up in the Great White North
-
Mikeew
- Active Participant
- Posts: 637
- Joined: May 1st, 2011, 9:36 am
- Location: Bexhill on-sea,East Sussex. UK
Re: Mike W's workbench thread
Thanks AndrewR and BlohmWolf, I think 
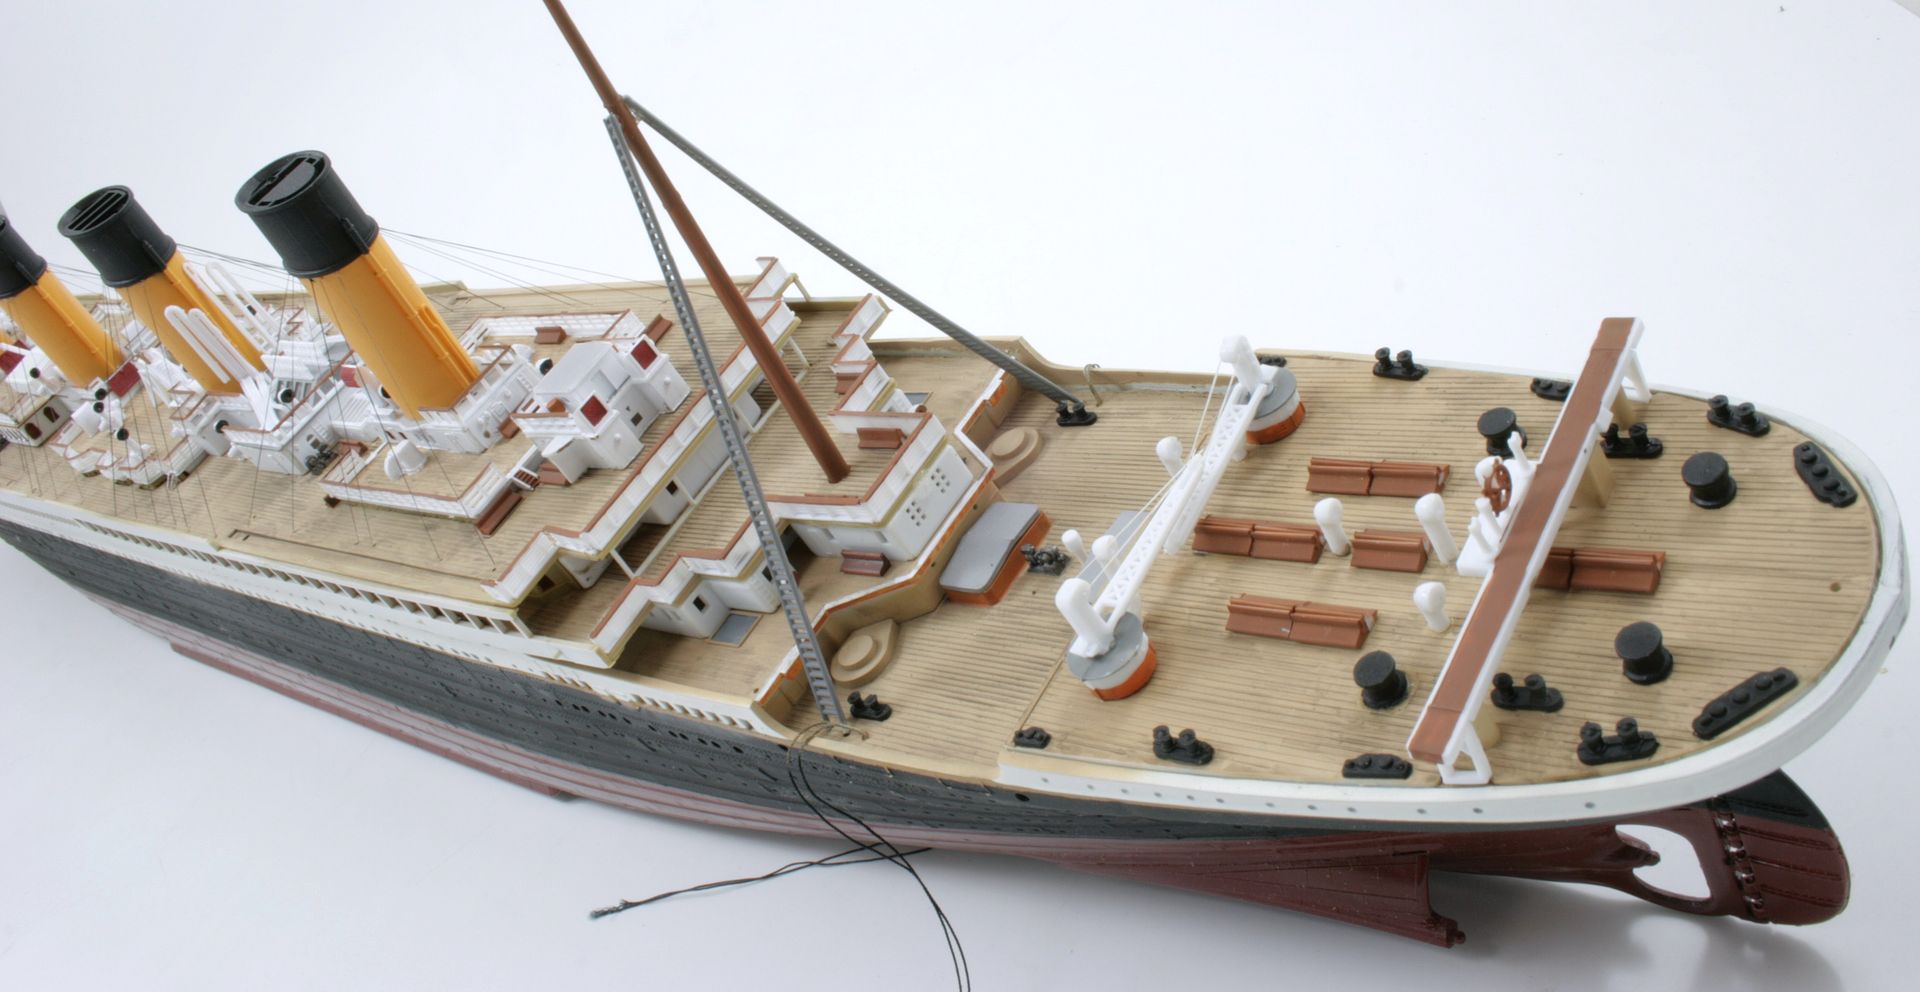
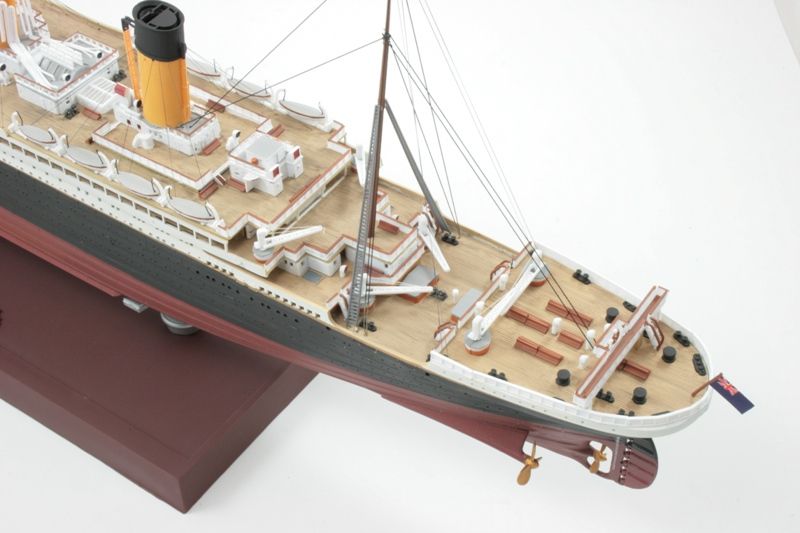
More on the Titanic build this week, need to get this finished up for a customer.
Slowly edging closer to the finish.
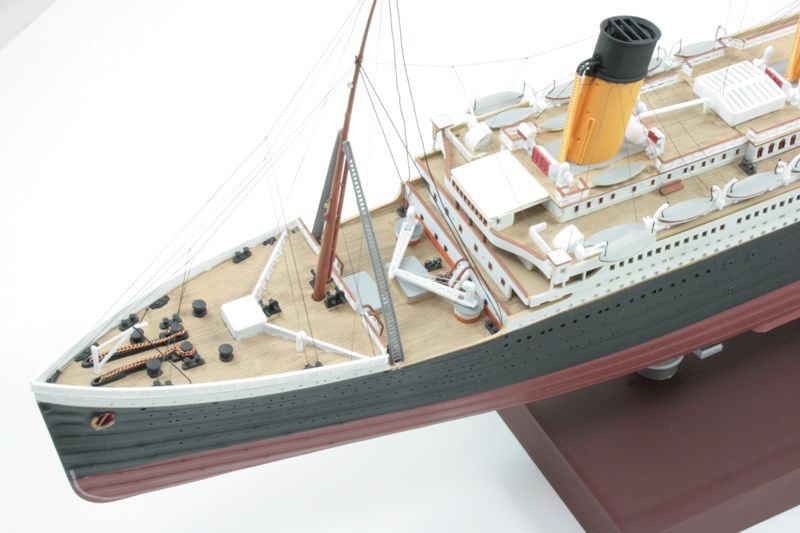
All decks are now fixed to the main hull. Both masts are fitted , just need some details adding likes (literally) bells and whistles.
I have done the rigging around the fore deck and mast just need to add some colour to the railing tops. The cranes have been built, painted and added to the foredeck also. Still have four more cranes to add at the rear deck areas.
The funnel struts and main rigging are done with stained Aeroclub rigging thread attached with CA. The railings are tricky as they come in one long run so need cutting to length then bending/fitting.
The lifeboats have been painted along with their davits (not pictured) and will be added later, all 16 of them, each made up of two halves
Next is the rigging around the rear deck, railings on the rear deck area and the main upper rigging between the two masts before attaching flags and decals and any touch ups needed here and there.
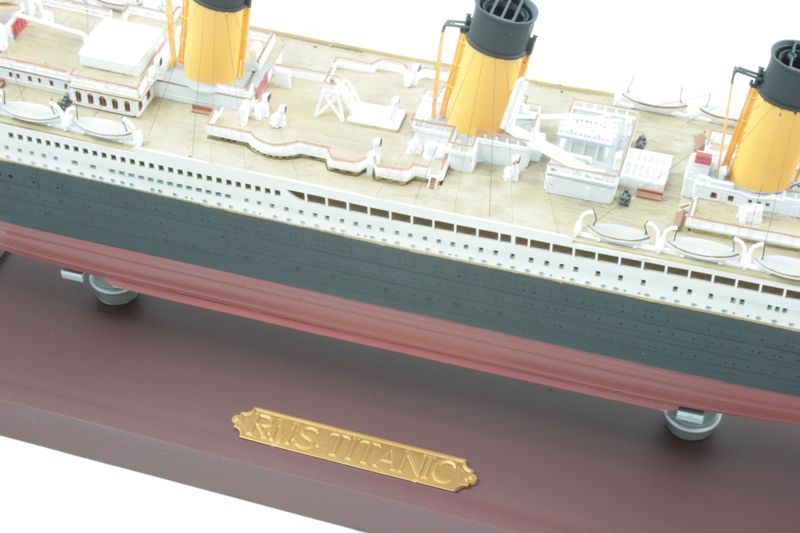
The Deck Tan colour on the decking areas was too bright and looked odd so it all got a thin wash to tone it down and add some interest.
It is difficult to photograph properly so apologies for the weird angles!
More on the Titanic build this week, need to get this finished up for a customer.
Slowly edging closer to the finish.
All decks are now fixed to the main hull. Both masts are fitted , just need some details adding likes (literally) bells and whistles.
I have done the rigging around the fore deck and mast just need to add some colour to the railing tops. The cranes have been built, painted and added to the foredeck also. Still have four more cranes to add at the rear deck areas.
The funnel struts and main rigging are done with stained Aeroclub rigging thread attached with CA. The railings are tricky as they come in one long run so need cutting to length then bending/fitting.
The lifeboats have been painted along with their davits (not pictured) and will be added later, all 16 of them, each made up of two halves
Next is the rigging around the rear deck, railings on the rear deck area and the main upper rigging between the two masts before attaching flags and decals and any touch ups needed here and there.
The Deck Tan colour on the decking areas was too bright and looked odd so it all got a thin wash to tone it down and add some interest.
It is difficult to photograph properly so apologies for the weird angles!


Re: Mike W's workbench thread
That looks really nice! 
Cheers,
Asoka
Cheers,
Asoka
Skill, Patience and Humbrol, with a hairy stick!
-
Mikeew
- Active Participant
- Posts: 637
- Joined: May 1st, 2011, 9:36 am
- Location: Bexhill on-sea,East Sussex. UK
Re: Mike W's workbench thread
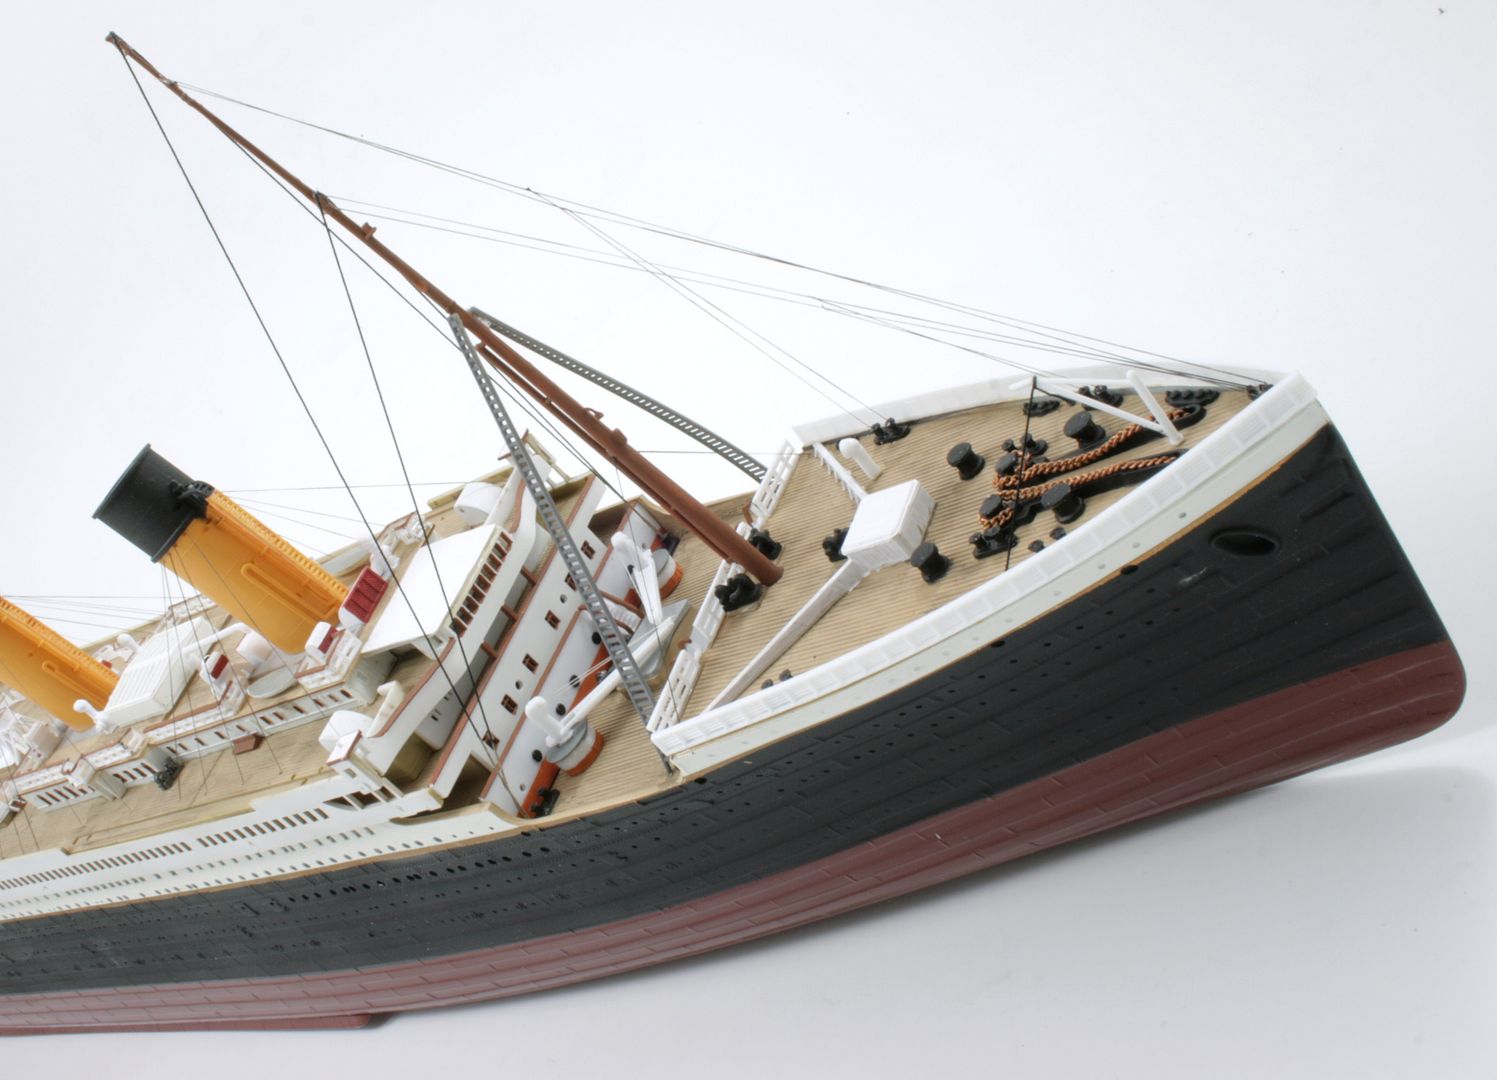
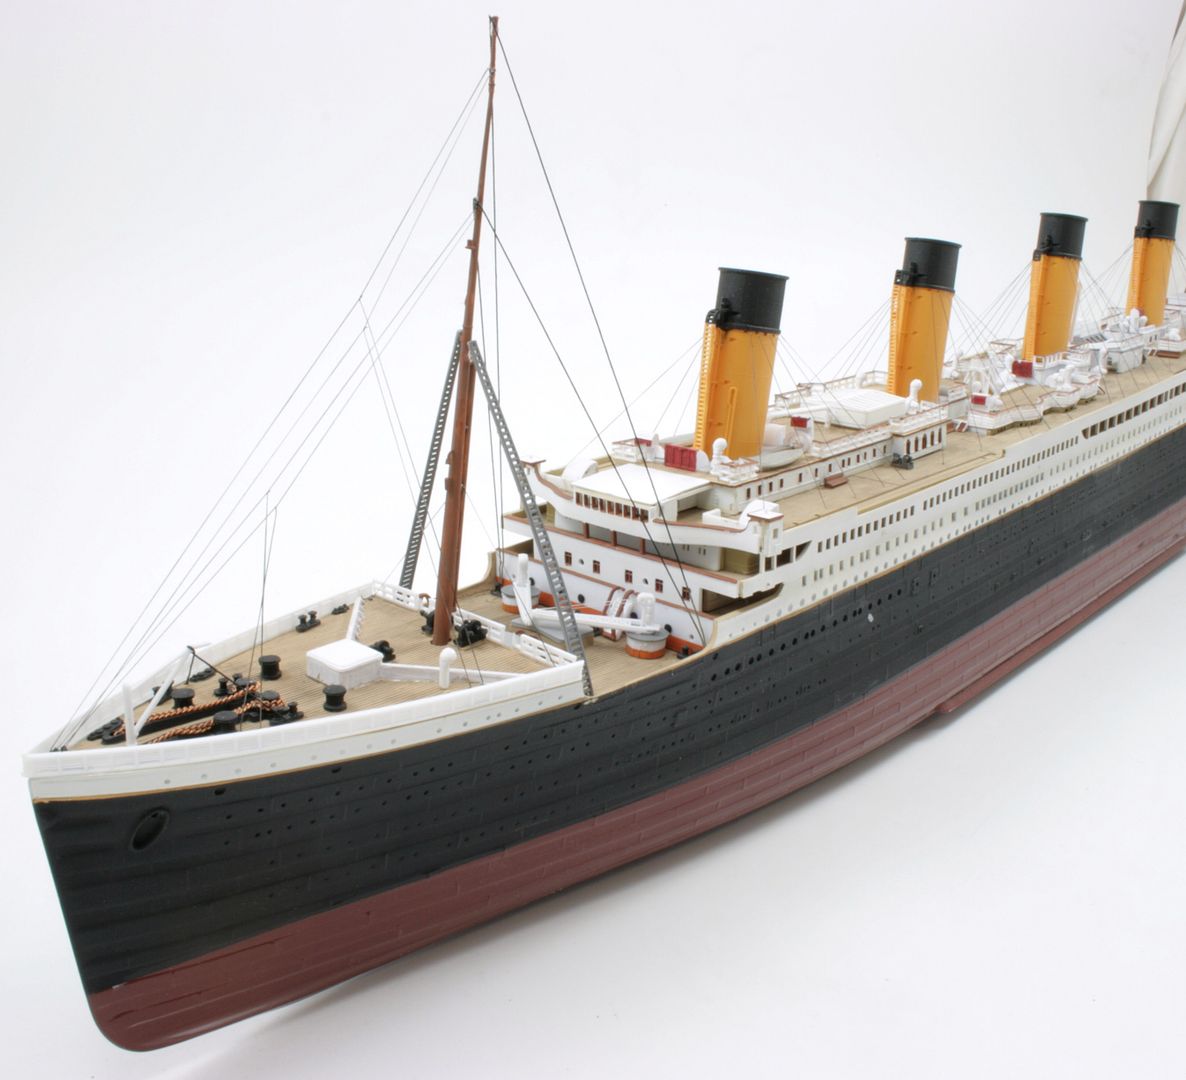
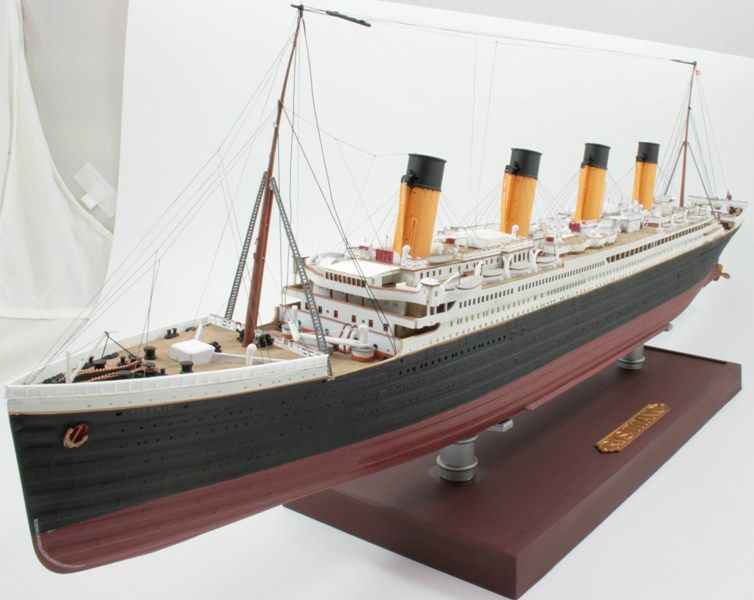
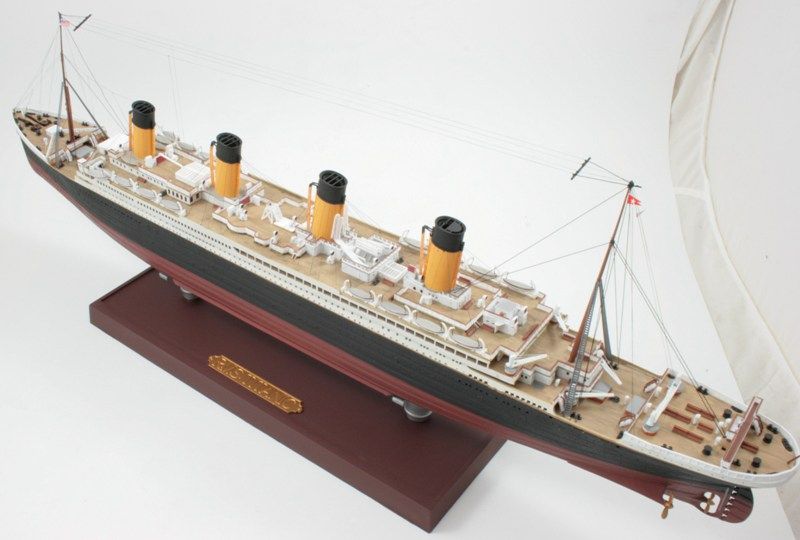
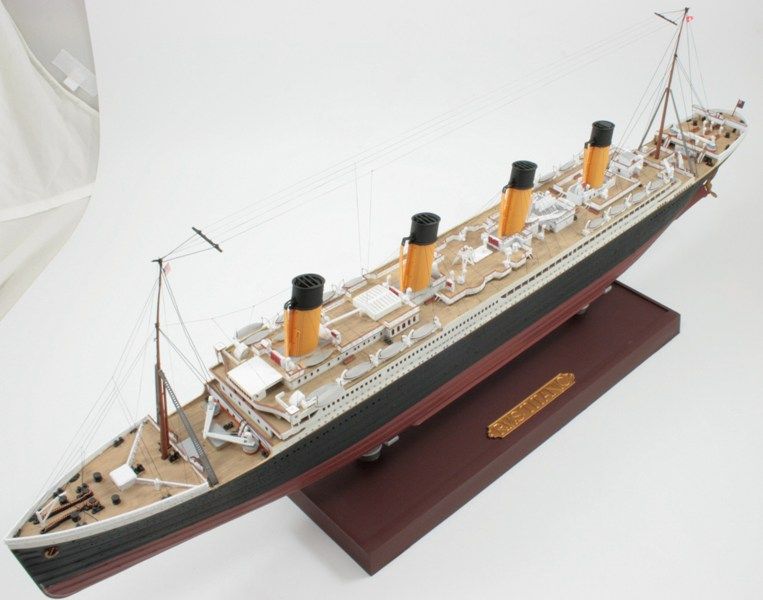
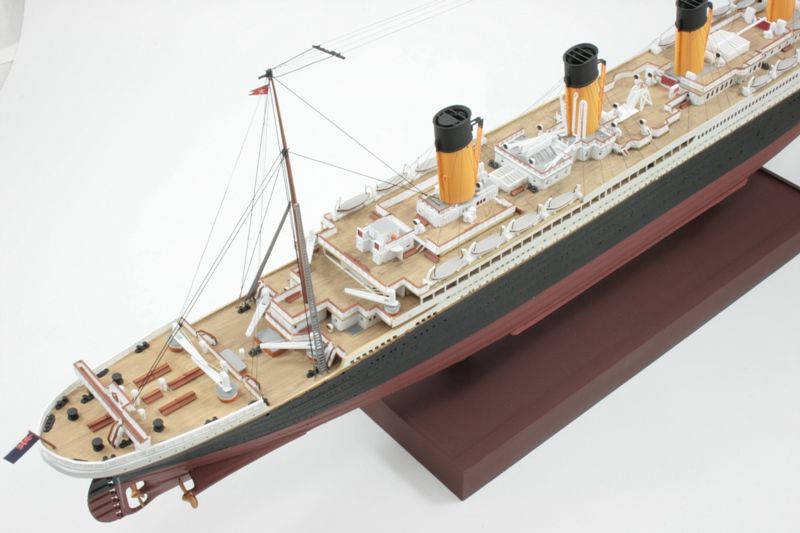
FINALLY!!!
Had this on the go for , oooooh........ must be a little over three years. Good job my customer was in no hurry.
Seriously though, he really did keep saying "There really is no rush!" and as he is a very good friend and lives locally he has been up to see it in progress, which I think is nice for him. I also have him as a friend on facebook so he can see updates there too via my model page.
It was a bit of a different subject for me, as most of you now aeroplanes are my bread and butter, so this was a real break from the old routine for me.
The biggest pain in the neck to fit was the railings, they come in stripss and needed cutting to length for each piece. A tedious job made all the more tricky in that the plastic was very brittle and prone to snapping. Some pieces needed bending to curve like round the bow and stern (especially the stern) and did not take kindly to me trying to bend them, using hot water to soften them helped to a degree but they are moulded in white plastic which is inherently more brittle than grey.
The rigging was the headache over the last week or so. I used the kit supplied cotton for some of the wires and stretchy thread for others all superglued into place and stained with black ink.
Paint used on here was a real mish mash; Tamiya, Gunze and Vallejo acrylics, Alclad lacquers and Revell and Humbrol enamels.
I have not covered half of what was involved as quite simply I have forgotten! But I am very pleased with it now it is done, just need a case for it to stop it A:getting broken and B:becoming a dust magnet.
As you can see, it was awkward to photograph in its entirety in the constraints of my light tent.
I hope you like her and please, ask any questions and I will endeavour to recollect the details.....


-
Stuart

- Raider of the Lost Ark Royal
- Posts: 19451
- Joined: February 25th, 2013, 4:55 pm
- Location: North Wales
- Contact:
Re: Mike W's workbench thread
Simply stunning!
Stuart Templeton I may not be good but I'm slow...
My Blog: https://stuartsscalemodels.blogspot.com/
My Blog: https://stuartsscalemodels.blogspot.com/
-
Dirkpitt289

- NUMA's Auto Mechanic
- Posts: 8724
- Joined: May 2nd, 2011, 1:55 am
- Location: New jersey USA
- Contact:
Re: Mike W's workbench thread
Beautiful build
.... Dirk
Beware of the DOG's of WAR
My Youtube Channel
https://www.youtube.com/user/ModelingGu ... rid&view=0
Beware of the DOG's of WAR
My Youtube Channel
https://www.youtube.com/user/ModelingGu ... rid&view=0
-
giulio_gobbi
- Modelling Gent and Scholar
- Posts: 1971
- Joined: May 4th, 2011, 8:37 pm
- Location: Naples, Italy
- Contact:
Re: Mike W's workbench thread
It's a beatiful build, congrats.
Regards
Regards
Sometimes the talent consists exactly in that: try five dozen times when others stop at three dozen...! (F.Labelle)
I think that modeling is a subtle mix of zen philosophy and absolute crazyness - but in my case I would not dare to specify the respective percentage of each......
I think that modeling is a subtle mix of zen philosophy and absolute crazyness - but in my case I would not dare to specify the respective percentage of each......
-
Mikeew
- Active Participant
- Posts: 637
- Joined: May 1st, 2011, 9:36 am
- Location: Bexhill on-sea,East Sussex. UK
Re: Mike W's workbench thread
Thanks everyone, my customer was over the moon with it.
Next.....
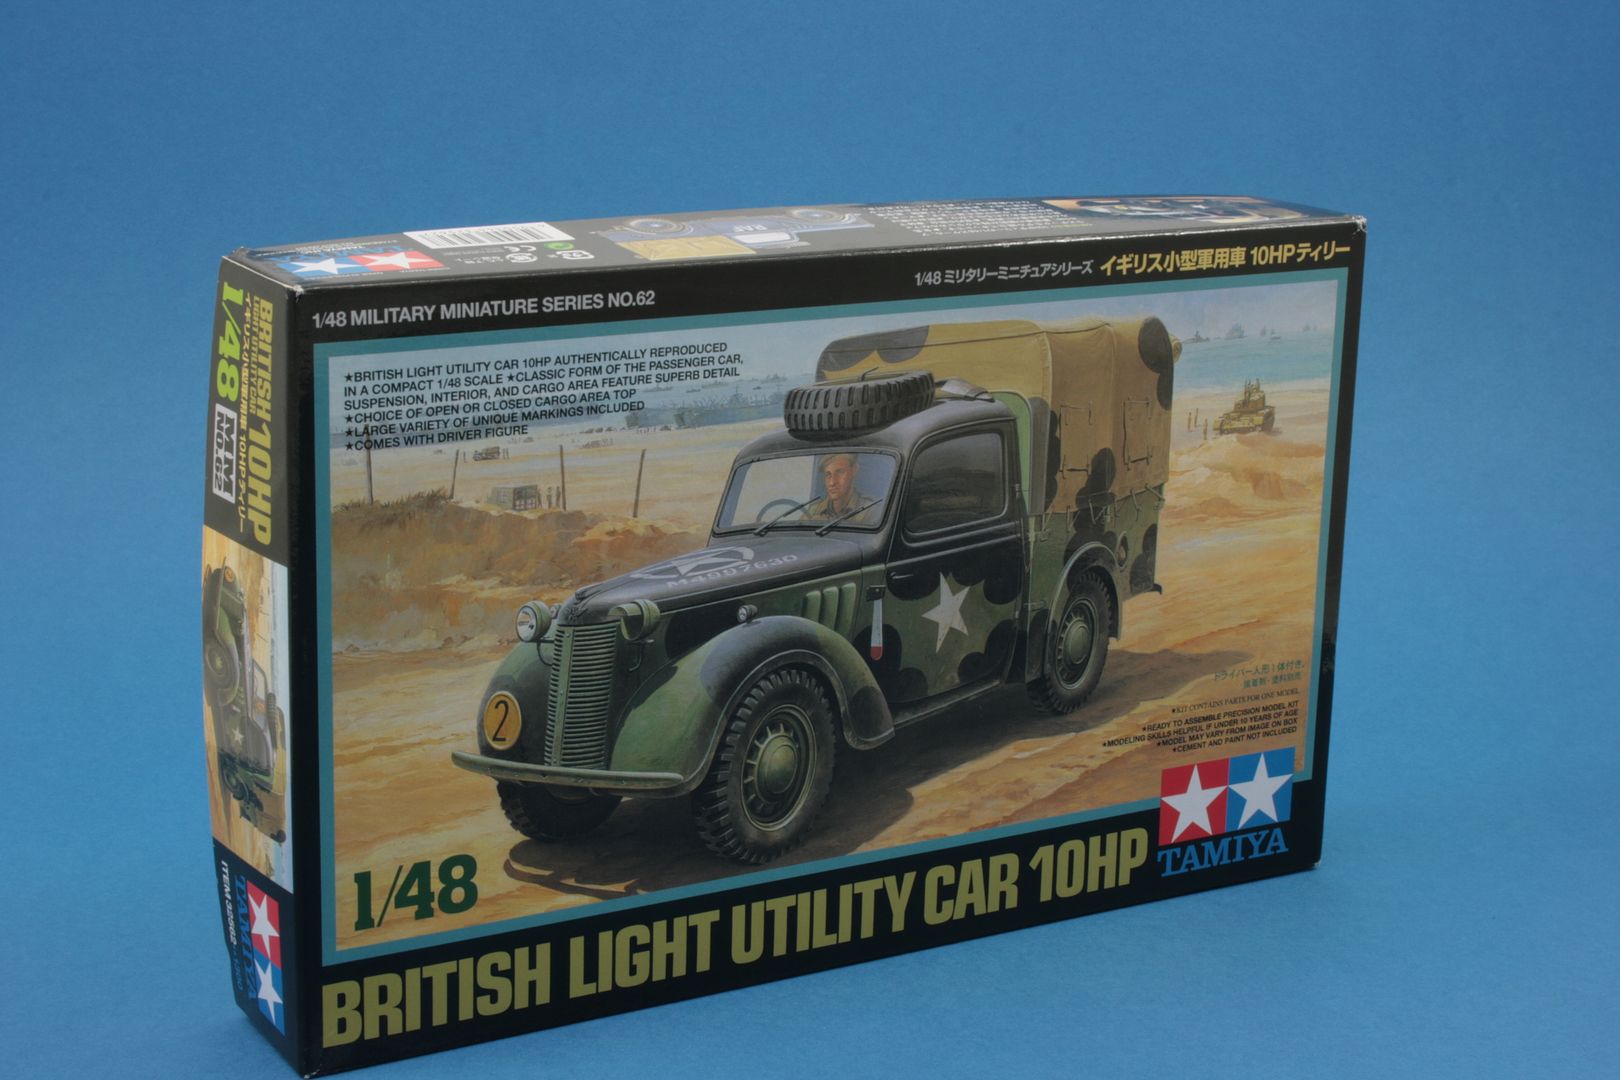
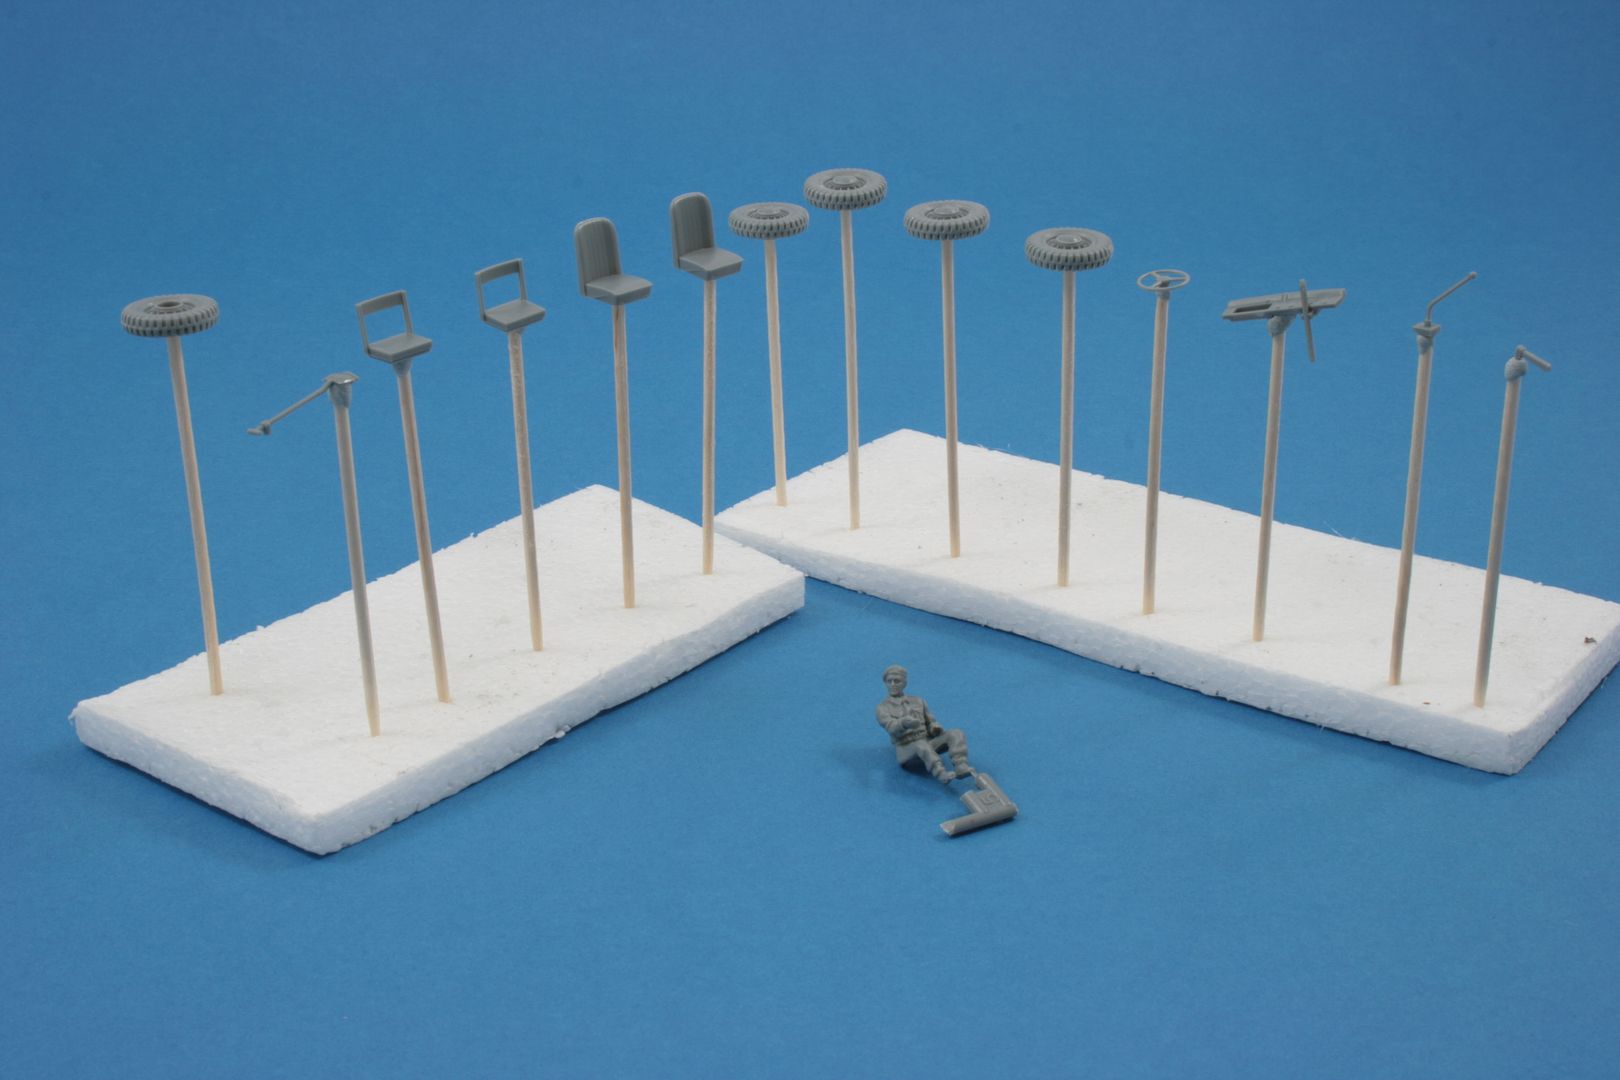
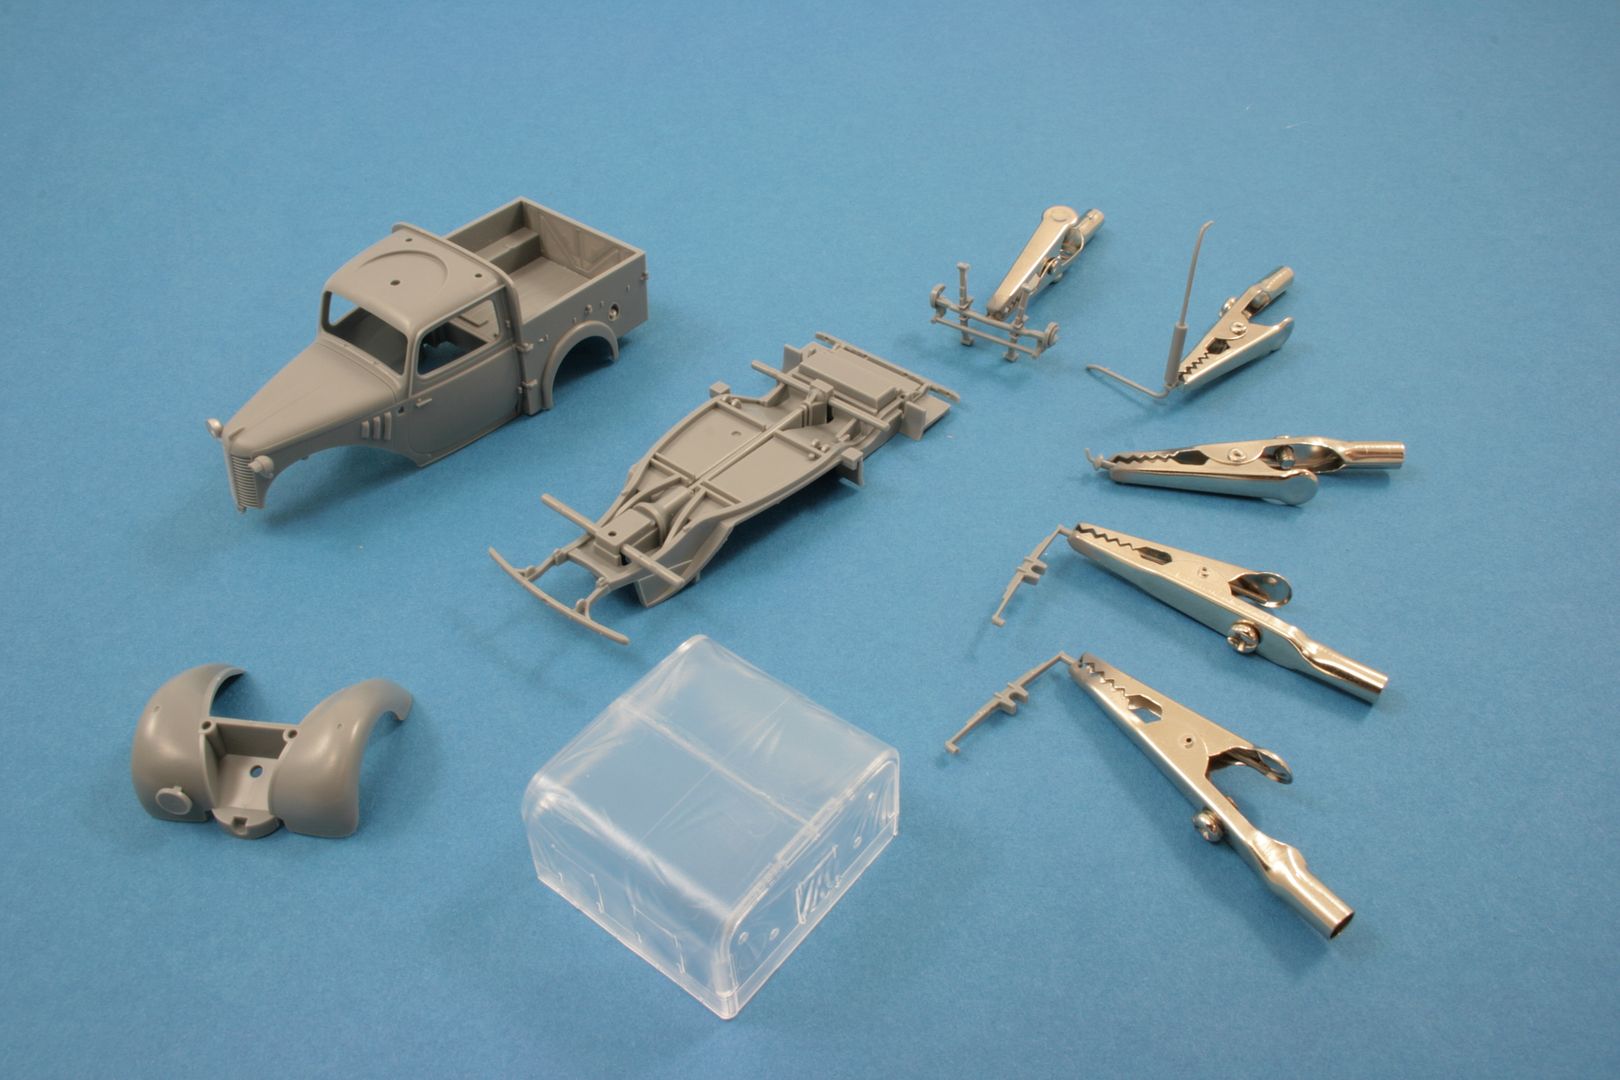
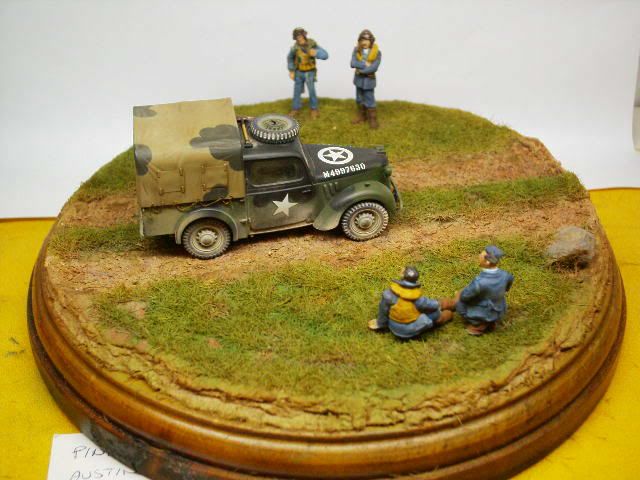
I was surprised when I opened the box at just how small this was . Small but perfectly formed, as you would expect from the big T.
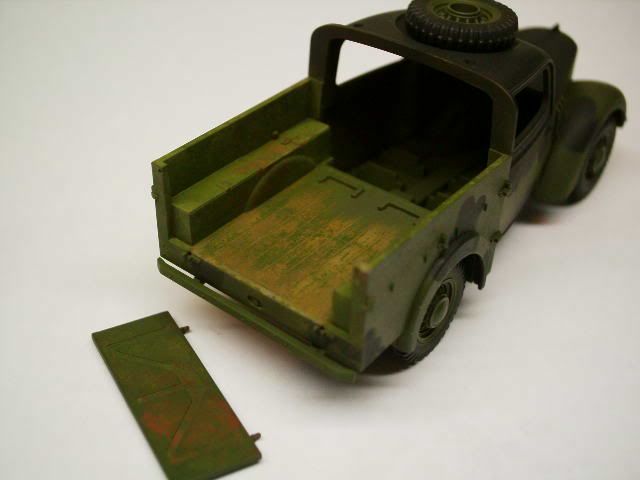
Started playing around with dry fitting etc this afternoon and in a couple of hours I was pretty much ready to start painting. It will be finished as an RAF Blue car with the cloth roof closed up.
Not sure why they opted to make the cloth cover in clear plastic, maybe because they can get a better fabric effect using clear plastic? it is, as you can probably make out, quite opaque.
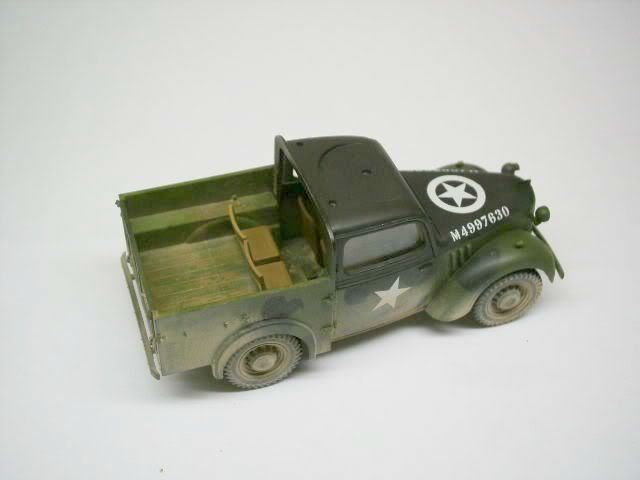
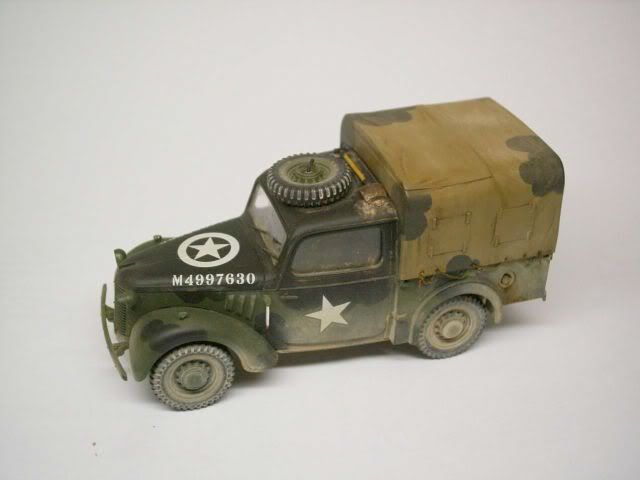
Most of the parts need to be Blue. The driver, seats and cover are going to get a base coat of Khaki brown before detail painting and weathering will be added.
Every time I build a Tamiya kit it is such an enjoyable experience as, even though you expect it, the fit of parts is second to none. This one is no exception and will just fall together once the parts are painted.
This will eventually be part of a small dio with a Tamiya 1/48 Mosquito.
Next.....

I was surprised when I opened the box at just how small this was . Small but perfectly formed, as you would expect from the big T.
Started playing around with dry fitting etc this afternoon and in a couple of hours I was pretty much ready to start painting. It will be finished as an RAF Blue car with the cloth roof closed up.
Not sure why they opted to make the cloth cover in clear plastic, maybe because they can get a better fabric effect using clear plastic? it is, as you can probably make out, quite opaque.
Most of the parts need to be Blue. The driver, seats and cover are going to get a base coat of Khaki brown before detail painting and weathering will be added.
Every time I build a Tamiya kit it is such an enjoyable experience as, even though you expect it, the fit of parts is second to none. This one is no exception and will just fall together once the parts are painted.
This will eventually be part of a small dio with a Tamiya 1/48 Mosquito.


Re: Mike W's workbench thread
This is an amazing little kit!
I made mine some years ago, and I really like to make it again!
Some work inside!
And with the weathering!
I put the decals as Tamiya indicate... but. I can´t confirm that the stars goes "poiting down"...


I try to make a small "vignette" but, not my strongest point!
Hope to see your soon, I really like this one!
regards
Henry
I made mine some years ago, and I really like to make it again!
Some work inside!
And with the weathering!
I put the decals as Tamiya indicate... but. I can´t confirm that the stars goes "poiting down"...
I try to make a small "vignette" but, not my strongest point!
Hope to see your soon, I really like this one!
regards
Henry
-
Mikeew
- Active Participant
- Posts: 637
- Joined: May 1st, 2011, 9:36 am
- Location: Bexhill on-sea,East Sussex. UK
Re: Mike W's workbench thread
Cool little car Henry, very inspiring. Thanks for sharing!
-
Mikeew
- Active Participant
- Posts: 637
- Joined: May 1st, 2011, 9:36 am
- Location: Bexhill on-sea,East Sussex. UK
Re: Mike W's workbench thread
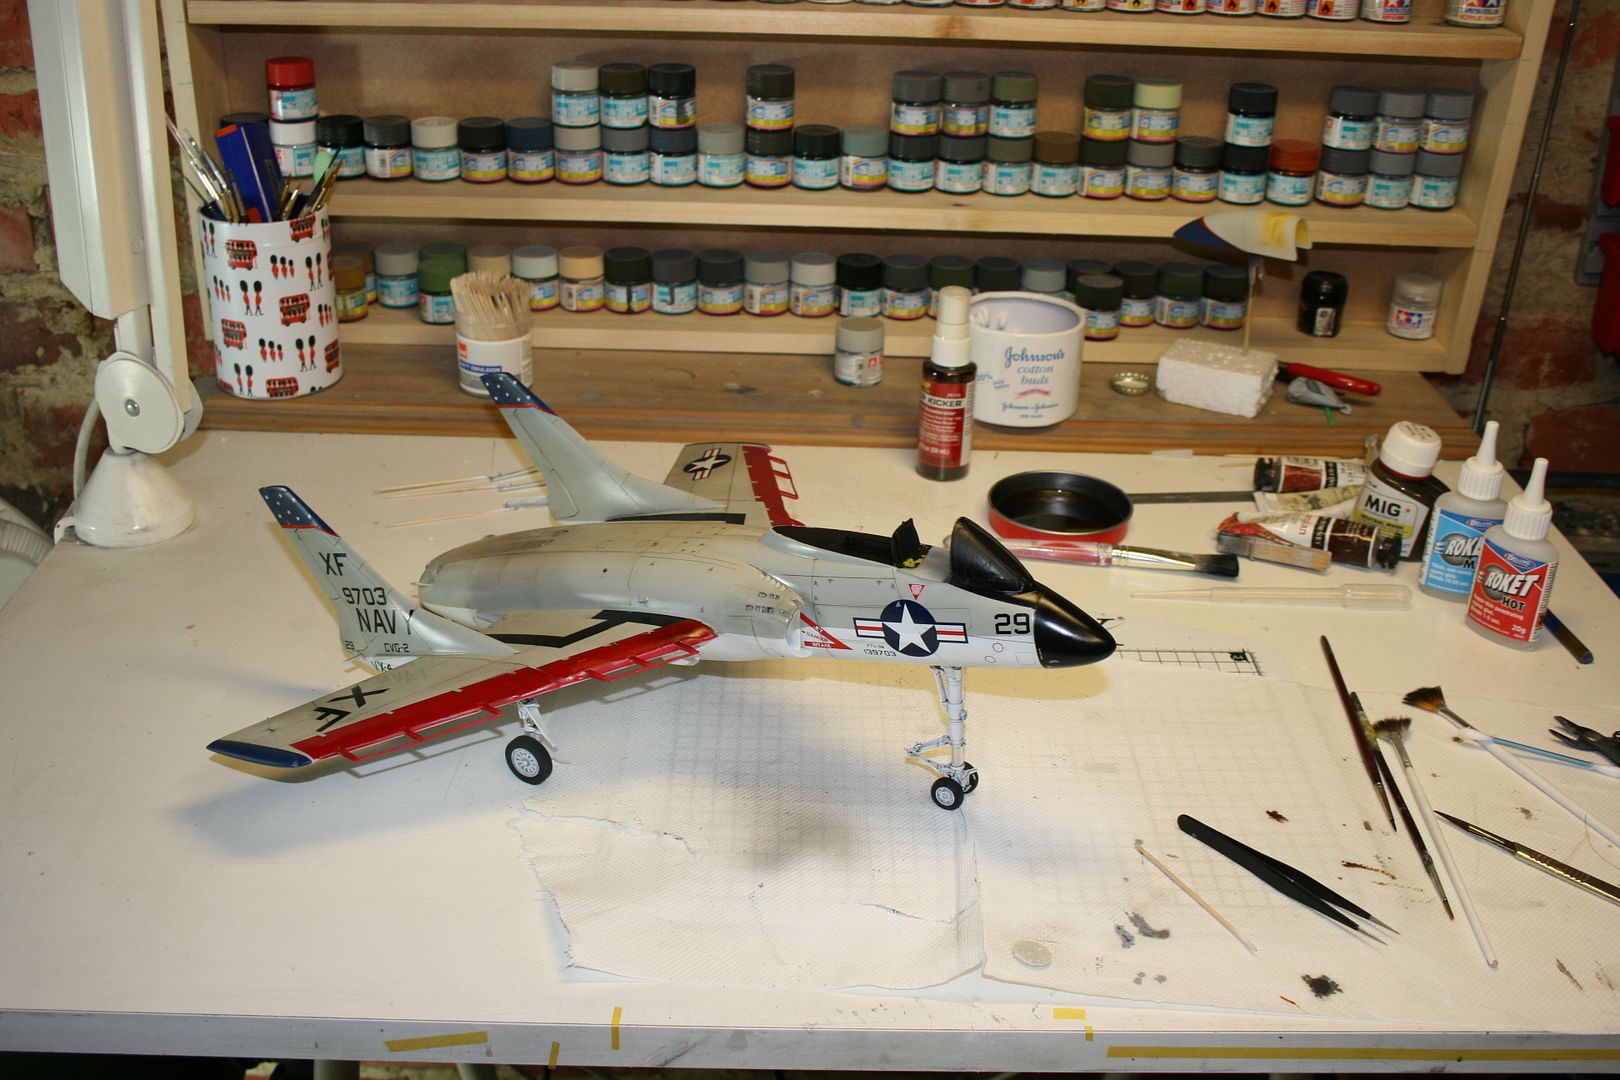
I have been working on an absolute BEAST of a kit!
This is a review build for Scale Aircraft Modelling, so just a teaser. It kind of takes over the workbench!
Its the Fisher Models 1/32 Vought F7U-3M Cutlass resin kit.
Weathering underway here but still have plenty to do, like the u/c doors and flaperons to be added. The canopy needs finishing and also got to make and paint the Sparrow missiles too.


Re: Mike W's workbench thread
Your rendition of the Titanic is stunning!
It's almost convinced me to have a go. Almost...
It's almost convinced me to have a go. Almost...
Daren
Half-assed Spitfire builder!
Half-assed Spitfire builder!