casting parts in resin (or metal)

Want to know all about building a model?
This is where to look for tips on everything from gluing to filling, and scratchbuilding to filing ...
Post Reply
rob_van_riel
Modelling Gent and Scholar
Posts: 3325
Joined: November 4th, 2012, 11:28 am
Location: The Netherlands
Contact:

casting parts in resin (or metal)

Post by rob_van_riel »

Note: this started out as part of a GB build thread here: http://uamf.org.uk/viewtopic.php?f=319&t=11506. At this time the GB hasn't even properly started yet, but once it gets going I expect some usefull running examples of the things explained here can be found there. Since those examples are too intimately linked the the project, I won't repeat those posts here, although I might add some summaries here at a later stage.

Fair warning: I'll probably ramble...

I'll concentrate on casting resin parts in rubber moulds, but the general principles hold for all variations.
I'll completely ignore the part of creating a master to work from, but obviously you need some sort of good quality original part to start with. Scratch, steal, borrow, or buy as takes your fancy. The only thing that might have an impact on the process is that the master should, if at all possible, be able to withstand the mould making process.

Starting with the essentials, just what is a mould? Basically, anything with a correctly shaped cavity into which one can pour a liquid, wait for the liquid to become a solid, and remove the solidified result will do. The methods and materials used in making the mould are closely dependant on the material that will be cast into the mould. Resin, our primary focus here, is a very thin liquid that operates at room temperature, and which is capable of holding encredible detail, but once solidified, it is fragile. From this, it follows that our moulds must be impervious to the chemicals involved, able to capture a lot of detail, and be flexible enough to allow removal of the product without destroying it, but we need not worry about temperature tolerance. If we were to cast metal, flexibility would be less of an issue, but heat resistance would be critical. Another case would be casting super fine plaster, where chemical resistance would be mostly irrelevant, but flexibility of even greater importance (assuming fine and fragile parts). For resin, silicone rubber fits the bill. There are many types of silicone rubber, each with it's own strengths and weaknesses, but in general, this is the material of choise.

So, our mould will be a block of silicone rubber with a correctly shaped cavity in it. How do we accomplish this? The key here is that silicone rubber also starts out as a liquid, that sets into an, albeit rather flexible, solid, so in essence, we'll be casting our moulds. (Software engineers like me are total suckers for recursion :grin: ). Back to square one, how to we make the mould in which to cast our secondary rubber mould? Fortunately, this is a lot easier, since silicone rubber sets very slowly, is a very thick liquid (high viscosity), and hardly bonds to anything (as opposed to resin, which also make a very fine glue). All we need is something strudy and leak proof enough to hold the rubber while it sets, and that brings us to the next component of the system: Lego. There must be other ways to do this, but seriously, Lego is just perfect for the job.

At this point I must take a sidestep to discuss mould design, since the design needs to be clear before we start pouring rubber into anything.
For simple items that have a flat side to them, a single piece mould will suffice. The opening through which the resin is poured in becomes the flat side, and the part is just squeezed out of the mould once the resin has set. This requires either a part with little or no undercuts, or very soft (=flexible) rubber, and it only works with parts where trapped air is unlikely to become a concern (trapped air could also be fixed by using a vacuum chamber, but that's hardly in scope for most of us; we'll have to think rather than brute force our way out of the issue). Note that vacform items are produced in such a mould, except that a sheet of plastic is sucked into the cavity, rather than the entire cavity being filled with some setting liquid. I might point out that making such a mould from a vacform sheet should be very easy, and for fidgitty parts might be a sensible alternative to sanding them out of a sheet.
More typical is a two piece mould, in which two closely fitting slabs of rubber surround the cavity. Another way to image this is a block of rubber with a cavity inside, cut in half so that the cut goes right through the cavity. Take a good look at injection moulded stuff from a tired old mould, and you'll see the seam in the form of flash. With the cavity completely enclosed inside the mould, it becomes necessary to connect the cavity to the outside world. Enter the sprue. I'll ramble on more about those later. There's also no reason to stop at two parts, although usually there's no reason to get more complicated. Remember that every cut through the mould is a possible leak.

Lets assume we need a two part mould.
There are two ways to go about creating one: suspend the part inside the box, pour the rubber around it, and cut open the mould with a sharp knife (this assumes you can still find the part in the block of rubber, and that you can do a neat cut without damaging the master inside), or pour the mould in two steps. In the latter case, something must take the part of the second half to be poured while the first half is being made. Soft plasticene clay is ideal for this.
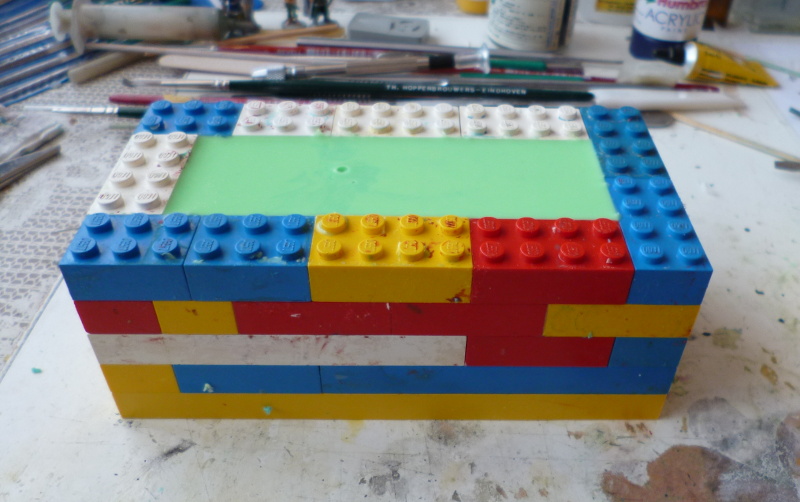
Take a good look at the part, and build a low Lego wall (about a single block high, but sometimes more) around the part, leaving about 25mm margin on one side of the part (this will be the end from with you fill the mould later), about 10mm on the bottom, and at least 5mm on one side, and 10mm on the other (this is for resin, should you wish to make a mould for metal, you want larger side margins; resin leaking out the sides is messy, molten metal leaking out the sides is dangerous). Since Lego uses discrete steps, you might end up with bigger margings than absolutely necessary, but I tend to just accept that.
Now, remove the part from the Lego bucket just created, end fill the bucket to the brim with plasticene clay. Push the part into the clay until the part is embedded up to the point where you want the seam between the mould halves to be (not necessarily the middle of the piece, nor necessarily a straight line).

Look to injection moulded parts for guidance on where to place the seam. This may involve some rough sculpting of the plasticene to get it right. That's OK, in fact it helps. At some point you're going to have to close the mould halves, and it helps if the seam isn't completly straight. Even of there's no need for any plasticene sculpting, make some dents in it to serve as locator tabs for the mould halves later. Although not strictly necessary, this is also a good time to put a thin coat of mould release agent on the master (vaseline dissovled in white spirits will do nicely). Once this is done, start building up the Lego wall until the highest part of the piece is about 2cm below the top of the wall. Unless your Lego is branck spanking new, there will be gaps between the blocks. Rubber likes to try and escape through these creaks and settle in the cavities inside the blocks or on your workbench, which is not what you want. Rub something into the seams to prevent this (vaseline of plasticene are on hand at this stage, and work well enough, although not perfectly).

Calculate the volume of the open space inside the now enlagred Lego box. Disregard the volume taken up by the part; this compensates for the rubber that will be lost by cliging to your mixing vessel. Mix up the same volume of rubber, pour it in in such a way that the rubber rolls over the part like a wave (this helps prevent air pockets in the rubber forming contact with the part), and sit there tapping the mould with the rubber for about ten minutes. This is as boring as it gets, but the tapping helps any bubbles of air escape from the still liquid rubber, and we really want only one cavity inside that block. After you grow bored of tapping, leave it alone for a day.

The next day, disassemble the Lego wall, and peel away the plasticene. The part may come away with the plasticene, but will be easy to place back into the mould half. Put the part back into the rubber, and build another Lego wall around the block (the part is facing upwards at this point), plus once again 2cm extra height. Coat the first mould half plus the part in release agent (this time it is necessary), and pour on the second half.

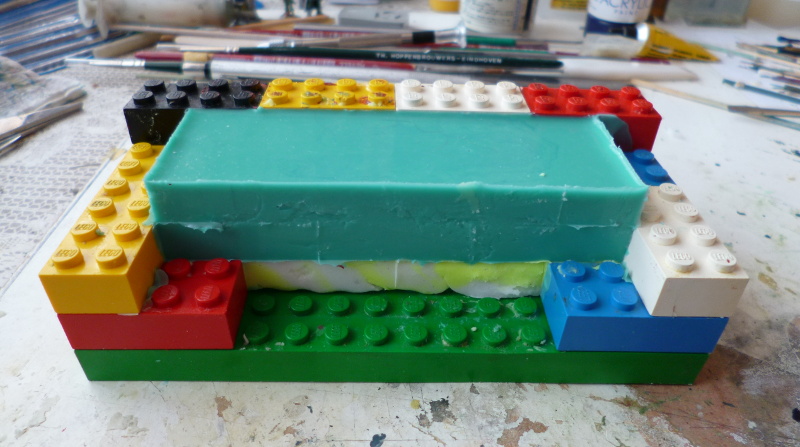
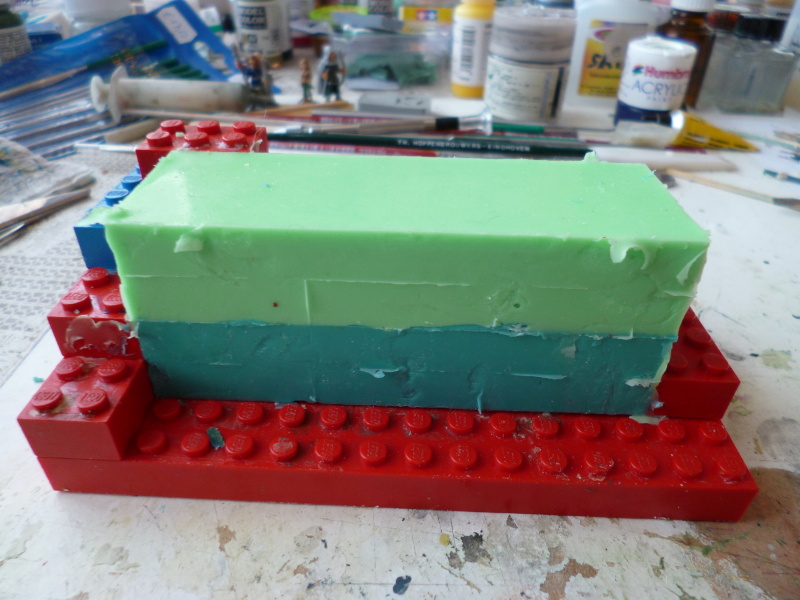
The pictures below show situation after the first half is cast, after the second half, and a box of Lego still intact filled with rubber:

Image

Image

Image

Now, we get back to sprues.
The purpose of a sprue is to provide an entry into the mould for the casting material. However, not all casting materials are equal.
When molten metal enters a narrow passage, it slows down, loses heat, solidifies and blocks up the passage. Thus, you want a relatively wide sprue and connection to the part, and as near as possible fill the mould from the central mass. This puts a nice big blob of hot metal behind anything settling into the fine detail. As a rule of the thumb, the sprue should extend half the height of the part above it, and come into the part cavity rought from above.
Resin behaves differently. It stays nice and runny, but tends to cling to the sides of the mould while filling it. This gives it the potential to cut off any exits before the air that fills the mould at the time of casting can escape. If the air can't get out, the resin can't take it's place, and the mould is not completely filled. The trick to work around this is to fill the mould from the bottom. Create the sprue as a column sitting beside the part (this is why one of the side margins needs to be wider), then a channel under the part, and finally the sprue gate entering the part from below.

Whatever the layout, the sprue needs to be cut into the mould halves with a sharp knife. Vents to allow the air out are also needed, but these can be much narrower. Keep in mind that regardless of the direction the vents take from the part cavity, they should always exit the mould at the top; otherwise they get to be called leaks, and will be used by your casting material to get out of the mould and onto you or your workbench.

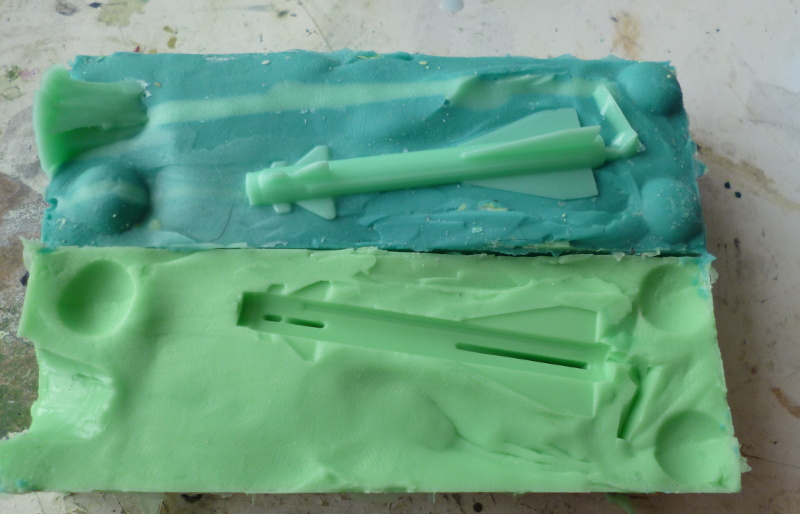
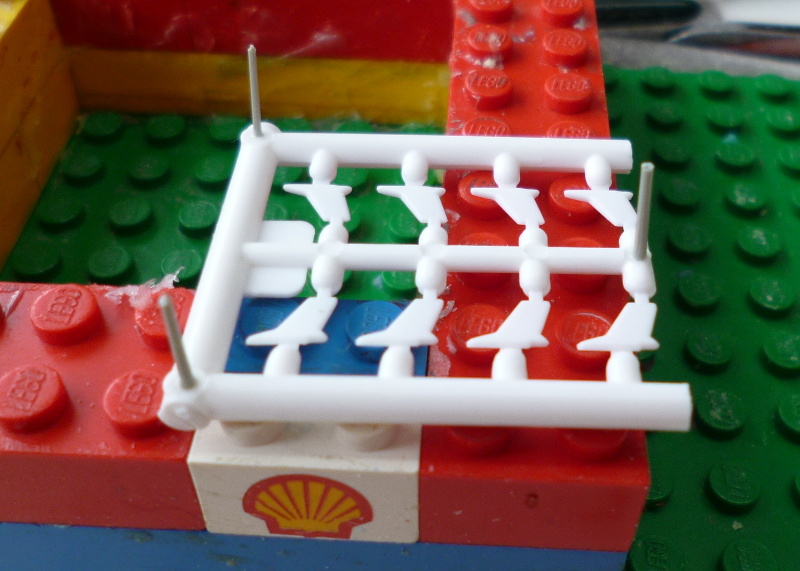
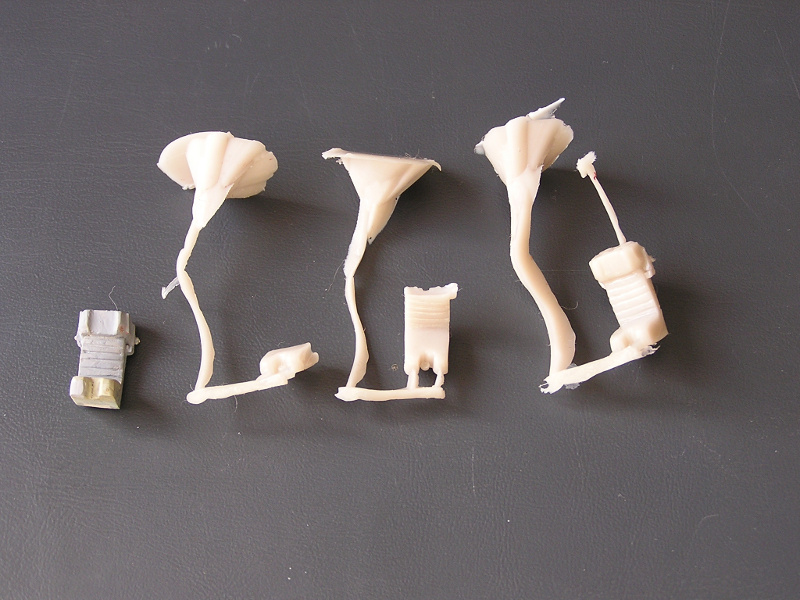
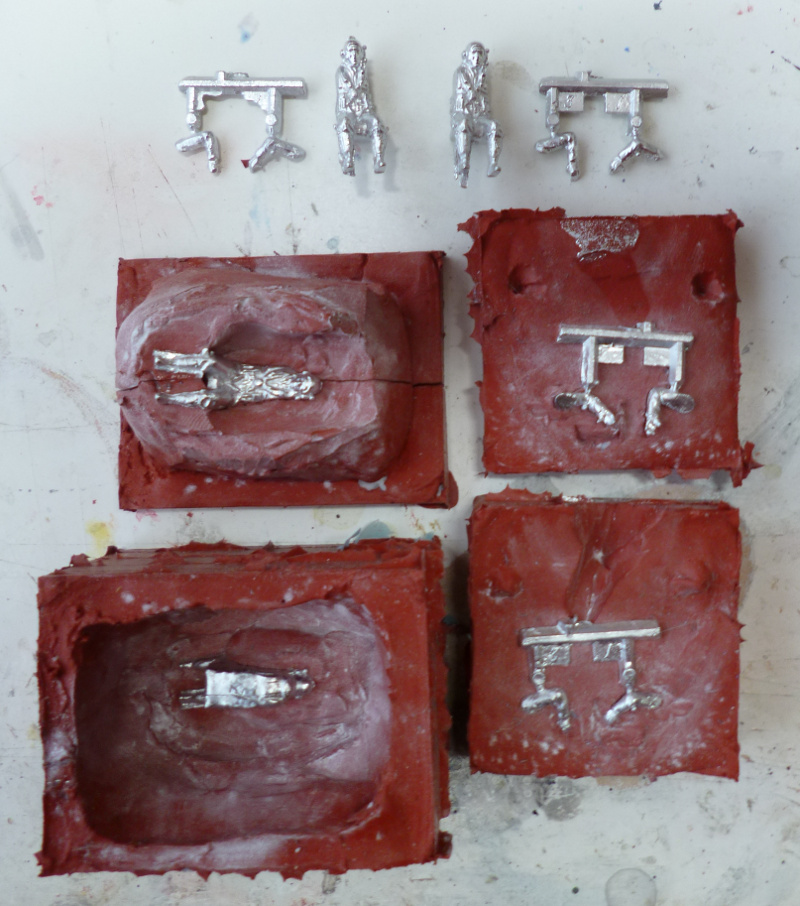
The pictures below demonstrate these ideas.
The top one shows the original and first few casts from a resin mould. The "low" sprue and the air vent at the top of the part can be seen quite clearly.
The bottom picture shows two moulds for metal. The left one is for the body of a pilot figure, and is actually a three part mould: the bottom, in which a casting is seen lying face down, and the two top halves shown together with another casting lying on top. The sprue enters through the back of the figure, where the gate won't be seem through the seat he'll be mounted in. The logical separation between the mould halves would have put the sprue on head, feet or sides, neither of which was desirable, so I divided one of the halves again. The one on the right is more traditional for a metal mould, and is for the corresponding arms. The sprue and the locator tabs can clearly be seen. The white haze on these mould parts is talcum powder, which I dust onto the mould before casting to improve the flow and release characteristics.
Image

Image

Right, over to you lot, I'm guaranteed to have missed some bits, so ask away.
User avatar
DavidWomby
Modelling Gent and Scholar
Posts: 11759
Joined: May 1st, 2011, 8:09 pm
Location: Florida, USA

Re: casting parts in resin (or metal)

Post by DavidWomby »

Wow. Thanks for that. I'll have to re-read it a few times. All I've done so far is moulds that are basically shallow and are flat on one side. Two part moulds are in my future so this is very timely.

Thanks for posting.

David
User avatar
JohnRatzenberger
Why is he so confused ?
Posts: 15734
Joined: April 5th, 2011, 3:42 pm
Location: Living on a sandbar - Nags Head, NC.

Re: casting parts in resin (or metal)

Post by JohnRatzenberger »

Excellent ! Thank you very much, Rob !
John Ratzenberger :???:
It's my model and I'll do what I want with it.
User avatar
fredk
Modelling Gent and Scholar
Posts: 6195
Joined: May 1st, 2012, 6:25 am
Location: Donaghadee, N'rn Ir'n

Re: casting parts in resin (or metal)

Post by fredk »

For 'one off' or very short runs I now use ploymer clay to make the mould. Ploymer clay is better known under its brand names of FIMO and Sculpey.
I'll edit this with a picture of a mould I used recently.
Sometimes when I use the heat proof silicone, I pour it over the subject, totally encasing the subject, then when its set I cut it apart to make the halves of the mould [if the subject suits it]

Edit; I wanted to make several Napoleonic Eagles. I used polymer clay for the mould. The original Eagle was in white metal. I pressed it into the clay to half its depth. Then cured the clay in an oven. When it was ready another piece of clay was pressed over the first, with the Eagle still in place. This was cured. The hollow extending from the base is both a vent and an over-flow. I use ''Davids'' 'Fastglas' car bodywork resin. Its cheap and does the job.
The mould;
Image

6 Eagles [each second one is turned] I made 12, need about 5. Mould is still good for more.
Image

Here is the size; 5p coin [about a 1 US cent size] and a 1/32 head.
Image

Polymer clay is fast and easy to use for making moulds, but the original can only stay in it if its heat proof.
Al speling misteaks aer all mi own werk..
Its not just how good your painting is, its how good the touch-ups are too.
User avatar
airjim
Sprue Teaser
Posts: 674
Joined: May 1st, 2011, 5:14 am
Location: Amorica
Contact:

Re: casting parts in resin (or metal)

Post by airjim »

Thank you for posting this!

Jim
Read my inane modeling writings at:
http://ascalecanadian.com
K5083
Active Participant
Posts: 943
Joined: May 7th, 2011, 2:20 am
Contact:

Re: casting parts in resin (or metal)

Post by K5083 »

Thanks, very good tutorial. I have been messing with this myself (and I do mean messing, my desk will never be the same) and where I get stuck is having the resin thicken before it can completely fill the cavity after going its roundabout route through the sprue tunnel. At least with the stuff I am using, there is precious little time when it pours freely. It looks to me like two of your three resin casts are short-shot in this way.

My other issue is with flash resulting from tiny gaps between the two-part molds. Mold release agent is absolutely necessary to get the two pieces of silicone to separate, but that thin layer of mold release agent leaves a tiny gap which becomes flash in my parts. Do you clamp your mold halves together during casting to try to squeeze out any flash?

One idea for creating the sprue. Rather than cut it into one of the half moulds, one could cement real sprue to the master and make it part of the master, pressing it halfway into the clay and routing it to one of the side edges of the mold (which will become the top edge when casting). That might produce a more consistent channel and better flow.

The vac GB is certainly a good excuse to get the materials out and try this again, since I too will want to clone some parts for mine. This will definitely be a guide.

August
A good model is any model you can walk away from.
rob_van_riel
Modelling Gent and Scholar
Posts: 3325
Joined: November 4th, 2012, 11:28 am
Location: The Netherlands
Contact:

Re: casting parts in resin (or metal)

Post by rob_van_riel »

Some notes on breaking in a mould:
Lets assume we've created the block-and-cavity part, and cut the sprue and initial vents. It is now time to pour something into that thing. Just don't expect miracles from the first shot. Typically, you'll find that the sprue, and perhaps some of the part have been filled, and that's it. Don't be discouraged, this is normal. Inspect the sprue to see if you've created narrows in it; if so, widen them. Pour another test. Probably, some more of the mould has been filled this time. Check the casting again, looking for any signs of blockage, or of trapped air, and cut corrections. Don't rush this; it's better have a few extra test shots, than to cut away too much rubber and wreck the mould. Once you get the hang of spotting and fixing problems, the fourth or fifth casting should start to look good. I suspect that initially there's also some hard to spot debris or remains of the vaseline used in making the mould that needs cleaning out.

Casting in general:
As when pouring the rubber for the mould itself, it is useful, and for some mould critical, to tap the mould while filling it. You may well notice that the mould initially seems to fill all the way to the top, after which the level suddenly drops. Add more casting material immediately. Better yet, pour a slow but steady flow and keep tapping that mould. With metal, this is in fact the only way (but find a way to keep your fingers at some distance from the metal, for example by tapping the clamp that holds the parts of the mould together, rather than the mould itself), and it takes some experience to properly get the feel for it. When casting metal, bear in mind that you'll probably lose the first two castings of any given session, after which the mould will have heated up, and the problems vanish.
You'll have to come up with some way of keeping the parts of the mould together while casting and waiting for the casting material to set. I recommend clasping the mould parts between some thin plywood plates, as directly clamping the mould will deform the mould (rubber is not stiff enough to spread the pressure from the clamp evenly, but bends around the business end of the clamp instead). Just enough pressure to keeps things together is optimal, any excess force risks deforming the mould enough to be noticable in the cast product. The harder the rubber used to create the mould, the more pressure you can afford.
rob_van_riel
Modelling Gent and Scholar
Posts: 3325
Joined: November 4th, 2012, 11:28 am
Location: The Netherlands
Contact:

Re: casting parts in resin (or metal)

Post by rob_van_riel »

K5083 wrote:Thanks, very good tutorial. I have been messing with this myself (and I do mean messing, my desk will never be the same) and where I get stuck is having the resin thicken before it can completely fill the cavity after going its roundabout route through the sprue tunnel. At least with the stuff I am using, there is precious little time when it pours freely. It looks to me like two of your three resin casts are short-shot in this way.
PU resin can be tricky that way. I typically spend about a 30-50 seconds mixing the components, and similar amount of time filling the mould(s). I get about 70% good castings. I should point out that I rarely mix up more than I need for a single mould, simply because of these time constraints. Don't forget to tap the mould wile pouring, it really does help a lot.
My other issue is with flash resulting from tiny gaps between the two-part molds. Mold release agent is absolutely necessary to get the two pieces of silicone to separate, but that thin layer of mold release agent leaves a tiny gap which becomes flash in my parts. Do you clamp your mold halves together during casting to try to squeeze out any flash?
What are you using for release agent? I get some flash, sure, but hardly ever enough to be significant. When that does happen, it's typically because the mould was slightly open during casting. And yes, I always clamp the mould, but with as little pressure as I can manage. Just enough to hold it shut, while freeing up my hands for other work. Squeezing equals deforming, and this can lead to seriously distorted castings.
One idea for creating the sprue. Rather than cut it into one of the half moulds, one could cement real sprue to the master and make it part of the master, pressing it halfway into the clay and routing it to one of the side edges of the mold (which will become the top edge when casting). That might produce a more consistent channel and better flow.
It might well work, but you'd still have to cut the funnel into the top to pour casting material into, and quite possibly do some corrections at the gate as well. Seems like a lot af hard work to accomplish little. As for the rest of the tunnel, width is in my experience more important than consistency. Resin is cheap, metal can be reused, so I don't worry about the sprue all that much. Note though that if I'm copying a part and the gates look large enough, I may drag along a part of the original sprue, as in the pilot figure mould.
rob_van_riel
Modelling Gent and Scholar
Posts: 3325
Joined: November 4th, 2012, 11:28 am
Location: The Netherlands
Contact:

Re: casting parts in resin (or metal)

Post by rob_van_riel »

fredk wrote:I use ''Davids'' 'Fastglas' car bodywork resin. Its cheap and does the job.
The resin sold over here for bodywork is actually polystyrene (sound familiar?). I tried using is a long time ago, and made such a horrid mess with it that I decided to stick with metal for a good long while. More recent experiments confirmed my distaste for the stuff (and wrecked a significant part of my Lego supply).
Is your's chemically different, or do you have more of a knack for working with styrene that I do?
6 Eagles
Nice result.
Polymer clay is fast and easy to use for making moulds, but the original can only stay in it if its heat proof.
The result is hard to argue with. I'll keep it in mind, but since my house is already loaded top to bottom with cool and usefull tools and materials, I don't expect to buy any in the near future.
rob_van_riel
Modelling Gent and Scholar
Posts: 3325
Joined: November 4th, 2012, 11:28 am
Location: The Netherlands
Contact:

Re: casting parts in resin (or metal)

Post by rob_van_riel »

Just a quick snapshot to illustrate how positively eager PU resin is to get into every little nook and cranny

Image

As you can see, the mould is a fairly simple affair, but even these relatively thin and large wings come out perfect most of the time. Don't think I could do that with any other medium.
rob_van_riel
Modelling Gent and Scholar
Posts: 3325
Joined: November 4th, 2012, 11:28 am
Location: The Netherlands
Contact:

Re: casting parts in resin (or metal)

Post by rob_van_riel »

Some more notes...

Planning: After you've poured something, whether it be rubber or resin, you need to leave the result to sit for a while, and in the case of rubber, that can be for hours. During that time, you really shouldn't be touching it; deformations are always a risk while things are still somewhat liquid, as is spilling some impossible-to-get-out-of-anything blubber all over your person and workarea. Try not to fill your entire workbench with setting casts, as you will be effectively locked out while things settle.

Rubber types: I've been comparing some different types of rubber recently, and I've found that the harder (when fully cured) rubbers also tend to be less runny before that point. All will be quite sufficient to capture any amount of detail, but the softer rubbers require more attention to leak-proofing the boxes into which they are poured. I believe this is due to the fact that harder rubbers are actually the same chemicals as softer ones, but with some inert filler added. Although this would explain the difference, I might be wrong about this.
rob_van_riel
Modelling Gent and Scholar
Posts: 3325
Joined: November 4th, 2012, 11:28 am
Location: The Netherlands
Contact:

Re: casting parts in resin (or metal)

Post by rob_van_riel »

Small parts are problematic to make moulds for in two pourings, but when pouring the mould in a single pass and then cutting it open, they're no more or less problematic than others. The trick with this way of making moulds is making sure the master stays put while the rubber sets. Something has to connect it to the outside world, and in the example below, I've added some 'legs' to the master.

Image

With al the chemistry going on, it's easy to lose track of the physics involved. The rubber starts out as a liquid, and unless you're working from a rubber master, there will be significant differences in density between the materials involved. Polystyreen has a lower density than rubber, so left to it's own devices a polystyreen master will after a minute or so come bobbing to the surface (I once almost lost half a kilo of rubber when making a mould for a complete wing to this; the only thing that prevented a total loss was me sitting there for a few hours with a pair of toothpicks keeping the ^%#@$^# thing under while the rubber solidified -- don't do this, it's no fun). The legs in the picture will be pointing up, keeping a fixed distance from the roof I put in the box into which I'm casting the mould.
Post Reply

Return to “Construction Tips”