John's Whatever Bench

Show us a view of your workbench / work in progress and build reports too.
Post Reply
User avatar
JamesPerrin
Looks like his avatar
Posts: 13695
Joined: April 5th, 2011, 8:09 pm
Location: W. Yorkshire
Contact:

Re: John's Whatever Bench

Post by JamesPerrin »

lancfan wrote:
jRatz wrote:I really need an RN catapult in 1/48, even plans for one.
This article from the Seawings site has plans for a catapult drawn with a Walrus perched on top.
https://www.seawings.co.uk/images/Catap ... rticle.pdf;

Ha-ha no excuse now John!
Classic British Kits SIG Leader Better to fettle than to fill
(2024 A:B 5:2) (2023 13:8:7) (2022 21:11) (2021 15:8) (2020 8:4:4)
User avatar
JohnRatzenberger
Why is he so confused ?
Posts: 15736
Joined: April 5th, 2011, 3:42 pm
Location: Living on a sandbar - Nags Head, NC.

Re: John's Whatever Bench

Post by JohnRatzenberger »

Thank you, David. I knew something like that was on Seawings but couldn't find it the other day.

I (draft-)scaled up the PE catapult from HMS Albatross and in 1/48 the extended for launch catapult is about 22", making it a rather big project. I have been considering just doing it with the extensions stowed which will be quite a bit shorter. I notice the article remarks on different versions, to include one with a bay removed, so I shall have to think about it.
John Ratzenberger :???:
It's my model and I'll do what I want with it.
User avatar
JohnRatzenberger
Why is he so confused ?
Posts: 15736
Joined: April 5th, 2011, 3:42 pm
Location: Living on a sandbar - Nags Head, NC.

Re: John's Whatever Bench

Post by JohnRatzenberger »

Back again. Actually this is more a roll-up of a half-dozen hours "work" spread over about the same number of days.

The Panhard: No pix, but I have inventoried all the parts and looked at them to see just what I had done when I left off some years ago. All set to move forward.

The Walrus: No pix, I have been working the first two pages of instructions and a little PE in there and painting that stuff. I'll do pix before moving on past that.

The M54/TPU: I ordered and received some S-gauge/scale turnbuckles from Tichy Train Group. Actually I got some HO and O also but only the S approximate 'scale'. I cut one end off 16 of them and joined each two together to get a longer turnbuckle, then cleaned them up. 7 of those are shown at the top of this picture.

Image

The turnbuckles are cored for a .0126 wire and I managed to drill one out to 0.020 so I could have a bigger wire. Then I tried making the smallest little "hook" I could and test fitting it into the turnbuckle and also on to one of the tanks. It seems to work. Now I need to do 8 of them - this time I start with making the hooks, then trimming the length. Then I can work with the 8 on the other end. It should all be clearer later.

What I haven't figured out yet is how to make threads on that wire - perhaps a steel color with some black drybrushed across it will look close enough.
John Ratzenberger :???:
It's my model and I'll do what I want with it.
User avatar
DavidWomby
Modelling Gent and Scholar
Posts: 11766
Joined: May 1st, 2011, 8:09 pm
Location: Florida, USA

Re: John's Whatever Bench

Post by DavidWomby »

Good grief they'd drive me nuts but great work on the turnbuckles, John.

David
User avatar
JohnRatzenberger
Why is he so confused ?
Posts: 15736
Joined: April 5th, 2011, 3:42 pm
Location: Living on a sandbar - Nags Head, NC.

Re: John's Whatever Bench

Post by JohnRatzenberger »

Here we are ....

On the M54/TPU, I am puttering at minor things while I wait for a small shipment of brass sheet to arrive so I can get back to the turnbuckles. The delay is because I know there is some brass sheet somewhere in this house but could not find it and so had to order more. :evil: It will, of course, become highly visible to me as soon as the reordered stock arrives ....


Panhard: Closer inspection of the parts showed I had not mounted the brake pads to the rod and that caused me no end of issues as there isn't quite enough room to do that with the rear wheels mounted. Problem is solved and another coat of rattle-metallic black is on the undercarriage; that's decidedly not prototype but it'll look good. Now I need to pain the wheels so I can then mount the chain drive to the spokes. The kit offers a solid section to fit on the axle but that's not right so I cut it out. Ignore the silver color, bad idea. The spokes have a rough coat of orange-red just to hide the black and I'll start a serious red coat this weekend.

Image

Walrus: Done steps 1 -16, including whatever Eduard PE I decided to use. The criteria: would it be visible, meaningful, and was it worth the effort. Thus latter criteria is becoming more important as this stuff is positively tiny. Anyway the floor is done and I'll start on the two sides and the roof so I can close it up.

Image

I need to take the floor down and spray a finish coat onto it, probably when I get tot eh same stage with the sides.

I did see an ad that a company over there is doing a McTaggart Scott catapult, or at least a piece initially then a full one much later. The piece, which includes the Walrus mount, should be somewhere at SMW. I have an email in to them to let me know when they have stock. Even the piece will make a nice display for the model.
John Ratzenberger :???:
It's my model and I'll do what I want with it.
chrism
Modelling Gent and Scholar
Posts: 4669
Joined: September 29th, 2013, 11:07 pm

Re: John's Whatever Bench

Post by chrism »

How are you finding the Walrus? I am tempted, but am keen to see a few more built before getting one. I
As for PE sets, I am tending to find that with Eduard sets, I use a few bits and leave far more off than I use, and consequently it does beg some questioning, as to whether it is worth the extra initial outlay
Trying to Build kits and not Buy kits
User avatar
JohnRatzenberger
Why is he so confused ?
Posts: 15736
Joined: April 5th, 2011, 3:42 pm
Location: Living on a sandbar - Nags Head, NC.

Re: John's Whatever Bench

Post by JohnRatzenberger »

Going more slowly than I thought but I have only a few steps more to finish the interior and be ready to button the fuselage up. I hope to have photos and some commentary this weekend. My plans had been to work among 3 models slowly but other things have gotten in the way and only the Walrus is getting time.

I don't disagree on PE, particularly Eduard. Long ago I did a lot more of it (two BigEds on 1/35 military vehicles for example) that I'm happy with, but now-adays I'm at the why bother stage. I tackled the PE on the Walrus only because I wanted to see what it might do and as far as the Cockpit (seatbelts) and Interior sets, I'm underwhelmed; I haven't started the Exterior or Stores sets.

Much is not visible and has not been assembled. The folding instructions have gotten vaguer, some of the folds are very thin and I cannot do them (the mounts for the ammo drums which I finally faked with some Evergreen), etc. Even worse are visible things Airfix left out that Eduard didn't take the opportunity to add-on -- for example, the 2nd pilot's control wheel, yet they added what appear to be the clips to hold it to the side of the cockpit. OTOH, Airfix provided no ammo drums for the interior and Eduard did, but of course anyone can make them of plastic. The Eduard seatbelts are correctly the old WW1 style broadbelt but I believe the pieces to be too broad and certainly too long.

I have not hit any major problems with the Walrus itself so far and I think it would look good OOB-ish. Allow me to hold on the "worth the outlay" question on the PE until I finish the interior work and put some photos up.
John Ratzenberger :???:
It's my model and I'll do what I want with it.
User avatar
JohnRatzenberger
Why is he so confused ?
Posts: 15736
Joined: April 5th, 2011, 3:42 pm
Location: Living on a sandbar - Nags Head, NC.

Re: John's Whatever Bench

Post by JohnRatzenberger »

Well, I'm still around, just working at all projects in bits and pieces, so much much real visible progress.

I have also started the What Might Have Been GB here: http://www.uamf.org.uk/viewtopic.php?f=396&t=18044; and that has eaten up a little time fixing a warped fuselage, adequately described in the GB thread.

On the Panhard, I have finally gotten the red down on the wheels and am now ruining that by painting the tires grey - I'll have some touch-up to do. Once I am happy, I can glue on the drive sprocket and chain and then move along. I could have done more, it's just paint, but I let each coat dry a day to be safe.

On the M54, I really haven't done much except cut some parts for the tiedowns from brass sheet and shape them. I should move along.

The Walrus got much of my attention. Photoetch & painting. I am almost done with the fuselage sides. Much of the PE was ignored. Right now I am doing ammo drums. Airfix did not provide any, Eduard prided them in PE which I found unbuildable so I cut little discs of plastic and stuck them between the top & bottom covers. Right now I'm putting on handles, then I'll touch up paint and stick them in place in the fuselage.

Image

That means I can go spray the interior with a matt coat - yes, that will dull the satin black panels, but I'm OK with that - and I'll get some pix of it all before I put the fuselage together.
John Ratzenberger :???:
It's my model and I'll do what I want with it.
User avatar
jssel
Still crazy after all these years
Posts: 12007
Joined: April 5th, 2011, 3:42 pm

Re: John's Whatever Bench

Post by jssel »

The Walrus sure looks great.
Besting 60 years of mediocre building of average kits in the stand off scale
User avatar
Purplethistle
Delusional Miniature Killer
Posts: 4680
Joined: July 10th, 2014, 1:03 am
Location: Glasgow

Re: John's Whatever Bench

Post by Purplethistle »

Don't know about the Egg Man, but you ARE the Walrus! :-D
"Spits, SLUFS and Rock 'n' Roll"
User avatar
JohnRatzenberger
Why is he so confused ?
Posts: 15736
Joined: April 5th, 2011, 3:42 pm
Location: Living on a sandbar - Nags Head, NC.

Re: John's Whatever Bench

Post by JohnRatzenberger »

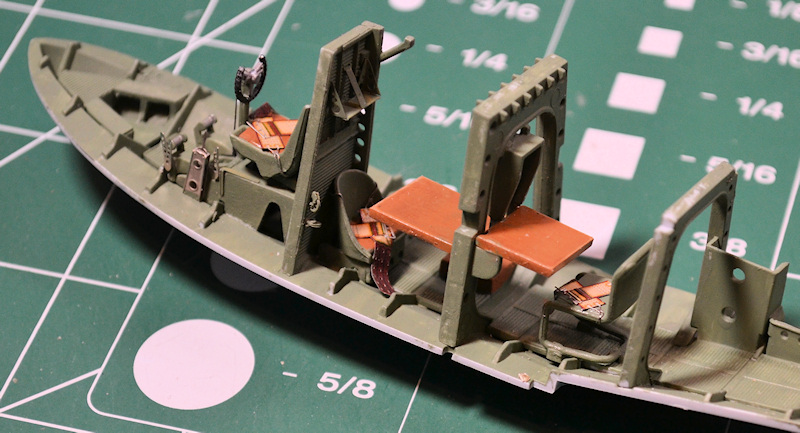
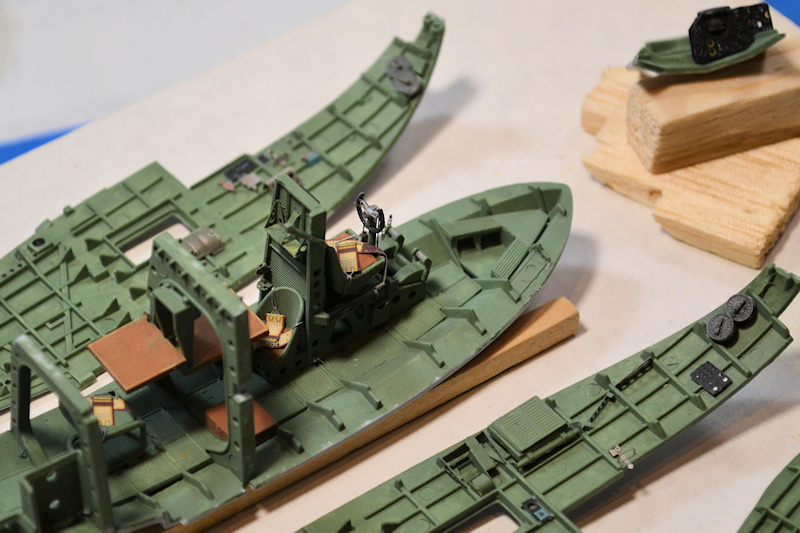
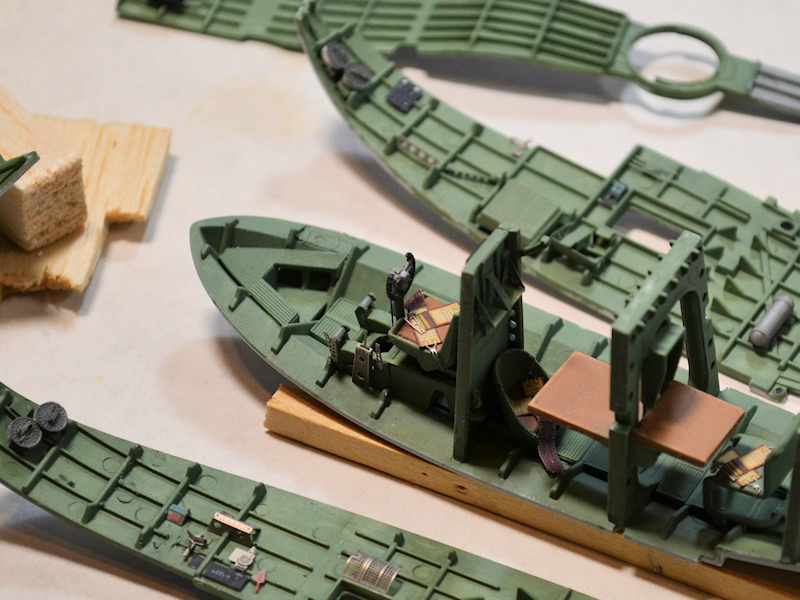
Finally, I have the Walrus interior done. It is mostly Airfix with less than 50% of the Eduard PE sets. Some were left off as invisible, some were left off as impossible, some became scrap plastic instead. In short, I'm not going to have these PE sets when I get around to my 2nd one, but it'sd been interesting anyway. I guess my disappointment is that even with the PE set there are dozens of visible interior details not offered. One can glean them from various walkarounds, the Mushroom Walrus/Stranraer book, and the maintenance manual floating around the web.

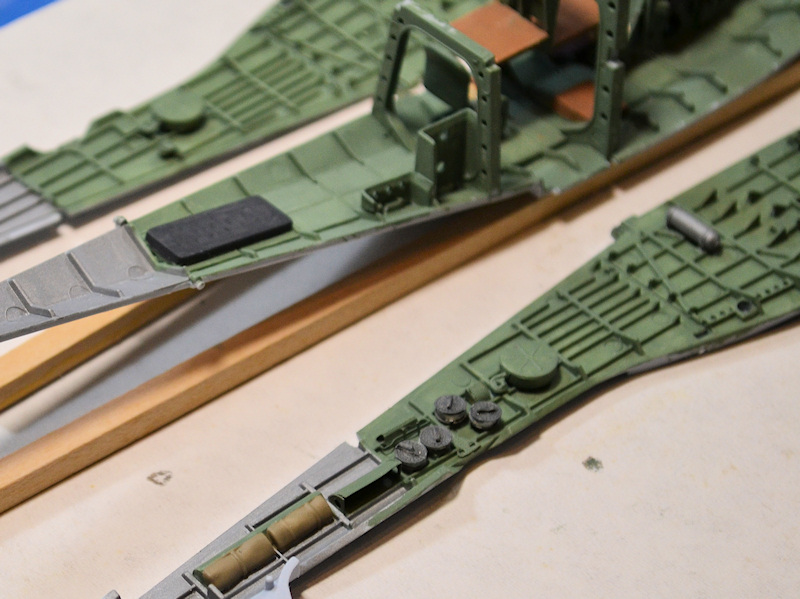
Does the Airfix kit need more detail ? Sure, in the nose and cockpit, but the rest of the interior - not really, even less so if you fold the wings. I think two glaring omissions (that could have been done simply) are the spare ammo drums and the 2nd pilot's control. You'll note I added ammo drum, a mix of PE & plastic, and did nothing about the 2nd pilot's control, even ignoring the hyper-detailed PE seat offered by Eduard.

So anyway. BTW, Humbrol enamel paints, brushed, for the interior. Model Master acryl flat coat sprayed over.

Image

Image

Image

Image

Image

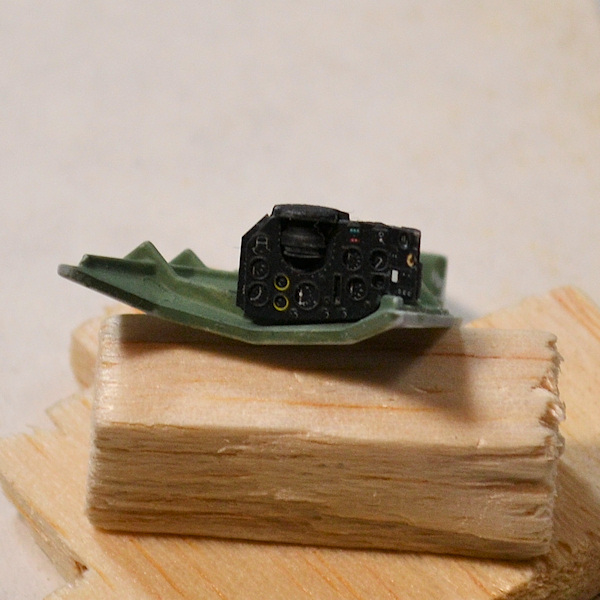
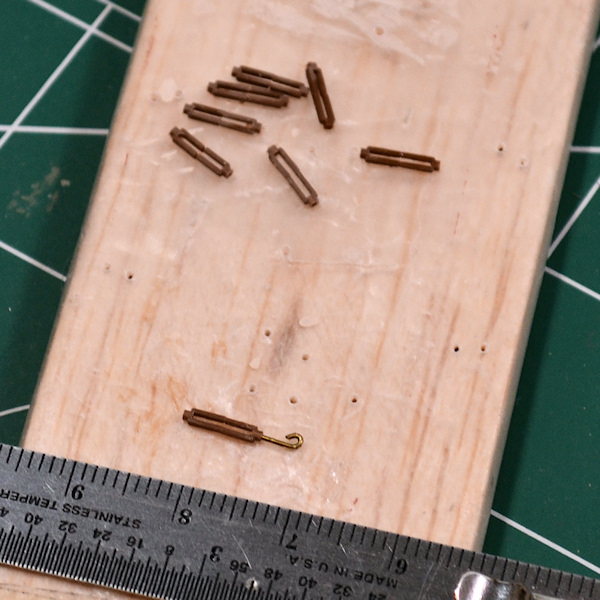
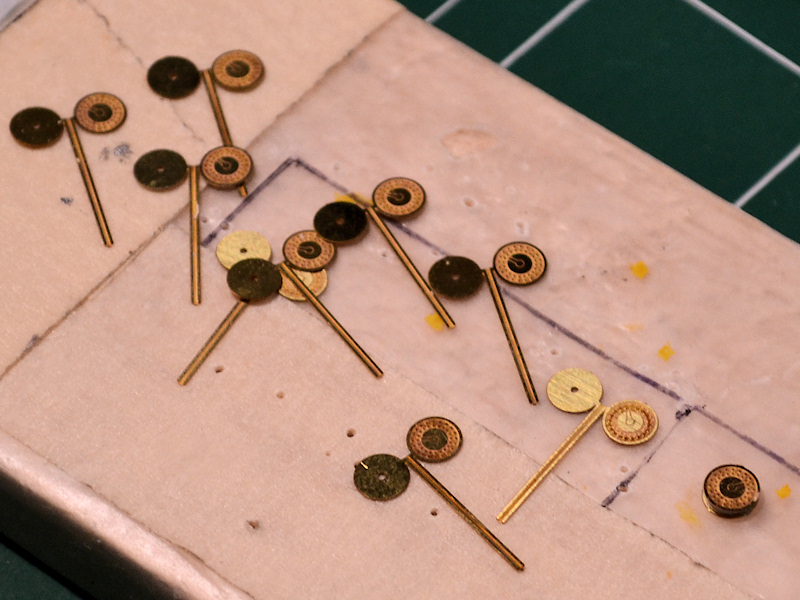
So, I see I forgot a decal or two and I need to put in and mask the fuselage side glass, then I can button her up. I have made a modification to the cable reel which I'll talk about briefly in the next installment.

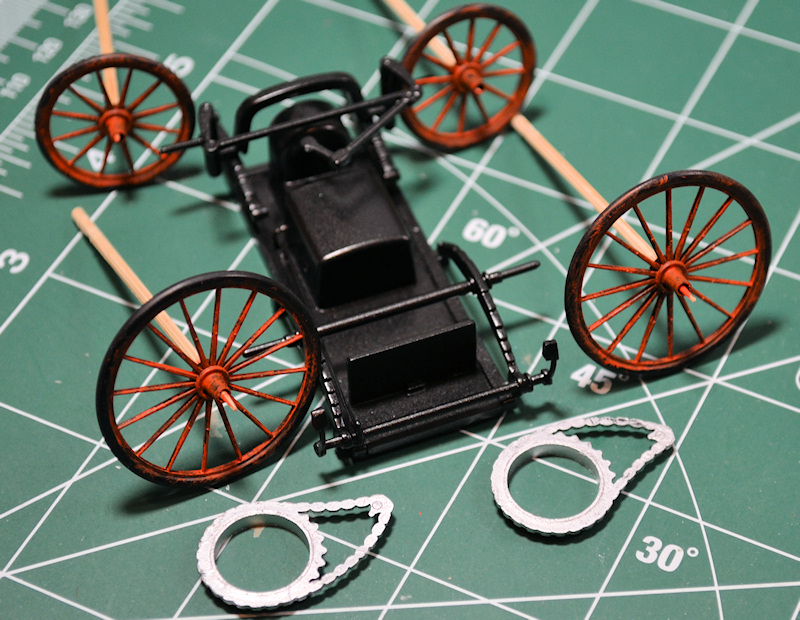
On other fronts, the Panhard wheels/tires are painted but my tires are just light grey and not a light tan. I need to decide if I want to fix that and regardless, I need to touch up the red wheels. The Gloster F.9/37 continues with cutting out and fitting of parts - I am not quite happy how the fuselage sits on the main wing so I'm working around that getting with the engines, cowls, and whatnot prepared. The M54 is about where I have to final the wood bracing, paint the tanks, touch-up the truck, and install the two tanks with a bit of connecting hose so I can get busy with all the tie-downs and all the hose to/in the pump unit.

It's been cold, but I finally got a small space heater going (safely) in the utility room so I could spray paint and that helps.
John Ratzenberger :???:
It's my model and I'll do what I want with it.
User avatar
DavidWomby
Modelling Gent and Scholar
Posts: 11766
Joined: May 1st, 2011, 8:09 pm
Location: Florida, USA

Re: John's Whatever Bench

Post by DavidWomby »

Gosh that Walrus interior looks imposing and impressive. Well done.

David
User avatar
Migrant
Happily Landed after Many Circuits and Bumps
Posts: 2428
Joined: April 5th, 2011, 8:33 pm
Location: Calgary, Canada

Re: John's Whatever Bench

Post by Migrant »

Agree with David, that's an amazing amount of detail.
User avatar
jssel
Still crazy after all these years
Posts: 12007
Joined: April 5th, 2011, 3:42 pm

Re: John's Whatever Bench

Post by jssel »

Beautiful work on all fronts.
Besting 60 years of mediocre building of average kits in the stand off scale
User avatar
JamesPerrin
Looks like his avatar
Posts: 13695
Joined: April 5th, 2011, 8:09 pm
Location: W. Yorkshire
Contact:

Re: John's Whatever Bench

Post by JamesPerrin »

Well that does all look rather lovely John.
Classic British Kits SIG Leader Better to fettle than to fill
(2024 A:B 5:2) (2023 13:8:7) (2022 21:11) (2021 15:8) (2020 8:4:4)
Post Reply

Return to “Workbench Window”