Page 5 of 14

Re: John's Whatever Bench

Posted: October 4th, 2018, 9:24 pm
by JohnRatzenberger
And today we add the project - introduced earlier as adding an aftermarket TPU to the M54 I just reviewed.

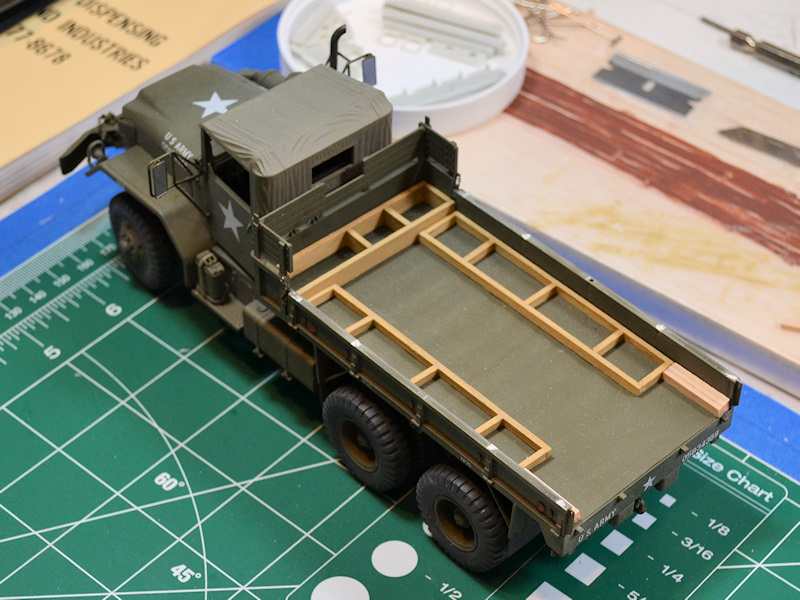
I have the US Army -14 (operator, unit, direct support, general support) tech manual and the -24P (company, direct support, general support) parts manual and the -14 will really be useful for this project to make up shortfalls in the TPU kit. The -14 also has the construction diagrams for the blocking and bracing frames used to hold the TPU in the cargo bed.

Here's the starting picture -- M54 with seats, tailgate, and cargo strap removed; parts from the TPU, and the -14 open to the blocking/bracing diagram.

Image

The blocking/bracing is various lengths of 2x4 and 2x8 - not at all difficult except is that true or dimensional lumber. Not really a biggie as one can always adjust lengths to account for the difference - I've got both, in 1/35, laid out.

I did spend a good deal of time with the TPU kit and the TM and now realize the gasoline pump has been replaced by an electric pump and a number of hoses are not represented in the kit. I should also have horizontal tie-downs, I have all the cargo tie-down straps I need, but not sure what I'll do about the horizontal ones.

Or I could just live with it and move along quietly ...

Image

In the above photo, the sideracks have been cut off - in the real world, I'd just pull them out, but this is the model world.

The skids are mounted on the two tanks, but something isn't right as the two tanks aren't lining up fore and aft correctly so I'm going to have to work with that. Also the pump mounts to the skids on the front tank, but it's about 1/16" too high. I guess I am going to have to take that much off the bottom on all the skids

Anyway, I'm moving along ...

Re: John's Whatever Bench

Posted: October 6th, 2018, 1:34 pm
by Old_Tonto
An interesting project John. I'll watch with interest.

Re: John's Whatever Bench

Posted: October 10th, 2018, 9:13 pm
by JohnRatzenberger
Benn otherwise occupied. Got a helicopter ride. There's a 5-day long story involving a couple hospitals, anemia & a-fib, but I'm back home. Unfortunately that screwed up our visit to our granddaughter. All we have is hurricane Michael pushing up behind us as a tropical storm Thur-Fri and then hopefully done.

All the time sitting/lying about gave me time to think about the TPU. Last post mentioned the height disparity between the pods and the pump base. Well, there's also an issue shown in the image below.

Image

The 4 openings are meant to be for the forklift to pick it up and set on the truck and I think you can see the problem - they don't go through the base. Unfortunately, I have already added a few parts and done some repair to the assembly and it's now too late to cut those opening straight through. Also, if you look carefully at the bottom of the skids, I'd have a lot to sand down to lower the pods.

My "solution" is to kill two birds by raising the height of the pump unit about .060" to solve the height discrepancy and do so by faking openings that appear to go straight through. I figure I can disguise all this with some black paint, or maybe a carefully draped kit bag or two.

Image

So, I can go back to doing some minor work on the pump unit and pods, but I can also see that I need to get the blocking frame scratchbuilt and installed so I can build the tanks and pump into place, including all the hoses and such. There are two running from the tanks to the pump and there are a number of other items not addressed/included with the kit, specifically turnbuckles to lock the unit into the bed horizontally (the cargo straps are for vertical lock).

And I have a thought about what might join this on the bench. I have a number of prior starts and such, but really need something new to dive into after all this.

Re: John's Whatever Bench

Posted: October 10th, 2018, 9:56 pm
by DavidWomby
jRatz wrote:Benn otherwise occupied. Got a helicopter ride. There's a 5-day long story involving a couple hospitals, anemia & a-fib, but I'm back home. Unfortunately that screwed up our visit to our granddaughter. All we have is hurricane Michael pushing up behind us as a tropical storm
That sounds scary. Glad to hear you are ok and keep your head down ( and feet dry) when Michael reaches you.

David

Re: John's Whatever Bench

Posted: October 11th, 2018, 7:17 am
by iggie
Sounds like you've been through the mill recently John; glad you hear things are improving and hope you and yours are not affected by the arrival of Michael. The news from Florida sounds pretty rough

Re: John's Whatever Bench

Posted: October 13th, 2018, 1:27 am
by JohnRatzenberger
Starting the blocking & bracing, using basswood strips.

I cut a 3x5 card to exactly the cargo bed dimensions, drew a center line and sketched in the TPU location following the dimensions in the TM.
Then I carefully positioned the 3 main pieces of the TPU and adjusted the sketched lines.

Image

I started by making and fitting the front section of the blocking & bracing. I'm using some AK wood colors on it.
Next I'll make the two side sections which run along the pods. Last is two small side sections on each side of the pump unit itself.

Re: John's Whatever Bench

Posted: October 16th, 2018, 1:27 am
by JohnRatzenberger
Moving along, we've got the side bracing built. A test fit indicated the pump unit is wider than real life and I think I'll just fake the rear section bracing around the pump with 3 blocks of wood. I think the TM says to adjust as necessary for a proper fit. I may also need to slide some shims in to tighten things up.

Image

And again with the TPU components in place.

Image

The two pods are done, next for the paint shop. The pump unit has a part added and I'm cutting the base off another. I suspect I'll paint all the parts at this stage then, after study, assemble the parts and the fuel lines one-by-one. I don't want to glue one down, only to find it's a problem.

Meantime, I still need some turnbuckles to tie the skids to the truck sides - a scratch build project I think. I've looked at various aftermarket, including train parts, with no luck yet.

=========================== Change subject ================================

For my 2nd project I wanted something new and different and finally decided to scratch the Airfix n/t 1/48 Walrus itch I've had since I bought it late last year.

Iggie did an In-Box Review which I contributed a bit too and also mentioned the Eduard photoetch sets for it. We'll dispense with the usual intro stuff and leap right in.

My target, still shifting a bit, is a Silver Wing, wings spread, gear down, Walrus with added detail, in particular the under wing bomb racks.

I spent two days studying the Airfix and Eduard instructions, cross-referencing both to see where I needed to pay attention. Now I'm started and the interior photo-etch is dropping out quickly - it cannot be seen. As good example is in the 1st page of the Airfix instructions (shown below) where Eduard has a complicated built of the camera port which cannot be seen.

Anyway, here's the 1st page of the Airfix instructions all done.

Image

So far, it's a very nice kit. I know it's not 1/72 but a leisurely build of a favorite aircraft in 1/48 is what I need. One of my all-time favorite models was the old CA 1/48 Walrus (also their Defiant TT and Anson).

I really need an RN catapult in 1/48, even plans for one.

=========================== Change subject again ================================

Got the Hannant's weekly email plus their Future Releases email !!
-- AFV Club 1/350 LST !! Yes, now we need a T-2 tanker and an Attack Transport - that'll get me back to work on the Liberty Ship.
-- Thunder Models 1/35 Ward LaFrance M1A1 heavy wrecker - YES !! We're finally getting around to some Allied support equipment.

Re: John's Whatever Bench

Posted: October 16th, 2018, 4:54 pm
by iggie
Nice to see the Walrus on your bench John; I'm sure it will be a pleasure to watch you put it together, and to see how big the pile of un-used PE is afterwards too!

Seeing you refer to a T-2 tanker rang a few bells; my dad sailed on one to Galveston before joining the Army, so about 1947/8 I'm guessing. I may soon be able to find some photos of his time in the Merchant Navy (I cannot for the life of me remember who he signed on with) as have got stuck with sorting out my late (estranged) mother's estate. If I find anything I'll post it up!
I found this online: http://milehighmodelshipclub.blogspot.c ... -1350.html :grin:

Re: John's Whatever Bench

Posted: October 16th, 2018, 6:00 pm
by mjatx
Looking forward to seeing that Walrus go together. I don't have the ambition (or space) to give it a go, so I'll live vicariously through yours.

Re: John's Whatever Bench

Posted: October 18th, 2018, 11:42 am
by The Great Auk
You've got a real talent for those deuce and a halfs, Mr Ratz!

The hubs look especially realistic.

You have some very enviable talent indeed!

The Great Auk

Re: John's Whatever Bench

Posted: October 19th, 2018, 1:22 am
by JohnRatzenberger
Everything is on a couple days stall while I finish my workbench remodel -- the utility room part downstairs where my spray booth lives and some cataloging of paints so I can find them again ....


The M54 & TPU is on also on hold for some RR scale turnbuckles to arrive - S & O gauge - I ought to be able to make something out of them.


I did a bit of work on the Walrus, specifically steps 6-9. As a tip, treat 6,7,9 as one step to get all 3 parts to align correctly and true.

Image.

I skipped past step 8 because I may make the PE rudder pedals, but if that fails the kit ones go on.


Lastly, we have a new model for the bench, well not new-new but new to UAMF. Back in 2012 or so, we had an Auto GB and I found the Europe Model Kits 1/32 1891 Panhard, which turned out to be a challenge -- the plastic, the instructions in French with hand-sketched drawings -- but resulted in a nice model. You can see it here.

Some research found this was a small company, only did 3 kits, all Panhards, but at some time I found this one, an 1895 Panhard.

Image

I did start the 1895 kit, but never took any photos and I do not know why, so the parts picture in an "in-progress" - mostly clean-up I think, I have to re-inventory. I can see that I hollowed out the chain sprocket and painted it silver to match the box art and I assembled some of the chassis plus added a brake linkage (brass rod hiding down there).

Image

I still have to decide the color scheme -- if I follow the boxart, it'll look too much like the 1891, but then I may have cloned the 1895 when I did the 1891. No biggie, just a decision to make. The 1895 is progress over the 1891 - not so much in the parts, but the instruction drawings are no longer just sketches and, although still in French, have more explanation. Google translate is my friend here.

Oh yes, I do have the 3rd and last of the series, a 1905 Panhard, which is a real advance -- not just in quality of plastic but in detail of the kit and dual-language instructions. Kind of a shame they still aren't around, or at least didn't last longer.

Re: John's Whatever Bench

Posted: October 19th, 2018, 10:55 am
by The Great Auk
I've never heard of Panhard before and that car certainly has the Gilded Age look to it!

Will enjoy watching more of your progress on this beauty.

The Great Auk

Re: John's Whatever Bench

Posted: October 19th, 2018, 11:50 am
by JamesPerrin
Ah, yes I remember you doing the previous kit. I do see them pop up on Ebay from time to time.

Re: John's Whatever Bench

Posted: October 19th, 2018, 2:13 pm
by JohnRatzenberger
We did have a short discussion on these a couple years ago: http://www.uamf.org.uk/viewtopic.php?f=13&t=14585;

Re: John's Whatever Bench

Posted: October 19th, 2018, 2:38 pm
by lancfan
jRatz wrote:I really need an RN catapult in 1/48, even plans for one.
This article from the Seawings site has plans for a catapult drawn with a Walrus perched on top.
https://www.seawings.co.uk/images/Catap ... rticle.pdf;

David.